You must be logged in to rate content!
23 minute(s) of a 280 minute read
5-4-2013
5-4-2013
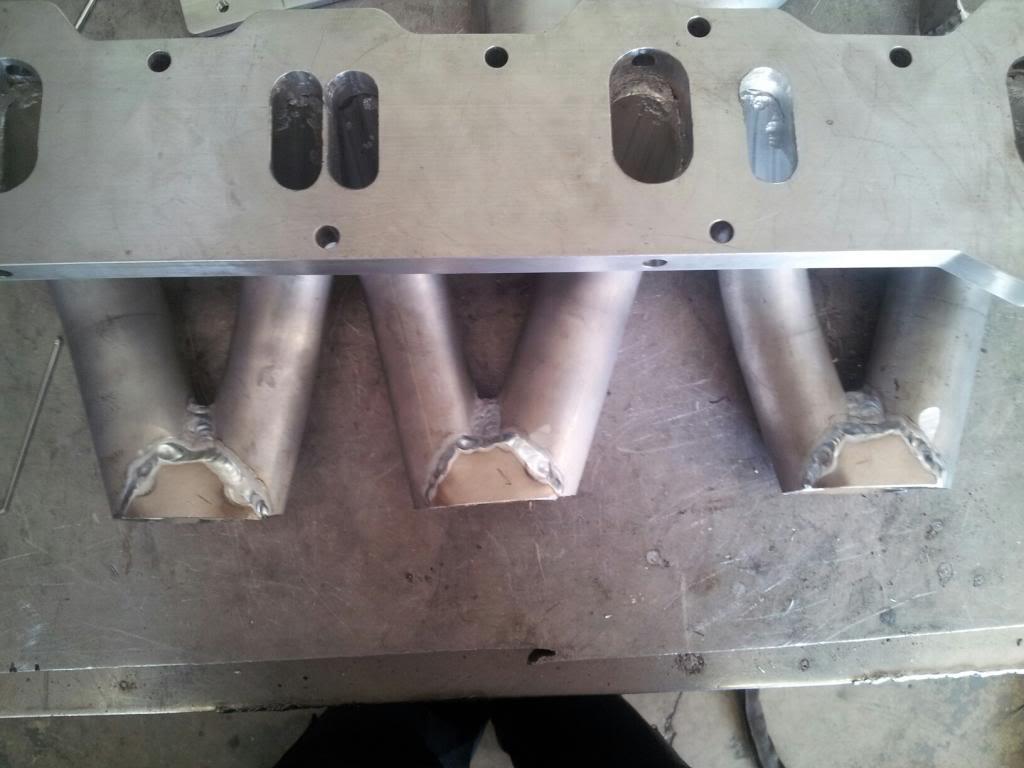
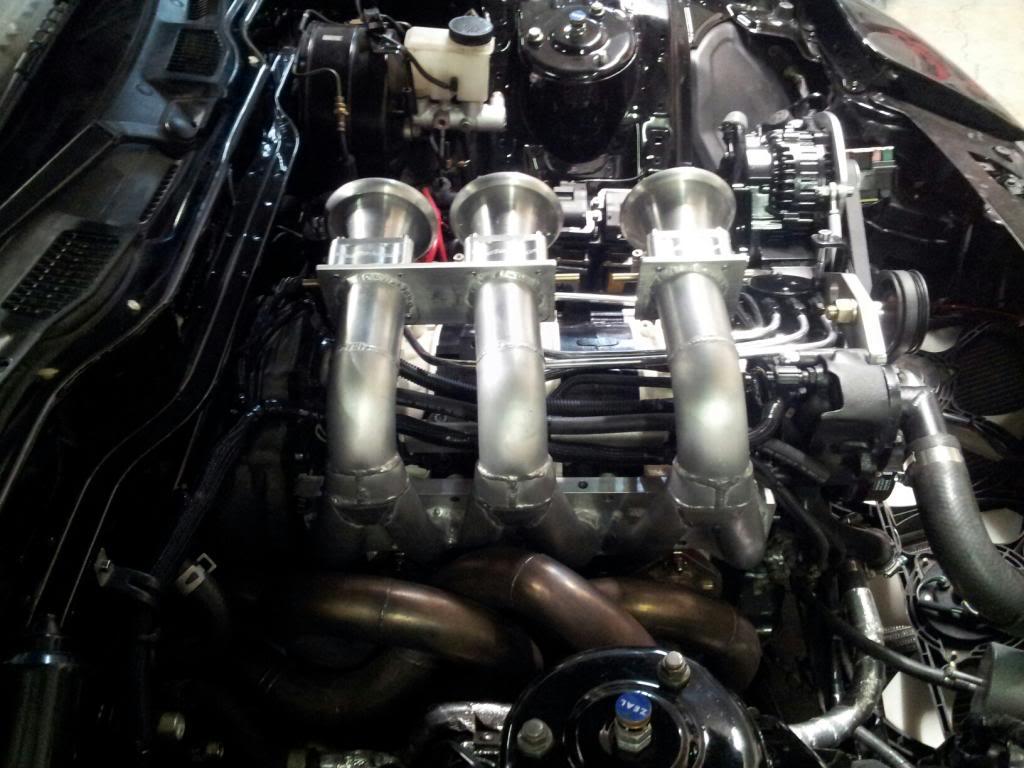
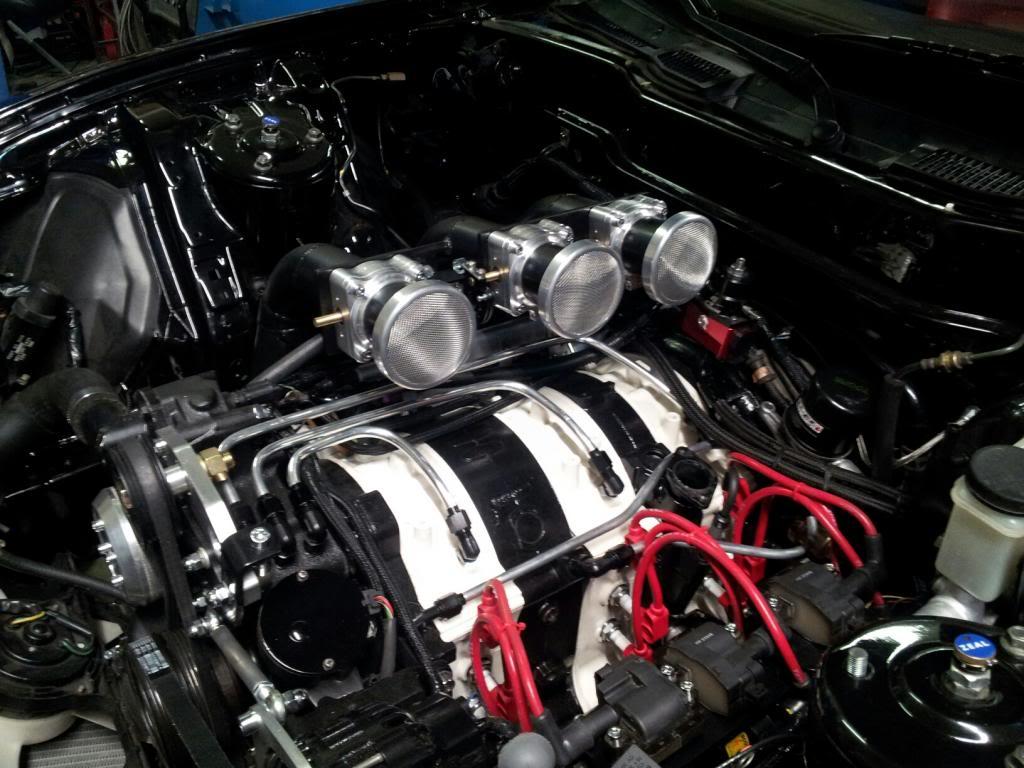
ogan has finished the intake manifold and just has to add the throttle bodies and we're good to go. Logan says the flow is even better than his manifold on his 3 rotor. There is quite of bit more to the inside of these than is apparent, but he would prefer I don't show the insides for proprietary reasons. He wanted to be sure that, if I posted these, I mentioned a) the welds needed to be thick in order to keep the inside flow as smooth as possible, given the very thin walls and "what's inside". Once smoothed, they will be painted wrinkle finish black. I told Logan, being the horny old bastard I am, that they looked like 3 girls on their knees with bikinis on bending over backwards... You'll see them too. ![]()
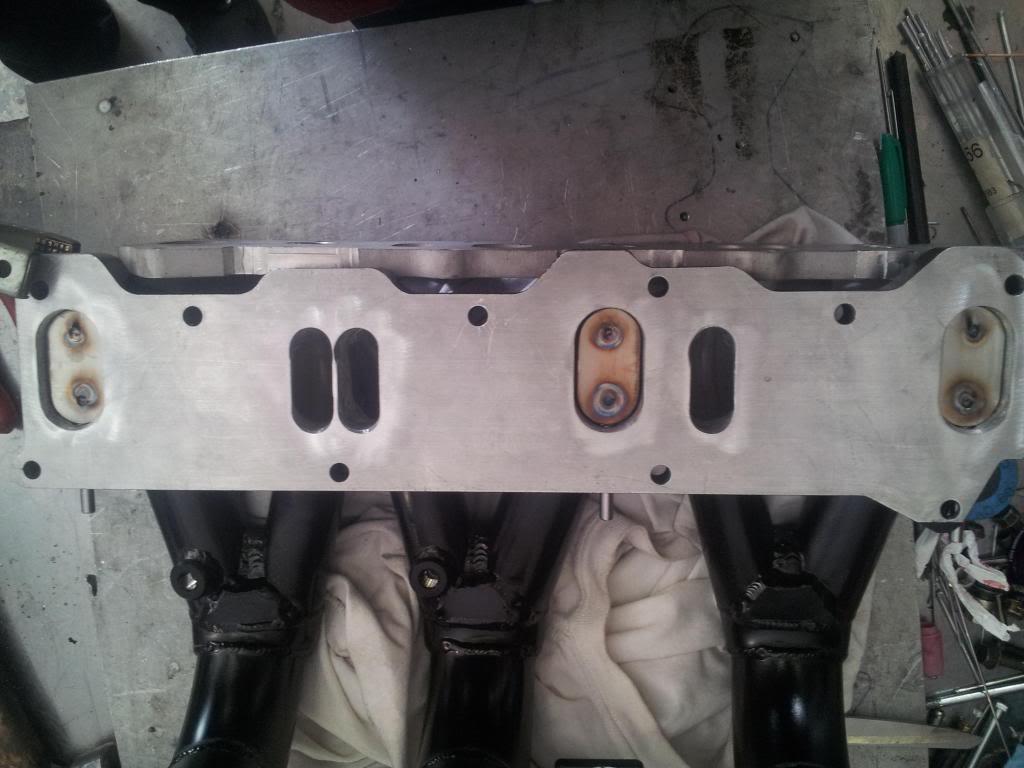
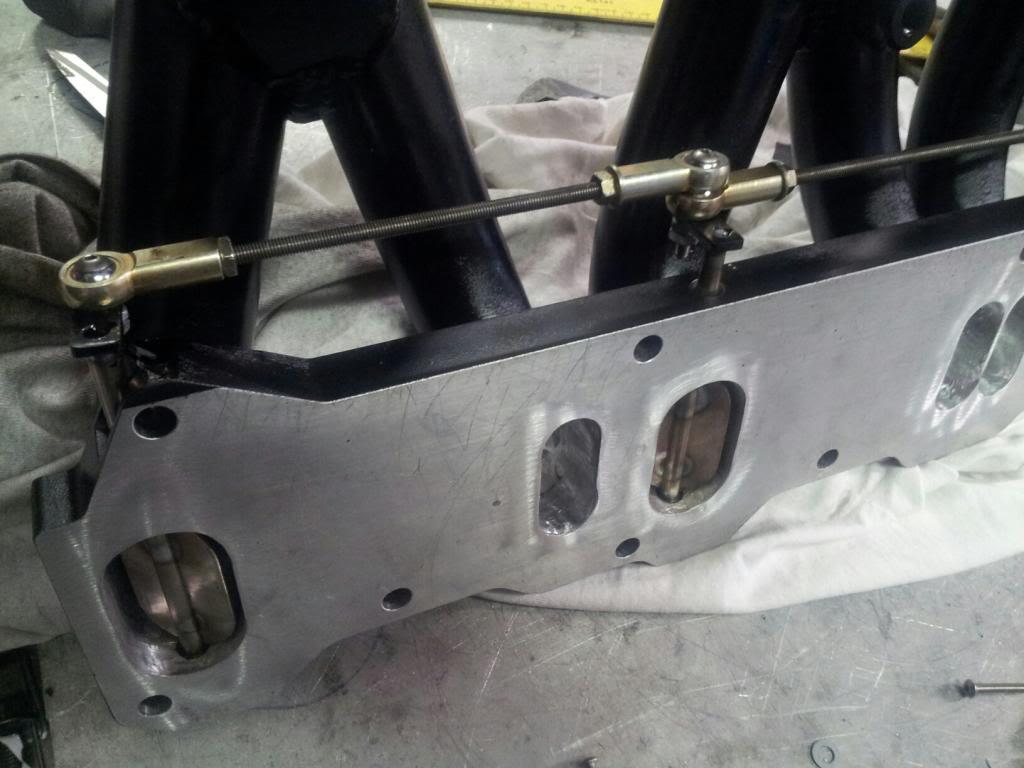
I included a picture that shows the holes in the intake flange for the ball bearings and butterfly end rods that will control the opening and closing of the secondary throttle butterflies. Its really exciting to see this fairly complicated design finally coming together.
G
Here are my 3 girls...
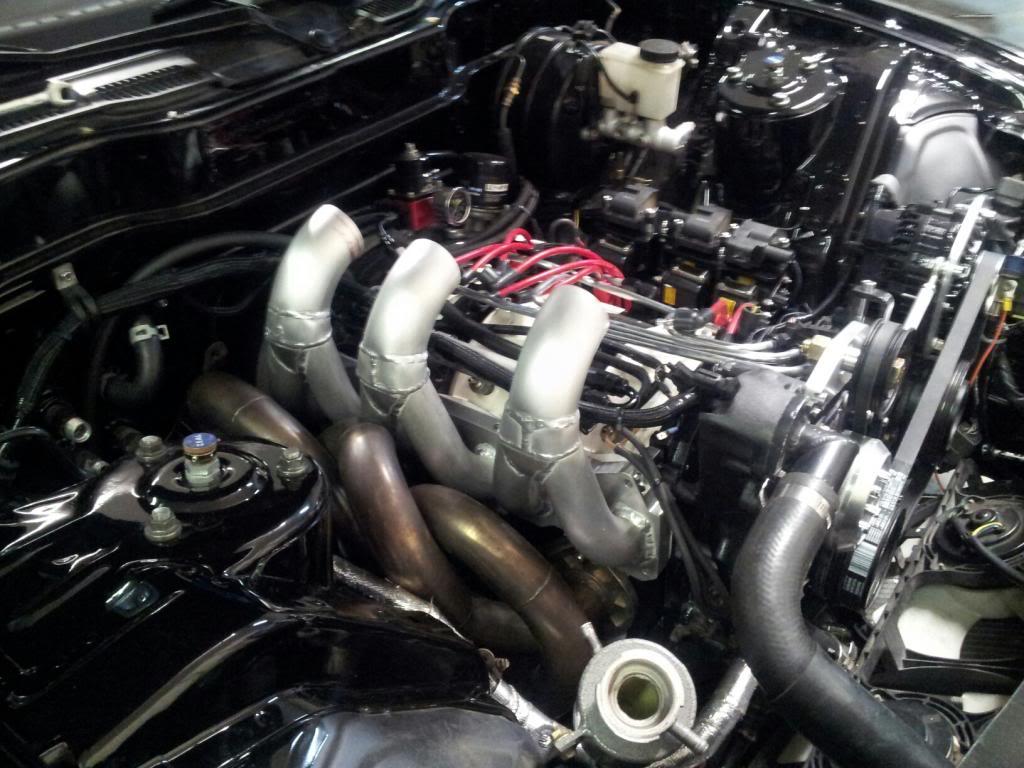
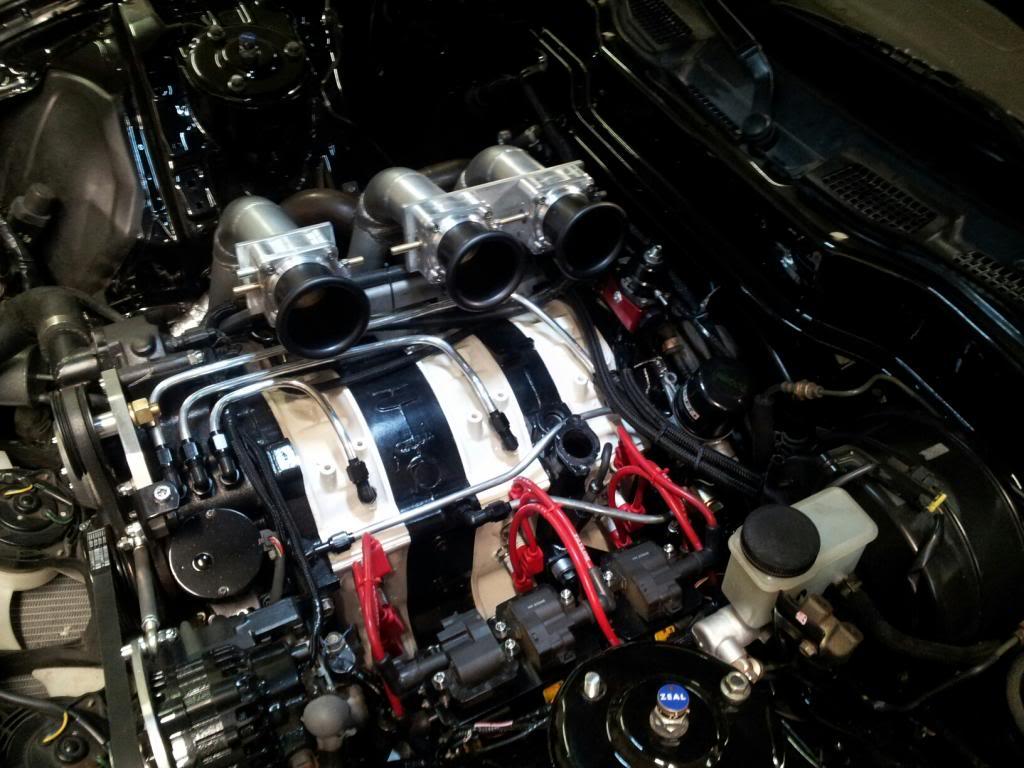
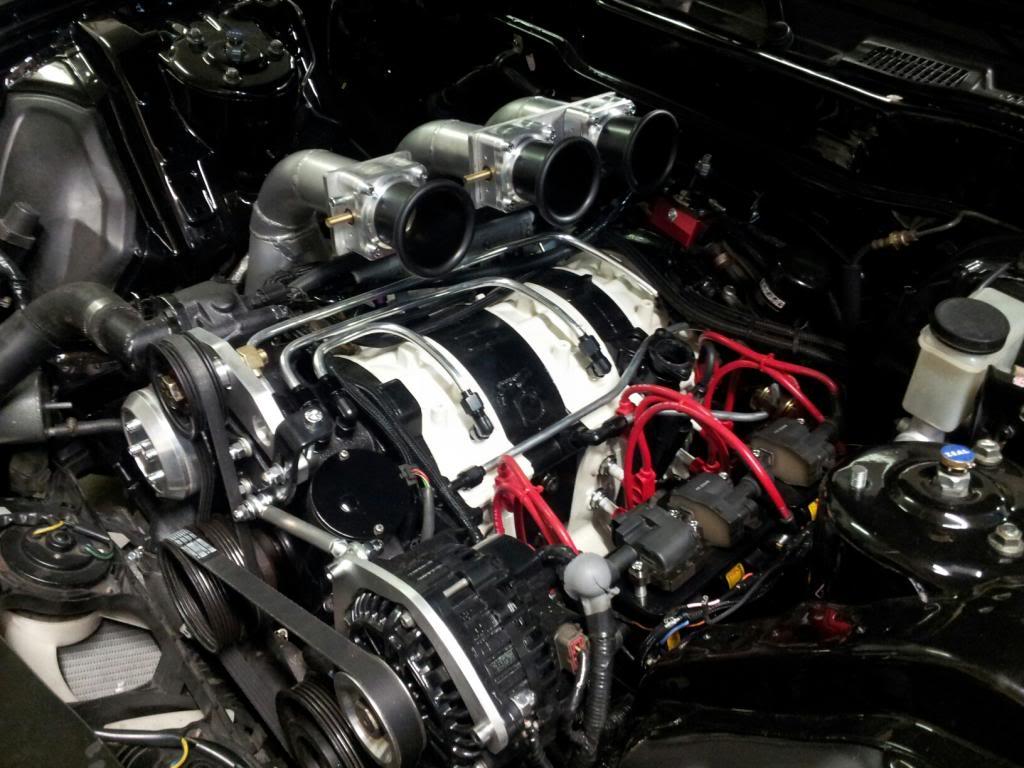
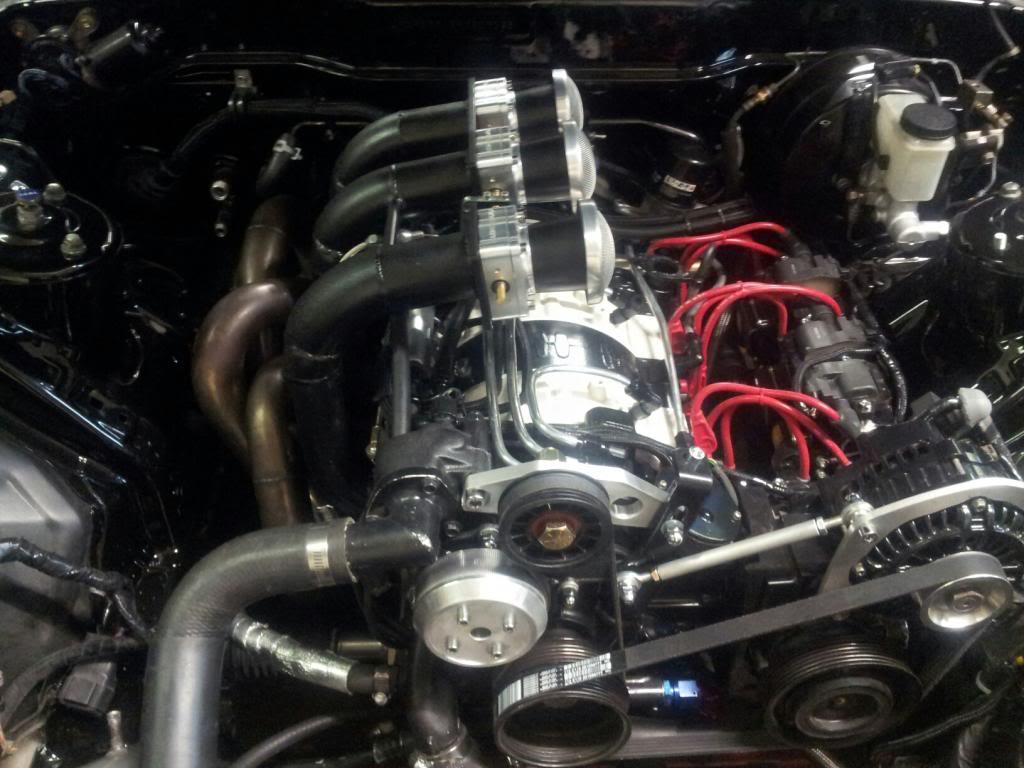
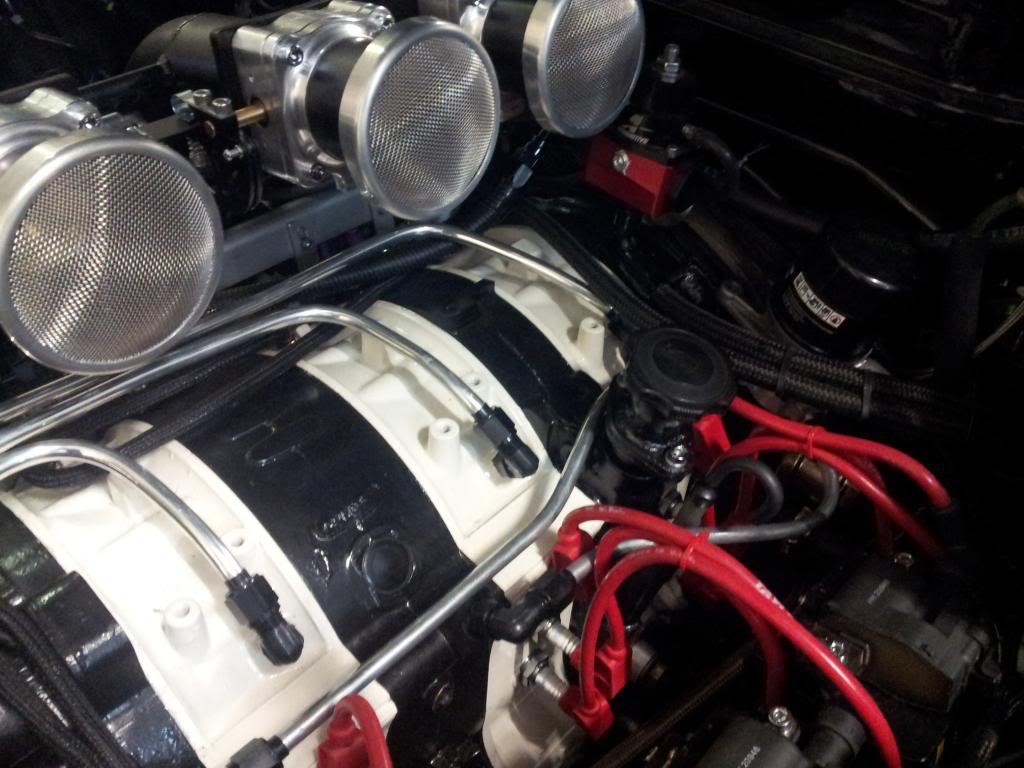
Note that the wiring (harness coming across the fuel rail and seen going down the front and rear irons, for example) is all encased in Snakeskin to eliminate any visible wires or wires wrapped in tape of some sort. And speaking of the fuel rail, it now stands out like a sore thumb. We'll polish it.
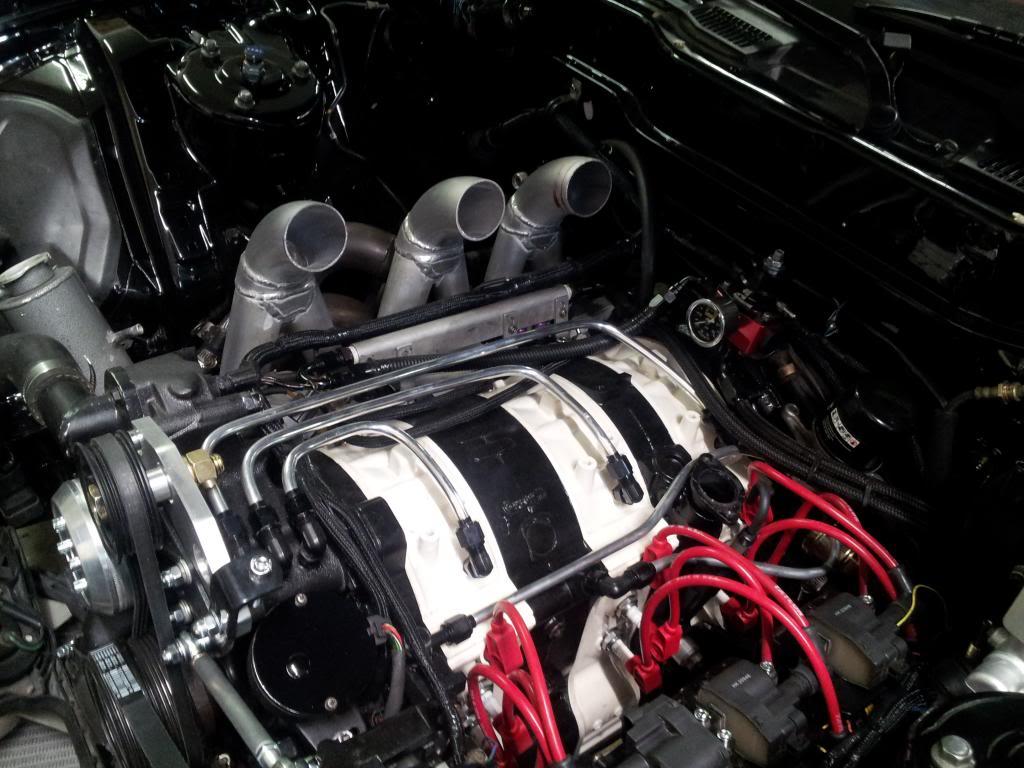
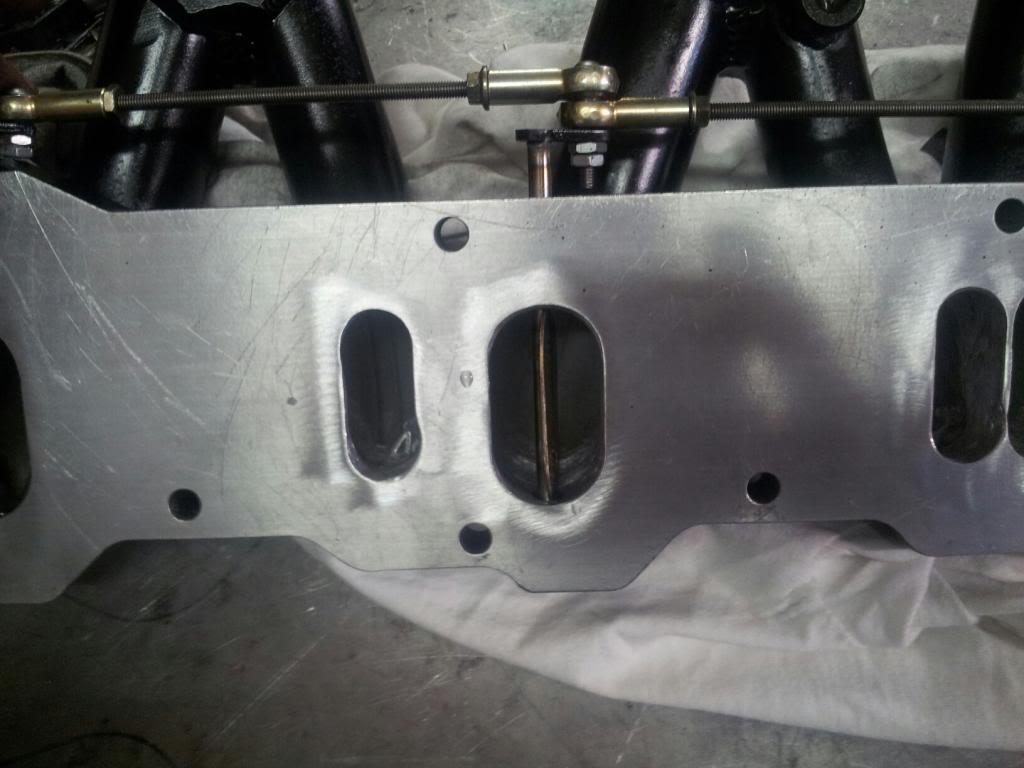
If you look at the flange where the secondary ports are, you can see the holes for the secondary throttle butterflies inside the openings and at the top of the flange (bottom in the picture) where the rod extends out for the actuators.
5-5-2013
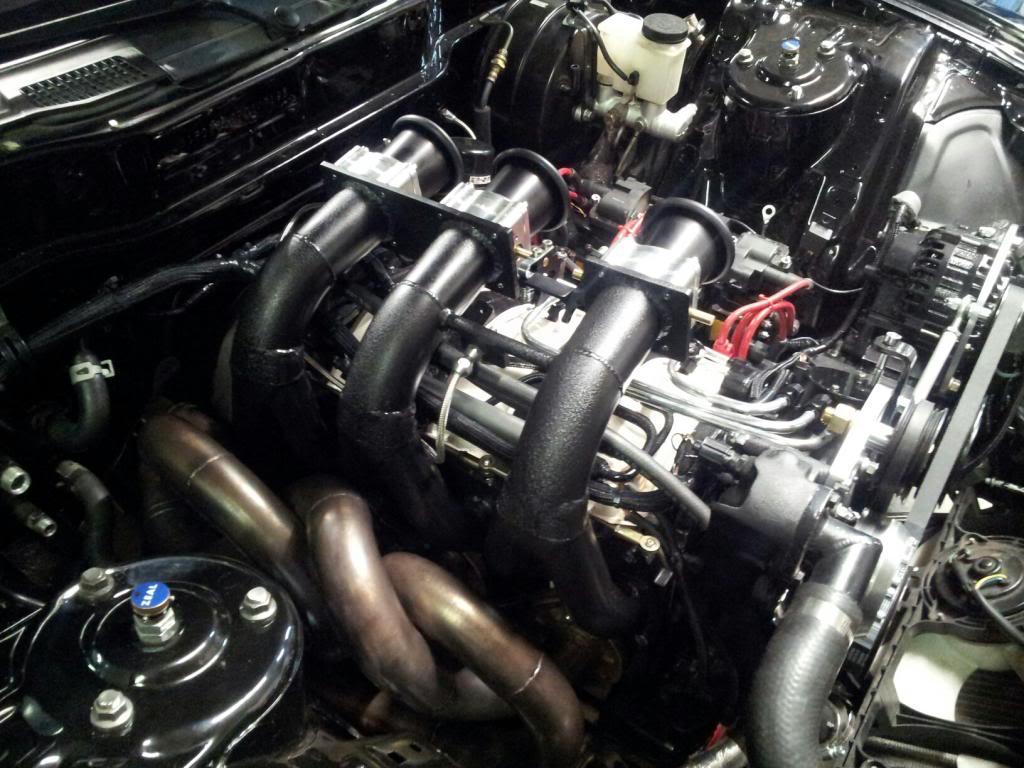
Ha. I got censored in England for that... And, yes. We are putting a gold leaf covered aluminum heat shield between the exhaust and the intake runners. Damn. Its necessary, but I wish it wasn't. It will fire Monday or Tuesday. By then he will have replaced the AST by building the function into the front cover and hooked up the oil reservoir where the ABS went. The whole thing, including the entire exhaust will be complete except for the actuation of the a) secondary throttle butterflies and -- I think -- the actuation of the exhaust cutout. When we start it up Monday or Tuesday, that will be handled manually.
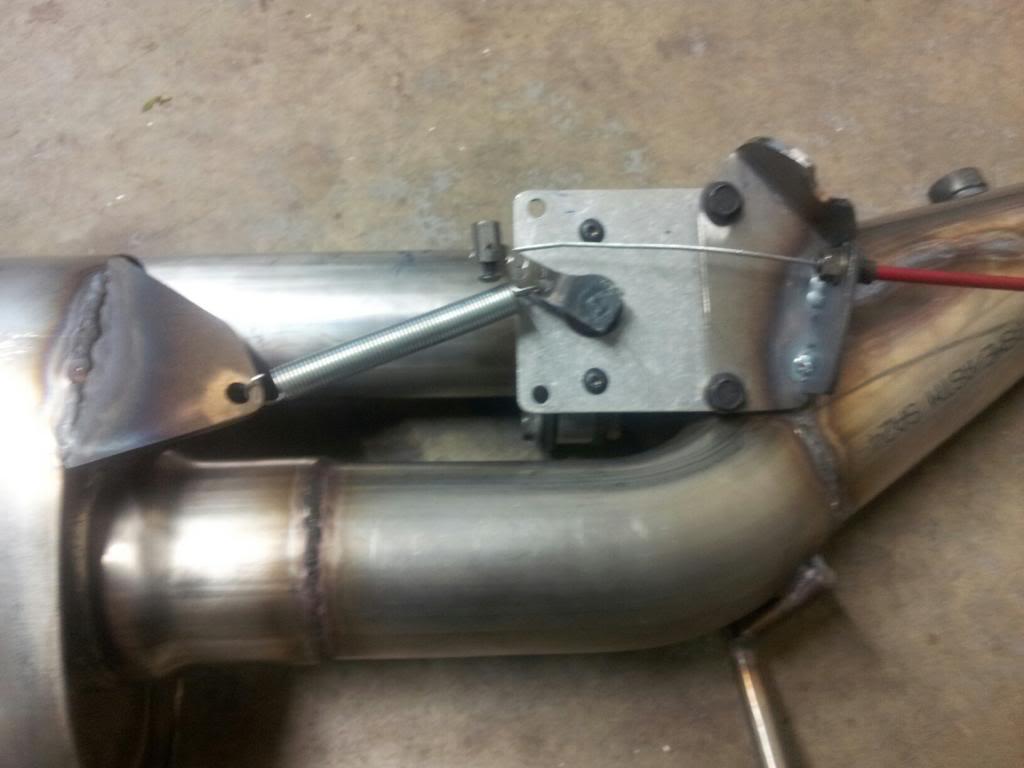
The exhaust has been a lot of work, because it is very complex in its entirety, what with the multiple pipes and mufflers, the electric cutout controlling the opening an closing of the second pipe, plus the dual in-bumper exhaust. While this is not going to be a very powerful motor in the scheme of things, it is probably the most sophisticated rotary motor that's been built and certainly the exhaust is as well. (After all this, I have to be able to lay claim to something being special about it... ![]() )
)
Tabbasco... You should have heard Logan laugh when I told him it looked like that! I almost hate to see the welds smoothed and painted, but I will always see my girls there.
I still have to decide on the air horns for the throttle bodies. I have two sets that are the same ID and length, but very different diameter bell mouths. I spoke to Gary at TWM about the project and told him what we had and he sent the second set with the very wide mouths. He thinks they will work better than the narrow mouths with the runners I have. They are very easy to switch out, so we can test both and see what, if any, difference they make.
G
Here are the air horns we had, which are now anodized a matte black...
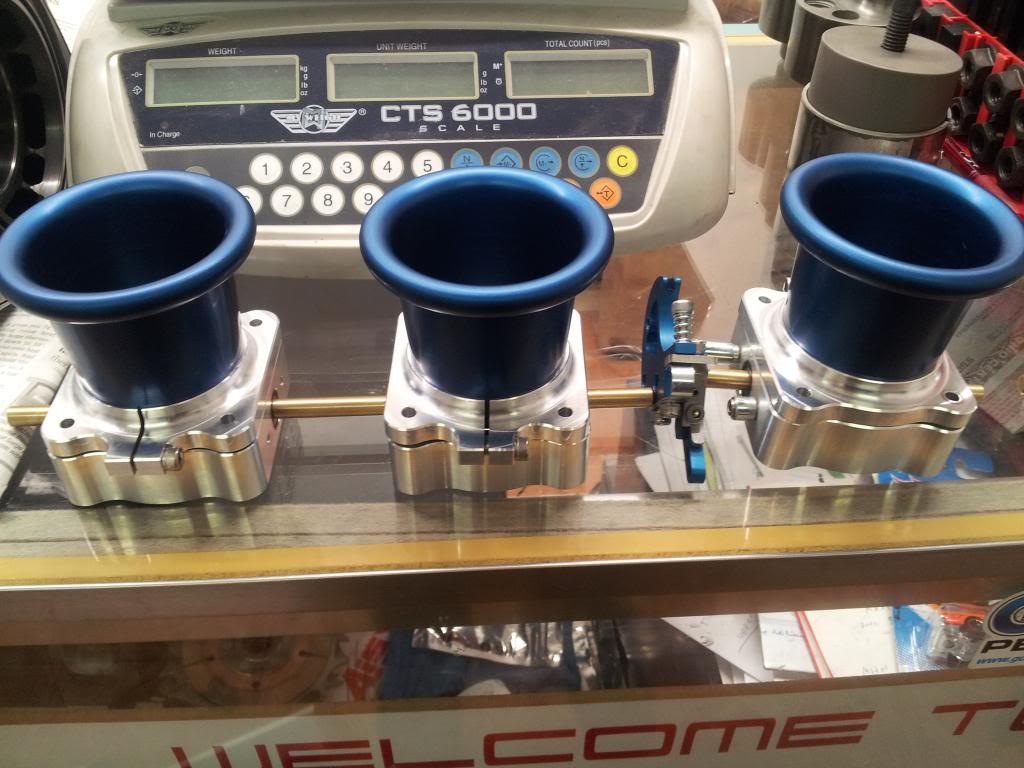
And, here are the second set of horns with the wider mouths...
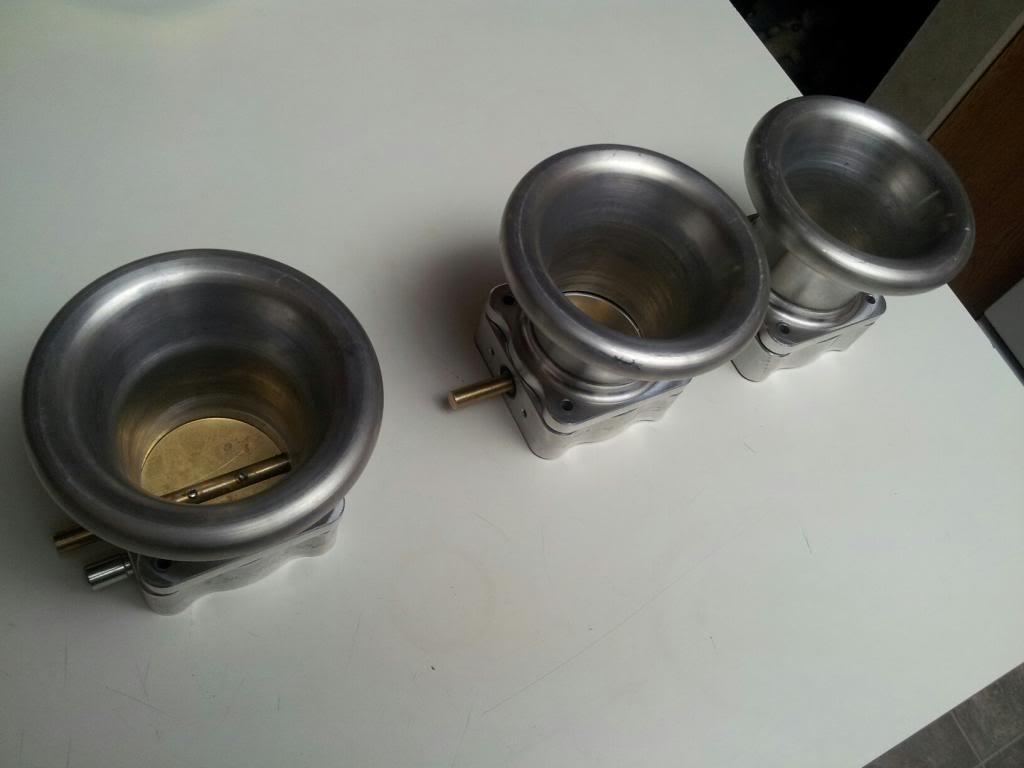
5-7-2013
Here are some pictures of the intake setup fairly complete. Some grinding and wrinkle finish on the runners and the actuator for the secondary butterflies. But its looking pretty good. I still need to test the wide and narrow (black) mouth air horns when we dyno, so I won't be choosing for a while.
G
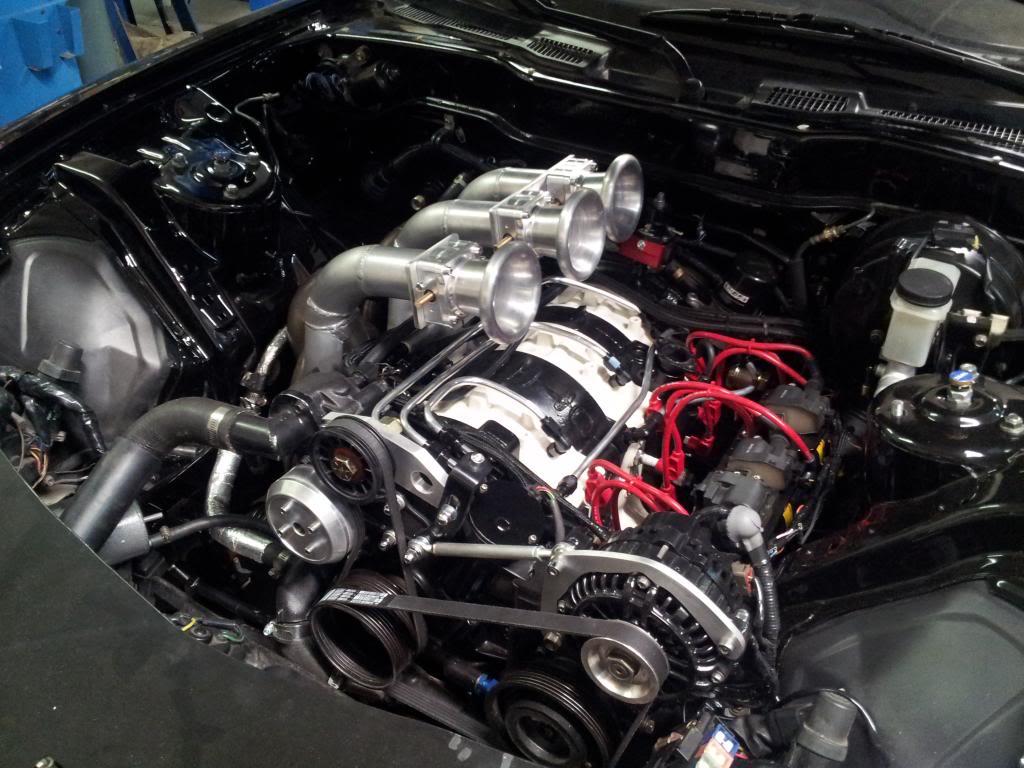
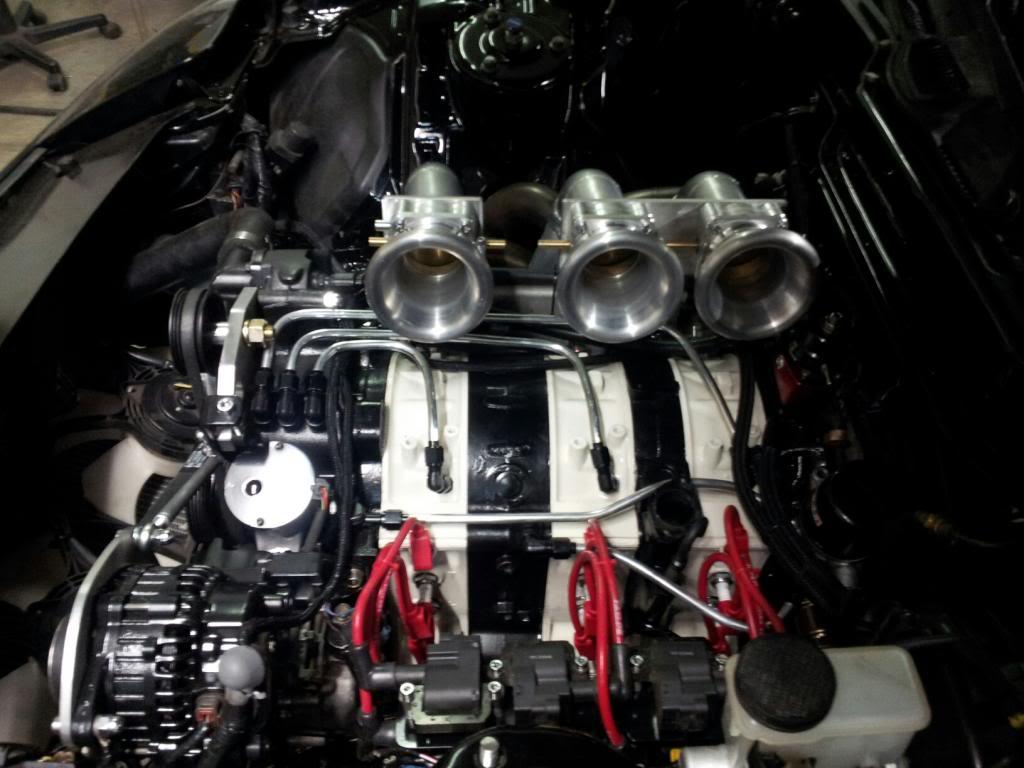
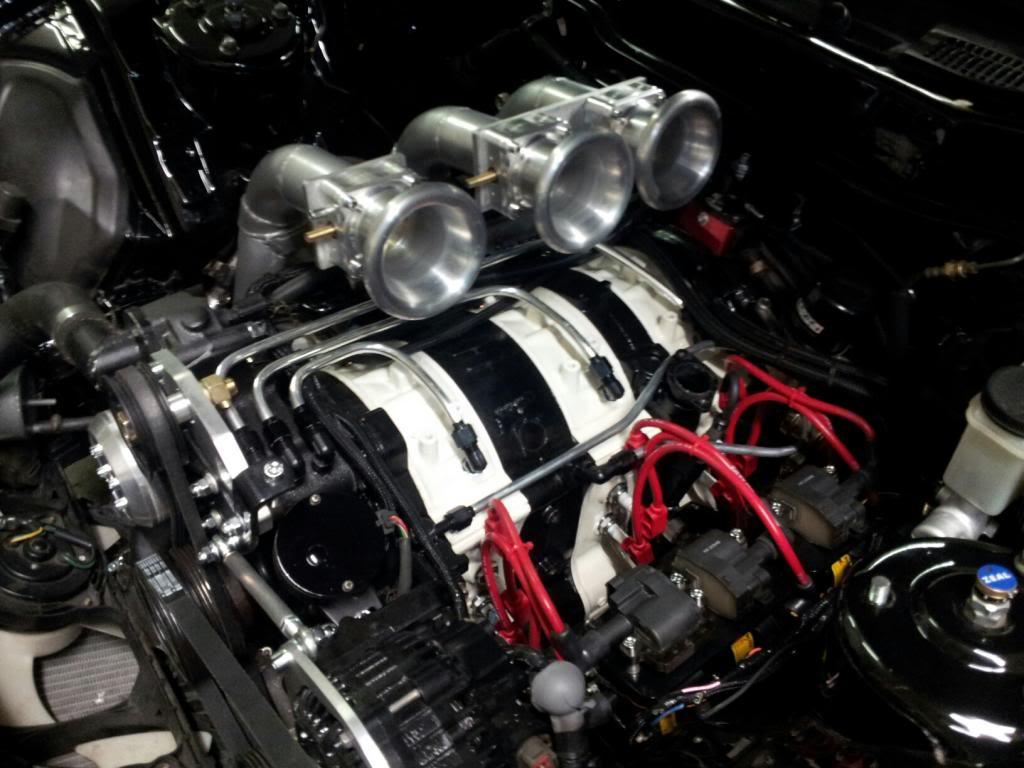
5-8-2013
More foreplay... Here's the finish intake flange. You can clearly see the 3 secondary port butterflies on the inner housing side of the flange. They run in ball bearings and Logan says you can blow on them and they move. Again, these will be opened and closed based on manifold vacuum.
So, the entire intake should be back on tomorrow and I'm hoping we start it up by tomorrow evening. There is very little left, though its several or maybe a few more that need to get done still.
G
First, here are pictures of the secondary butterflies with the linkages to open and close them. I think this is a work of art. Now, when I think of the normal arrangement, I think why didn't they do this?
G
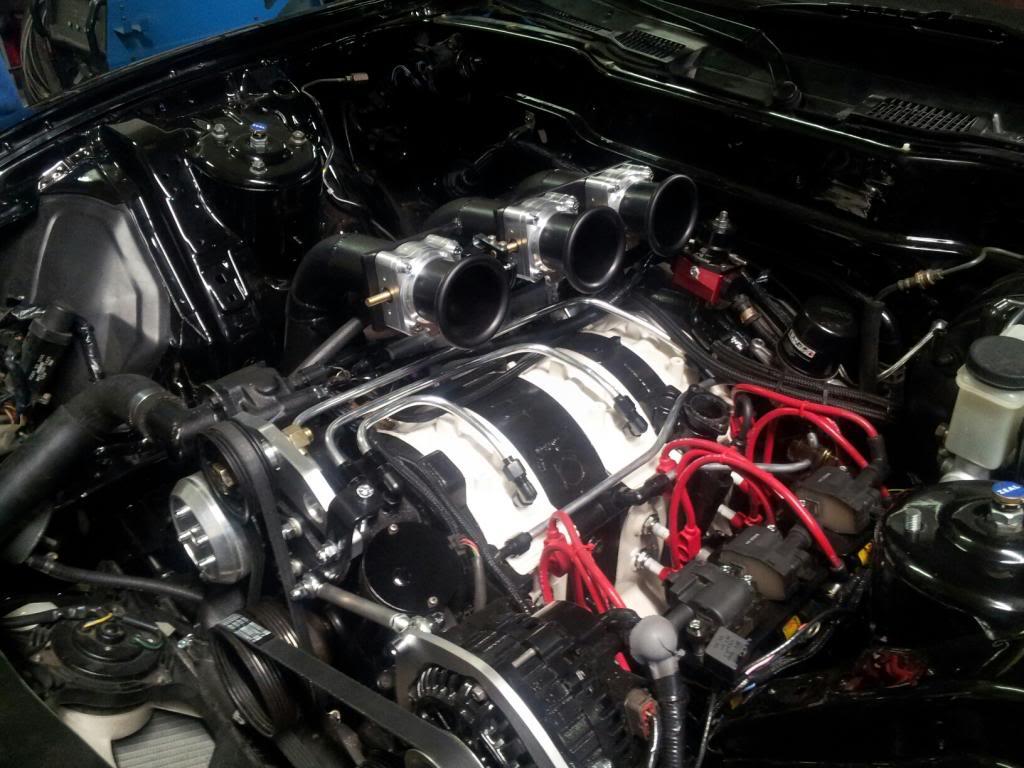
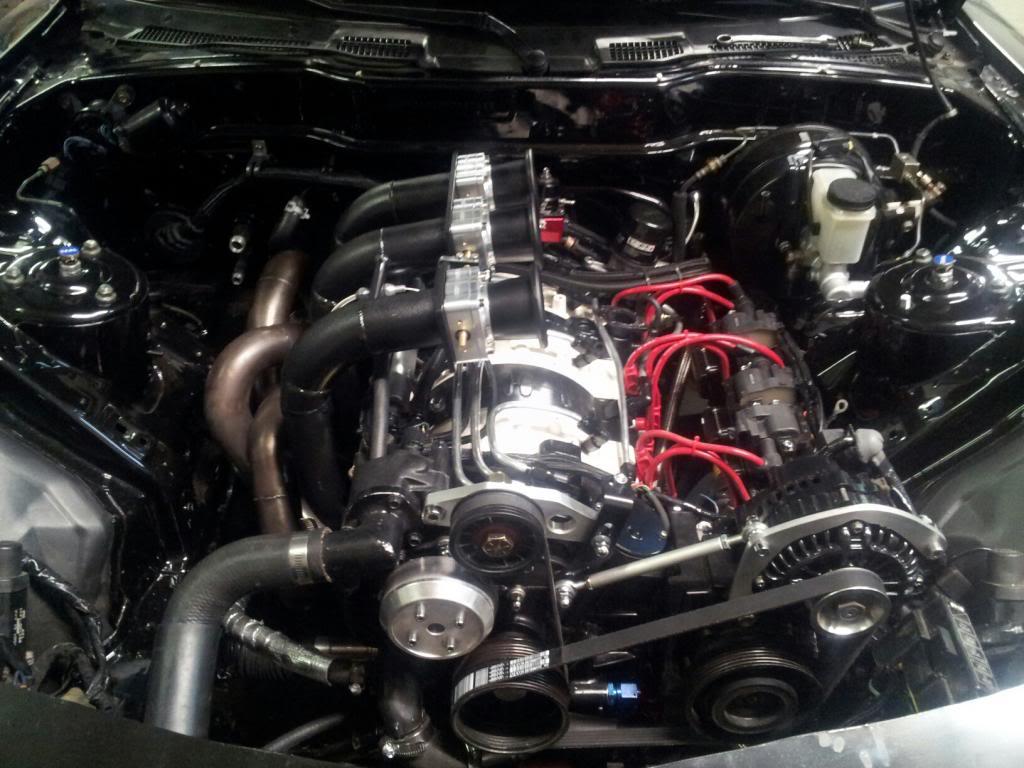
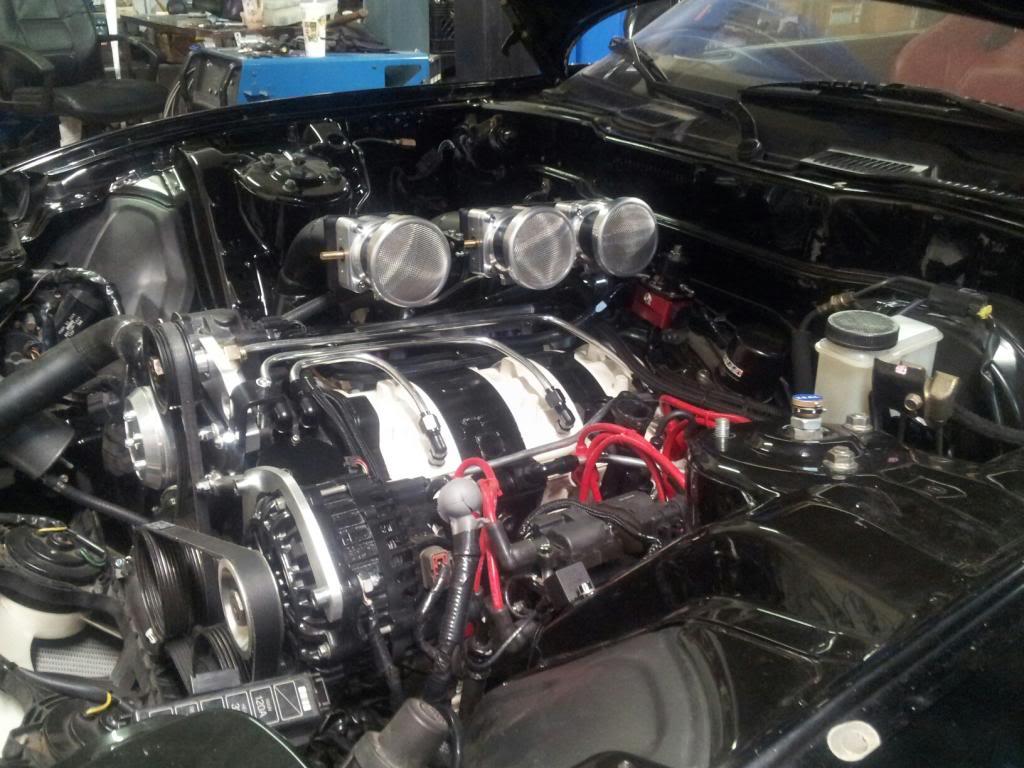
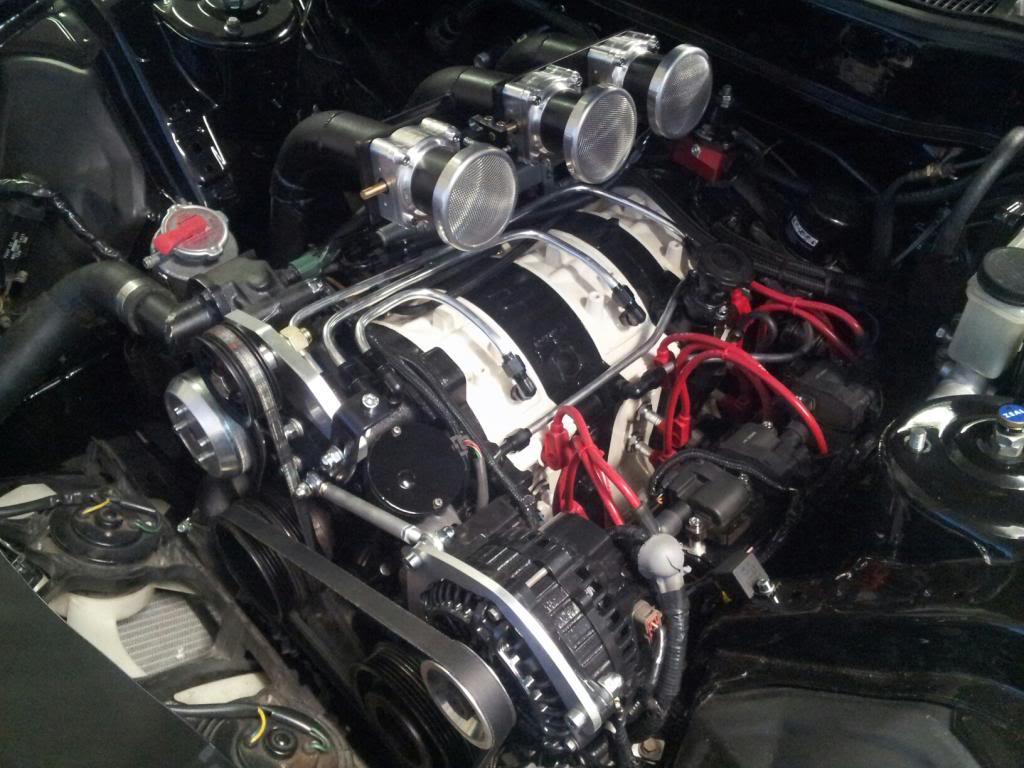
Well, the motor is finished. No start-up video, but the motor is finished. Not talking every last detail, but the motor's done. Its what I dreamed of for a long time. Although I like a lot of things about my car, I would be more than happy having a stock base clean FD and having this in it! But with the other stuff I've done I really have the FD I've always wanted. Here are a couple of pictures.
G
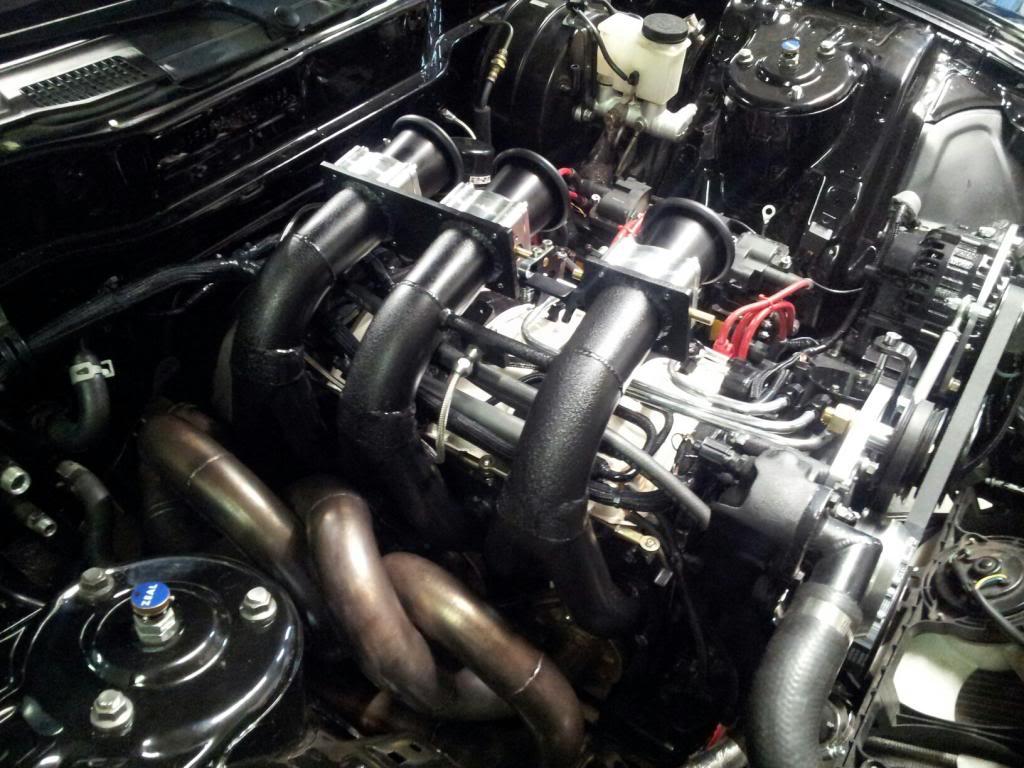
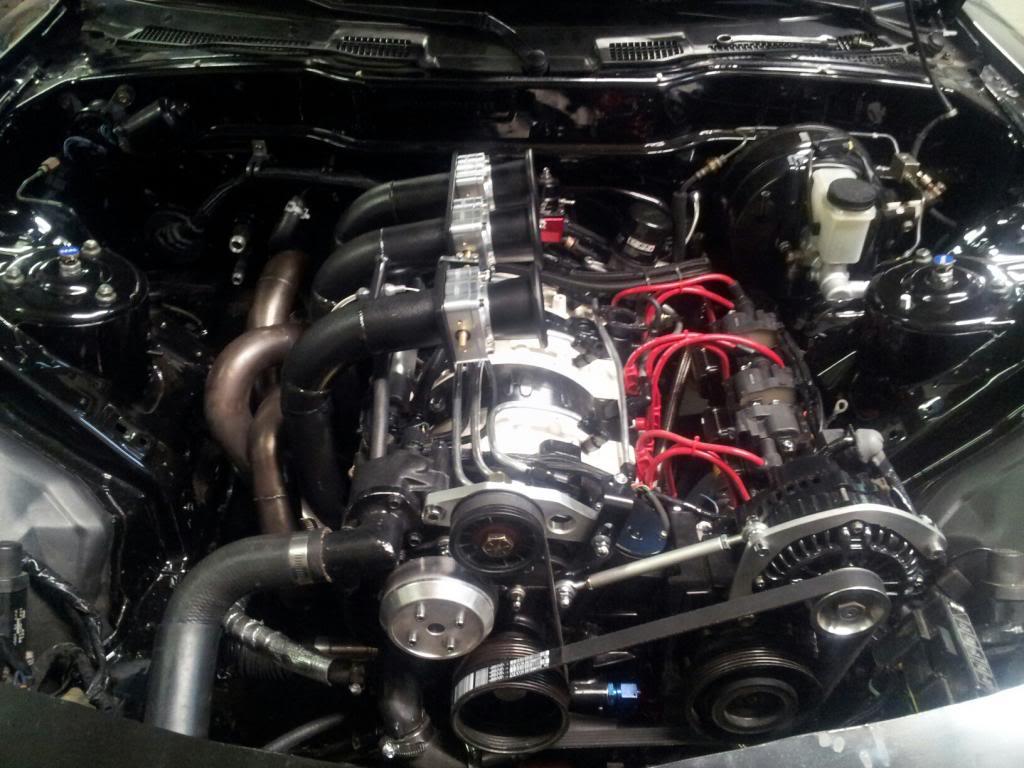
Here it is the way it will be on the street. Really factory.
G
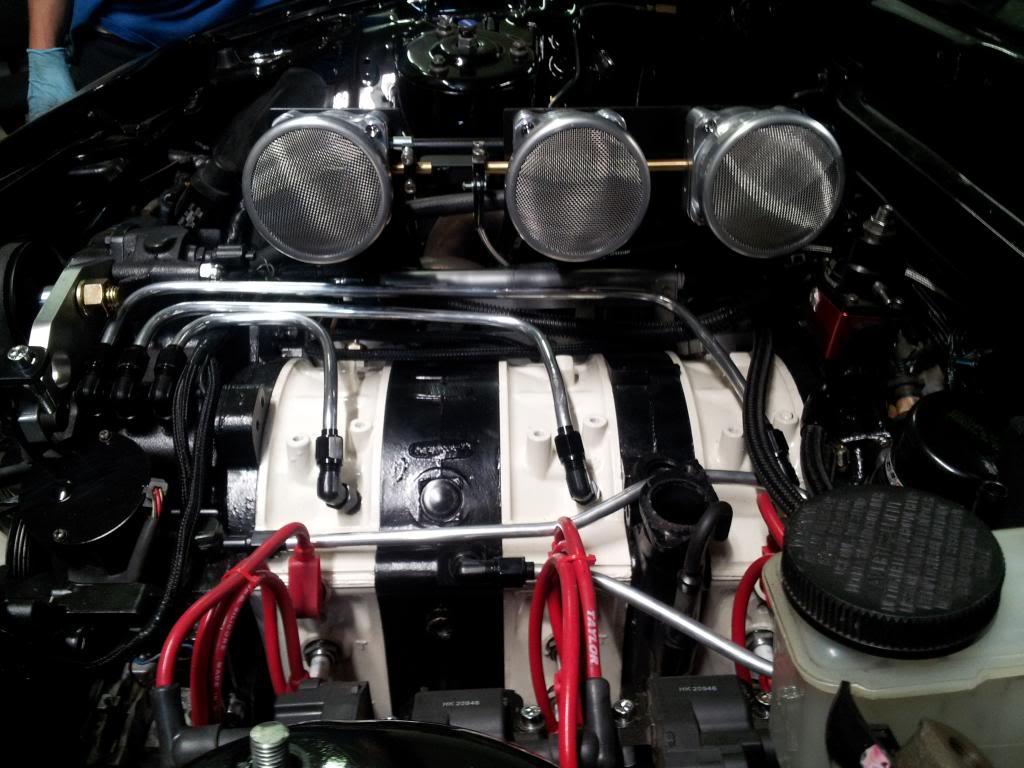
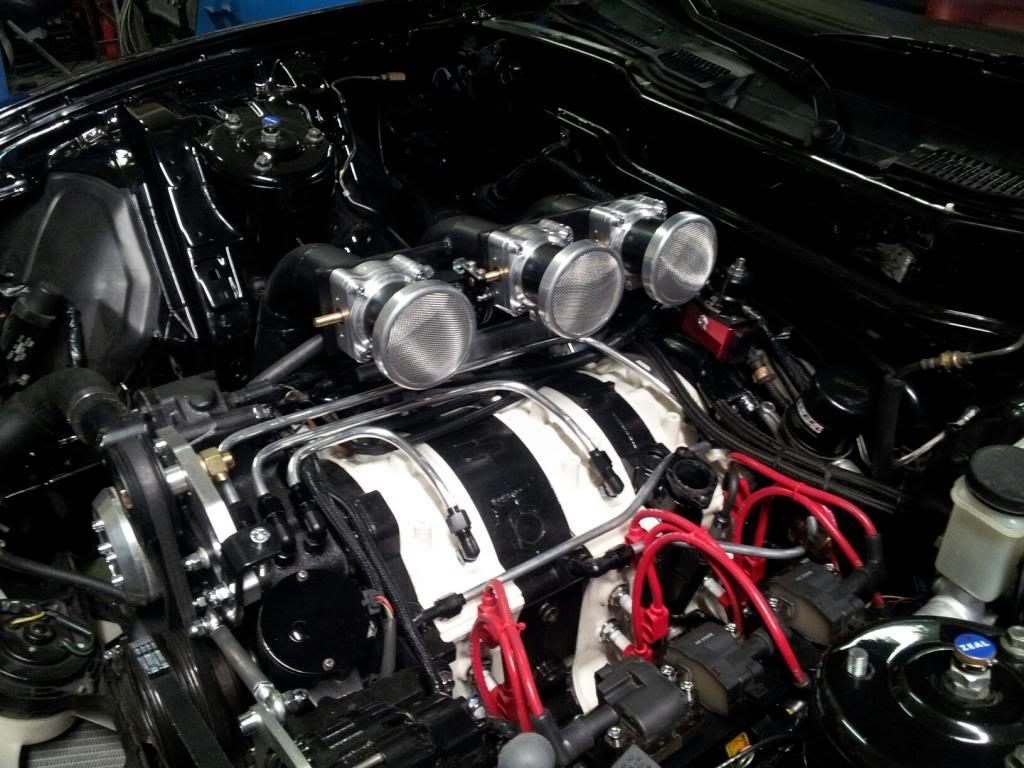
5-9-2013
Didn't see your questions on the last page regarding the secondaries. They are very well-sealed and there should be no leakage. We are controlling it with a carburetor vacuum actuator that runs off manifold pressure.
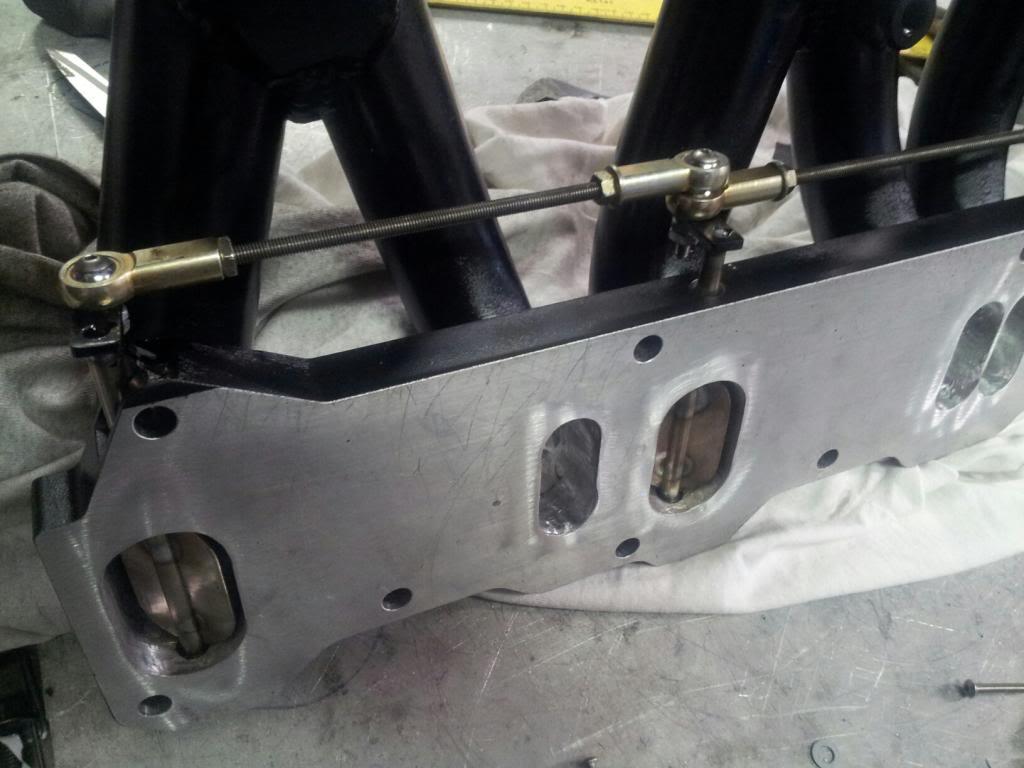
Also, take another look at the runners themselves. Here they are immediately after being painted, so wrinkling has just begun. But the paint will help you see the design better. Take a look at the area where the bikinis are again and the size of the runner legs...

I'm just going to pop the two final engine pictures back up again. ![]()
![]()
![]()
G


And I think this may become my sig... ![]()
5-10-2013

5-11-2013
Tuning? We don't need no stinking tuning. Seriously, it will run pretty well pretty quickly. Logan knows these pretty well and its easier to get these to run at 90% of what's possible pretty quickly when its all you've been doing. While we have the secondary butterflies to stage and the exhaust pipes opening and closing, everything else is essentially the same motor that Logan has been building and built for himself a few years ago. There's a good deal more tuning in turbo setups, because you have another dimension entirely for boost for example. Plus, timing is so much more critical. Anyway, short answer is there's something more than a base map and it won't be hard getting it set for driving and VIR. The trick stuff may or may not take some fiddling.
G
5-12-2013
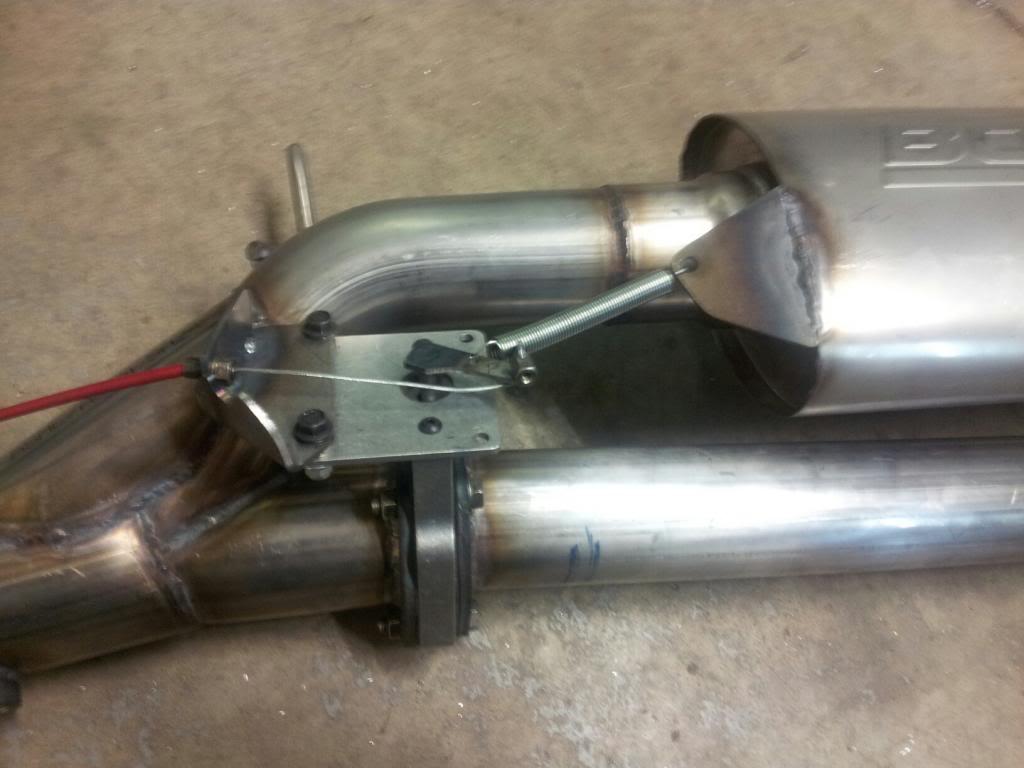
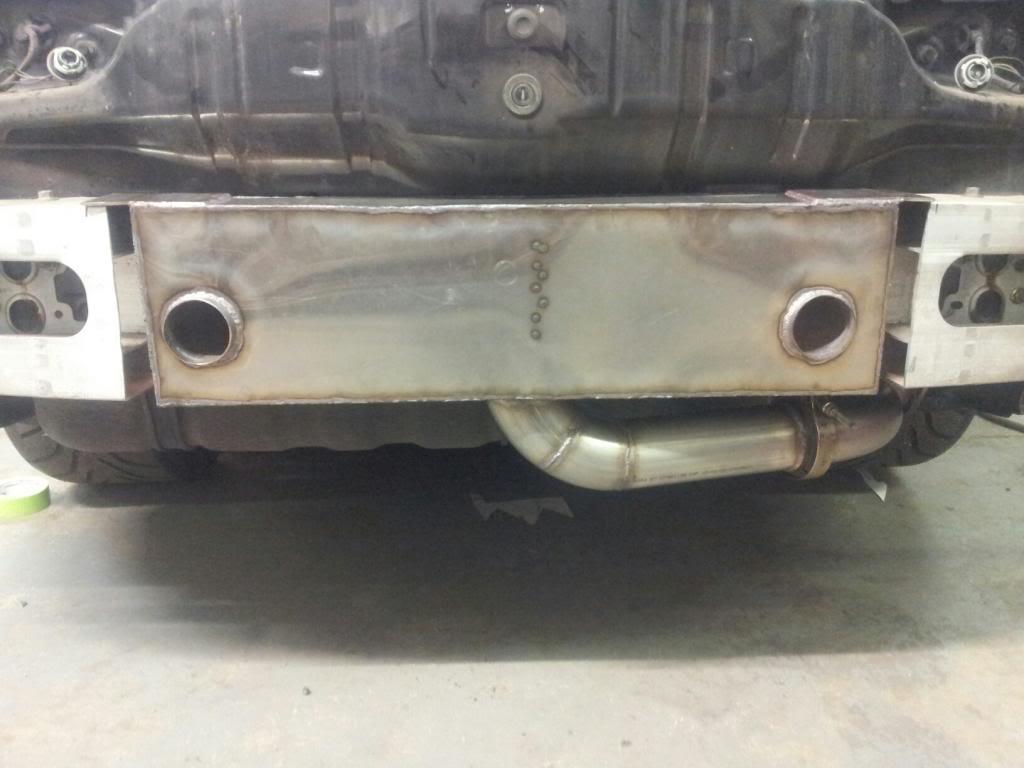
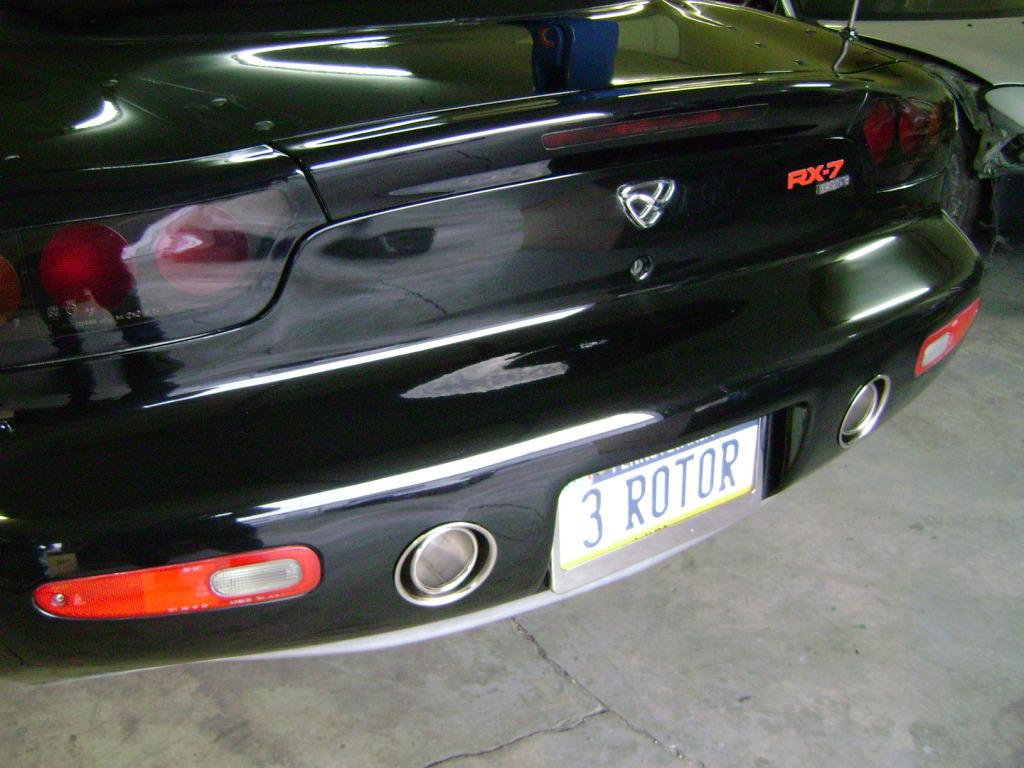
With the motor itself getting done, I haven't posted anything much on the exhaust itself. Here are a couple of pictures that show the cutout that controls the second pipe. The butterfly is opened and closed by a cable which is actuated by a solenoid. The other pictures show the in bumper muffler box at the end of the two exhaust pipes. You can see how the box mounts to the frame cross rail. Little integrity of the original bumper is lost. I don't have a picture, but the entire box is covered in heat shielding before the cover is put on.
G

Just some more shots of the engine.
G
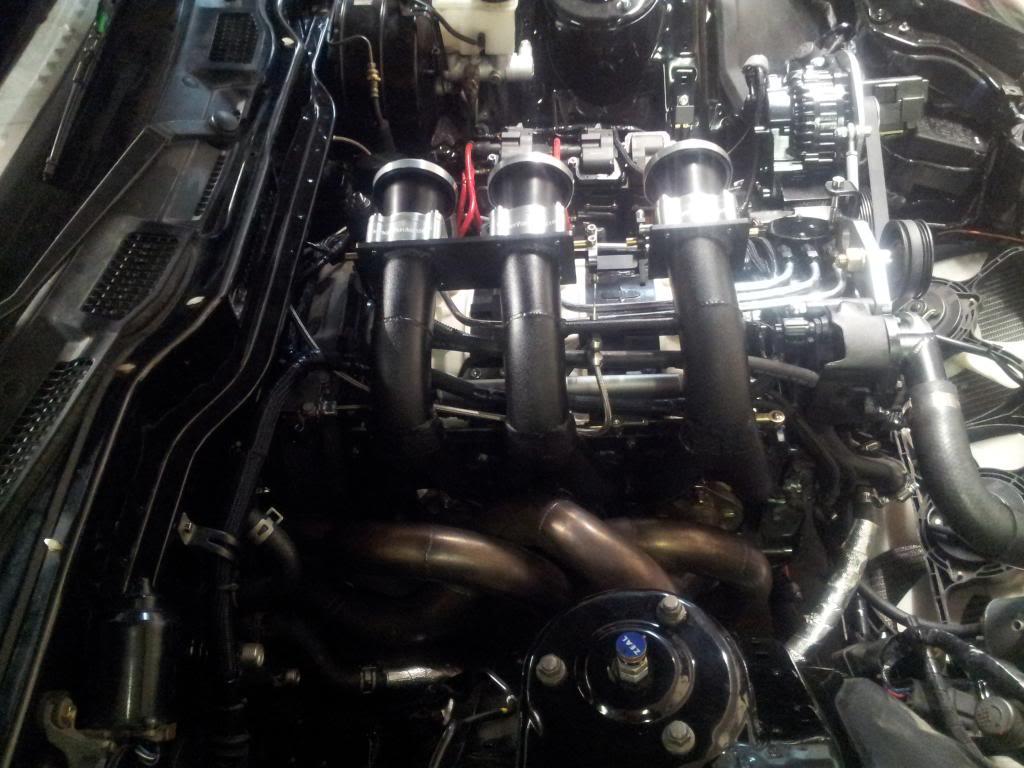


Zoom zoom today for certain, David. And some good pictures of the car actually sitting on that R888 rubber!
A few people have commented on the mesh screens on the ITB air horns and how it would restrict air flow. We'll do a few runs with them on and with them off, so we'll see what if any actual losses there are with these. Any form of colder air is going to present about as much air to the throttle bodies as the screens do. Unless I lose more than 10-15 rwhp I am not going to change it. I really like having a minimalist engine bay. I wanted as simple an engine as I could make it and its hard to imagine anything simpler than what I have. However, if there is a real issue and I really lose a bunch of power with the screens on, I have a plan. I'll put in a NACA scoop on the hood in the valley on the driver's side. about a foot in from the leading edge of the hood when its closed. The duct will open into a plenum affixed to the underside of the hood that directs the air to the 3 air horns. There would be cold air and a slight ram effect. I've drawn all this out, but don't think we'll need it.
And, here's a really dirty picture of the front end with the smoked turn signals and side marker lights. We'll have it cleaned up by the end of the week.

5-14-2013
The last finishing touches are in. The AST replacement is in, and the oil pre-mix tank is in where the ABS was, and the heat shielding is in. So, that's it.
G
These first 2 pictures pretty much show the engine bay as it is going to be.
These next 2 show the AST replacement, including the coolant hard line and the Hargett Quick Disconnect.

Here you can get a pretty good idea of all the replaced nuts and bolts with the Cy-Chrome Allen heads and acorn nuts. They are everywhere.

This last one shows the oil pre-mix reservoir.

Ceylon... I absolutely agree with one of your swaps. Can you guess which? I'll help you. I love the plastic oil cap. I actually think its an odd plastic. It looks and feels a lot like Bakelite, which is a favorite material of mine. So, the cap is a fun essential part of my "factory" look... So?
I noticed, and I'm sure a lot of others have as well, that the higher the standard you have for the main parts, the more you notice the ones you didn't improve as much. The little things are as time and money consuming as the big things. Maybe more so. And the more of them you "fix", the more the remaining ones stand out.
I will say that I had a very clear vision in my head of what the whole engine bay would look like when we got done. I had drawn out a lot of the parts and assemblies, if you will, over a few years and had the original version of the motor in there for several years to look at and think about. The only things that came out a little differently are the oil pre-mix reservoir, the AST replacement, and the heat shield, which I had completely ignored.
Josh... First, thanks for the nice compliments. They always mean a lot but mean even more coming from someone you know and respect. What I really want to see now is whether its what I think it should be. Whether its what I thought in my head when I decided to do all this. I had a lot of stuff I wanted to get in here, like the whole exhaust thing. A monstrously complex exhaust system with actively computer-controlled functions and all you see are the 2 exhaust tips in the bumper. And whether I could make "enough" power with a conservative, non-peripheral ported motor and whether that motor could be as reliable as it theoretically should. Can I get really good gas mileage? Will I worry at all about driving it on a moment's notice?
Second, I'll get some nice K&N filters. ![]() Third, I'm good with the red plug wires. My car is 80% black, 10% red, and 7.5% cream and 2.5% polished metal. Seriously. The only "violations" of that are the the "ZEAL" in blue on top of the shock towers and the gold on the heat shield. So, the red plug wires works okay for me.
Third, I'm good with the red plug wires. My car is 80% black, 10% red, and 7.5% cream and 2.5% polished metal. Seriously. The only "violations" of that are the the "ZEAL" in blue on top of the shock towers and the gold on the heat shield. So, the red plug wires works okay for me.
G
5-15-2013
Car is more or less together. Down to little things like center caps on wheels and valve in OMP. But its running and Logan's driving it. Its being detailed tomorrow and they're going to try to take off the factory mudguards and polish a few bits. The original paint is probably getting a little tired.
Got some good videos. Both inside car and around it. I think Logan may have done some tuning, because it sounds better.
Only videos? Well, skip some of this. Just pictures and babble.
First, with a full tank of gas and my 60 pound bass speaker in the hatch, my car weighs 2900 pounds and 52.7% of the weight is on the back. Take away half a tank of gas at 70 pounds and my speaker enclosure and my weight is 2770 and still more than 50 on the rear even taking all 130 pounds off the rear weight only. Now, I added leather on every vinyl surface and sound deadening, and metal plated the plastic pieces, and I added a rotor and iron. And, I deleted the power steering, ABS, turbos, air bag, intercooler, hard pipes, wastegates, and downpipe. The net result is that my NA 3 rotor weighs the same as or slightly less (if stripped of ABS, air bags, and power steering) than the stock twin-turbo car.


The motor's done. There are a few small changes since the last posts. Mainly some pipes being painted black, the oil reservoir being mounted where the abs was and a few other small things.

The car has may a year's dust on it which will all be fixed in the next day. I still wanted some pictures of the outside of it to start to see what it looks like overall.


http://s254.photobucket.com/user/fd20na/media/Gordon%2520R1%2520files/GOPR0061.mp4.html
And here's Logan pulling away...
http://s254.photobucket.com/user/fd20na/media/Gordon%2520R1%2520files/GOPR0062.mp4.html
Bwarrrrrp... I probably have an earlier era definition in mind if you're wondering about the GT moniker in the title. Without going into origins I think 1950's Maserati A6's, 60's Ferrari Lusso's, 330 GTC's, most Astons till late 70's and today again are all GT's in the classic sense. Ferrari's Maranello stands out among their recent cars. But the earlier Ferrari GT's were much more track oriented than today's on a relative basis. Really nicely done interiors, but very simple. Meanwhile, the bodies were relatively lightweight and they had great engines. So, I'm not talking today's exotics, but I'd still put the 370Z a step down from what I'm talking about. I'm kind of partial to Vettes having had 2 C4's and think the new Vette qualifies as a GT, because they seem to have finally raised the interior to Cadillac levels. And, that's what I was doing here in redoing the interior the way I did to match the motor sort of.
Hey, Prometheus, I haven't seen your name on many posts recently? Good to hear from you and glad you like where it went.
Now, here's the thing. Below is my favorite video for obvious reasons. I just play it over and over again. However, Logan never revs it over 5000 rpm, so, for now, you have to imagine what it sound like at 8800 rpm. Also, the cutout valve for the second exhaust pipe is not hooked up to the ecu and is in the closed position, so, the sound is muffled a bit. Still, I can tell that the exhaust and dual tip muffler box back there really worked to deepen the sound tone. Other guys with 20b's will comment on the issue of mufflers and sound I'm sure. Anyway, here's what is ultimately a tease for me, but is very encouraging.
G
http://s254.photobucket.com/user/fd20na/media/Gordon%2520R1%2520files/GOPR0056.mp4.html
5-16-2013
Rxmfn7... The one thing I can tell you is it seems to be worth the wait! The easy sound of the motor is very reassuring. It seems very comfortable cruising or getting on it. Very loose.
RCCAZ1... Its very hard to express what I am feeling right now. I put a lot of myself into this and had been frankly disappointed with the car and couldn't understand why it wasn't turning out to be what I thought it should be. The idea was a detuned 3 rotor NA race motor that was refined and civilized and yet sounded great when you got on it and made 350-400 rwhp. The idea was that it would be completely reliable, because it was NA and what happens? I get the car done and a bearing seizes necessitating a complete rebuild and almost another year and almost the same money again, minus the cost of the longblock. Now, with this build, I am sure I have what I wanted and thought I could make and Logan deserves a lot of praise for making this happen. He understands these motors unlike anyone else I have run into. Roger Mandeville and Carlos Lopez have been the best known NA 3 rotor motor builders and deserve their reputations. I know both of them to talk to and Roger clearanced and balanced this motor. Carlos has explained a lot of things to me over time and I know Logan has spent a lot of time with both of these guys. Logan is the next generation of really sophisticated multi-rotor builders. Anyway, I love the way it sounds both for the aural pleasure and for how the mechanicals sound. They sound really good. Its a good motor.
Thanks, Matt724... It will go on the dyno Monday morning and we'll see what it makes. I'm trying to document everything. I'm sure the numbers will be satisfactory and somewhere in the broad range I am expecting. I'm pretty sure from having driven Logan's 400+ whp car and my car with its earlier NA motor that the power is going to be all I will need or want. ![]() We'll also have it on the track at Virginia International Raceway Monday afternoon doing laps with a variety of other FD's powered by stock twins, single turbo 13b's, a single turbo 20b, a Formula Mazda 13b NA, and a 4 rotor NA. So, we'll get a good idea where the NA 20b fits in terms of handling on a track.
We'll also have it on the track at Virginia International Raceway Monday afternoon doing laps with a variety of other FD's powered by stock twins, single turbo 13b's, a single turbo 20b, a Formula Mazda 13b NA, and a 4 rotor NA. So, we'll get a good idea where the NA 20b fits in terms of handling on a track.
You know, I can just listen to the video of Logan driving the car and get goosebumps, but I realize that many people on here have never heard an NA rotary other than maybe a 787b video. The sound of the motor is so different than the sound of a 13b single turbo or the stock twin turbo powered cars, but its the motor I think the FD was always meant to have. And Logan says it sounds epic... ![]()
![]()
G
Logan driving the car with 5000 rpm redline and part throttle...
http://s254.photobucket.com/user/fd20na/media/Gordon%2520R1%2520files/GOPR0056.mp4.html
Nice job!
Posted by Diggymart on 3/13/19 @ 9:54:43 PM