You must be logged in to rate content!
107 minute(s) of a 219 minute read
4-19-2021
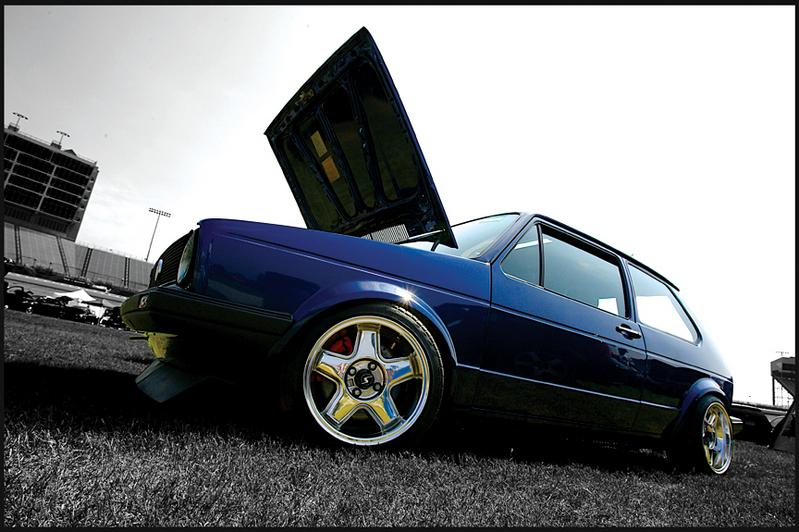
A little durtydubs and a lot of eurowise: r32 AWD-twin turbo Mk1
Compliments of Nashty Rabbit @ www.vwvortex.com
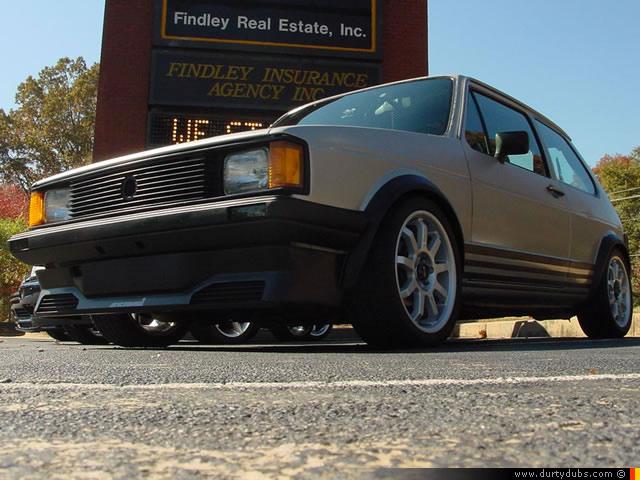
A few of you know me and for those that don't a a brief history of me and my car.
I bought my 84 gti back in the late 90's and within a year the car was fitted with the typical mods of the time. Built high compression 2L 16valve, built 4k with LSD, suspension upgrades, some exterior and interior mods, bigger brakes and wheels (yes, wild cards... don't hate...  ), must-have fuba antana, and a few other random things....
Then, the "bug" was planted into my head a couple years later courtesy of my sister (loopsnew), scott (assist racing), and old friend yoyo (yohannes). My sister convienced me to strip the car down and repaint it...
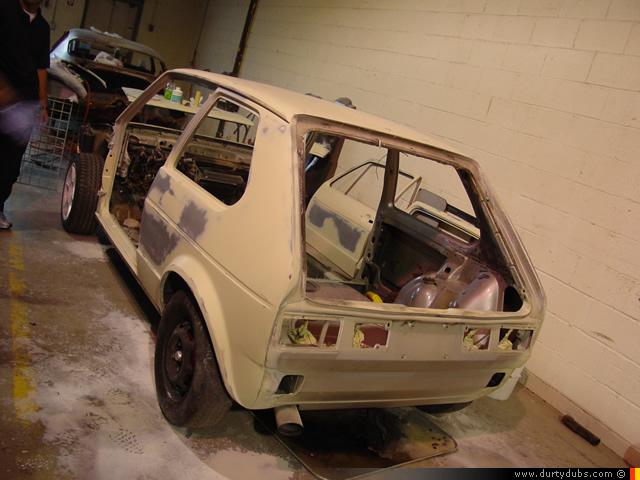
then yoyo had mentioned I should add a "little" extra power (turbo) since the motor was out and after talking with Scott at Assist Racing, well, the rest was history and I ended up with what many of you recognize as my little "bunny".
The build was fun, but all the people I have met along the way made it so much more of an experience for me. No one really understood why I'd spend so much time and money into something like a rabbit, except for some of you I've grown to know, enjoy, and respect! 
Having said all that, I'm happy to say that the little bunny is about to get another big change in its life.
This time, I've paired up with eurowise and after much talk, looks like its a go  The project will take a good bit of time, but the end result should be all worth it!
During this build thread I am extremely open to ideas and think eurowise would also appreciate information you guys/gals could share in regards to the build. We have discussed a game plan in regards to the swap, but like everything else, plans don't always go as thought so am sure this will be a long, yet informative process for us all! For those that don't know much about eurwise, check them out at http://www.euro-wise.com Trust me, you've seen a lot of their stuff....
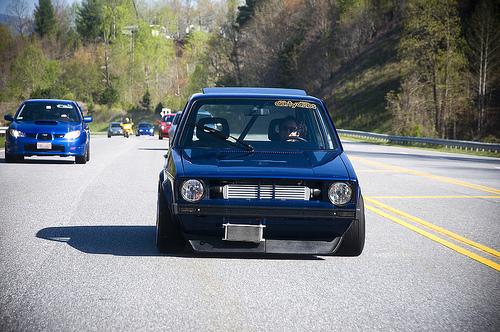
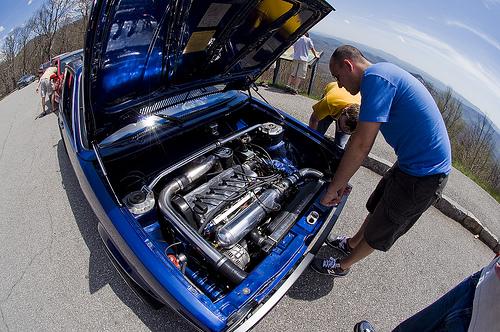
I leave everyone with one last clip I took a few weeks ago. I mainly took it to prove everything on the car is functional and WILL BE FOR SALE. I was borrowing an 020 from Scott so I had dialed the car down to only 8 lbs of boost, so trust me when I say the car was just trolling around 
Anyways, hope you boys and girls enjoy this thread!
take care,
nash
10/5/2010
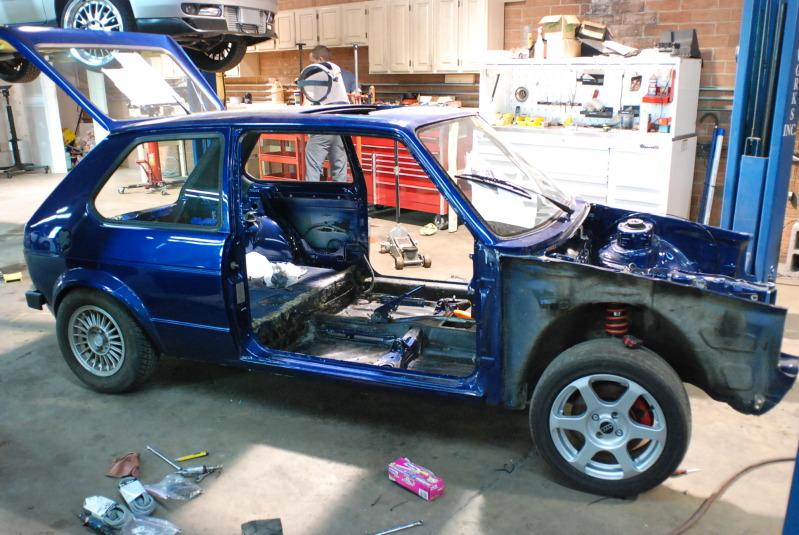
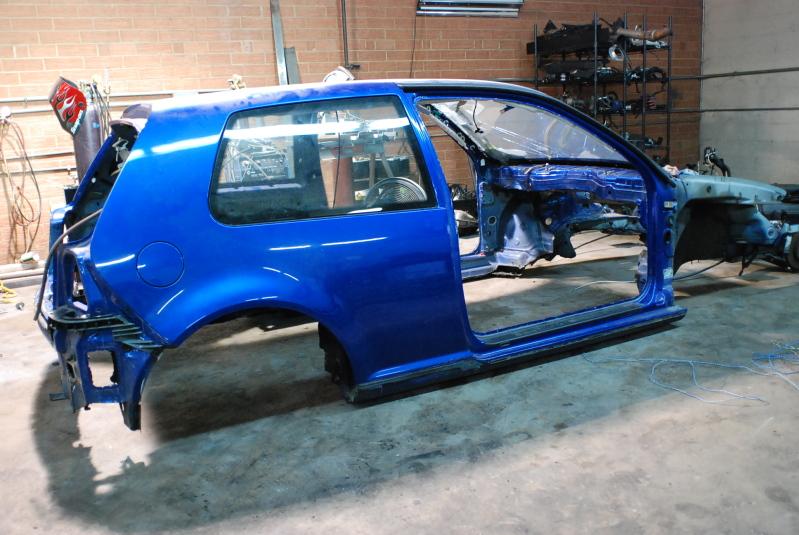
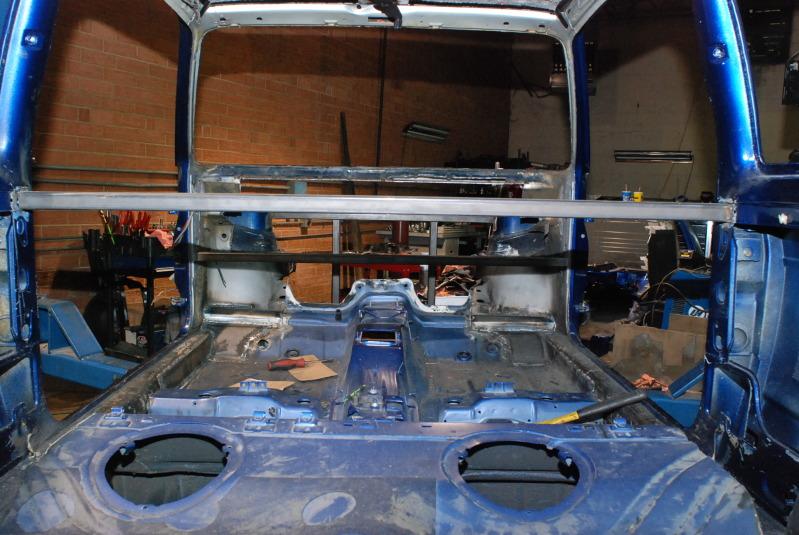
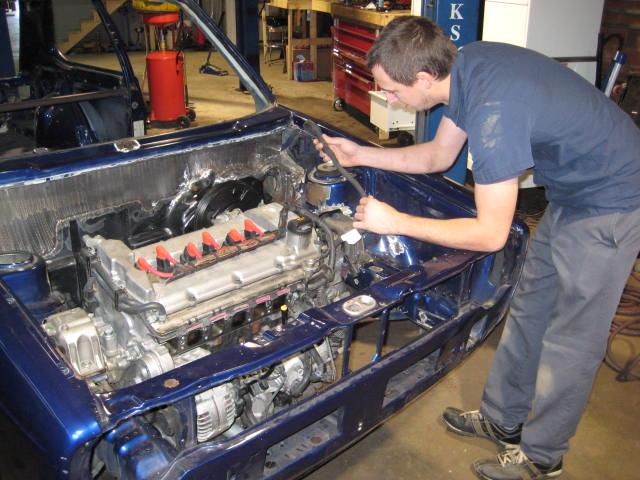
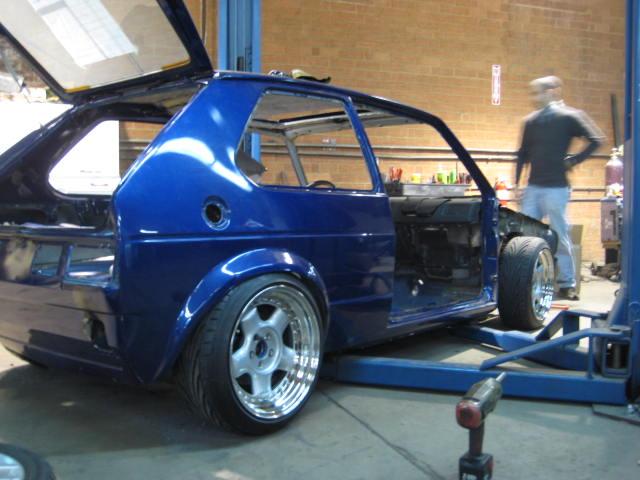
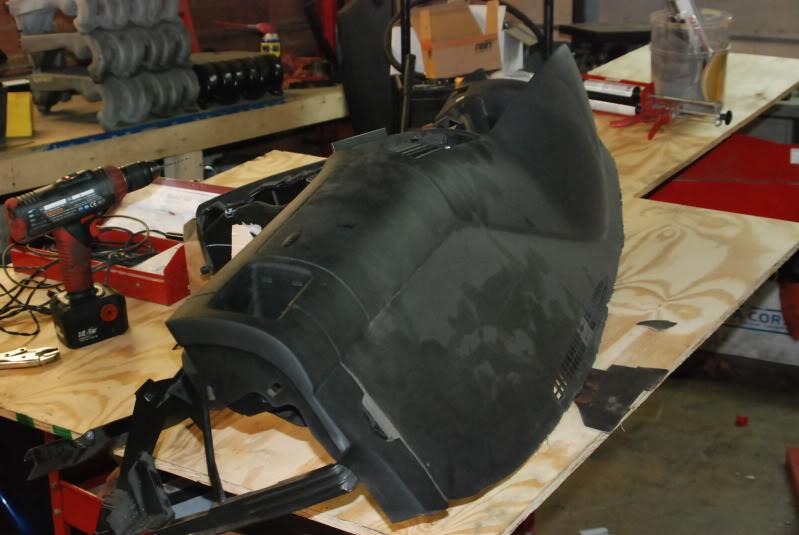
can't believe the car looks like this now.... 
interior shot of the r32....
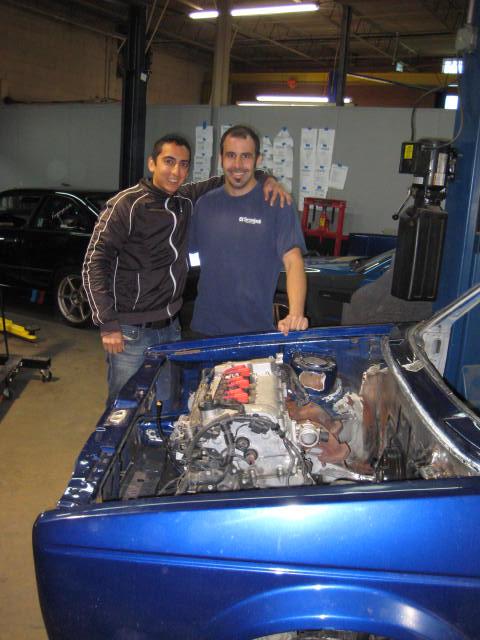
guys at eurowise given me a little chubby....
take care,
nash
10/8/2010
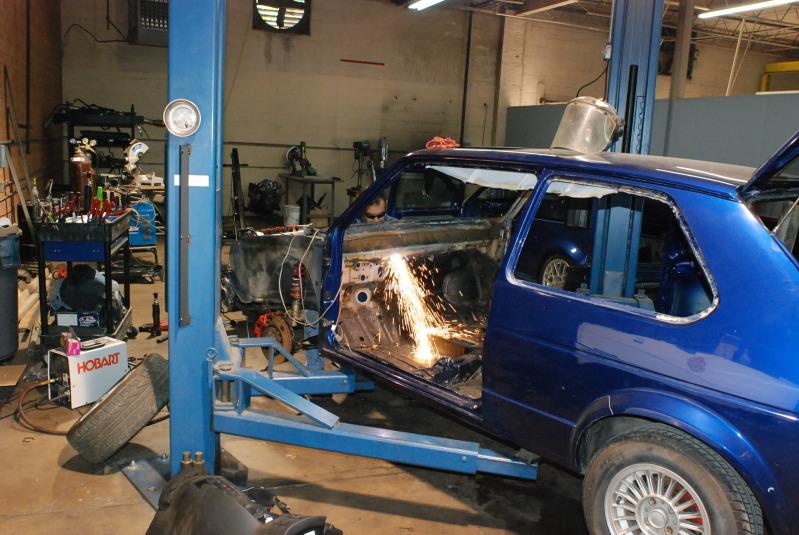
NO more rabbit bulkhead.... Doug "the real deal fabricator" doing his thing...
take care,
nash
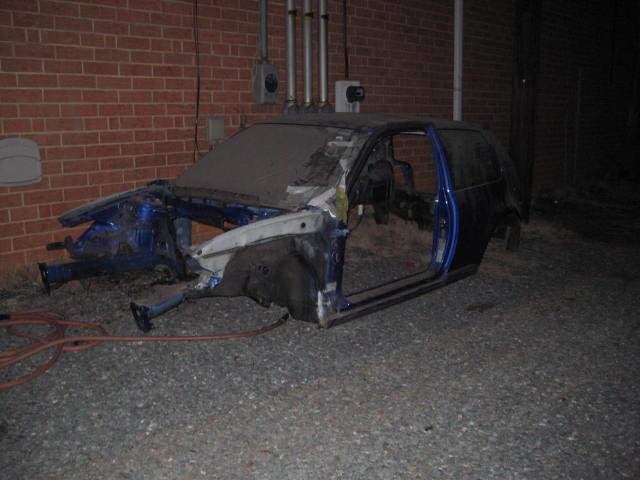
10/9/2010
And to think my sister bought this car brand new back in "04 for some 30 odd thousand dollars....
hope you're having fun cutting away doug.... lol....
10/13/2010
The euroWise Guys are getting serious now...
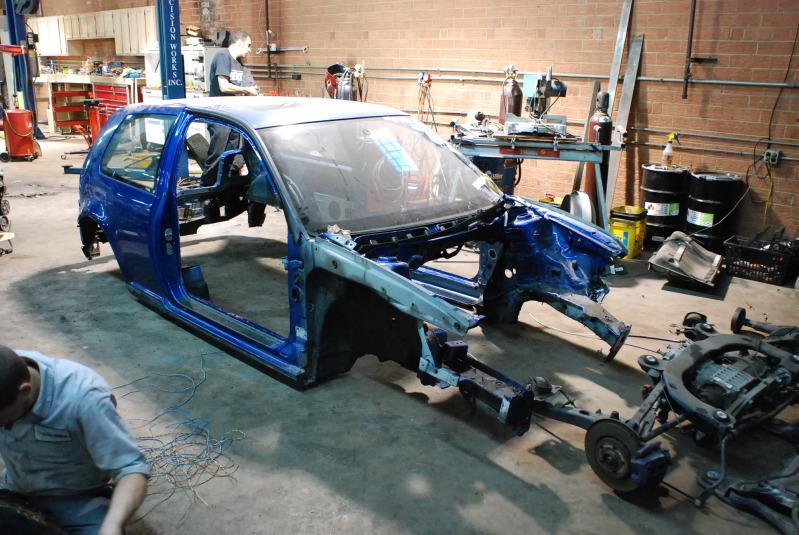
So what i wanted was basicly the entire r32 car stuffed in a rabbit shell... I'll keep the typing to a minimum and let the pics do the talking....
braced more of the car up to keep everything true...
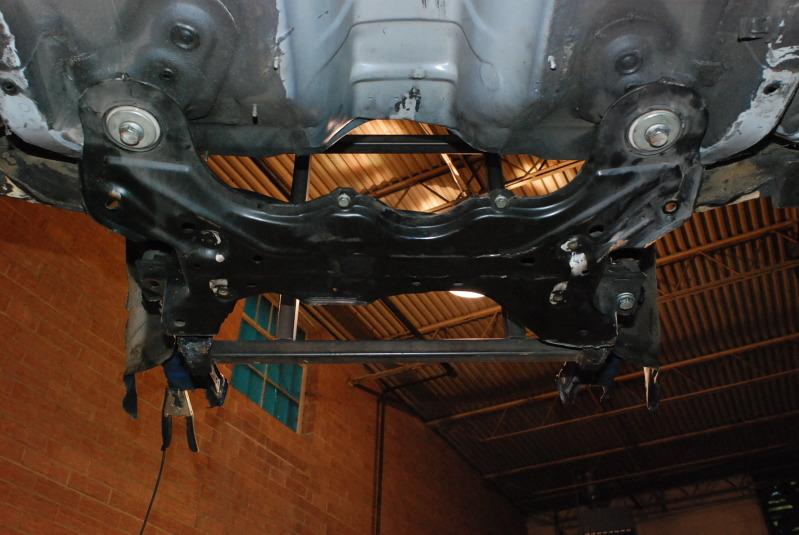
notice the modified mk4 subframe... Bolted in place...
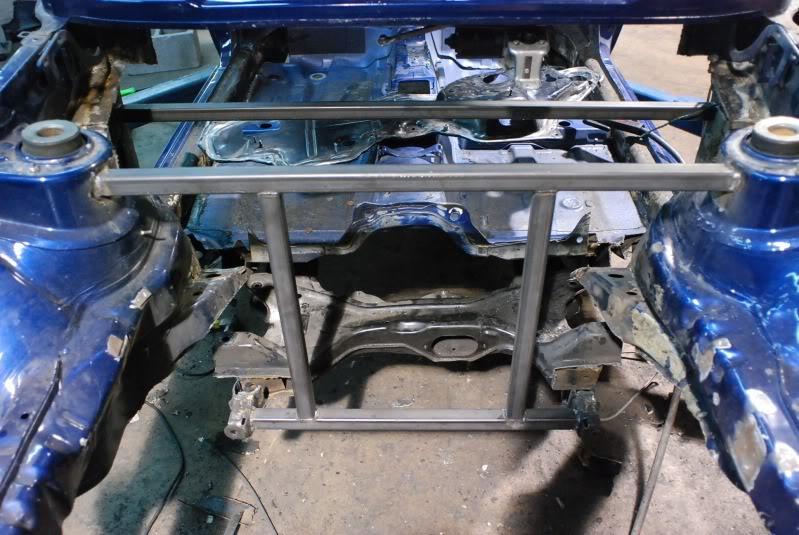
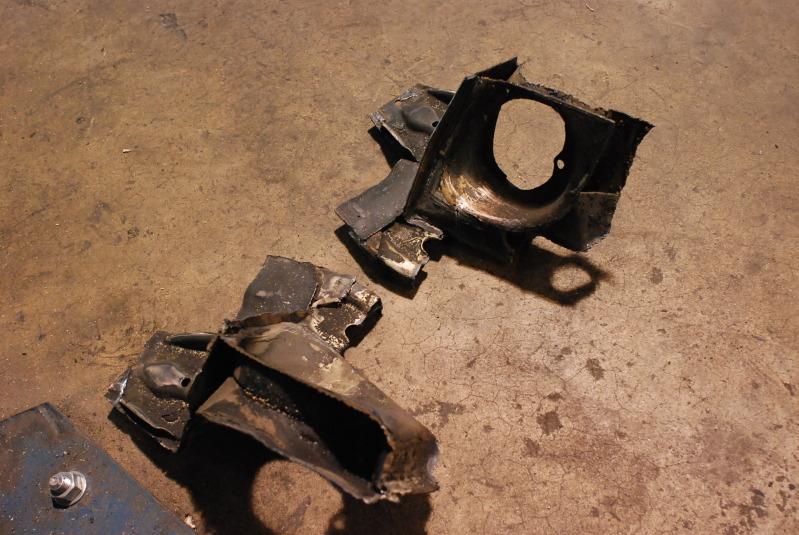
They go from this....
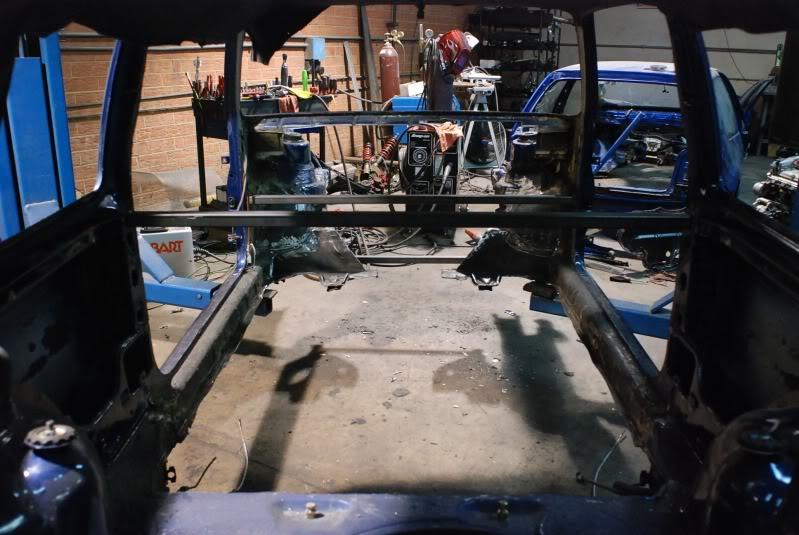
to this...

from under the car...
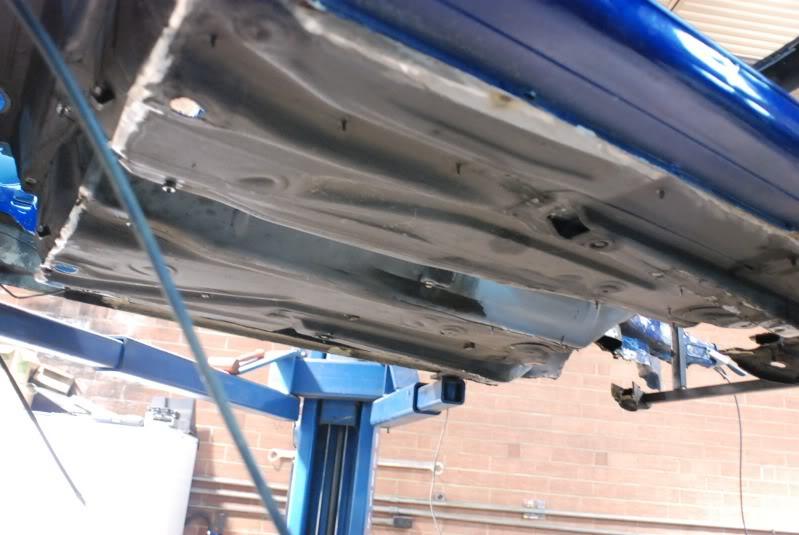
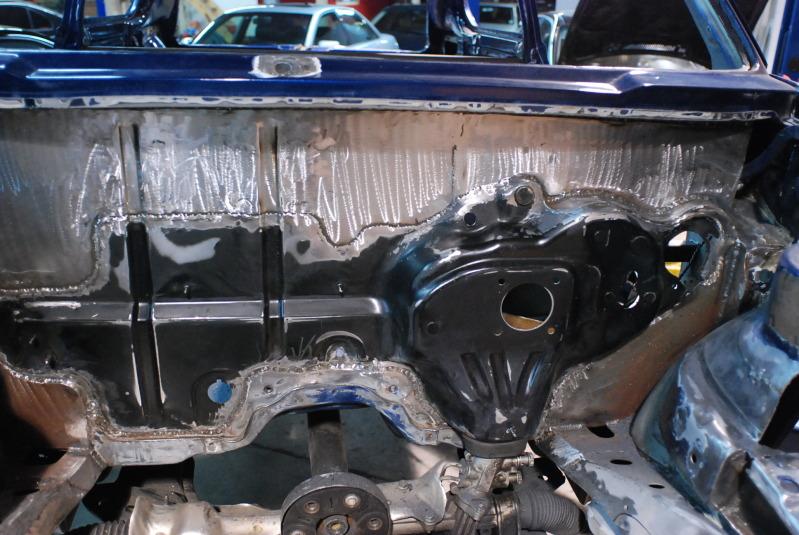
and finally, a new firewall, and don't worry, there will be a few less holes soon....
10/18/2010
More progress and must say... the guys at eurowise are definitely doing things the way i had explained and asked and they have even surpassed even my expectations in regards to quality and time.... thanks fellas
enough of the hallmark comments and time for the progress report.....
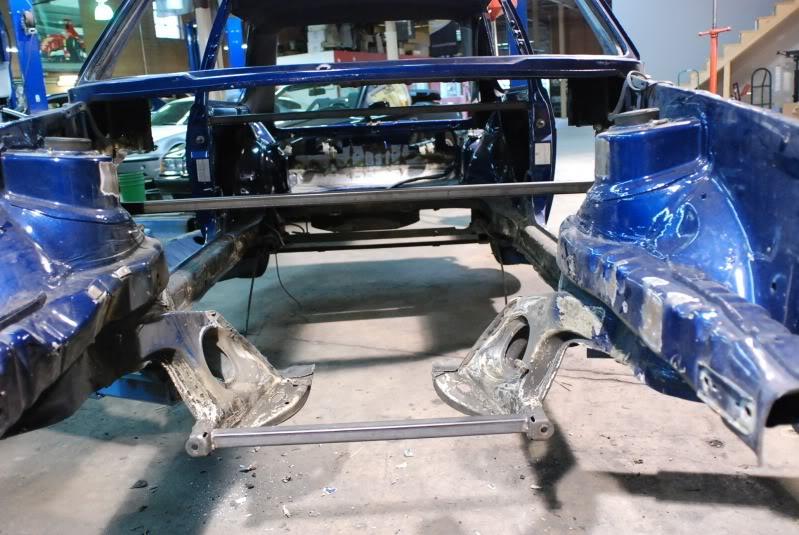
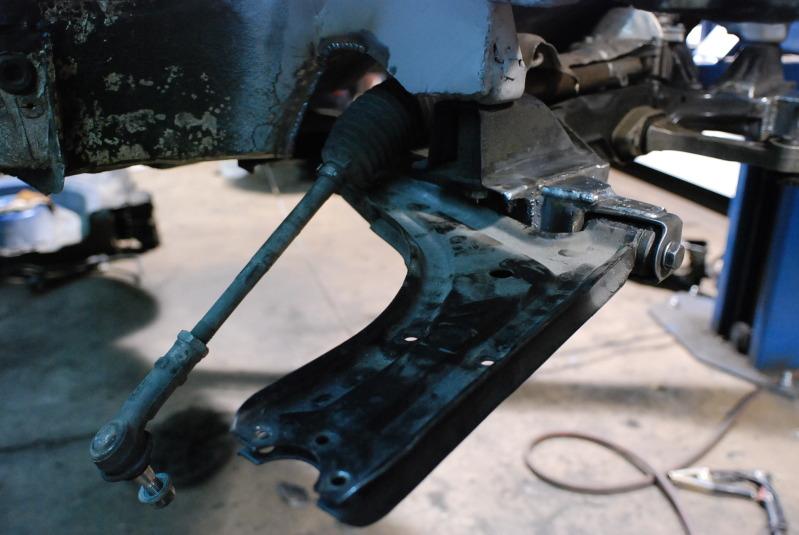
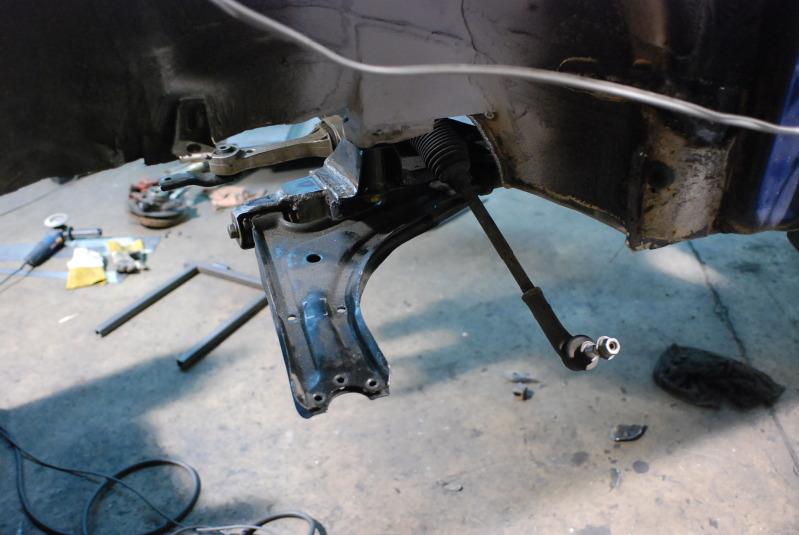
mk1 front control arm structures cut off
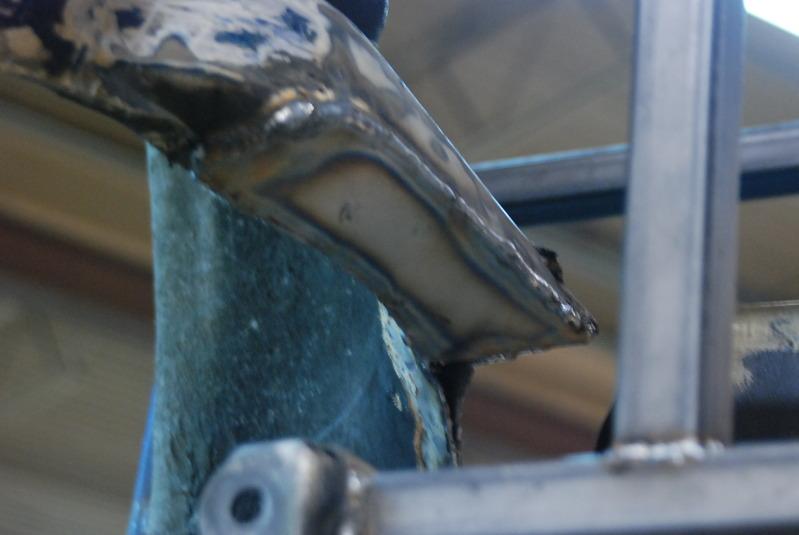
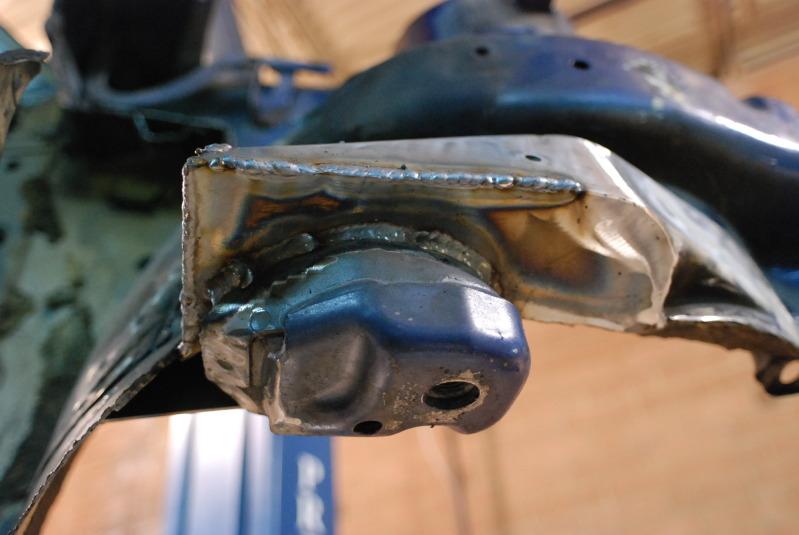
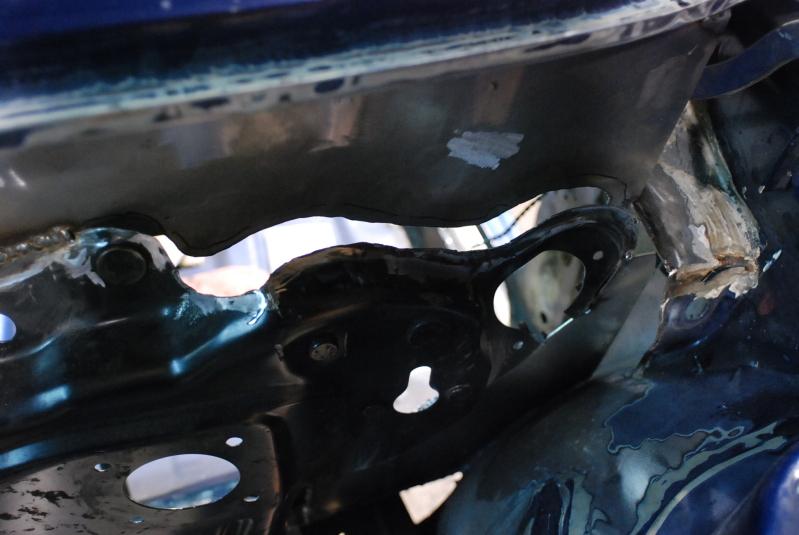
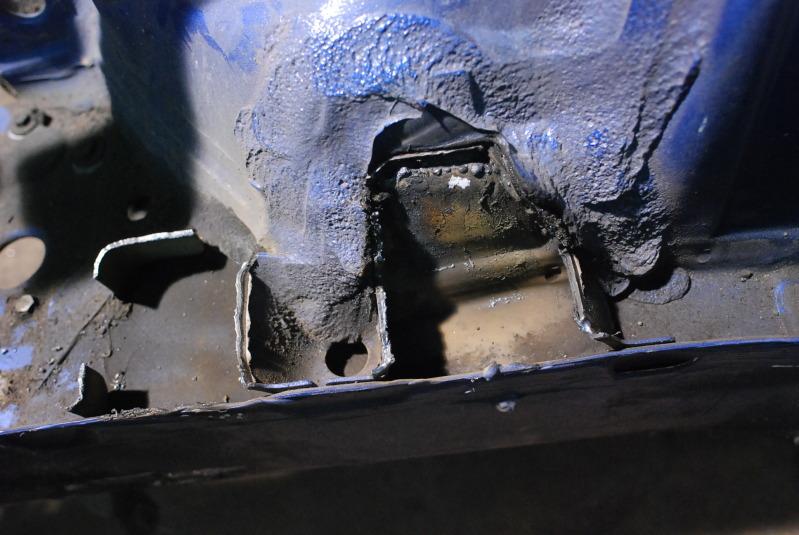
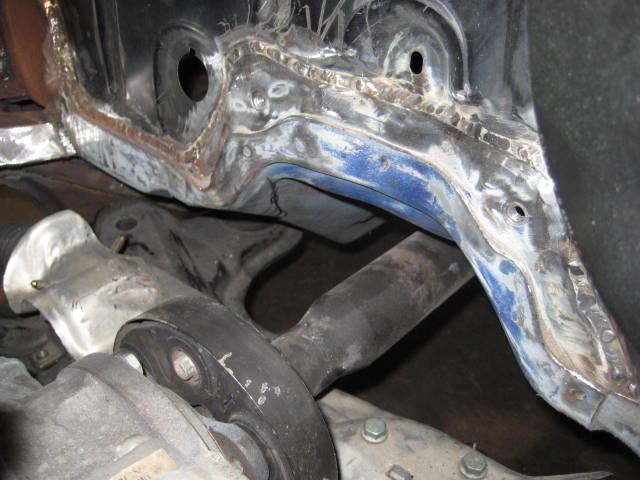
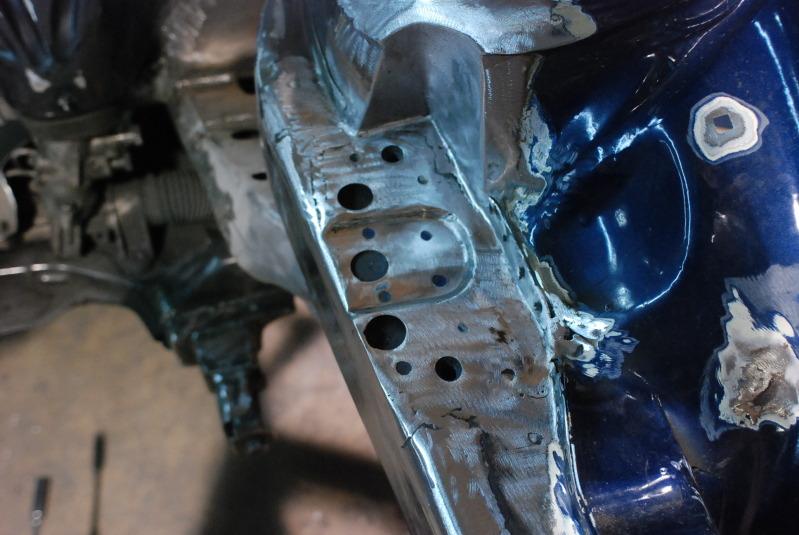
they reinforced the body with steel plates where the mk1 subframe\control arm mounts were cut off
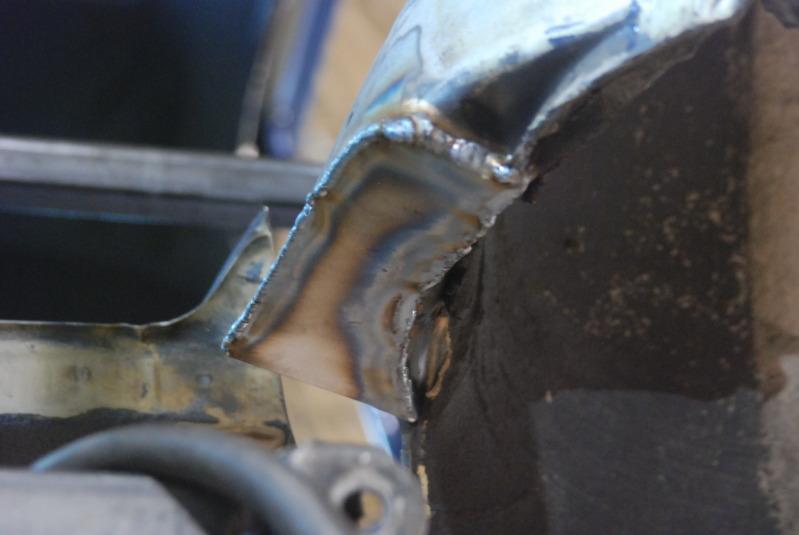
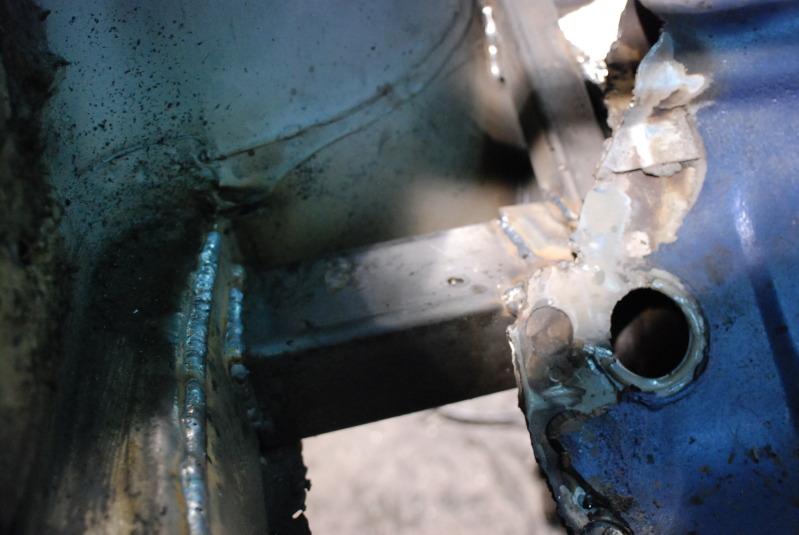
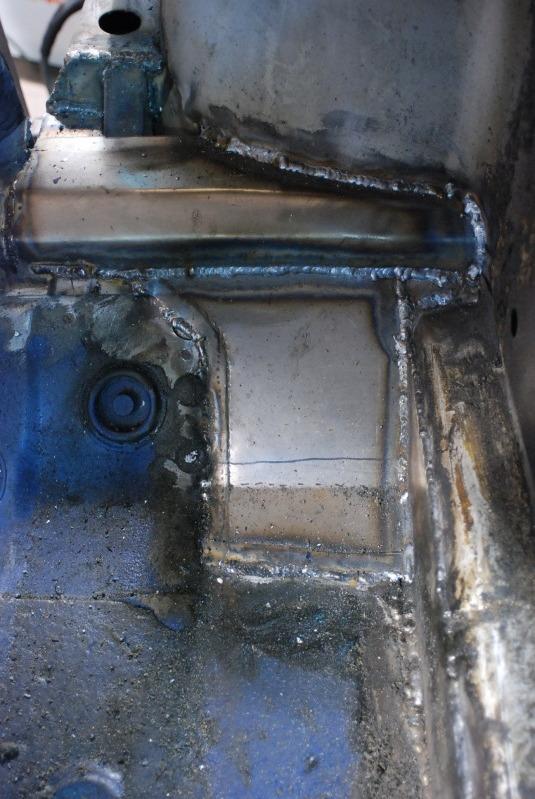
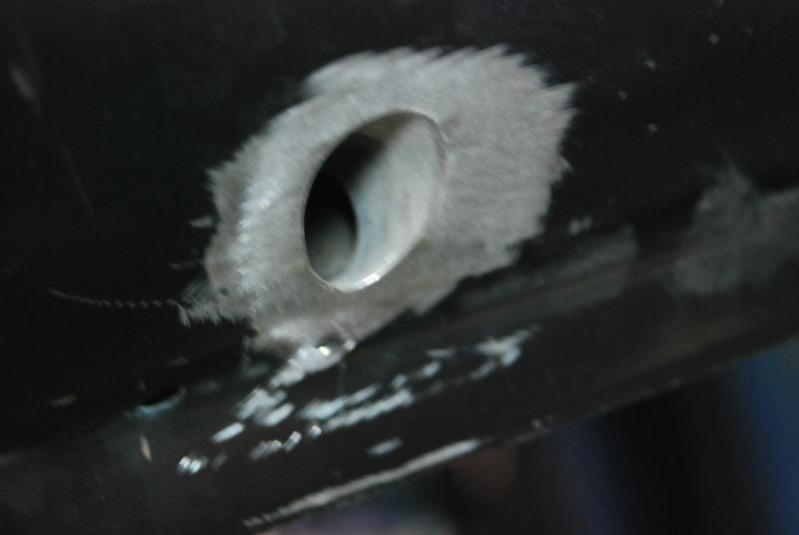
drivers side oem mounting point for front subframe mount retrofitted
passenger side shot
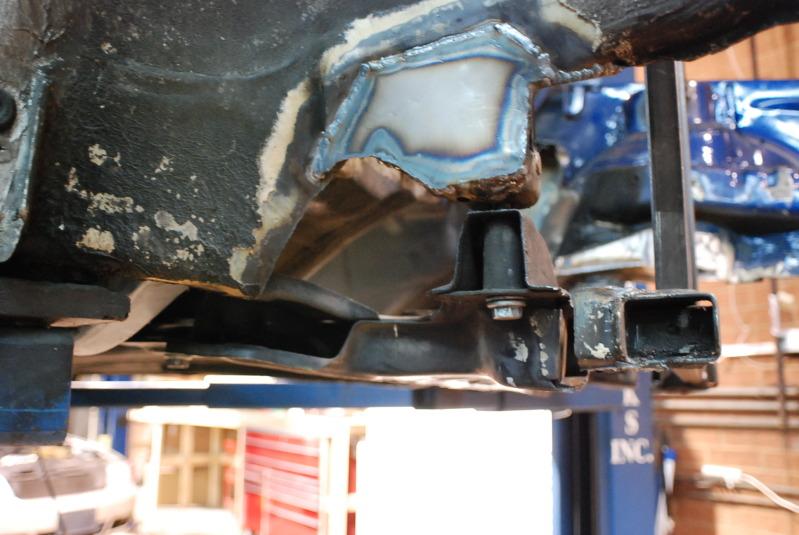
detailed shot of mounting point
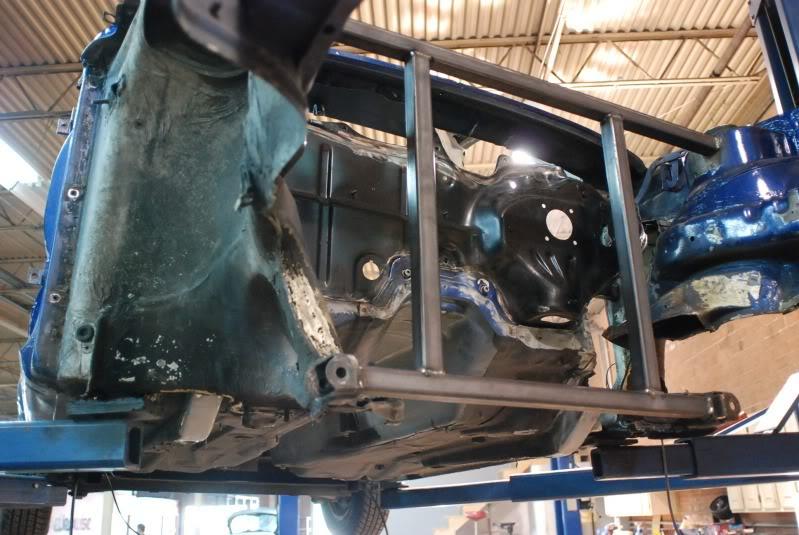
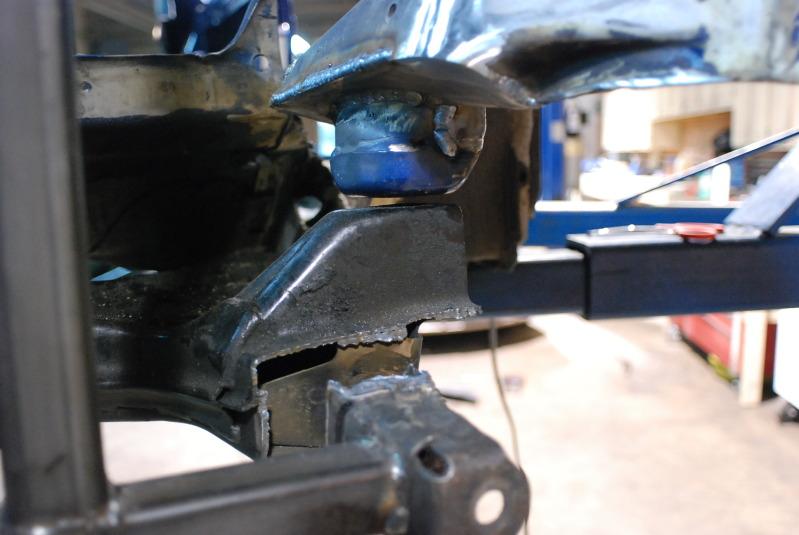
view from under the rabbit of the subframe bolted up 
10/18/2010
I haven't moved from my bed since noon today... I LOVE slow days 
More goodness
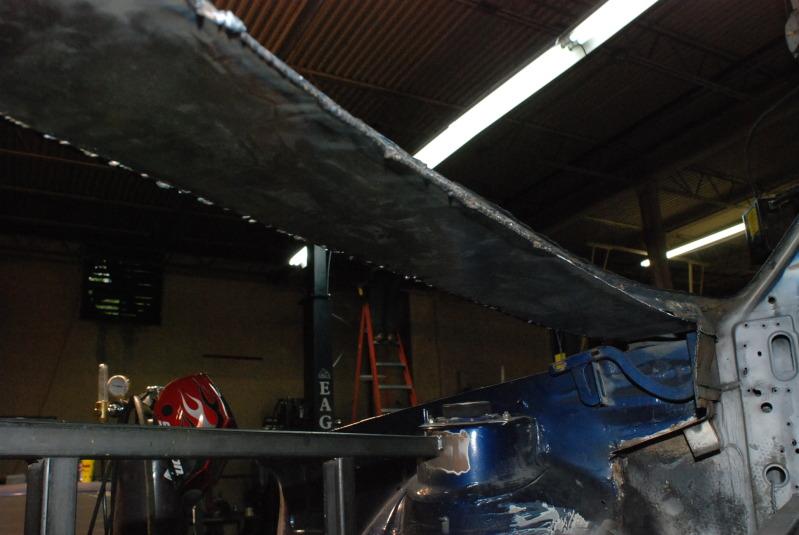
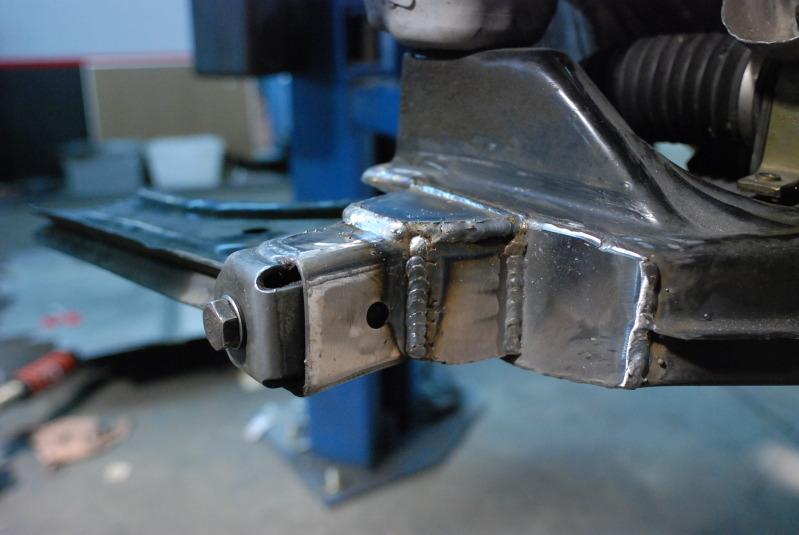
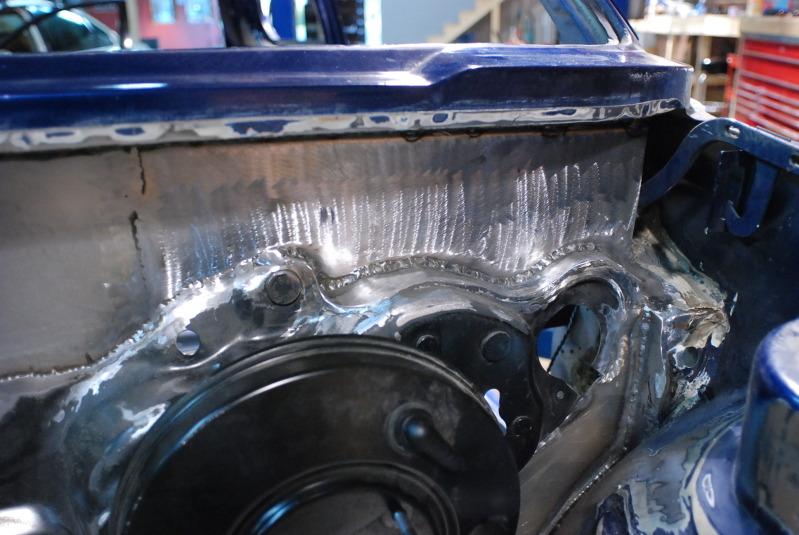
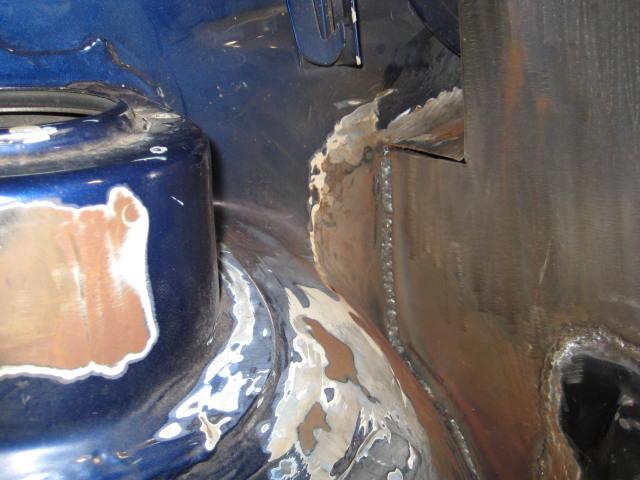
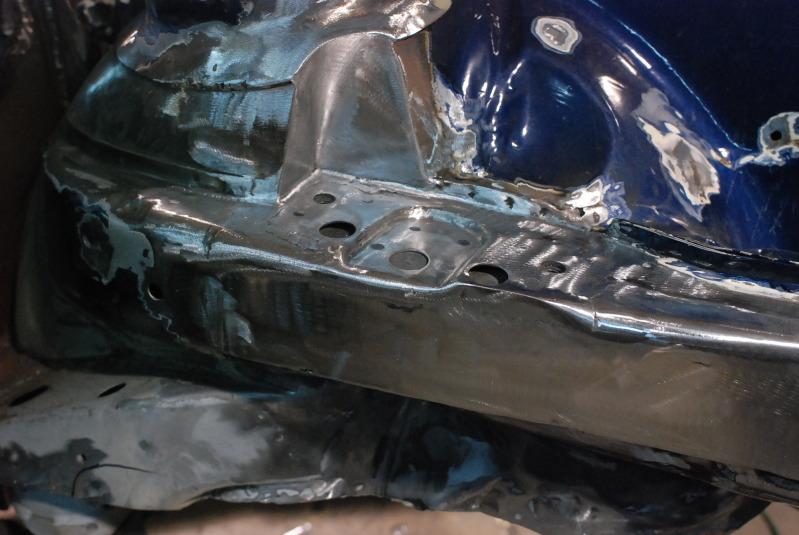
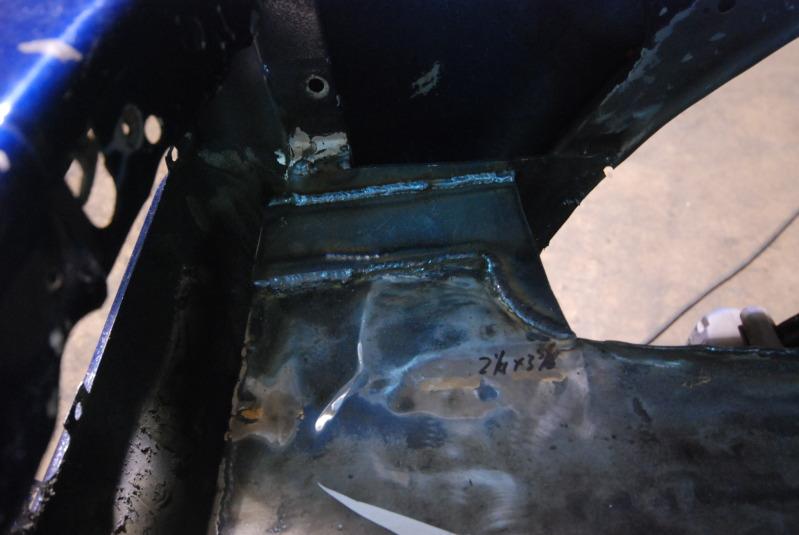
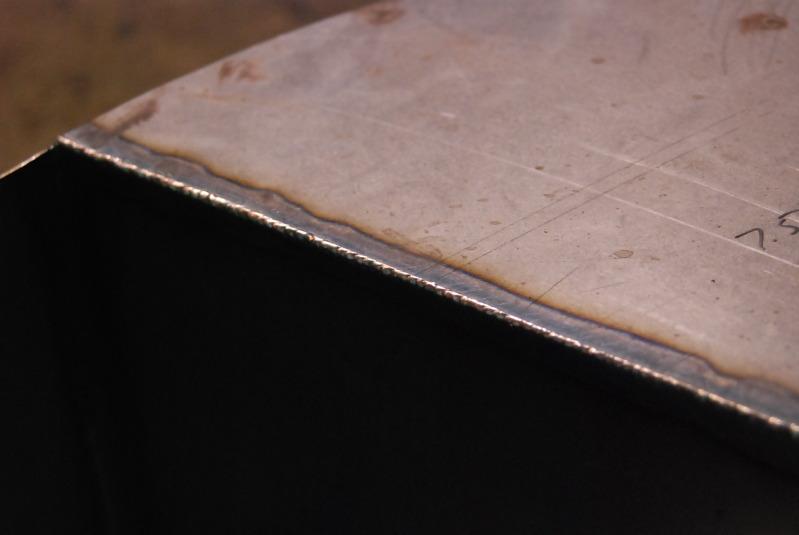
Here is a shot of the frame rail on the drivers side from r32 where it ends on the floor pan. They used 2.5 inch .125 steel square tubing and built on to the floor to meet mk1 front subframe. Then went back and reinforced it with 12 gauge sheet metal. There'll be more support on this car than Dolly Parton's bra
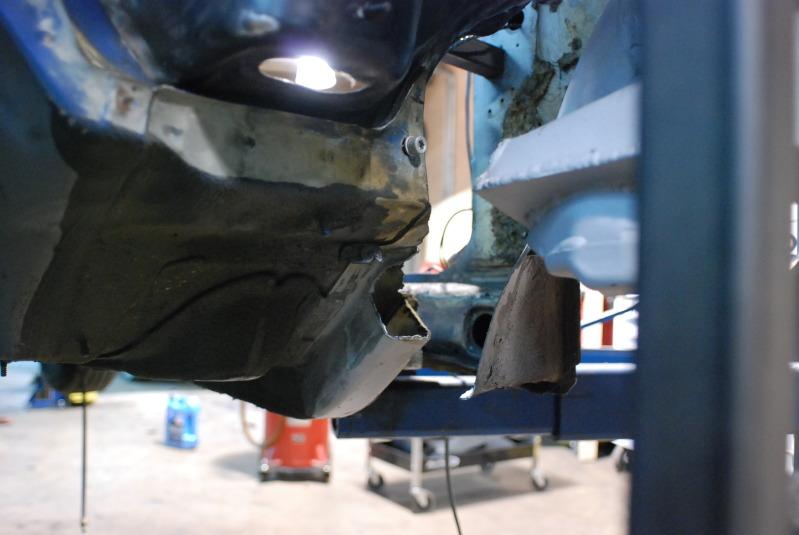
picture of the passenger side 50% built boxed in and reinforced
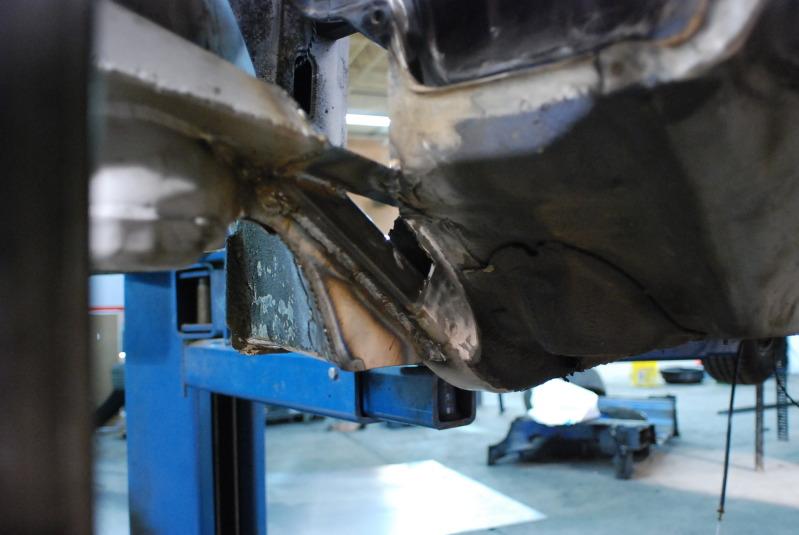
its starting to look not only more functionaly but a little prettier....
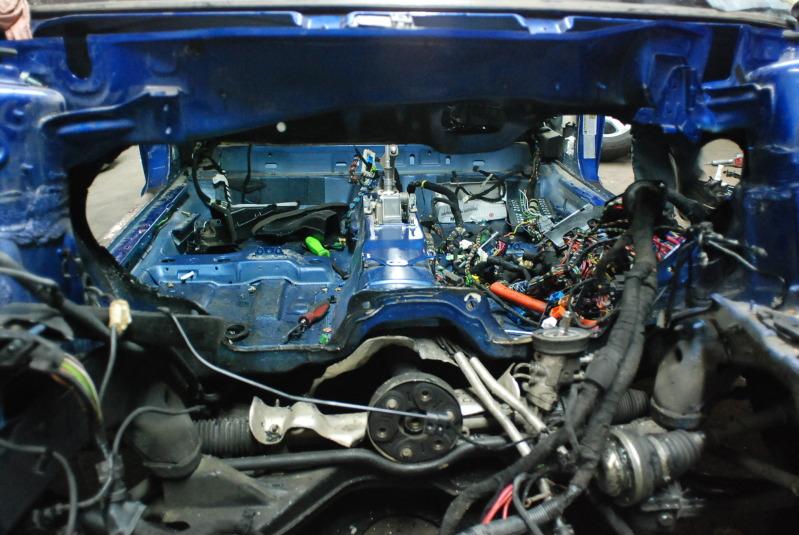
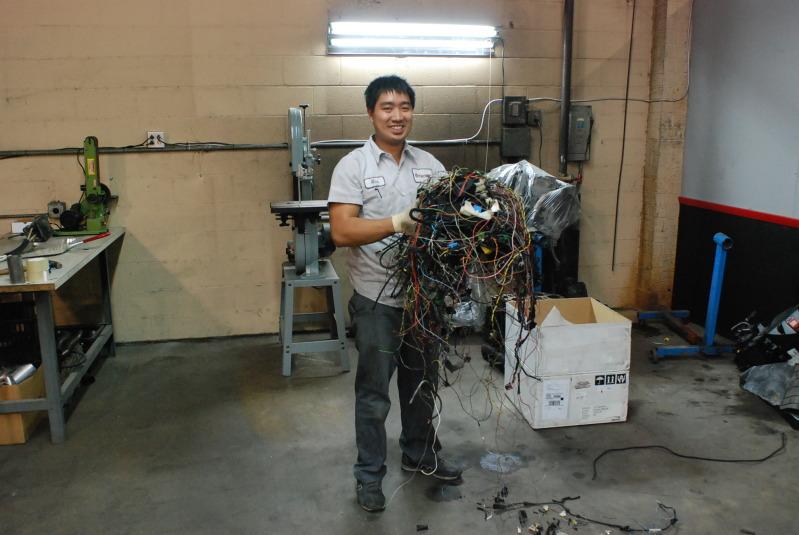
and for you wiring guru's... a pic of mike holding some of the wiring that will not be used on the swap... Mike said that ronnie's removed about 10 lbs of wiring...  AND EVEN MORE AMAZING IS A PIC OF MIKE WITHOUT A CELLPHONE IN HIS HAND TEXTING....
10/19/2010
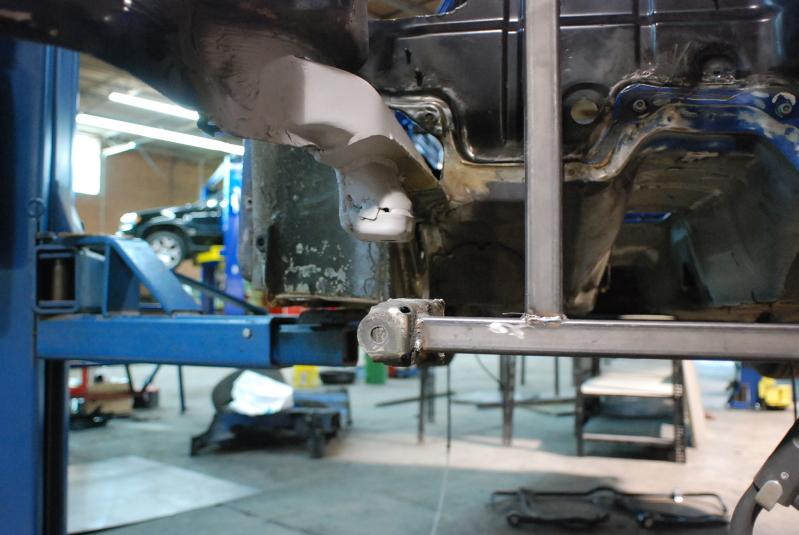
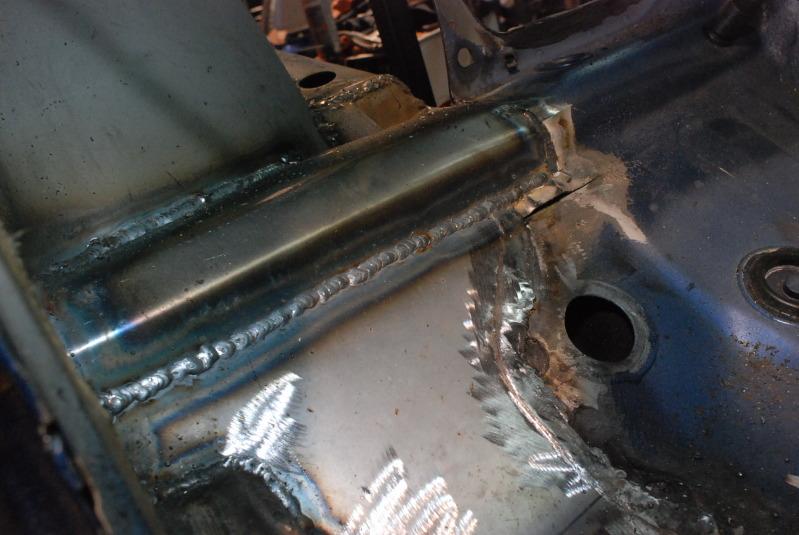
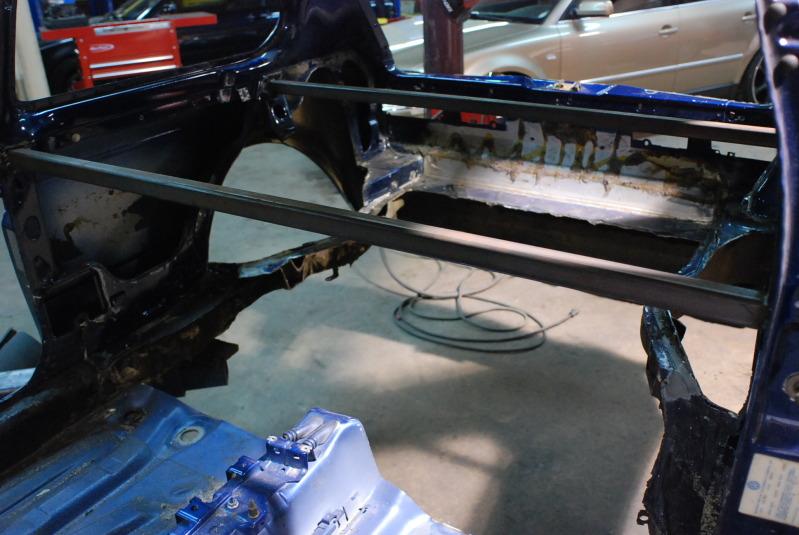
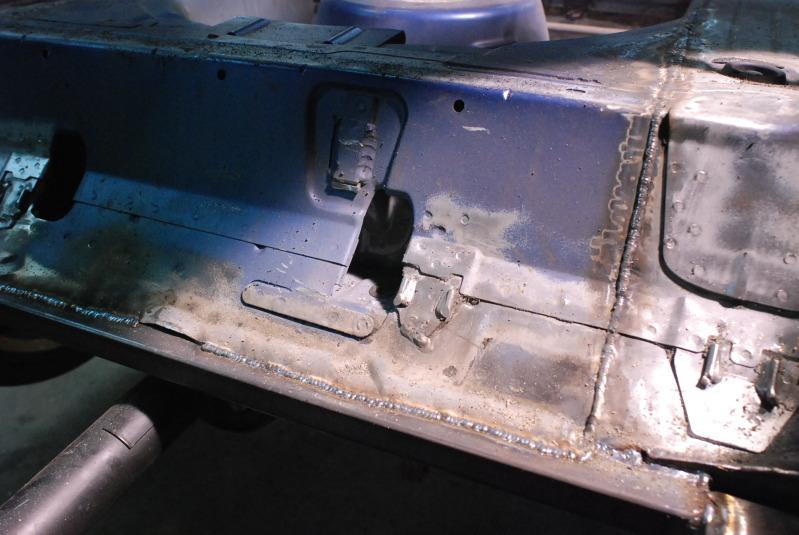
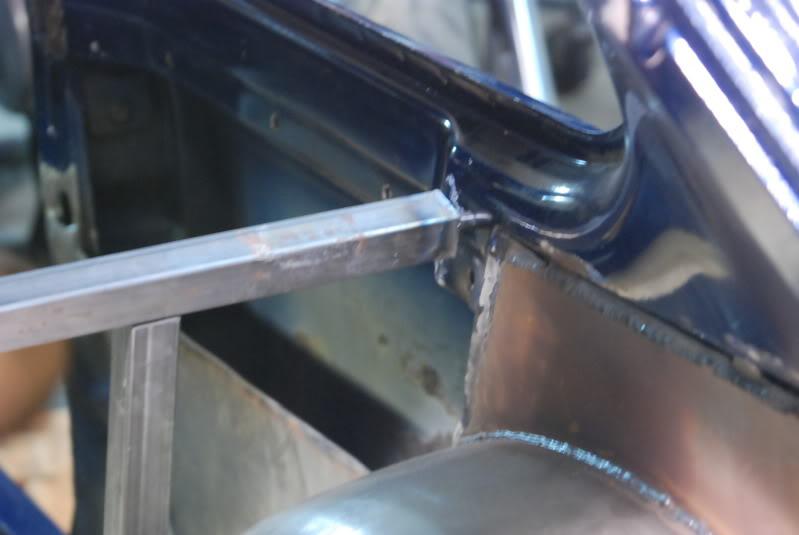
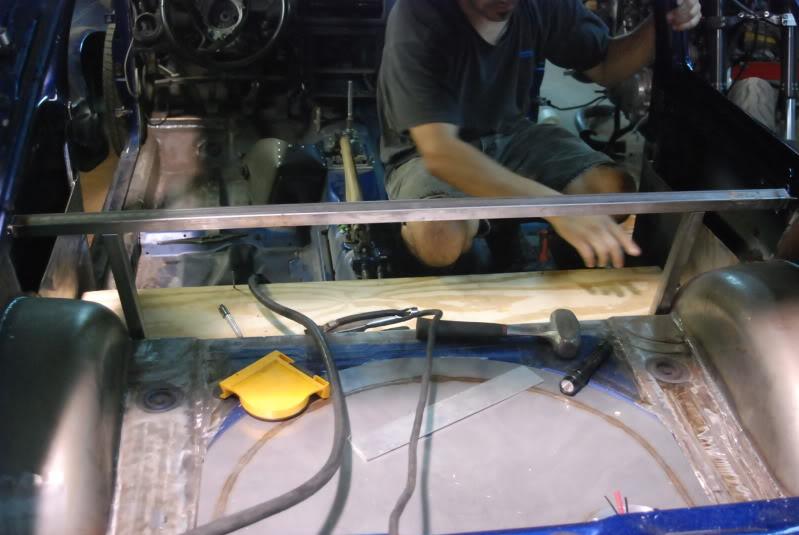
This will take a second so grab a cup of joe and kick back...floors completely welded in today and reinforced with 12 gauge steel along the door frame on the inside of the car
Then doug welded to the steel plates were horizontal 2.5 in .125 square tubing running underneath the car across the front where it meets the tunnel.
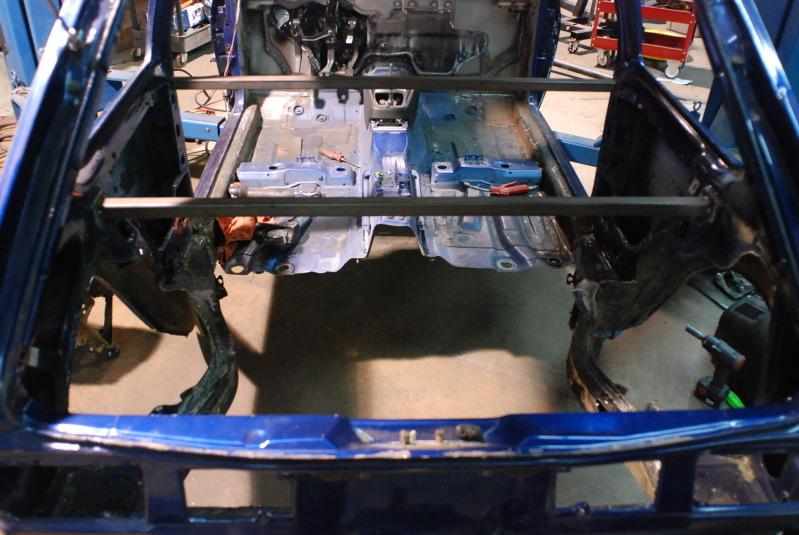
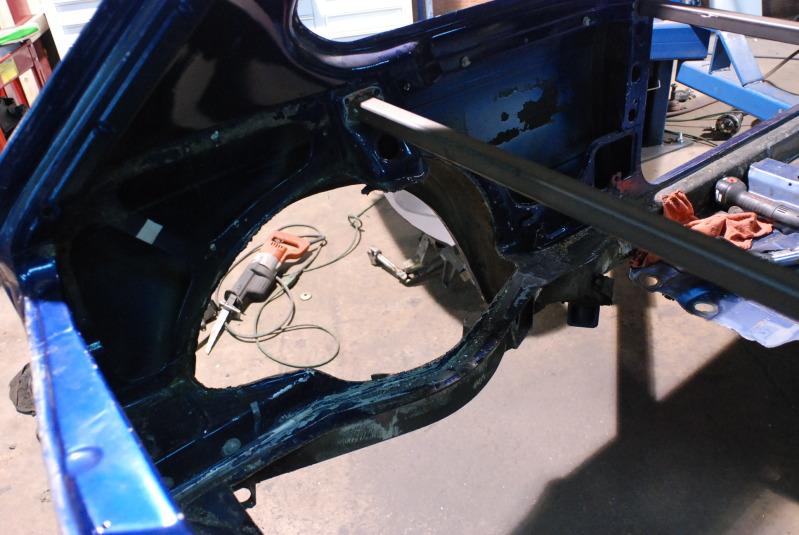
Here is a shot of the drivers side where the foot pedal rest area would be
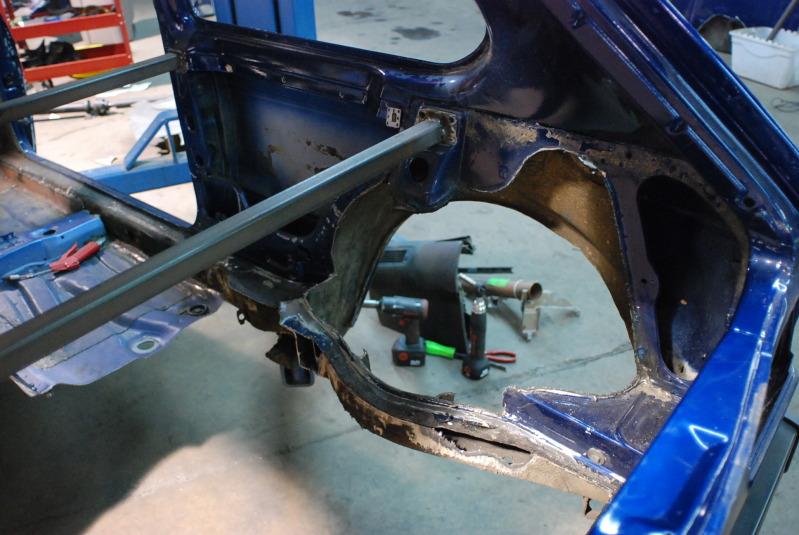
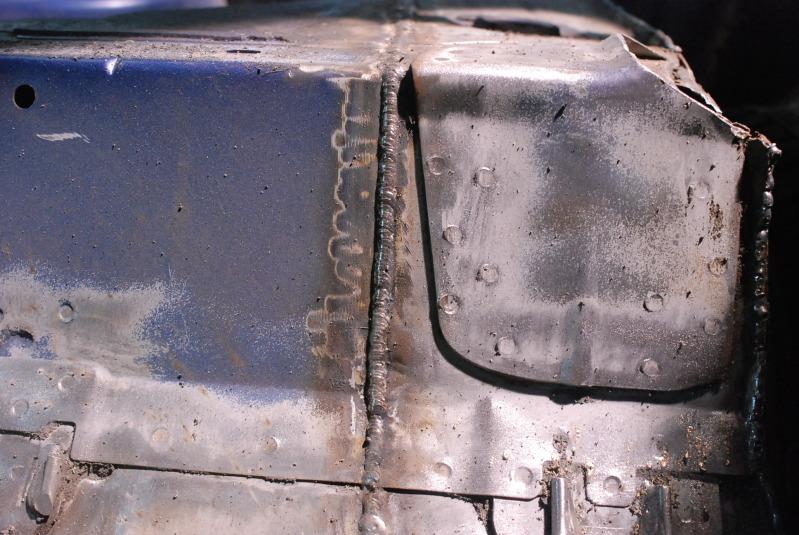
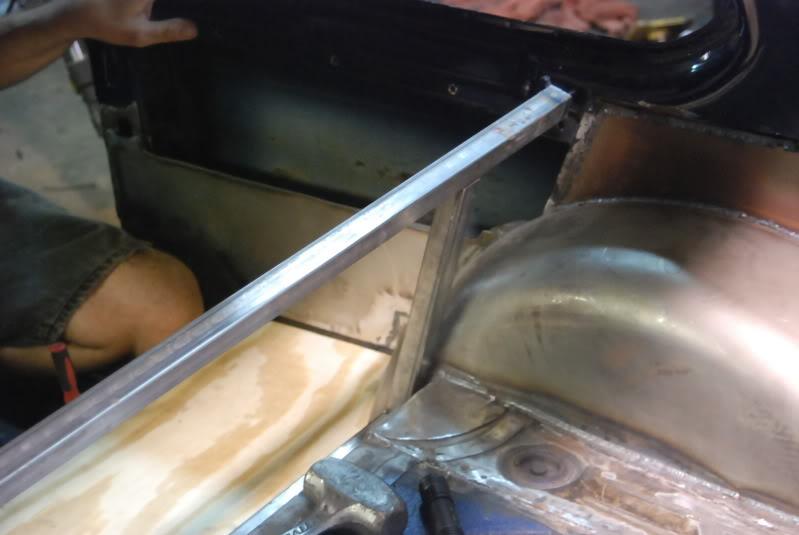
A shot of the 1.25 square tubing running through the insides of the rabbit frame rails before being all boxed in and covered up on the passenger side.
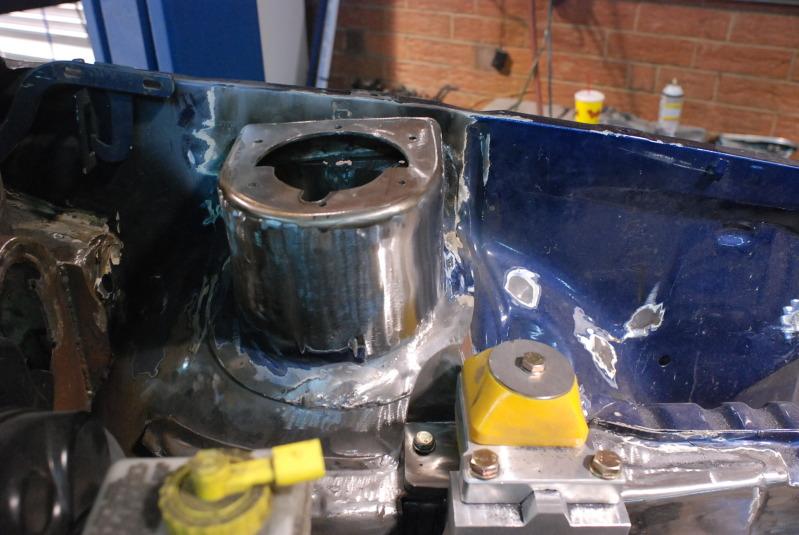
They braced the front lower windshield panel underneath with 12 gauge steel. We will also be using it to build the new bulkhead.
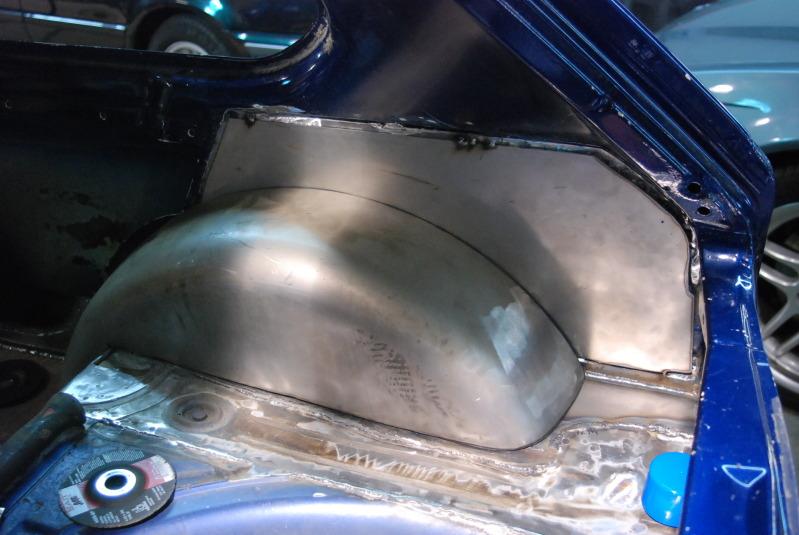
The passenger side shot of the floor where the r32 floor meets the mk1 strut tower and frame rail where it is exposed. Eurowise will be bracing and sealing that up like factory. What i like to call OEM + ... 
Doug building templates for the floor pan. Child's play for him at this point....

The drivers floor pan finished up and braced and sealed up from top
A shot from the engine bay.
Passenger side.
And a view from the pan welded in from the inside.... Wonder if TMI makes a carpet kit for this application... 
10/20/2010
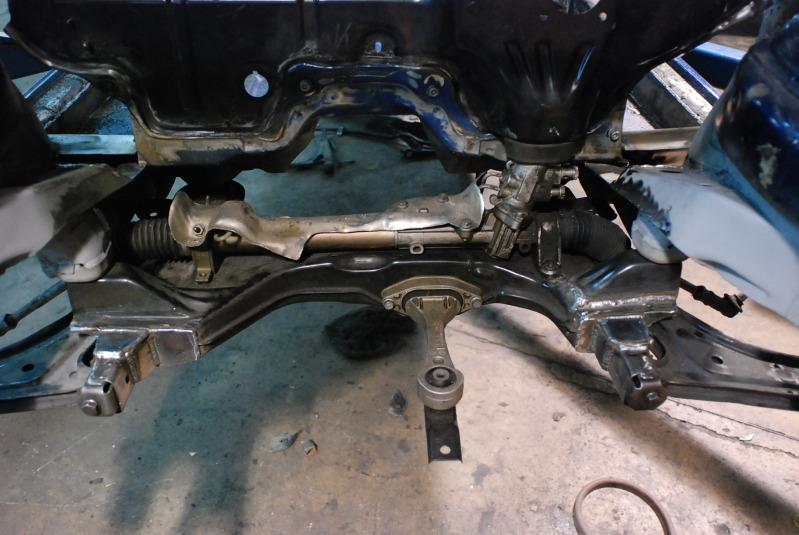
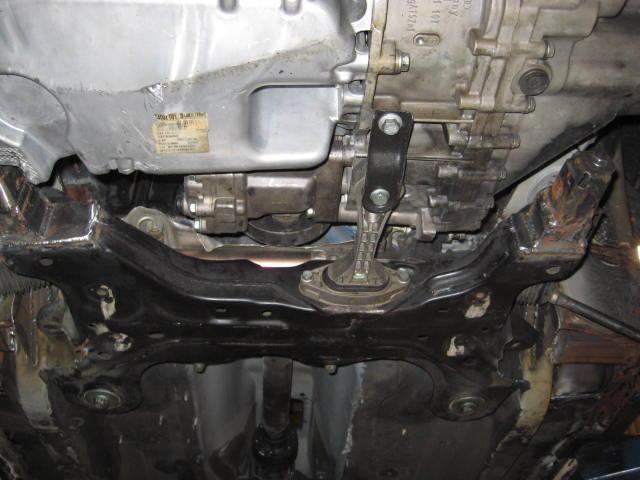
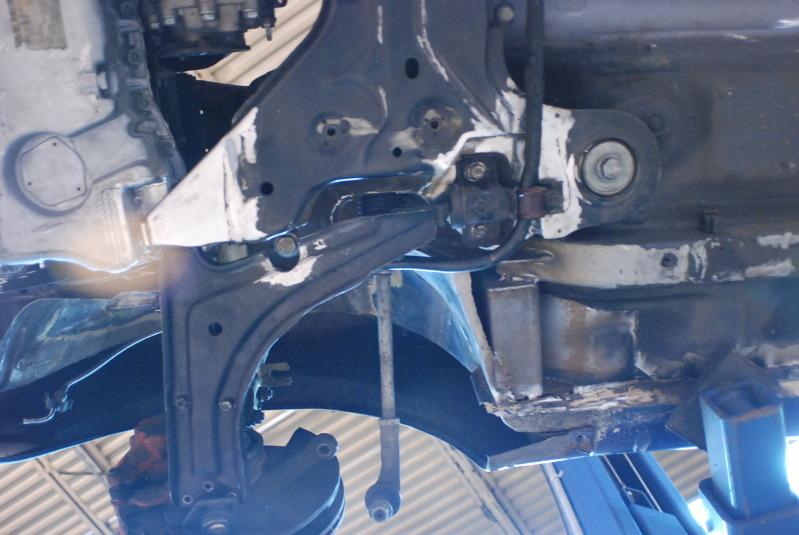
So the eurowise guys got the modified r32 subframe built, and mounted in place
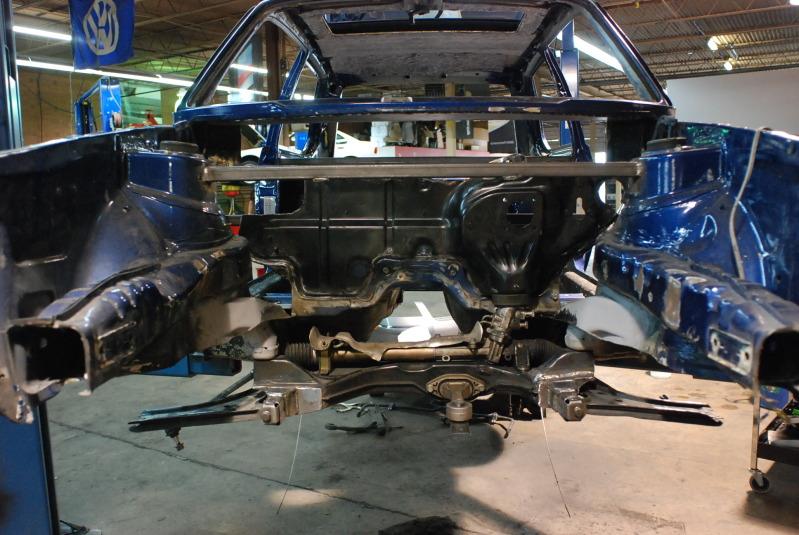
They also bolted in the r32 power steering rack, and bolted the r32 modular bulk head in place. fits just like stock! Kinda... Close up pic
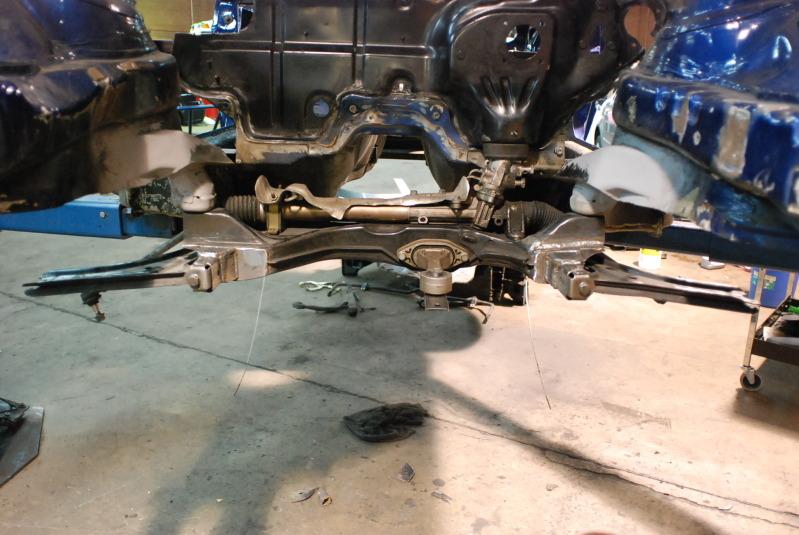
The passenger side control arm shot
The driver's side shot
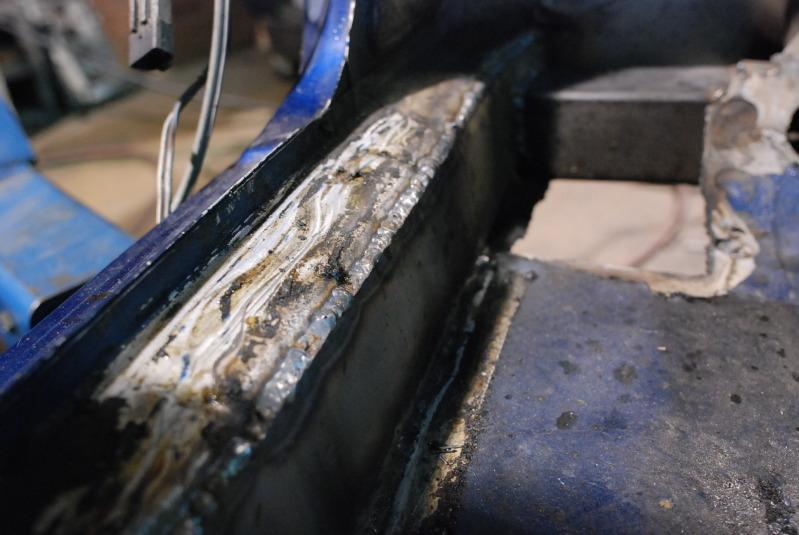
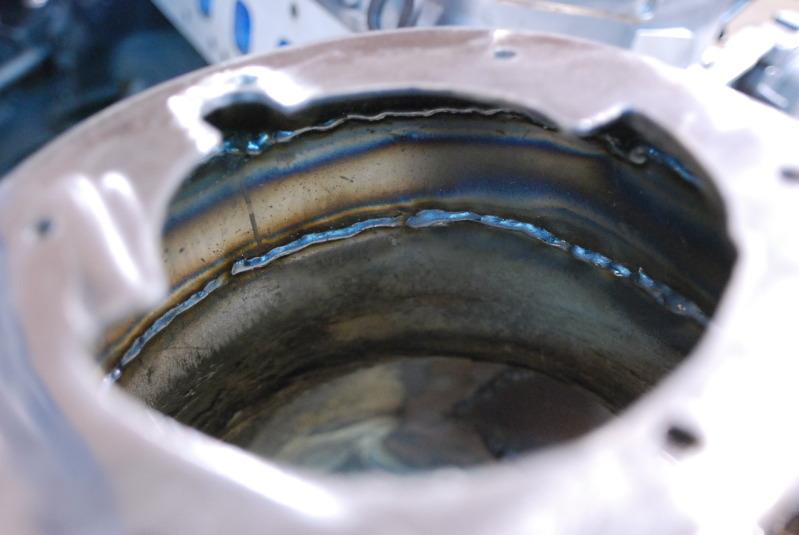
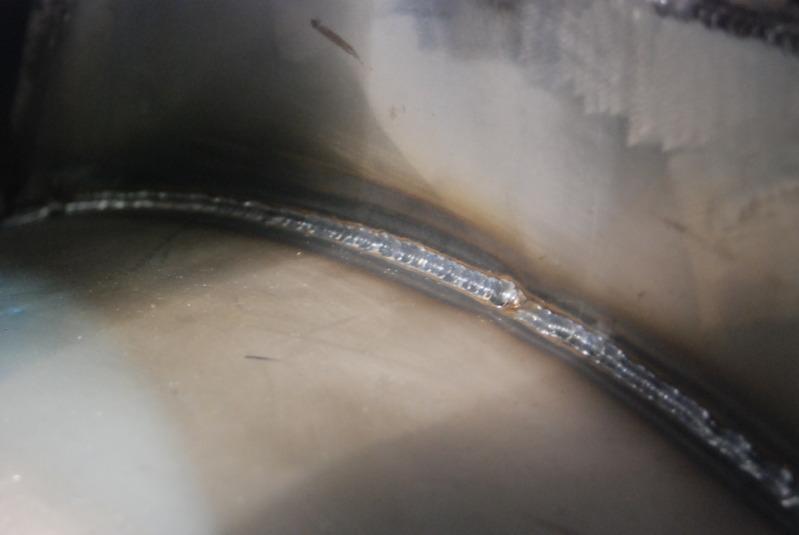
The money shots... Look at those dimes...
And one last shot from the top....
And speaking of dimes.... I think the guys have earned an extra 10 cents/hour for the amazing work... thanks fellas
10/27/2010
So got most of the bulkhead in place and welded in.... going to need to add some detail one way or another to make this work (aesthetically that is....)
Almost all in place... In the pic, the welded in bulkhead metal looks to be a huge piece for is only a few inches so not as hideous looking as the pic shows....

Had a gap between the two pieces of metal that was filled in...
10/28/2010
So my first ordered part of many to come  came in yesterday
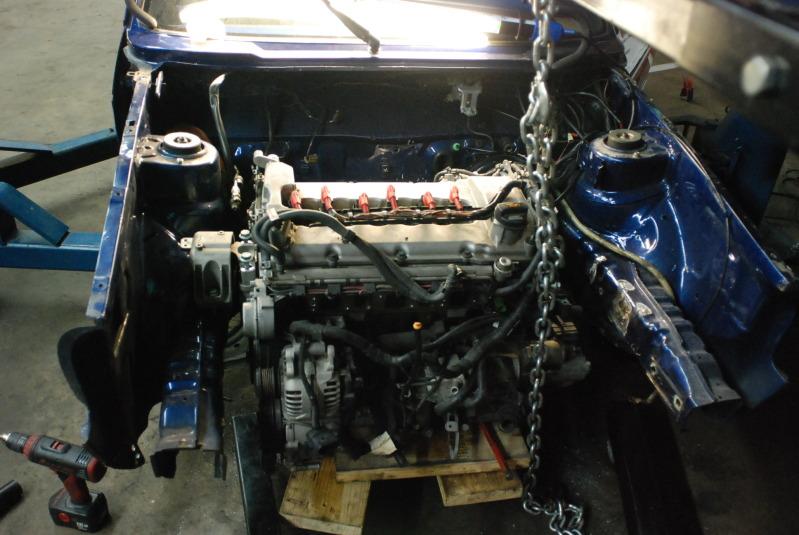
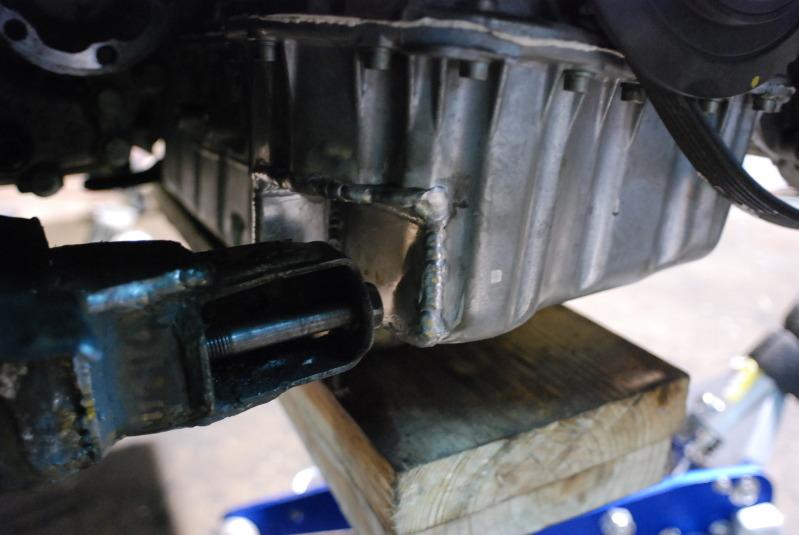
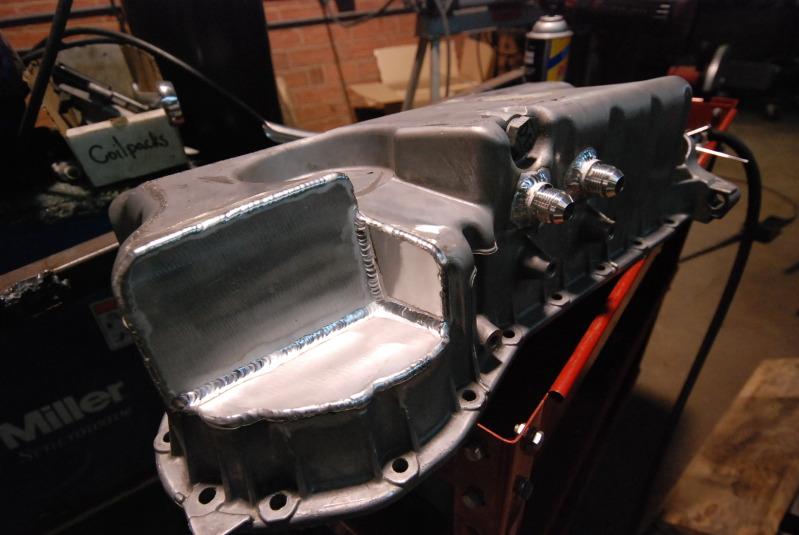
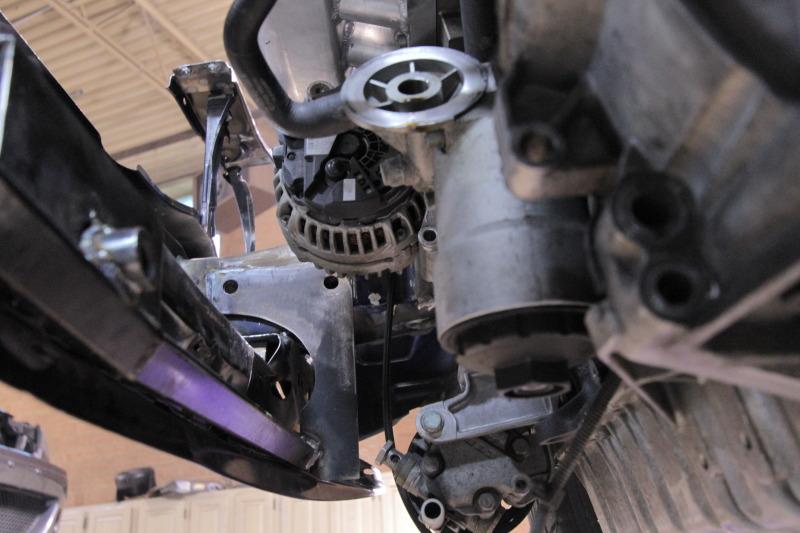
Motor is MOCKED UP into place. Oil pan sits higher than i expected... Whoo-Pee.. But basicly how it will sit...
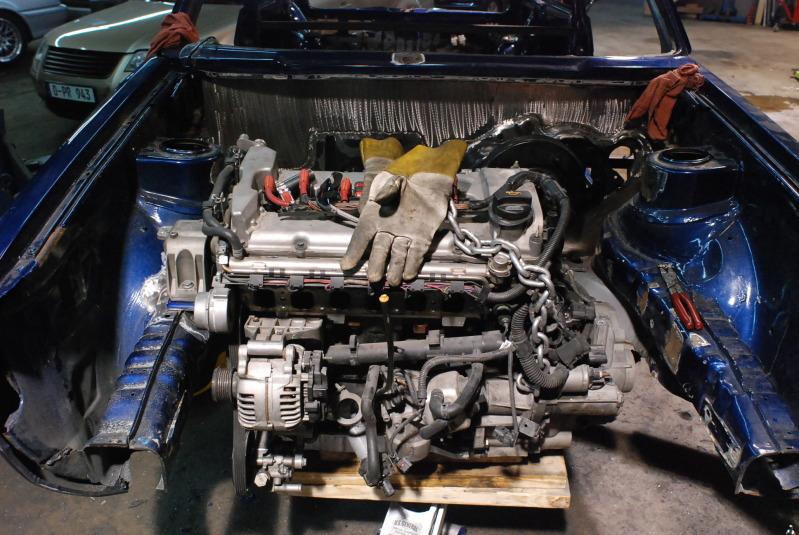
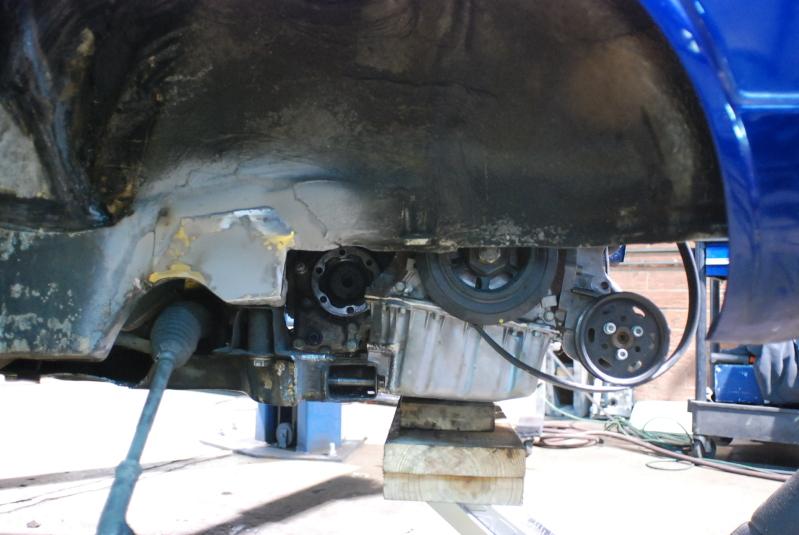
A few details... Courtesy of the control arm they had to modify the oil pan. Not sure how this will affect the baffleing capabilities of the pan
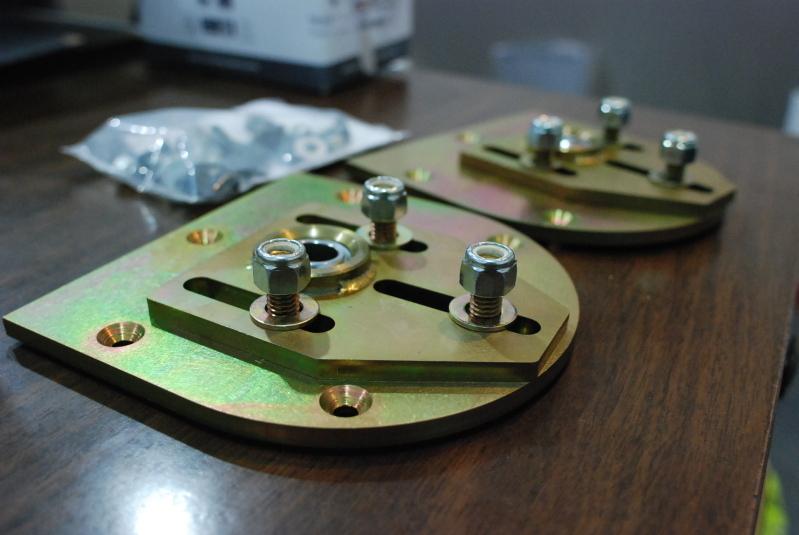
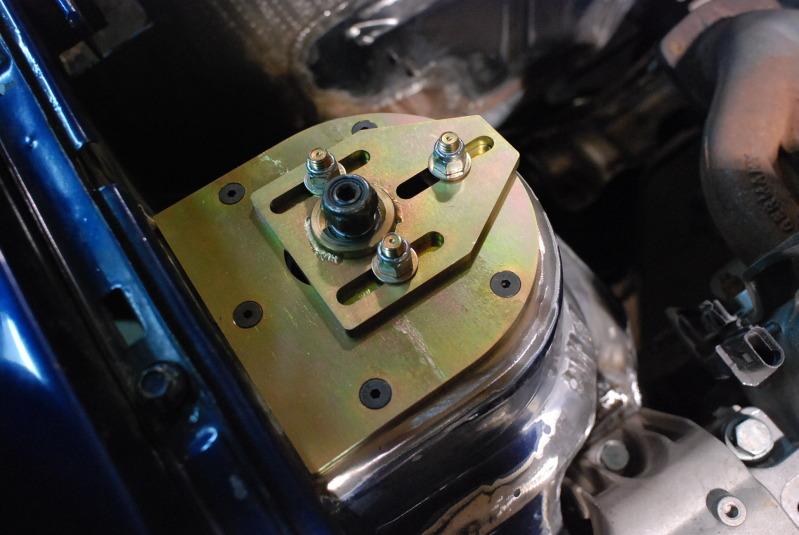
Keeping to the OEM + theme, they used the r32 engine mounting plates. I know the two different blues don't match....

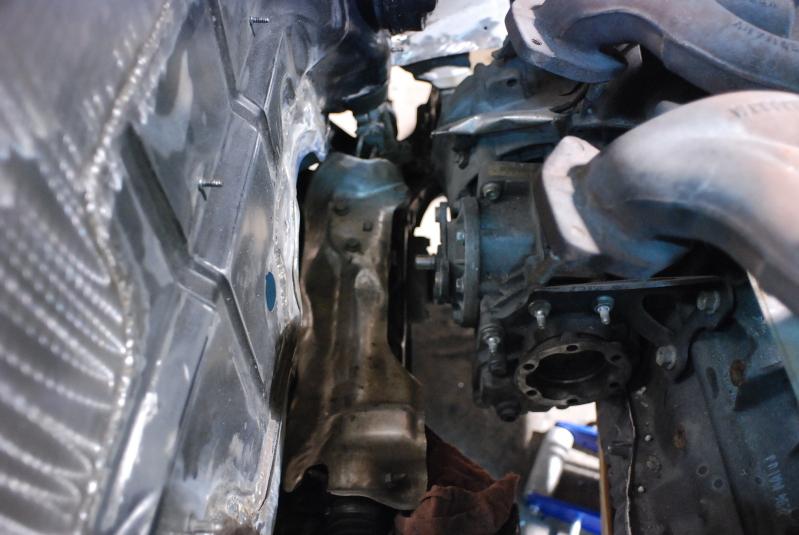
And from the r32
And what got my chub going..... The diff is looking spot on.... Looking good fellas
11/1/2010
Random stuff and updates....
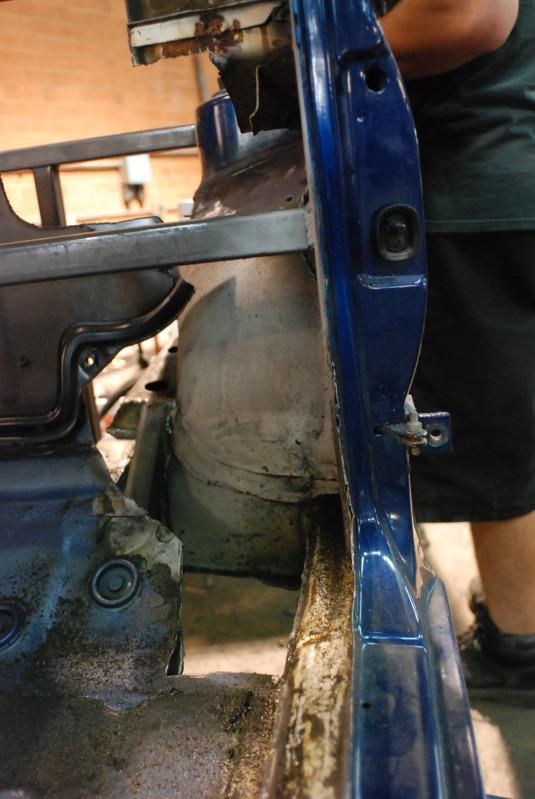
Everything had been pushed back about 3 inches from the firewall back so the motor could be positioned further back...
A pic of where did firewall use to sit in comparison to the new wall...
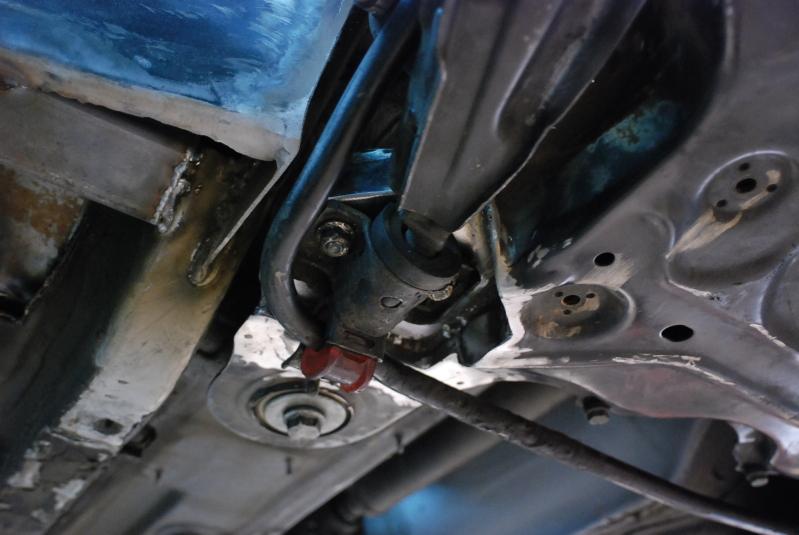
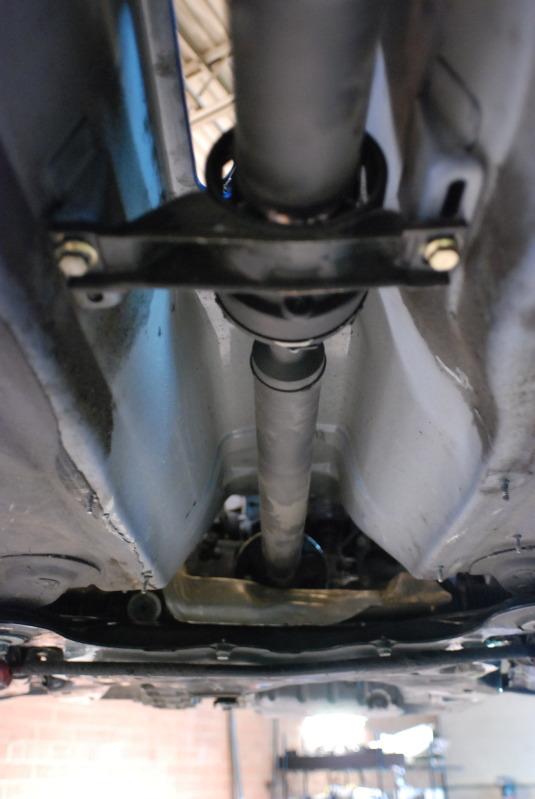
driveshaft is in... we decided to use reinforced zipties to keep it in place and will be running the shaft under the beam.....
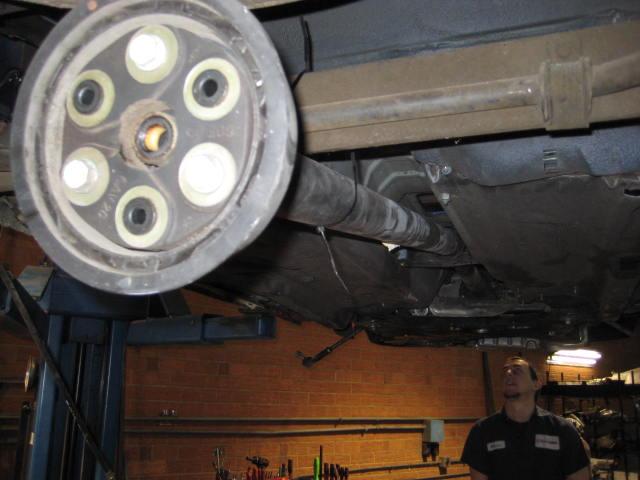
Drive shaft clearance for the tunnel
the rabbit got boned finally.... dogboned that is...
the electical guru himself Ronnie showing off how little the original harness is now...
And finally, doug, the only man i'd have sex with for his services!!!! Insane skills with all the metal fabricating..... Oh yeah, if you didn't notice, the motor is in now
11/2/2010
So the “dramaâ€Â I spoke of earlier involved the firewall. Once the r32 firewall was retrofitted into the rabbit I didn’t like the look. I’ve always liked the grooves and lines that added character to the bay. Too much I never liked, but too little I dislike more. There are only a handful of extreme shaved bays I liked and I don’t think my project could pull it off so here is where the drama lied… Mike didn’t have the appropriate machinery to do what I want so the firewall was left the way it was. After I exressed my great dislike Mike put his mind to work and made up a metal forming die. Good stuff Mike!
The best part is Doug, has no clue what Mike has done and I wish I could be there to see his face because he didn’t like my idea of extending the vertical lines…. He’ll get over it…
On with the pics…
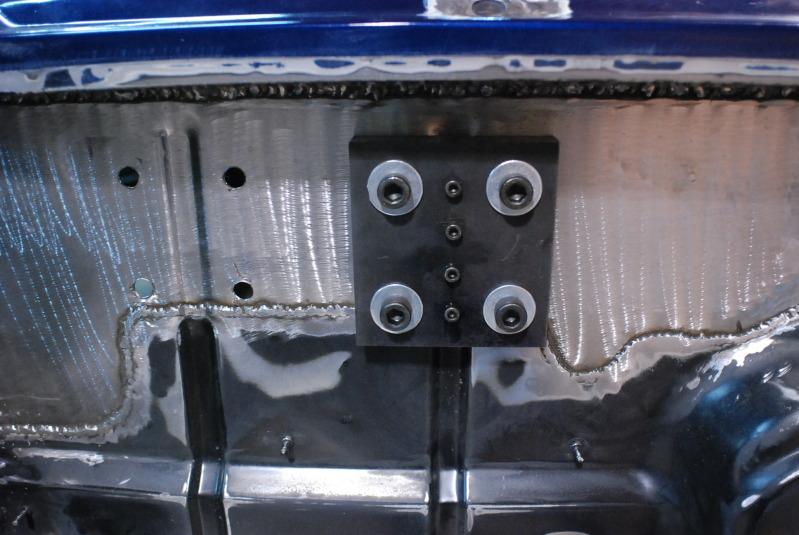
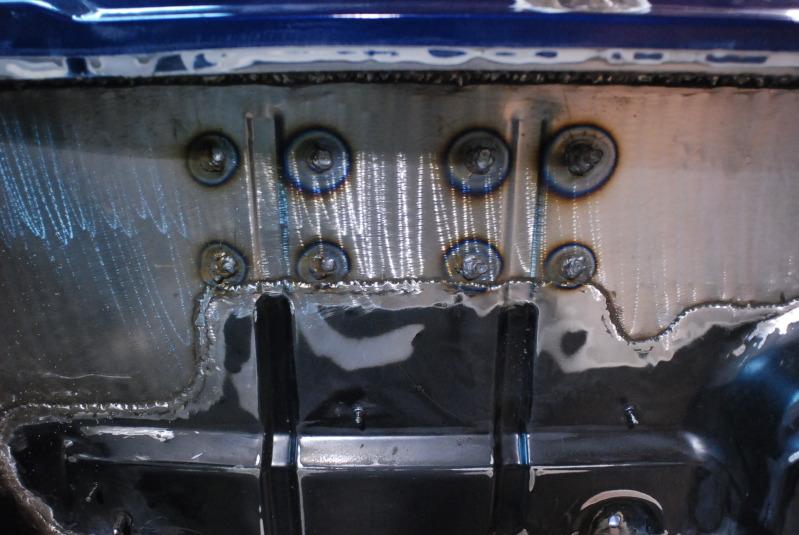
The firewall: The end pieces by up top by the hood latches aren’t complete but will be soon so please excuse the mess…. Anyhow, notice the two vertical lines that go up and just end. Now, the pics make the welded empty spaces look huge and they’re nowhere as big as it looks in the pics, but the little void kept bother me…
Mike’s metal forming die and how it works:
The overall size and weight is an amazing 25lbs and was designed to have the inserts removable and can be interchanged with other shapes to make different forms. He’s asian like that… 
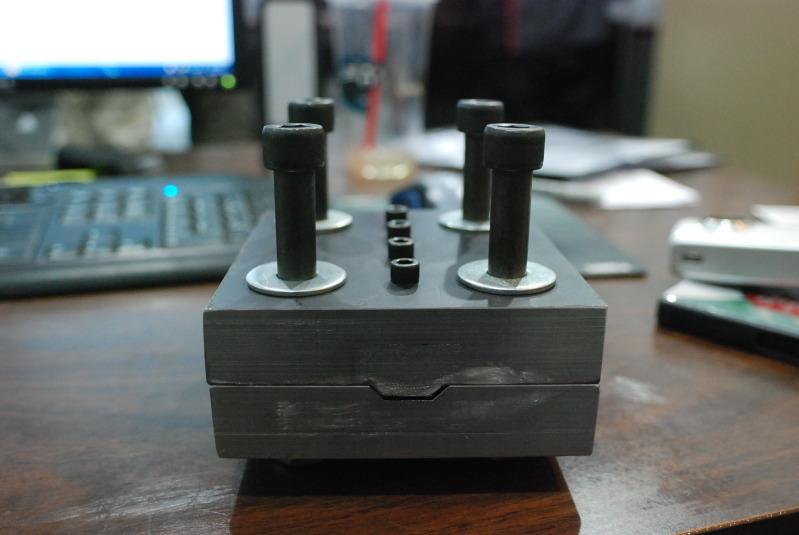
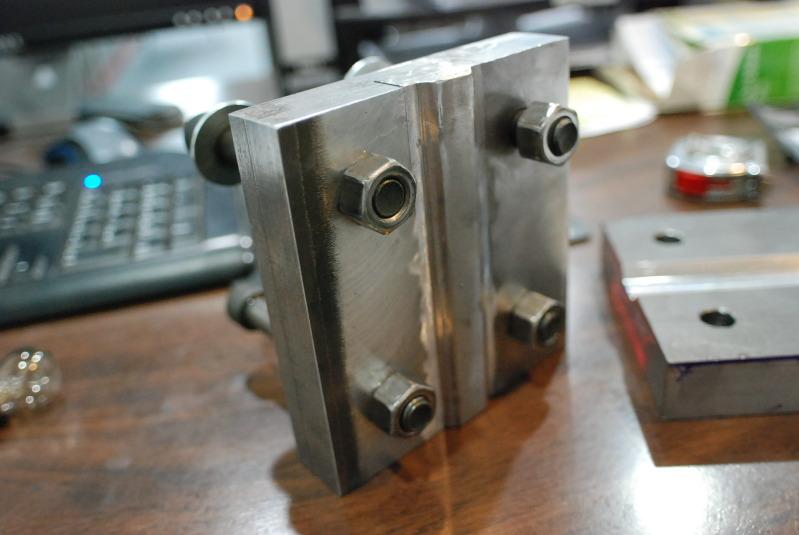
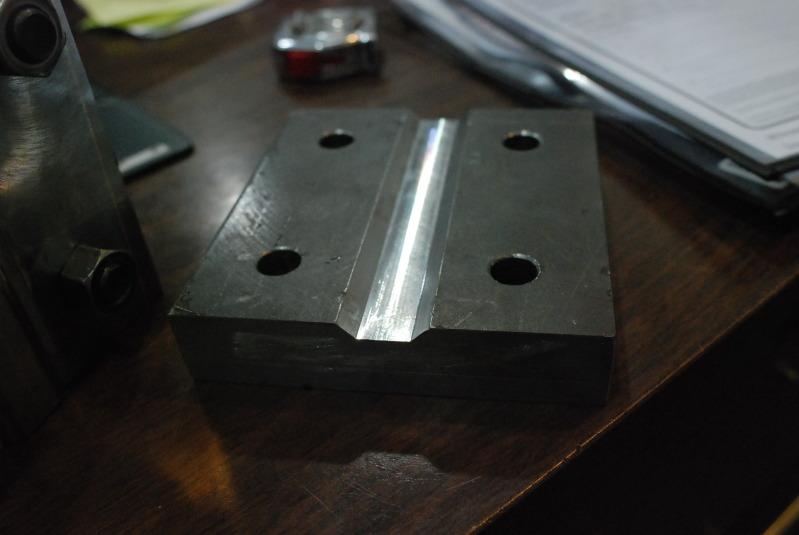
It easily stamped the 16 gauge sheet metal . Directions are as follows: Position tool and drill holes. Attach die and crank down on the bolts till both ends come together. Remove tool and weld holes shut, smooth welds and bam….
I know its a lot of work for such a minor detail, but I’m funny that way and Mike has been more than willing to provide what I’ve asked of him and his crew. Thanks homie, can't wait to give you that massage and buy you some Outback Steakhouse goodness Saturday...
11/2/2010
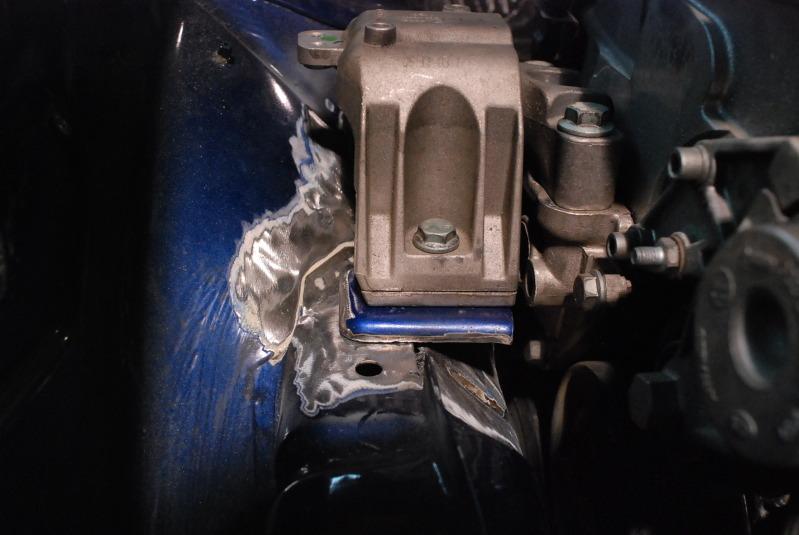
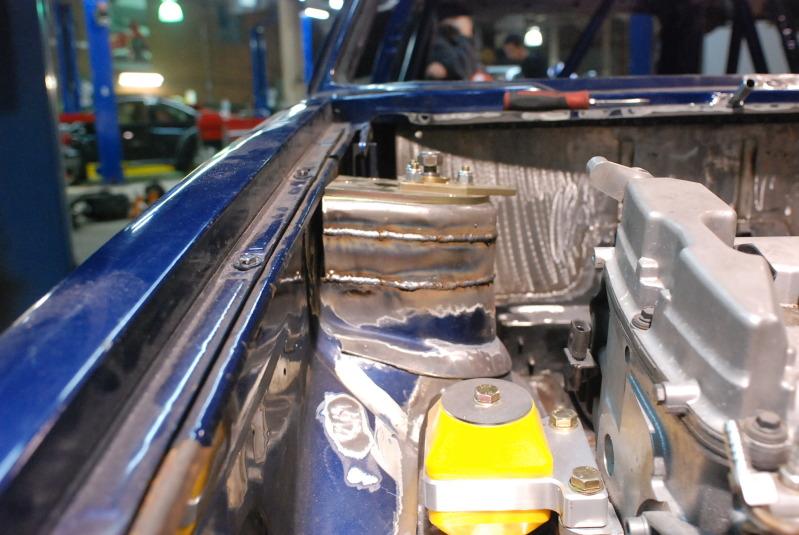
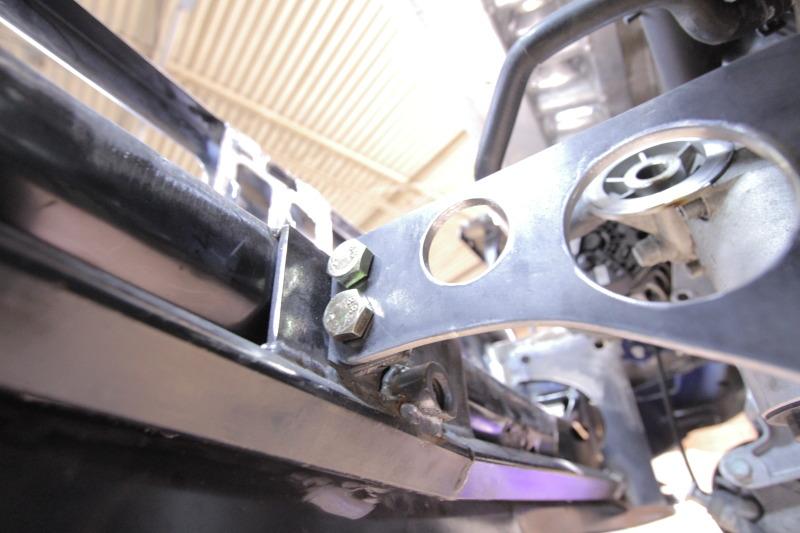
Engine mounts are finally set
So as many of you that have owned a vr6 knows the oil pan sits way too low especially for the ride height we have all come to fine pleasing to the eyes…. Having said that, Mike knew I didn’t want to compromise ride height nor practicality so the resolution was simple…… Keeping in line with the OEM + theme we have more eurowise goodness.
Driver side.
They machined a spacer to raise the height of the engine mounting point on the driver side so the mount meets the frame rail at the same point as the passenger side. Along with the pan sitting higher, think it flows better inside the bay in regards to engine symmetry…

They cut into the rabbit frame rail and tower.
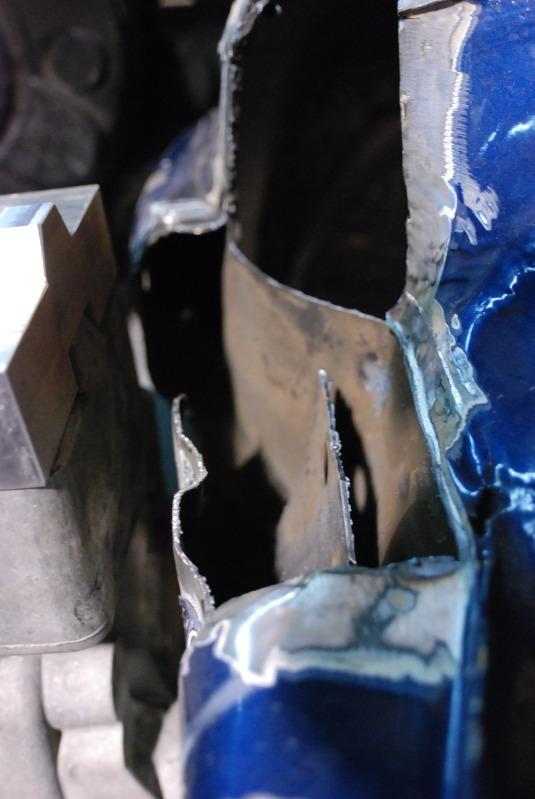
Then superglue’d everything back together…
And another angle of the driver’s side frame rail.
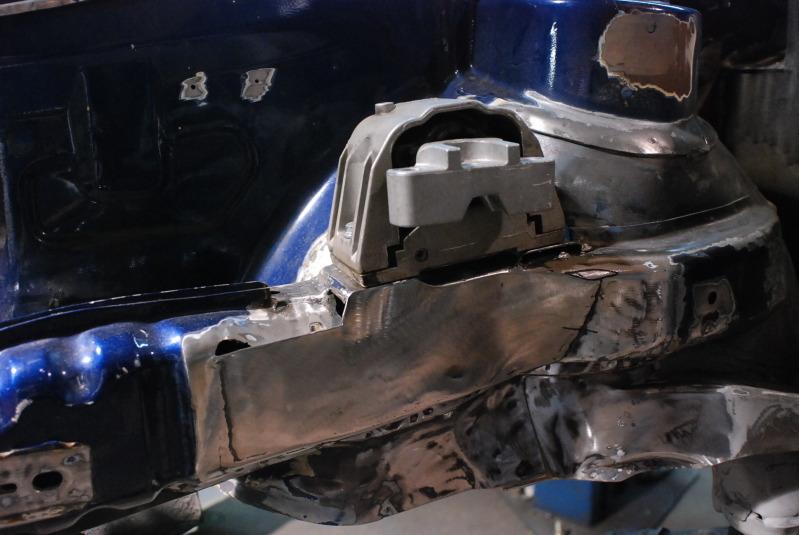
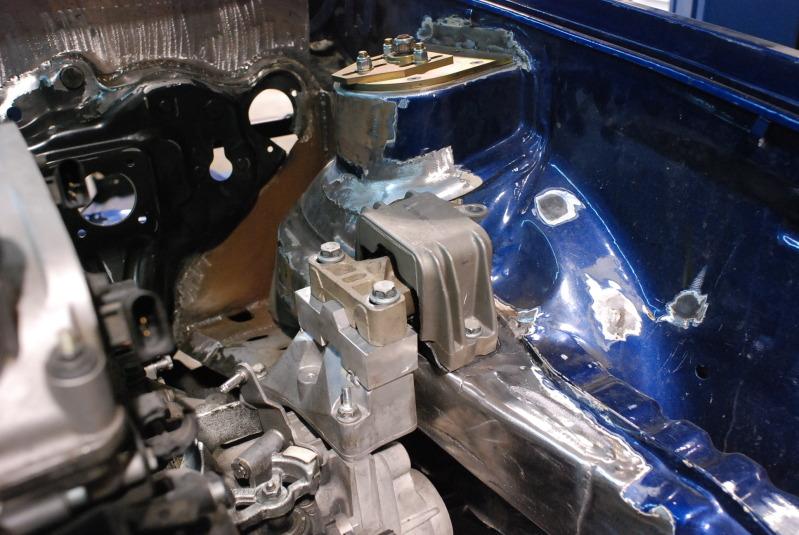
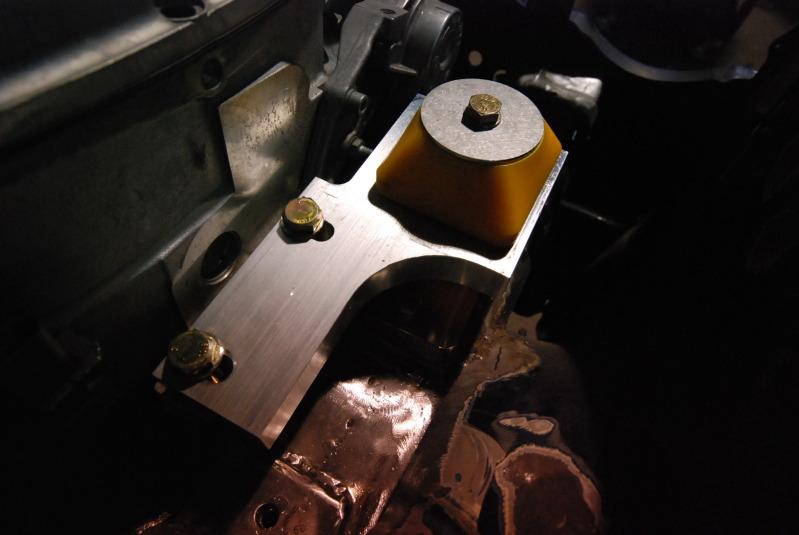
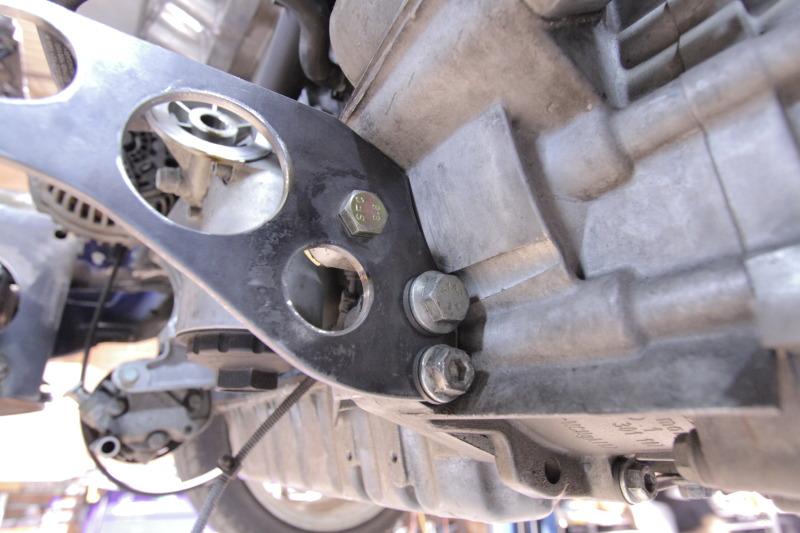
Passenger side…
A pic of the mounting point tacked in place to locate the engine. They also used\retrofitted the OEM R32 mounting bracket onto the rabbit frame rail.
And a pic of it reinforced and cleaned up a bit… Again, please keep the OEM + theme in mind.
11/8/2010
So it’s starting to look like an engine bay again…. It’s getting closer to permanent, even though everything you see might not be permanent….
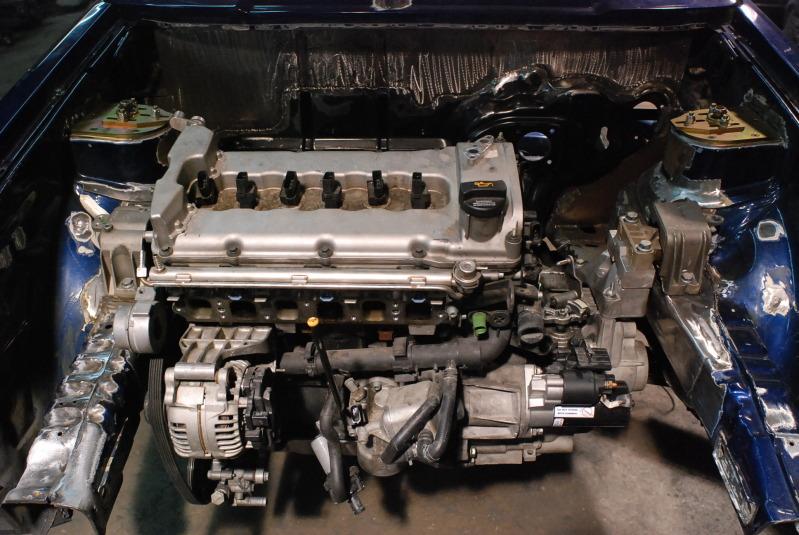
90% of the Driver side mount is done…. The spacer will be machined down to a more aesthetically pleasing pieces along with a few more things on that side of the bay…
Strut tower plates are in.
They got the r32 subframe with OEM intergrated a1 control arm mount and a1 sway bar mount installed
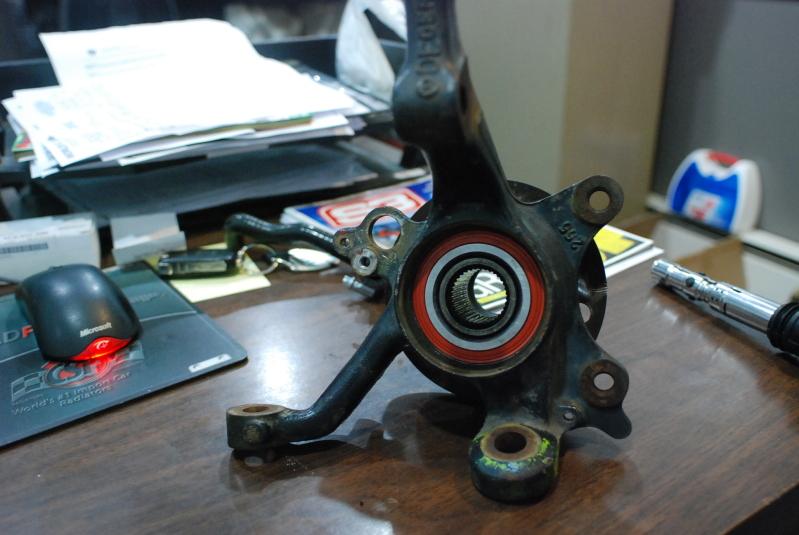
They got the spindle mocked up. The A1 setup you see in the pic will NOT be used…. After machining the hub with a bearing that gave way one weekend on the track, I think I proved the a1 spindles are bunk for any weekend-event intense driving…
And finally the driveshaft bolted up to the stock OEM r32 location.
11/10/2010
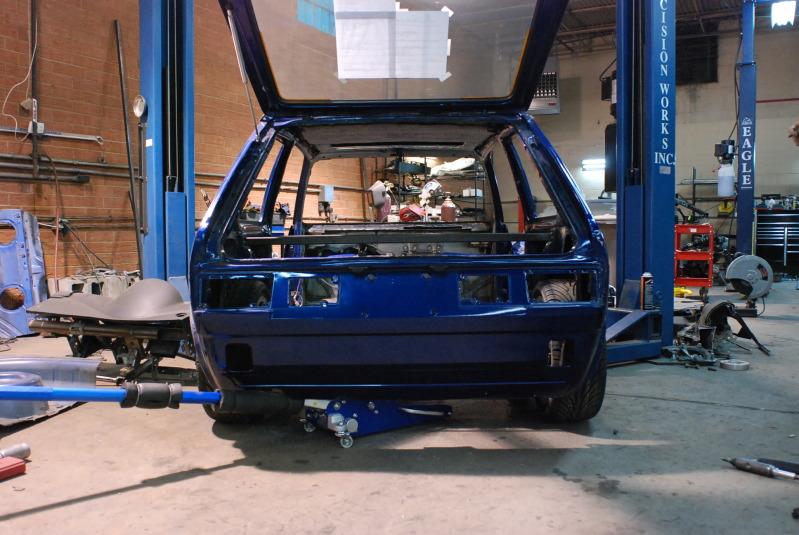
The ass is gone finally....
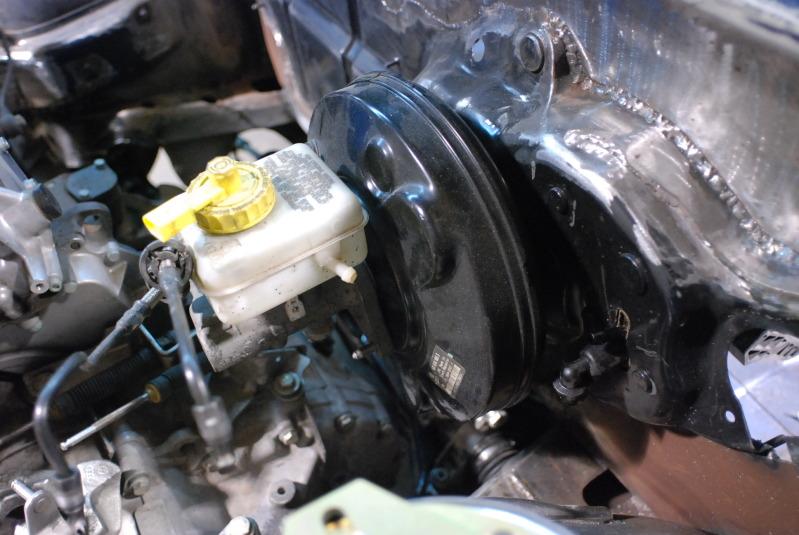
The brake booster bolted up.
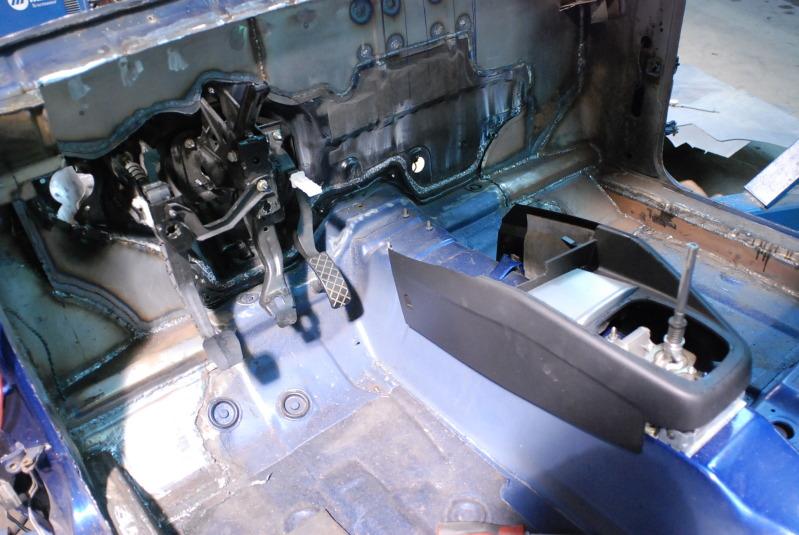
Pedal cluster is in. Complete r32 setup...

And finally, getting everything in place so the cupholders can be mocked up.... YES, you heard it here first.... MKAY4 cupholders in a rabbit.....
11/11/2010
More booty talk...
Measuring from hub to hub the r32 is 2.5 inches wider than the rabbit suspension.
So the plan was as follows... shorten the control arms, the axles, and narrow the r32 floor pan so everything will bolt up and fit just like an oem r32 suspension. even the rear spring seats will fit in the OEM pockets.
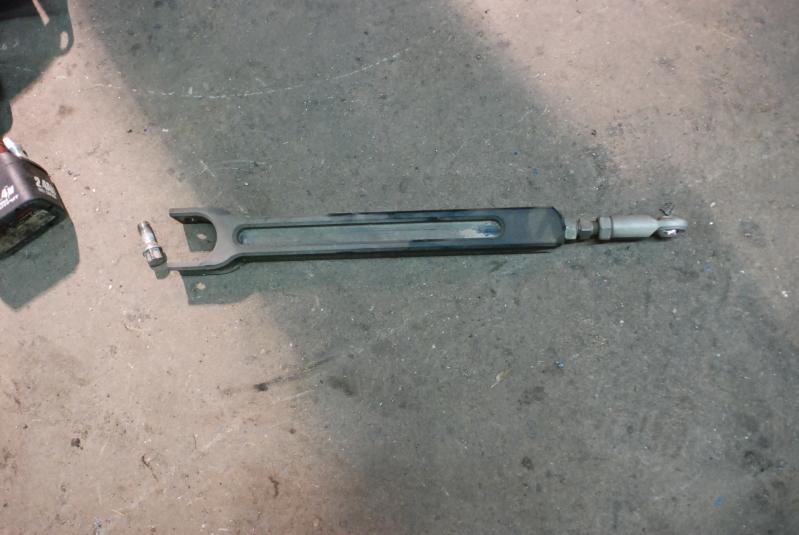
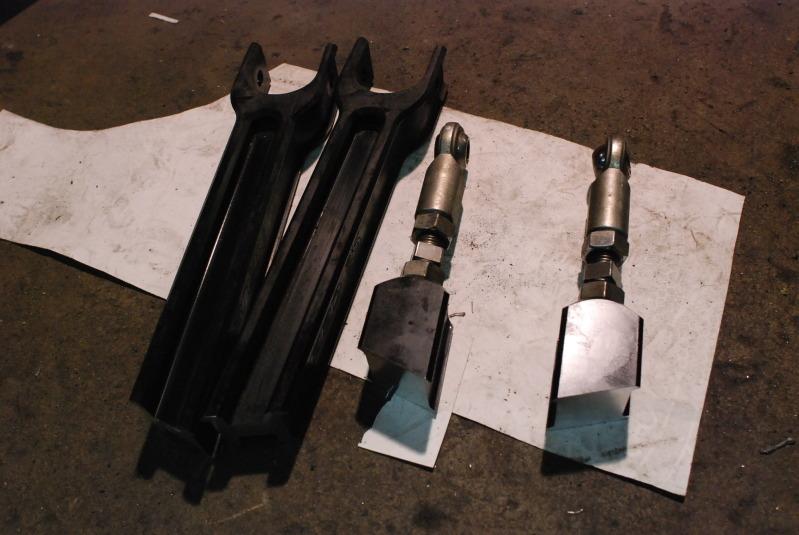
shot of the rear upper control arm before modification
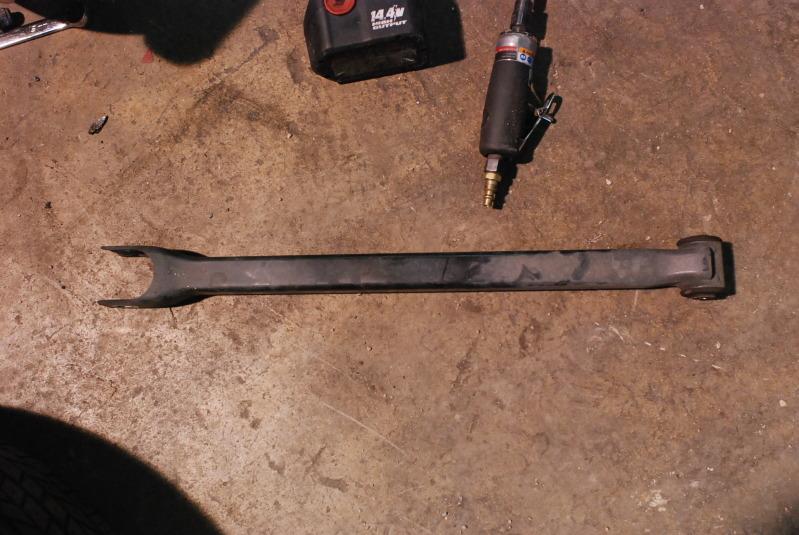
shot after shortening to show how much will be removed from each side
the inner control arm was cut offset, so tto get the caster back to spec
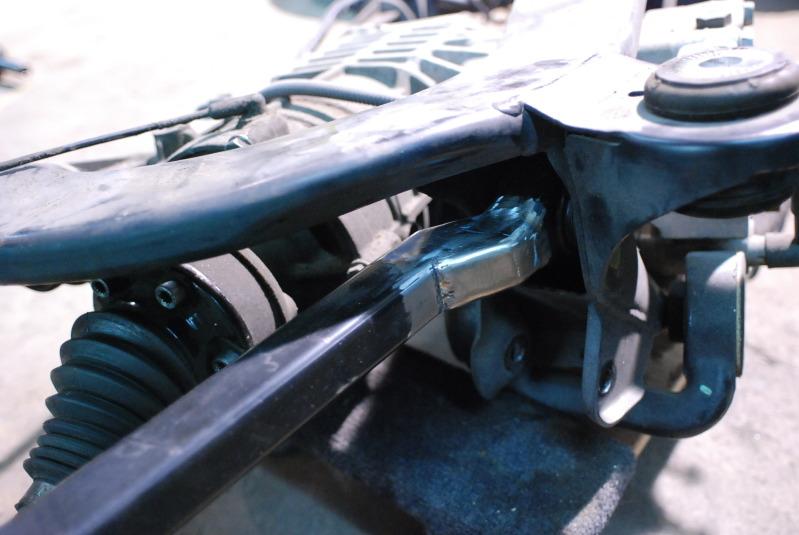
top angle showing the control arm installed with the offset modified. notice the axle sits straight now
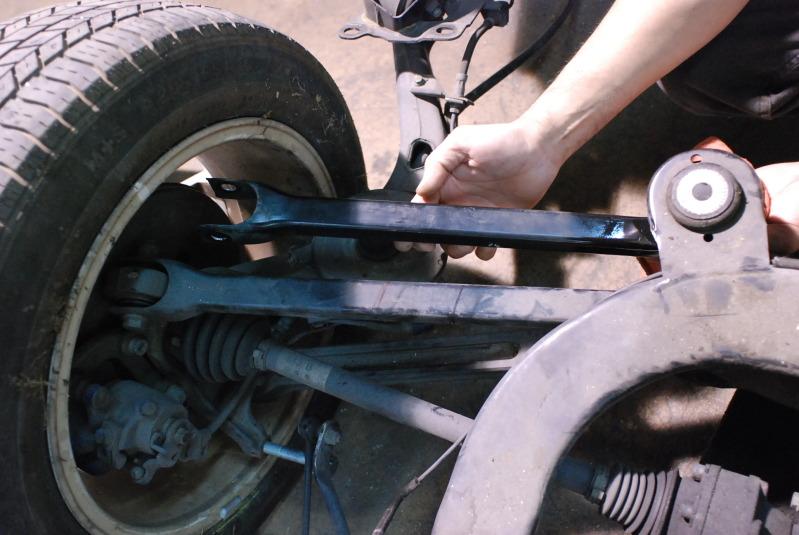
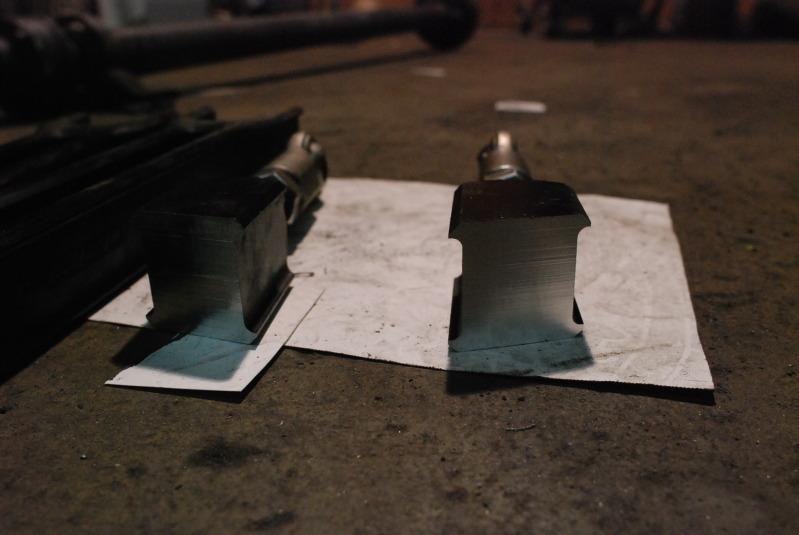
shot of the adjustable lower control arm
They machined and sectioned it 2.5" shorter and then they will either super glue or tig weld it back together.
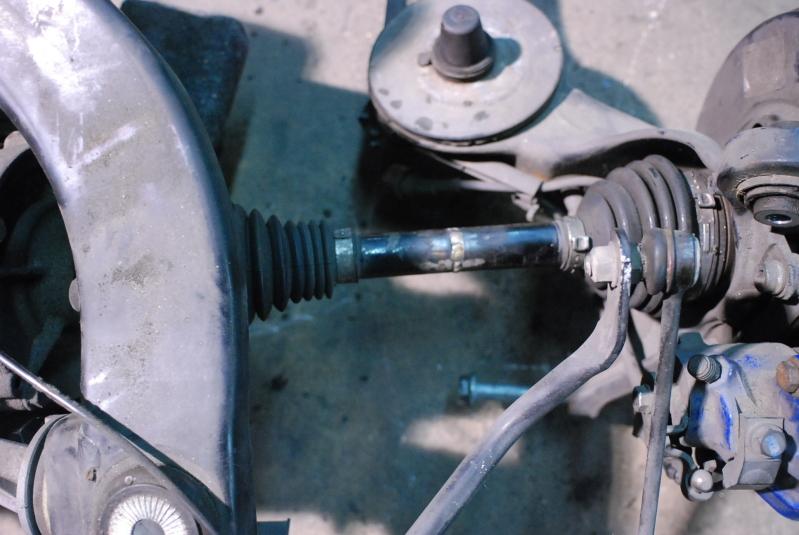
For mockup they modified the factory axles until proper length was achieved and all had smiley faces. Then they'll send off to have custom axles built to withstand the horsepower goals..... (goals directly porportional to how many years of ramon noodles i'll have to eat.... )
passenger side axle shortened.
11/13/2010
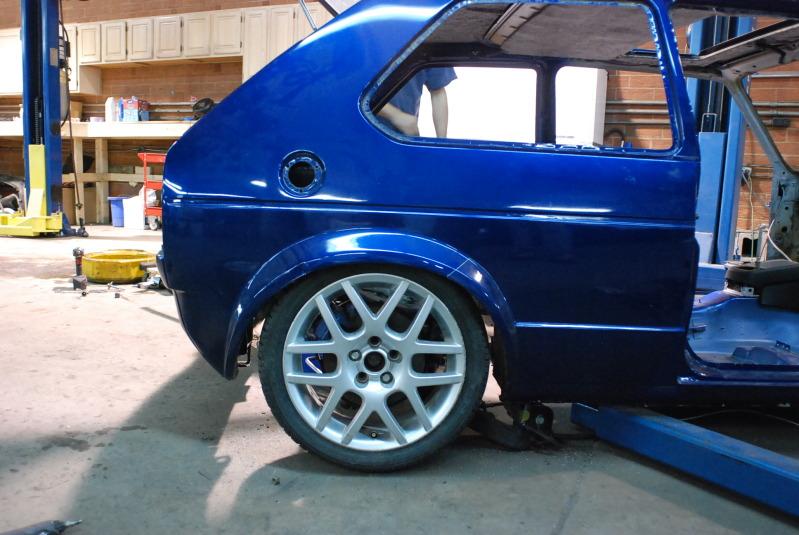
So.... Got peeps showing up here at the house for the UFC fights so a quick post... No details necessary, however, not these particular wheels, but get use to seeing 16's on this car.....
11/15/2010
So it’s getting closer and closer every day. Again, I can’t thank Mike enough for having the sense to agree and take on this project…. He was scared and whimpering like a 10 year old nun in a Italian brothel house once I laid down what I wanted, but after my nonstop coaching, he grew a pair, and he has made me a proud client….  You and the rest of the eurowise crew are, and will continue to be, something and someone(s) the rest of the automotive community can be proud of! So enough of my ass kissing and back to what you guys really care about…. The build….
Its not how big a shaft you have, but what you do with it that counts….. The driveshaft was shortened then insert was machined for strength…


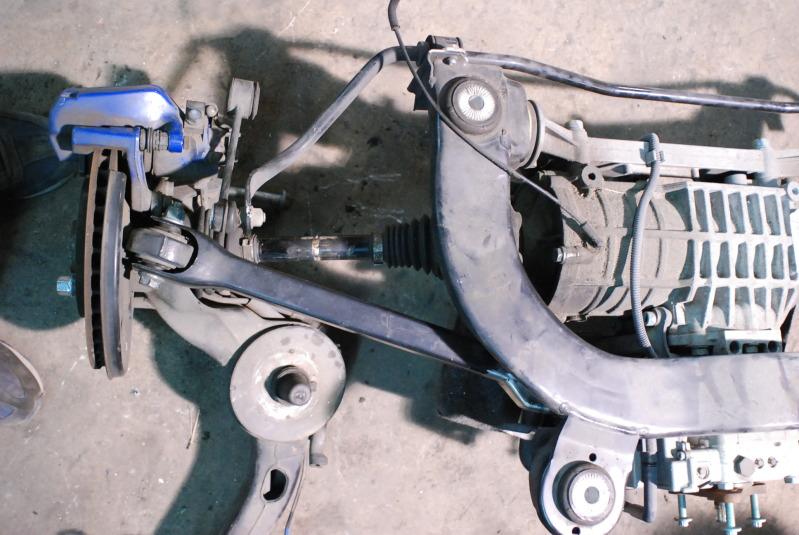
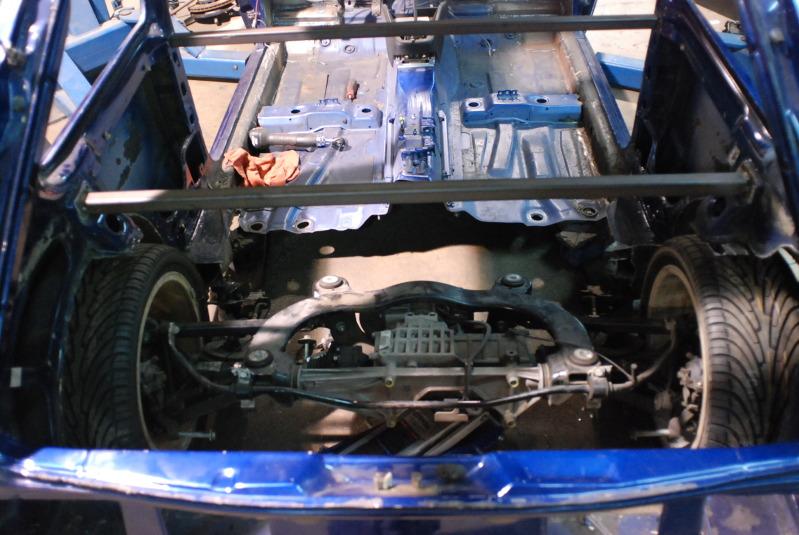
So, from the factory the R32 wheelbase is approximately 5 inches wider. The complete R32 rear suspension and axles has been narrowed to be exactly the same width as the mk1 rabbit to fit the body.

The rear end was then mocked into place with the r32 floor bolted to the r32 subframe.

They then checked for clearance issues, measuring, measuring and more measuring and planning, then a little more measuring…. 
Using the rear support brace they welded in place to keep the body straight, they squared up the rear suspension assembly and welded the square tubing to the sub-frame to hold the assembly in place.


They finished playing with the shaft and got it bolted to the rear differential.


And some shots of the rear end from the outside. You can see where they have the trailing arms\spindle assembly mocked in place. It's home will be bolted to the R32 floor pan just like it did from the factory as well. This complete rear assembly will be removable and serviceable…

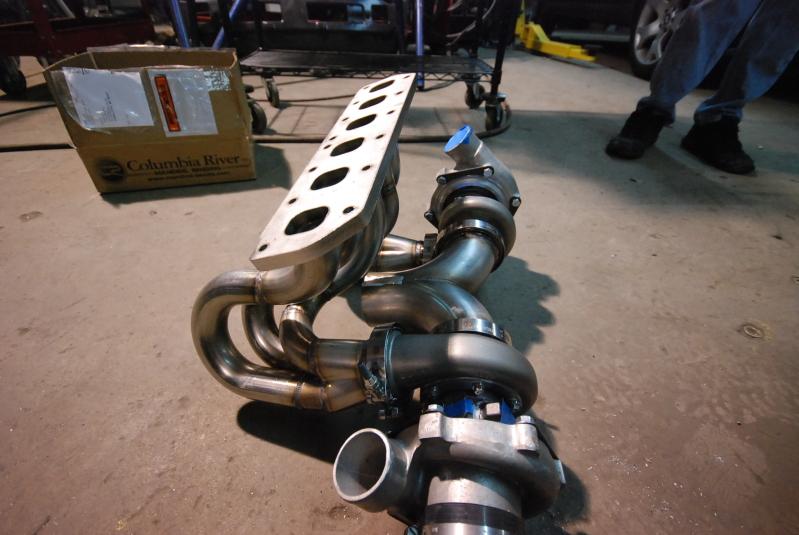
And finally, they got the parts in for the custom short runner manifold….
Again, IF ANYONE KNOW HOW TO GET A HOLD OF JAROD (AKA XKROMX). PLEASE MESSAGE ME IF SO…. THANKS SO MUCH!
11/22/2010
So was up at charlotte over the weekend and basicly got harrassed by a bunch of yahoos.... 
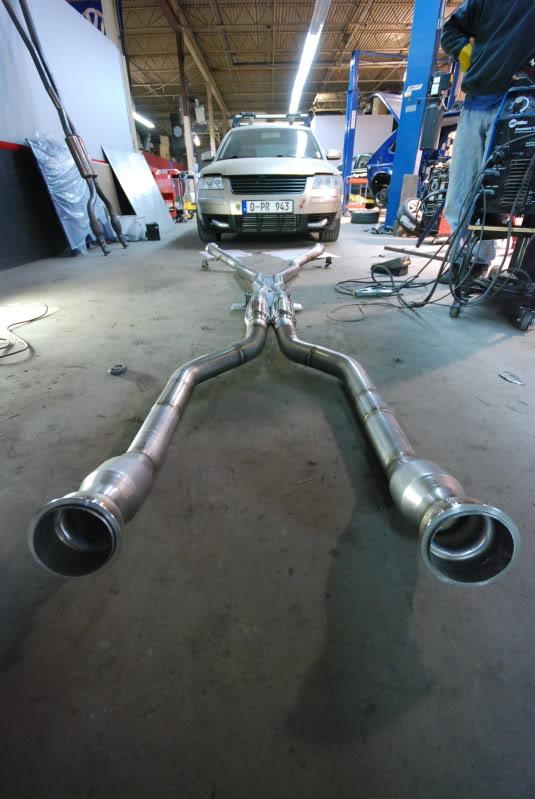
So here's some eyecandy...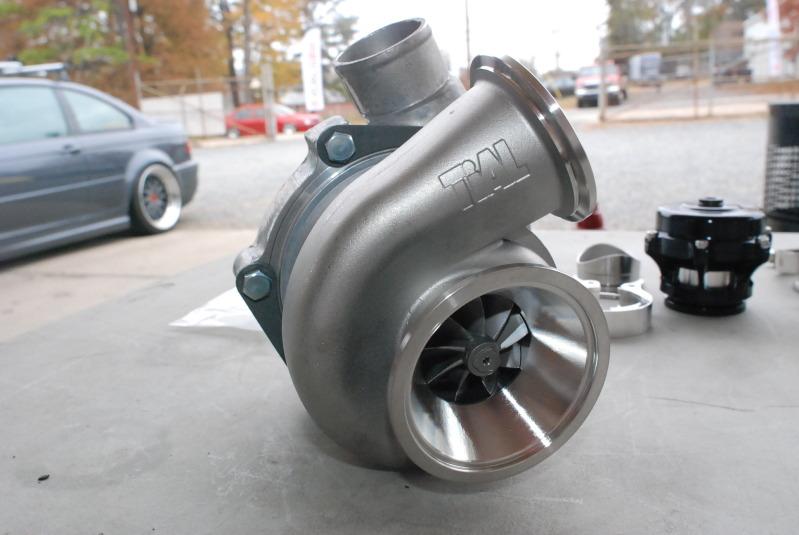
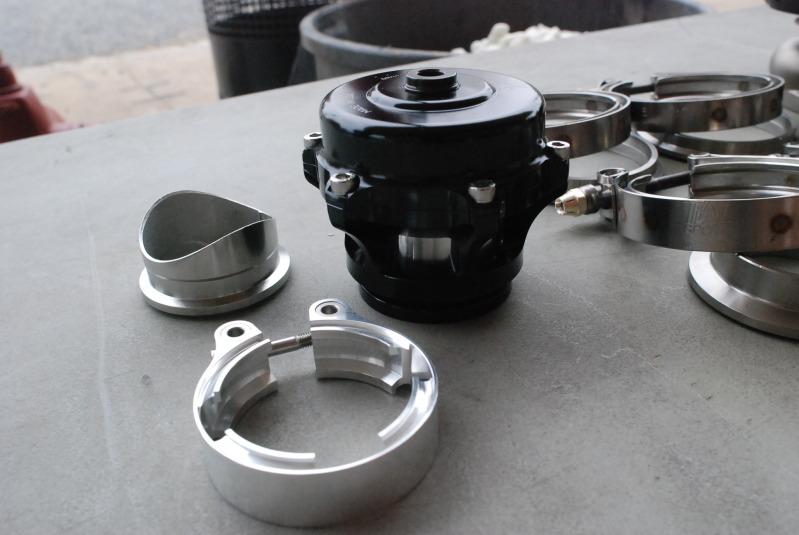
And all of it together.....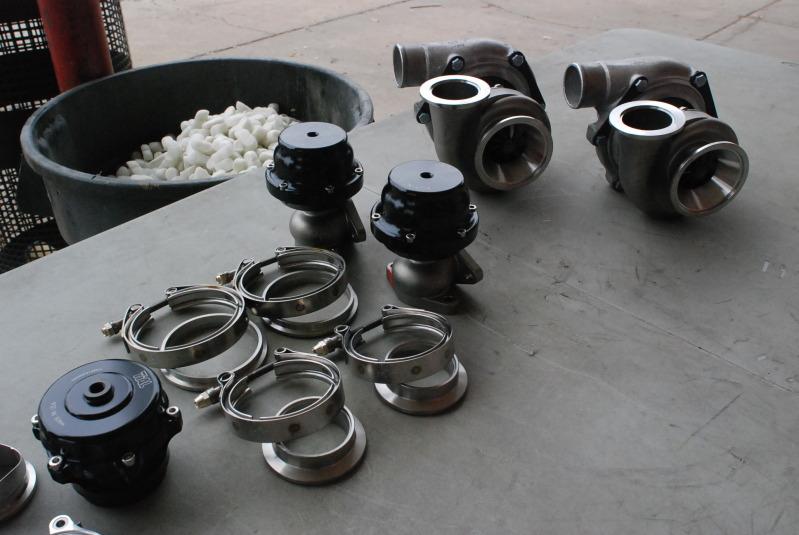
We're aiming for 200 whp......
12/1/2010
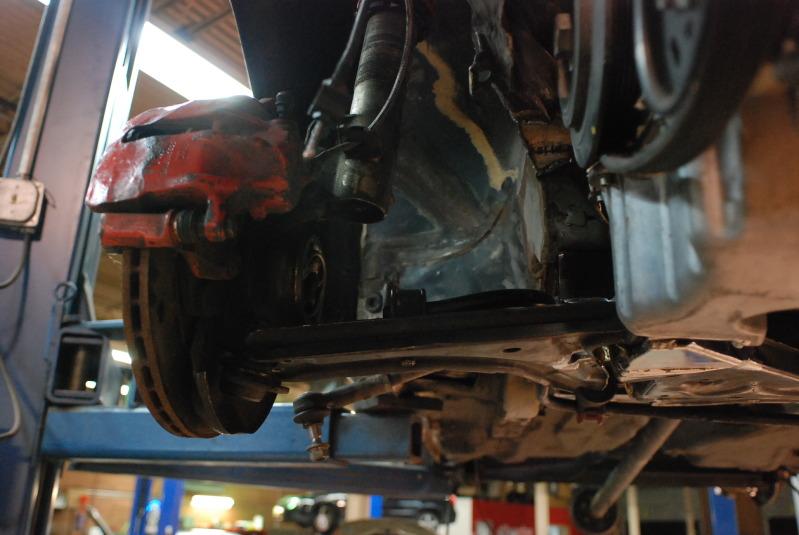
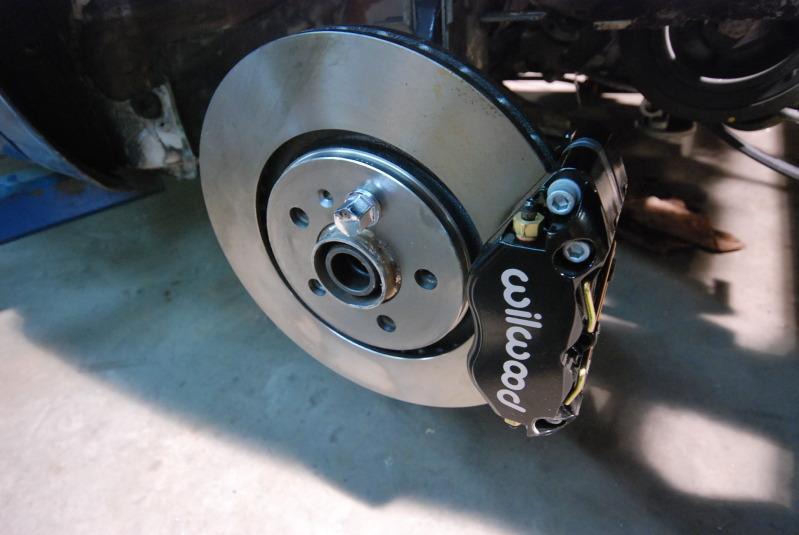
Custom modified mk3 VR6 spindles, with custom machined R32 hubs, VR6 wheel bearings, machined strut brackets to accept mk1 coilovers.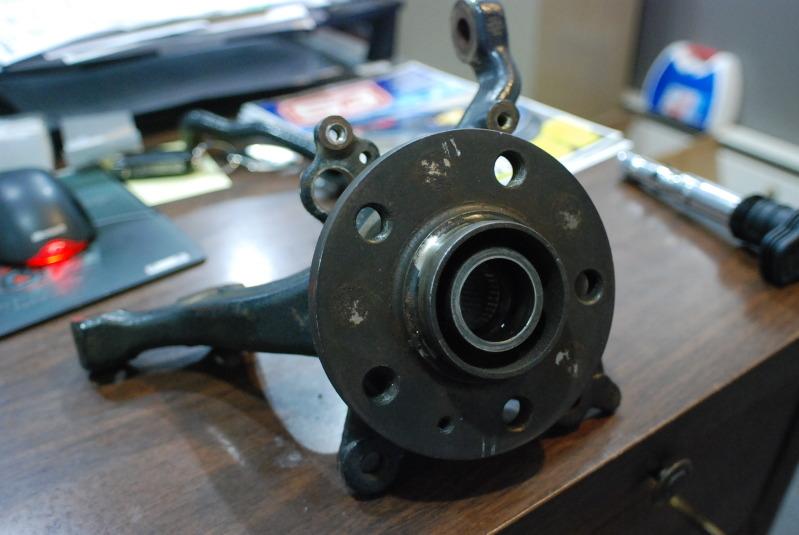
The front suspension spindle bolted up and modified vr6 ball joints.
They mocked up the spindle and suspension.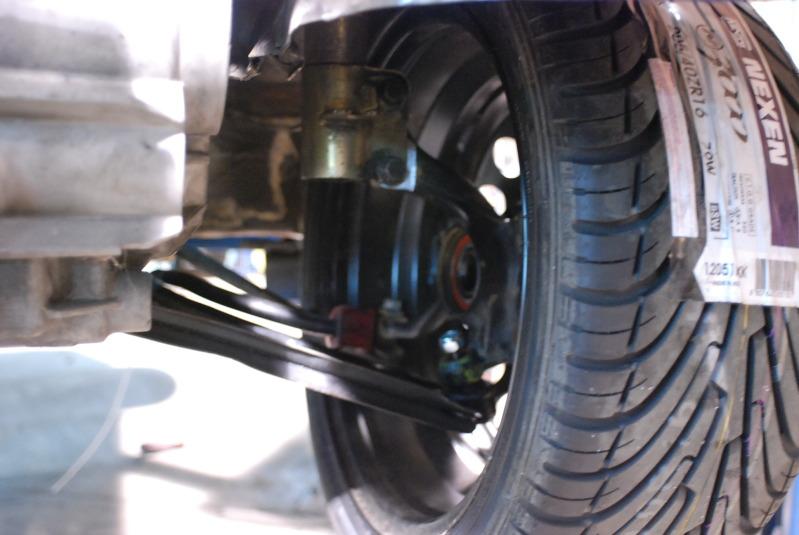
As for the back in…. Since the original rabbit wasn’t designed for this setup, eurowise went through the rear, as they have the entire car, and welded 1 inch square tubing like shown here in the picture below. Obviously a good bit of weight has been added, but well worth the support this little bunny will need in the months to come…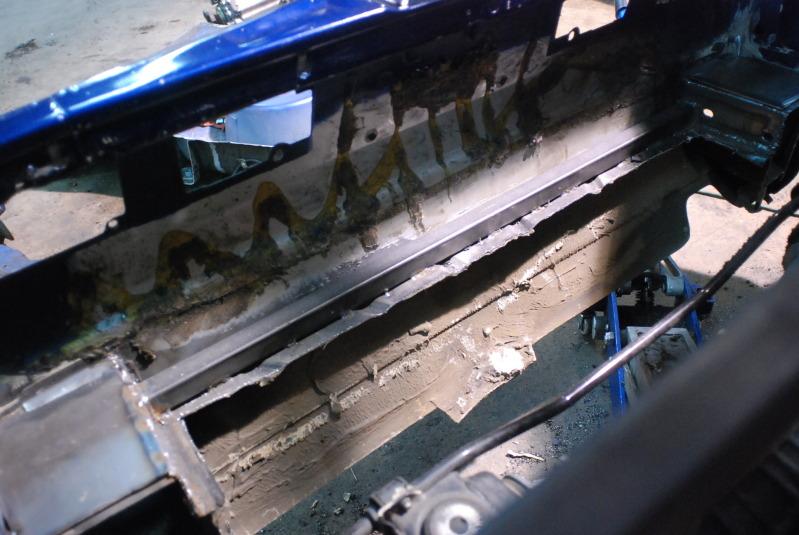
They went back and boxed it in with 12 gauge steel.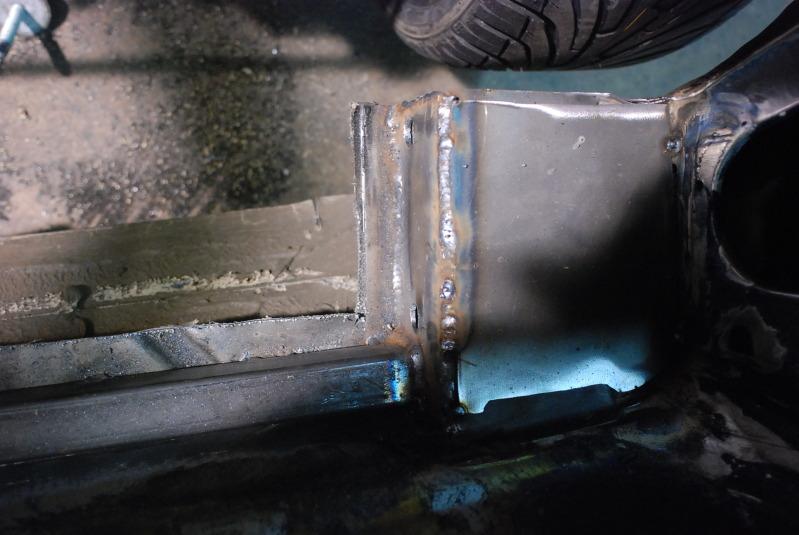
Since the r32 is wider overall and we wanted to utilize the OEM rear floor pan to flow with the rest of the body, they had to section the floor into 3 pieces shorten it and weld them back together. Much like doing a chop top, that I’d like to call a half ass… 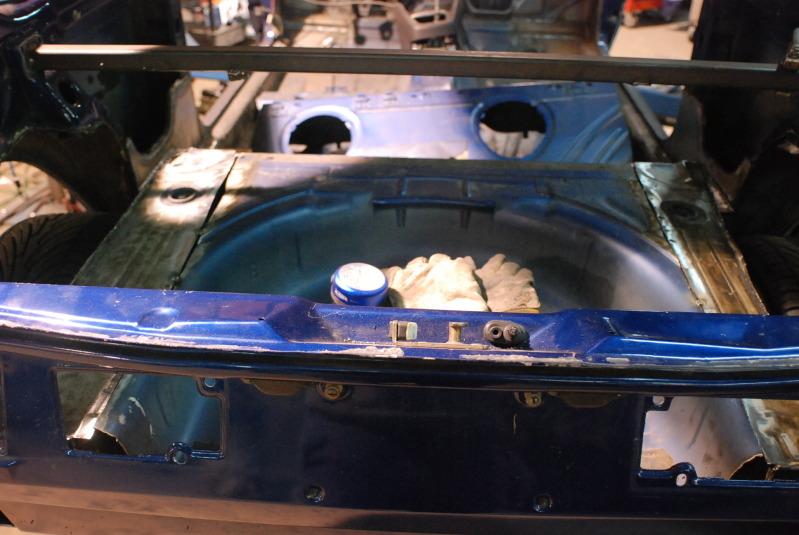
Doug wrapping up the rear floor, welding and grinding down to make it look like 1 seamless floor pan. 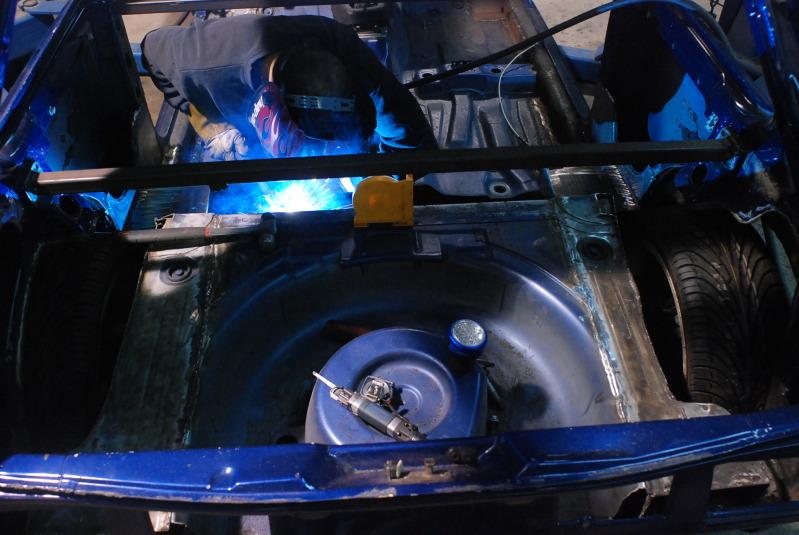
After speaking with mike, there’s a good chance I’ll probably stick with a 15â€Â wheel, but a random shot of the rear 16â€Â wheel tucking…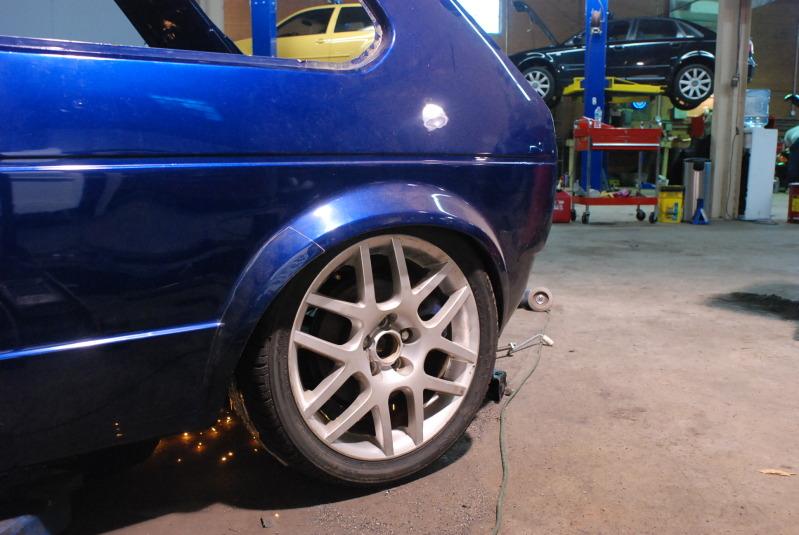
Thanks to Black Forest Industries for providing these beautiful complete performance engine mount replacements.
The transmission mount was machined and modified because BFI does not offer a transmission complete mount replacement at this time…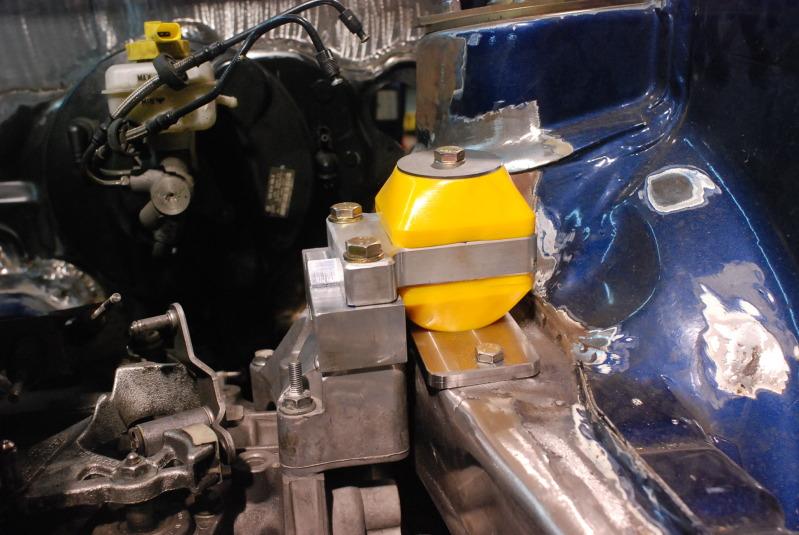
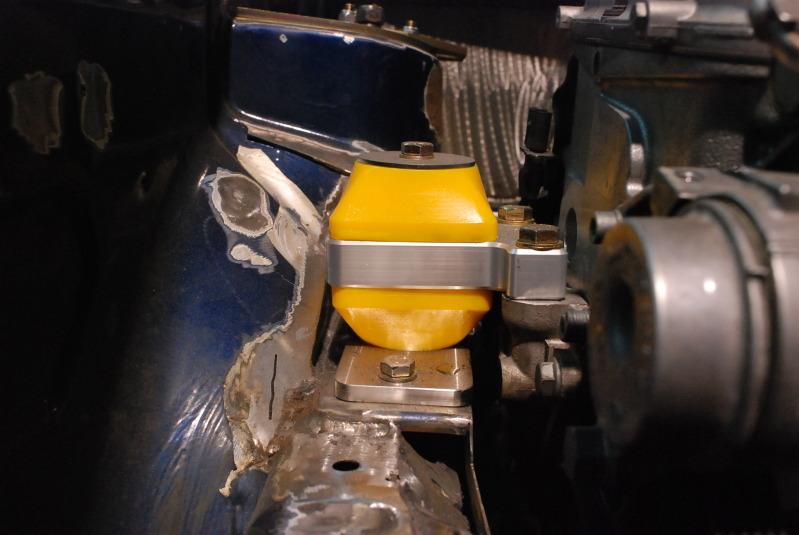
How the engine sits now completely bolted in.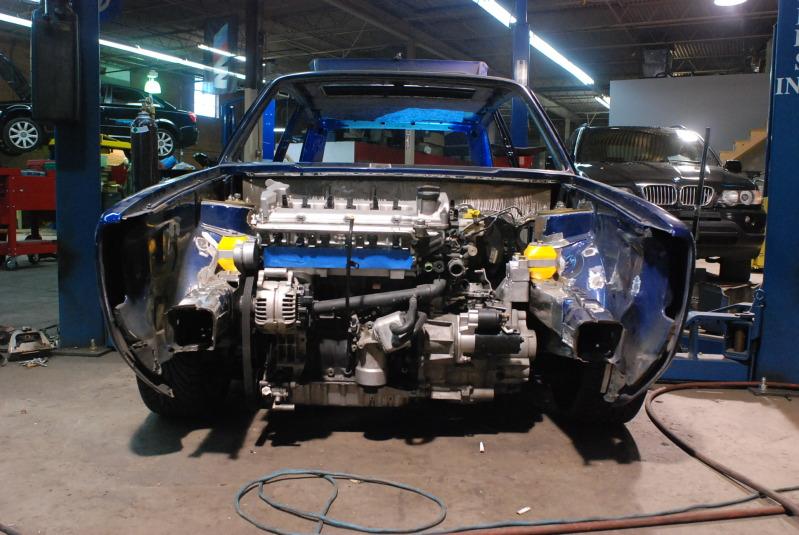
And finally after 2 month we finally have an mk1 r32 AWD rolling chassis.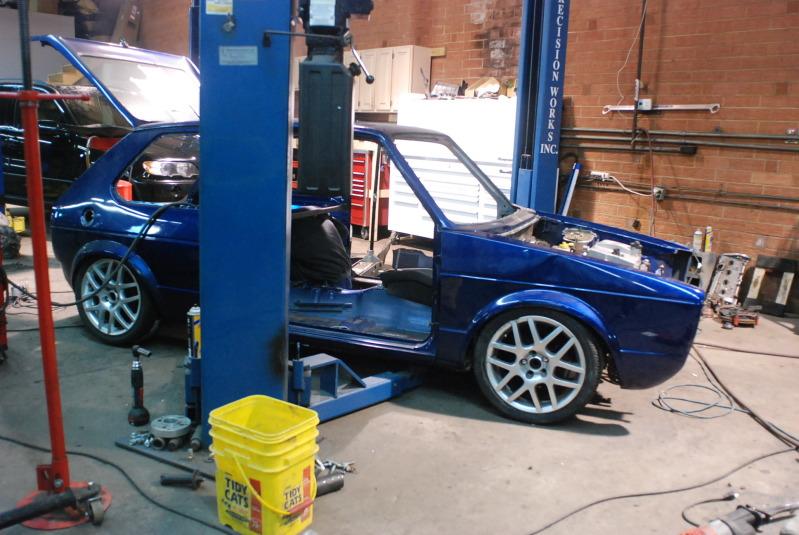
All I got to say is…
{singing voice}I love what you do for me…. eurowise{singing voice done} 
12/2/2010
So here it goes... eurowise got a ton done, literally!!!!!! I've decide to give them all another 10 cent raise
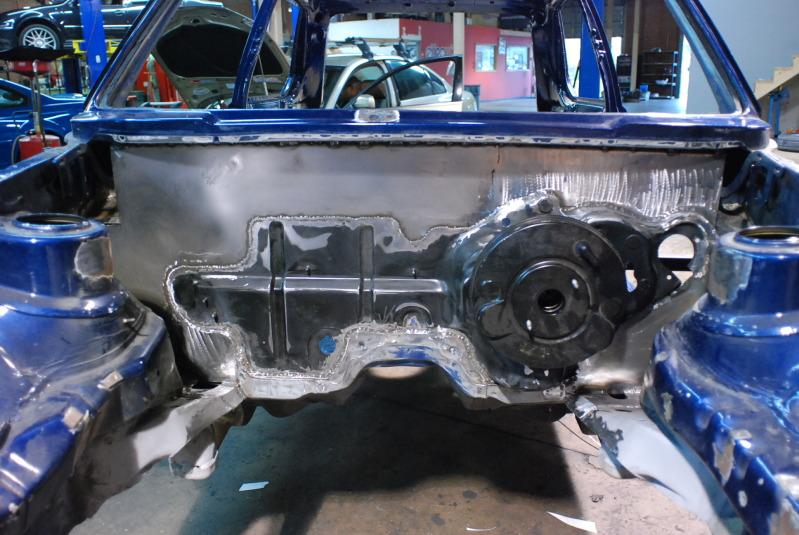
Here is a complete underbody shot of the rear subframe \differential bolted up in its new home.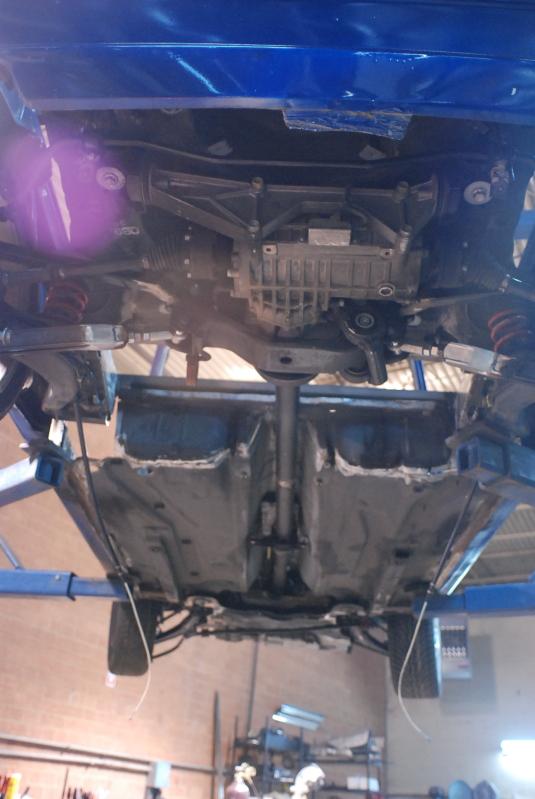
Closer shots of subframe\differential bolted up.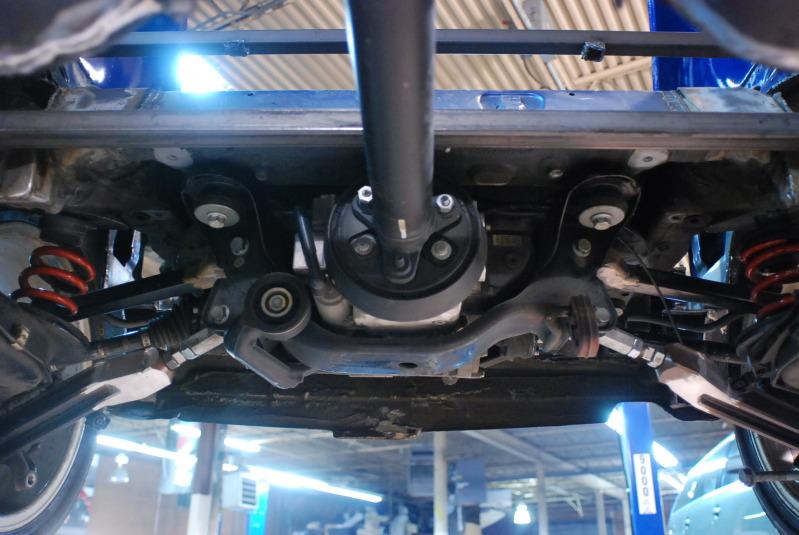
A passenger shot of the suspesion.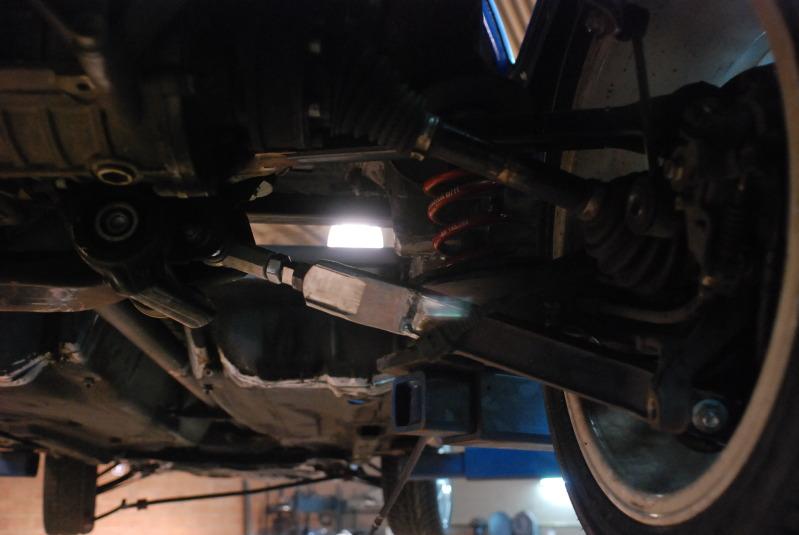
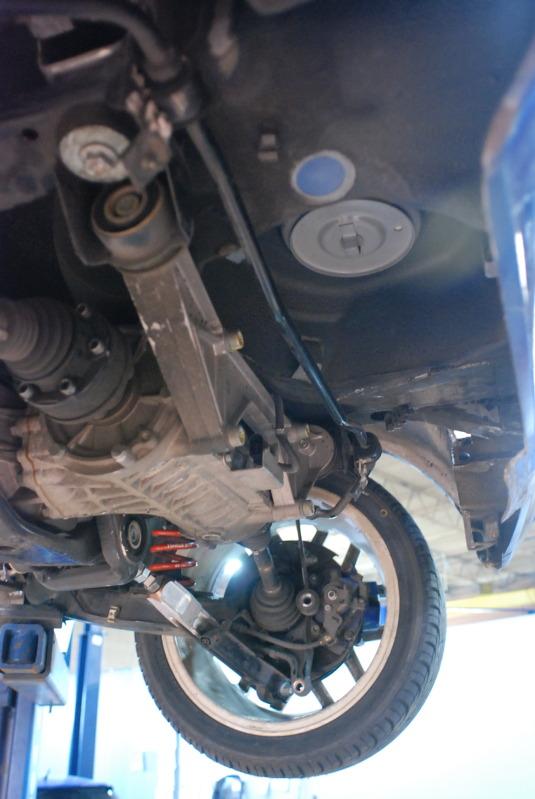
The drivers side trailing arm mount and bolted in place.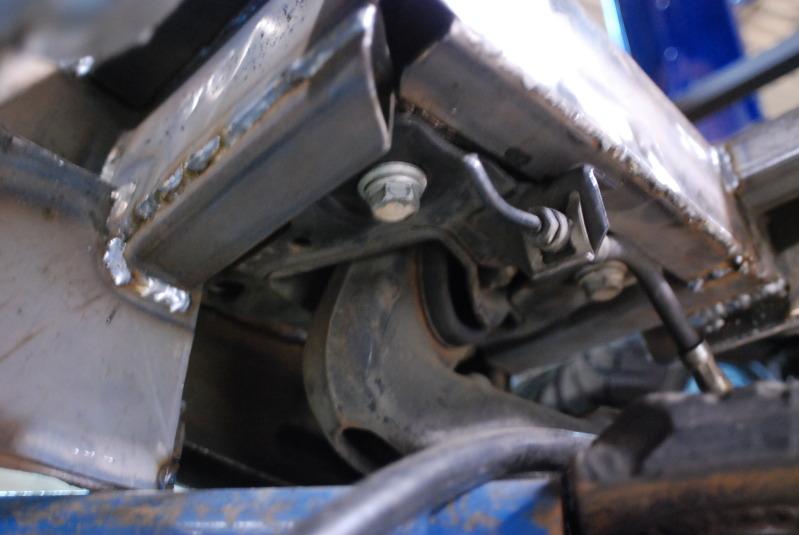
I like this part... The removable trailing arm like OEM. 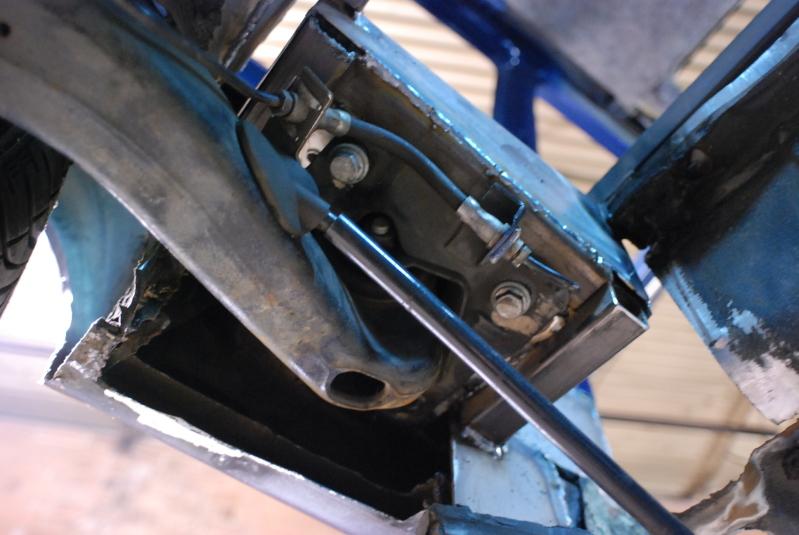
The factory floor is now in place.... the rear spring seat\mounting cup is retained and utilized.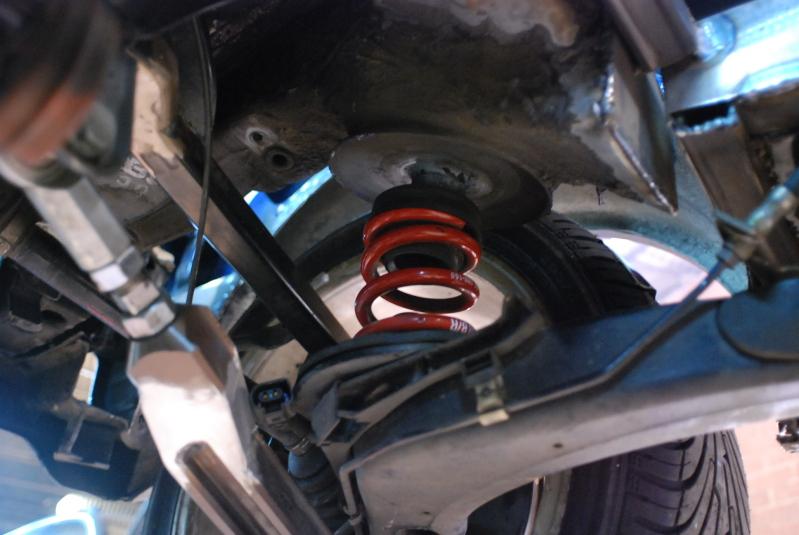
This goes out to patrick.... Even inserted arrows for you my friend... A shot of where the rear shocks will mount. Like the r32, it mounts at the bottom of the spindle and at an angle bolts to the bottom of the floor. 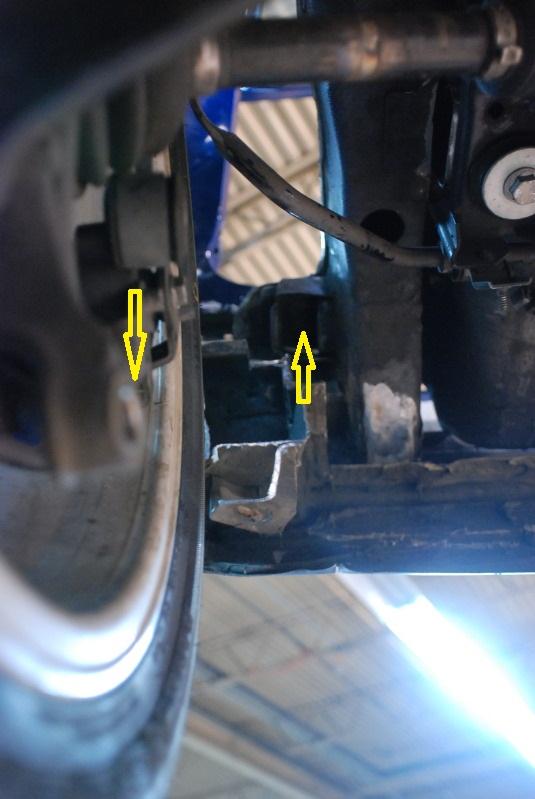
According to Mike, the rear floor pan is 75% complete.
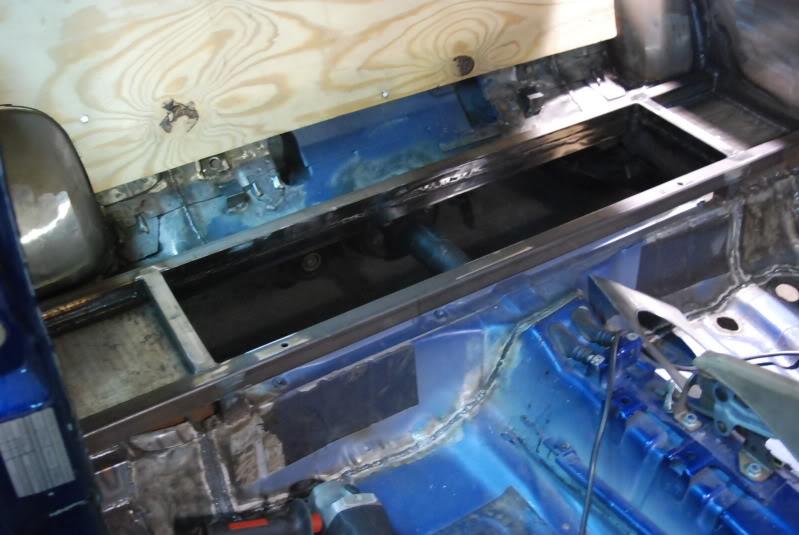
Transition where the floor pan and rear differential pan hump meets they welded 2 parallel square tubing braces. The pockets on both sides of the drive shaft open. One for an full size battery and the other will be a storage pocket for my toilet paper and Depends diapers... 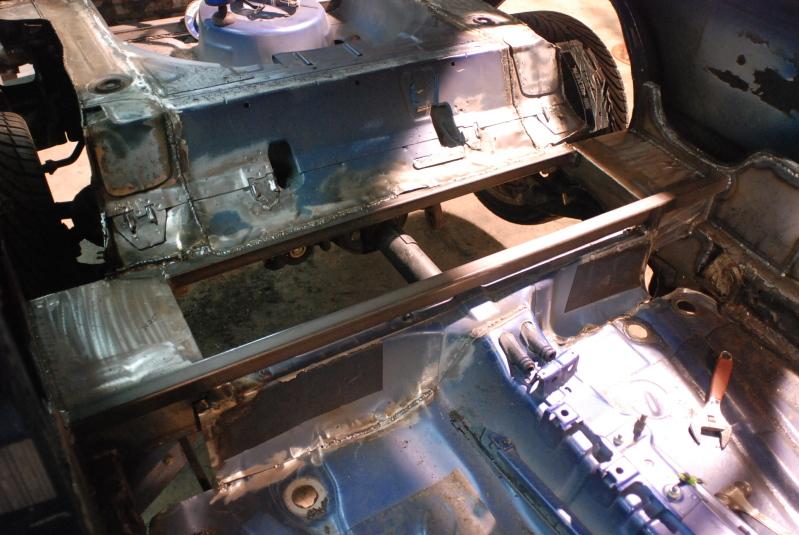

The pockets.... passenger side gets the battery and driver side gets the Depends.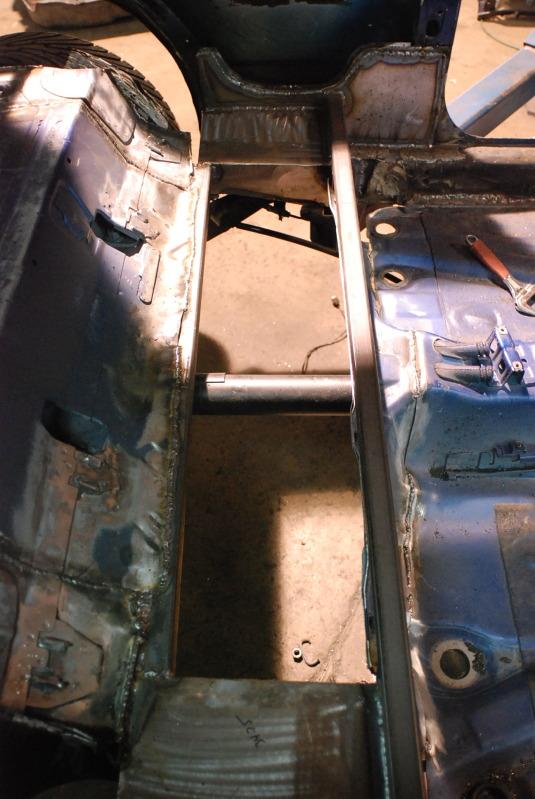
And one last shot.... I might be a little biased, but this shot is too damn sexy.... wheel gap and all 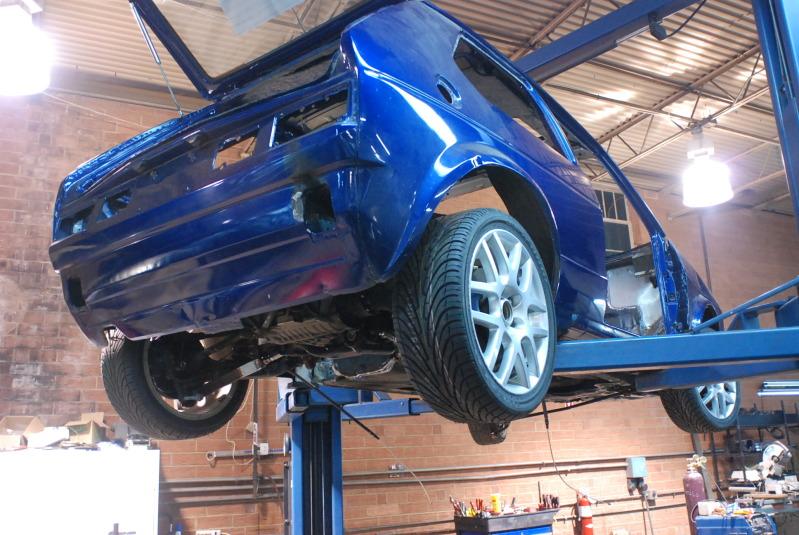
Thanks again guys for all the comments.... Its definitely helped motivate the guys up at eurowise...
12/3/2010
I told mike I want to maintain a pretty aggressive stance and wanted to minimize wheel gap as much as possible. In order to achieve this with the new taller spindles, they raised the strut towers. This will give us 1.75 inches in height drop without adjusting the suspension and sacrificing ride quality.
A shot of the passenger side strut tower top cut off and this section will be extended and cap will be welded back on.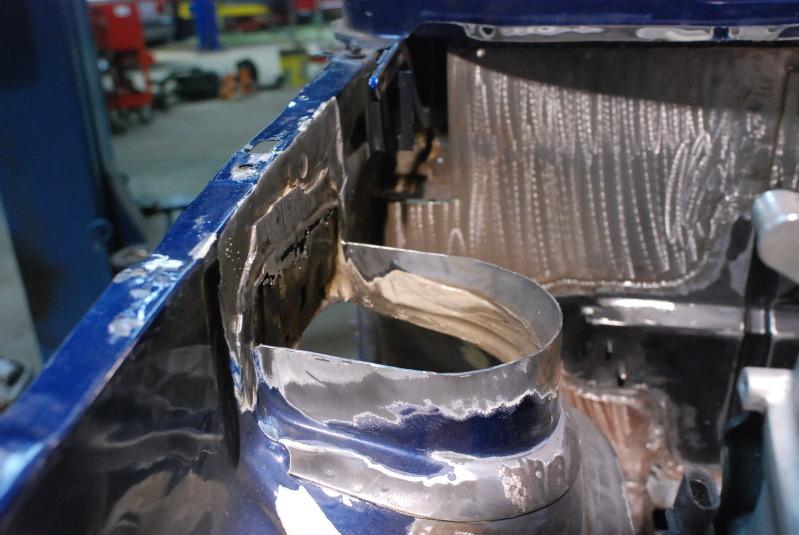
half finished product. The welds will be grinded down and smoothed out...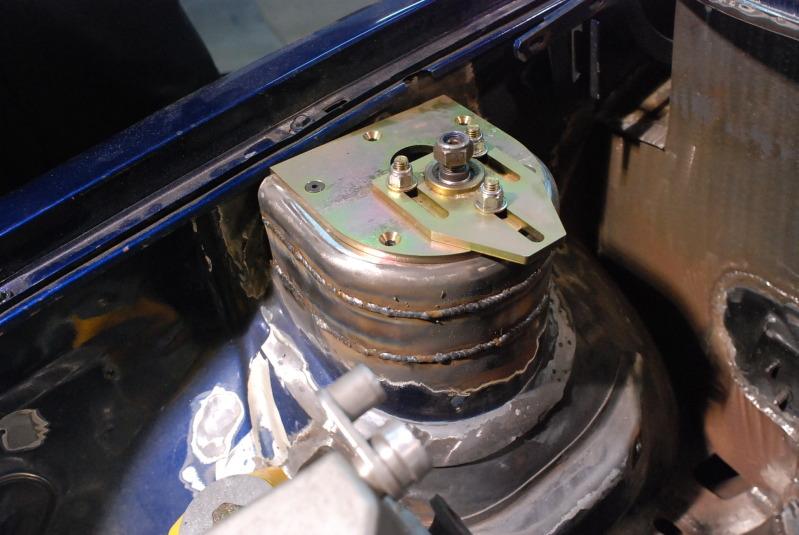
They way it currently sits with 16" wheels with 205/40/16 for MOCK up and yes, we have already been notified that they are on backwards... 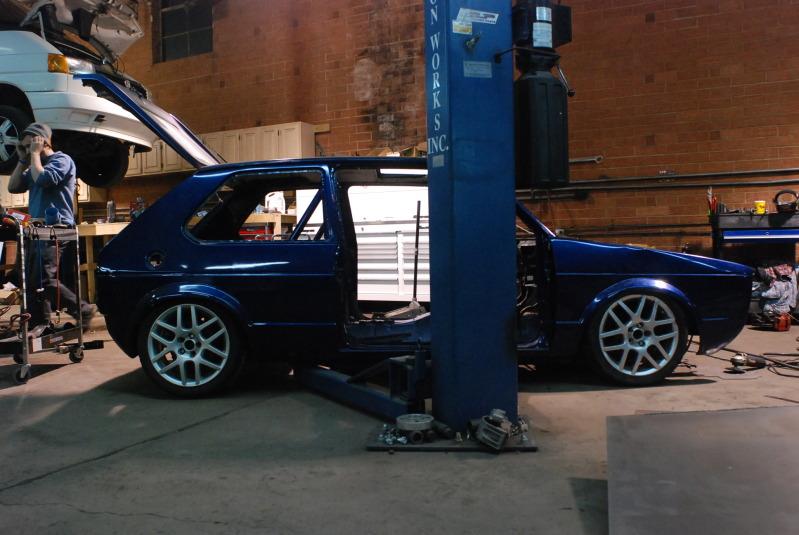
And they began mocking the cage up... In the background you will see the father of the man... 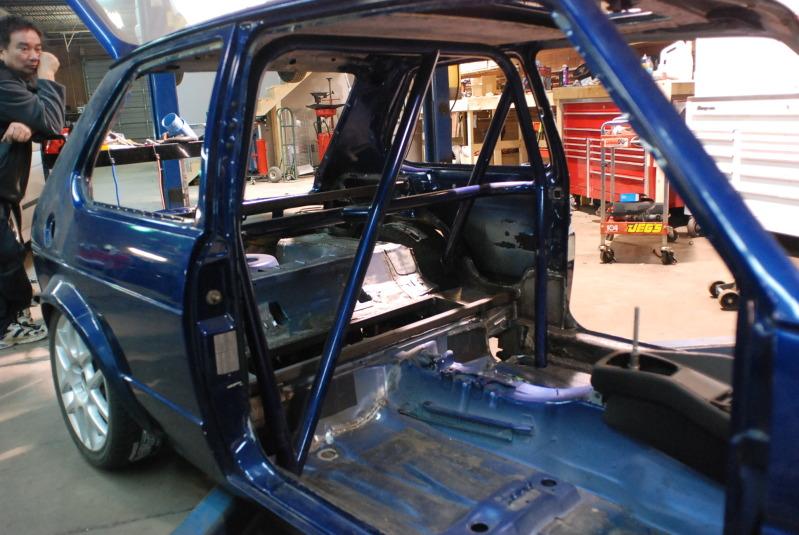
12/4/2010
So they started cleaning the towers up this morning...
First, they went back and welded the towers from the inside.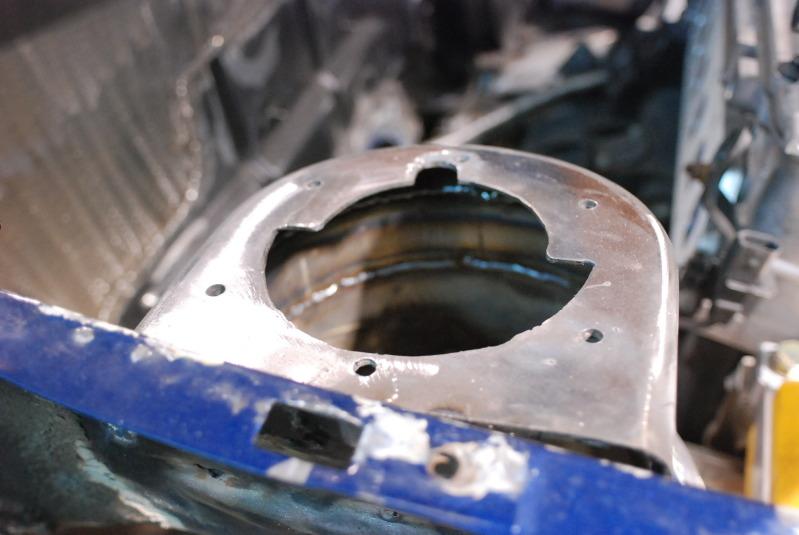
Once done, they went back and grounded down all the outside welds.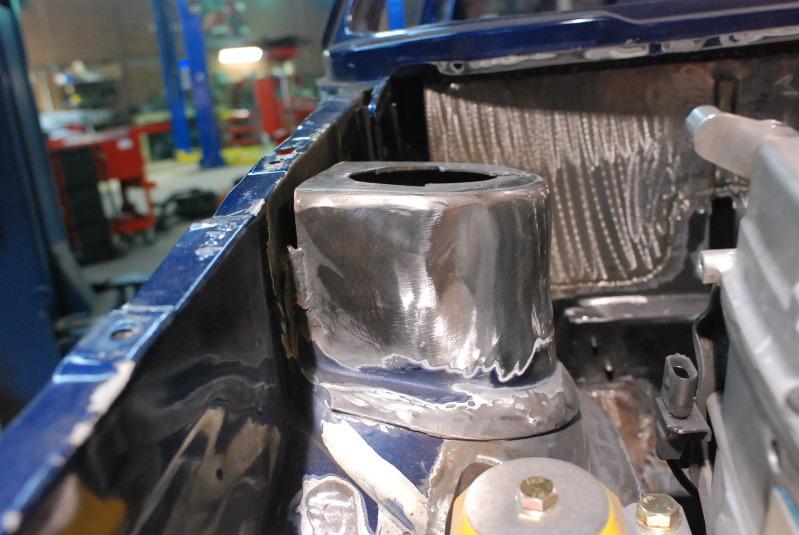
12/8/2010
Hump day updates:
For the past few days they have focused their attention on completely seam welding the entire car. The rabbit should be 10x stronger than stock with all the structural bracing and welding of the panels.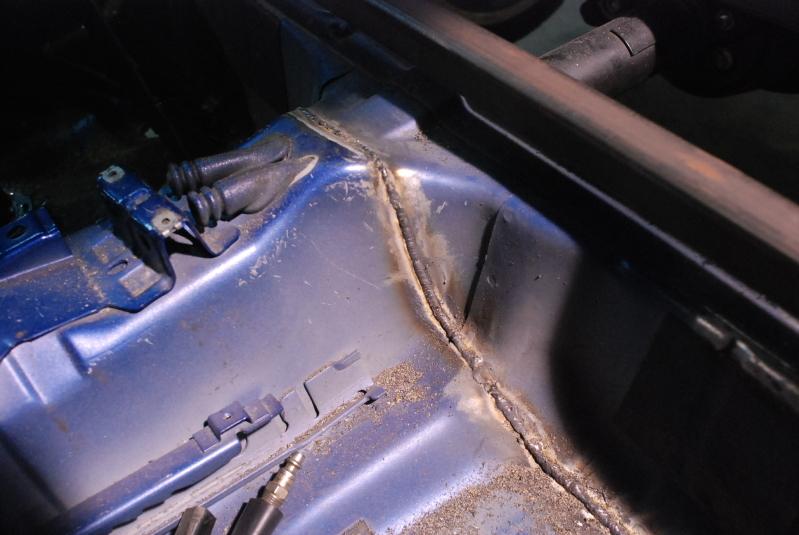

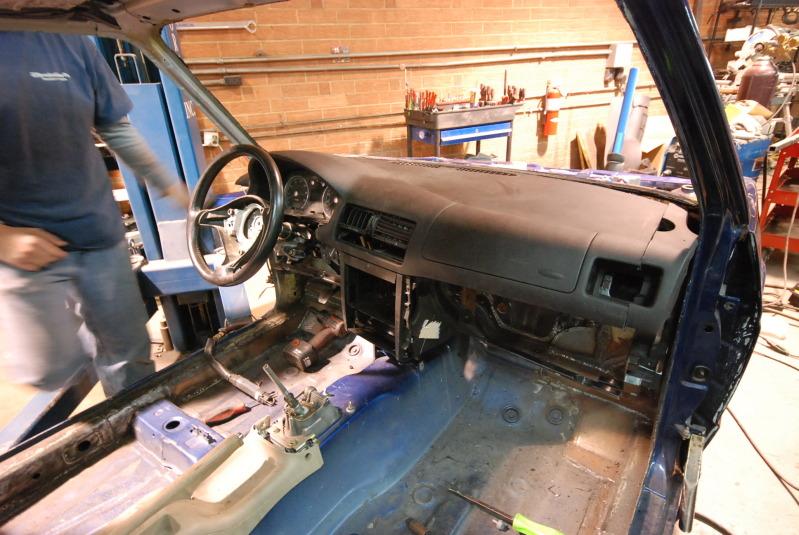
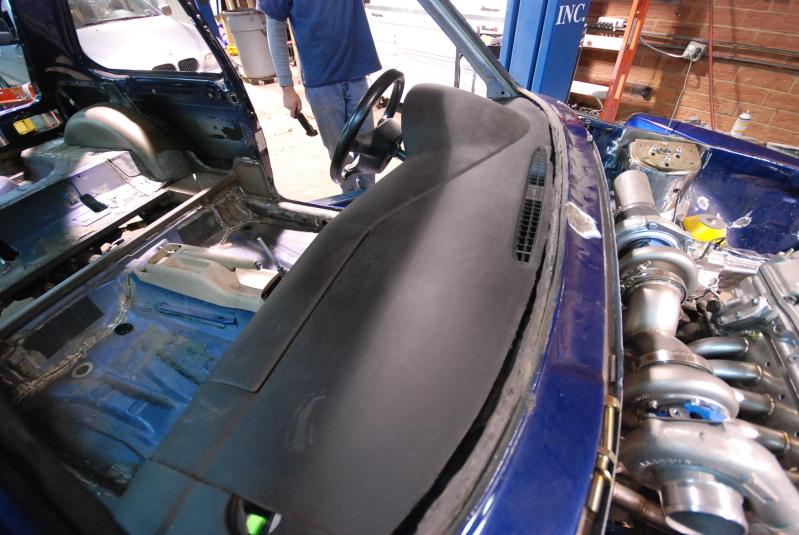
They started working on the dash today, shortened and modified the factory R32 dash support brace and welded\bolted it in place. 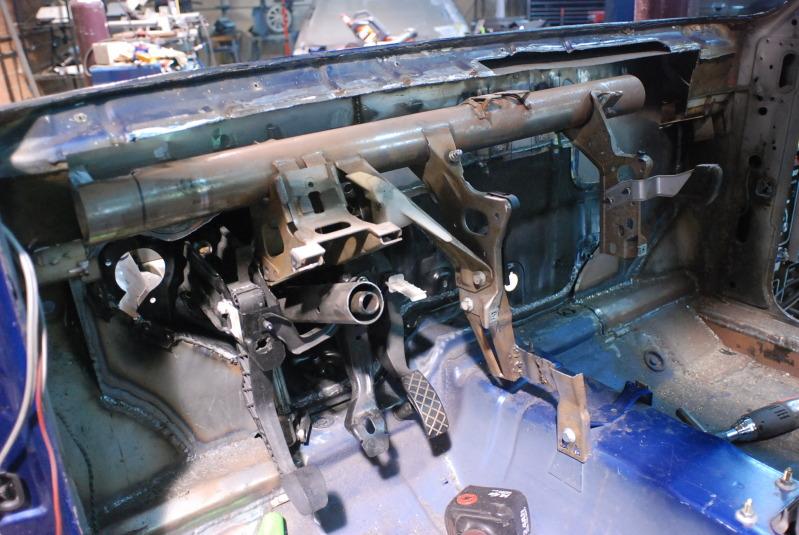
A rough idea of what to expect...
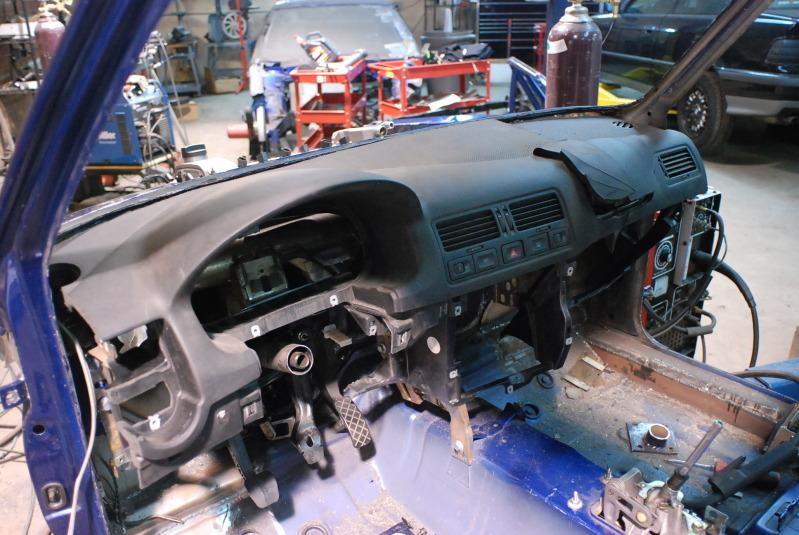
The dash was shortend approx 5 inches on the side and about 4-5 inches in the front along the windshield.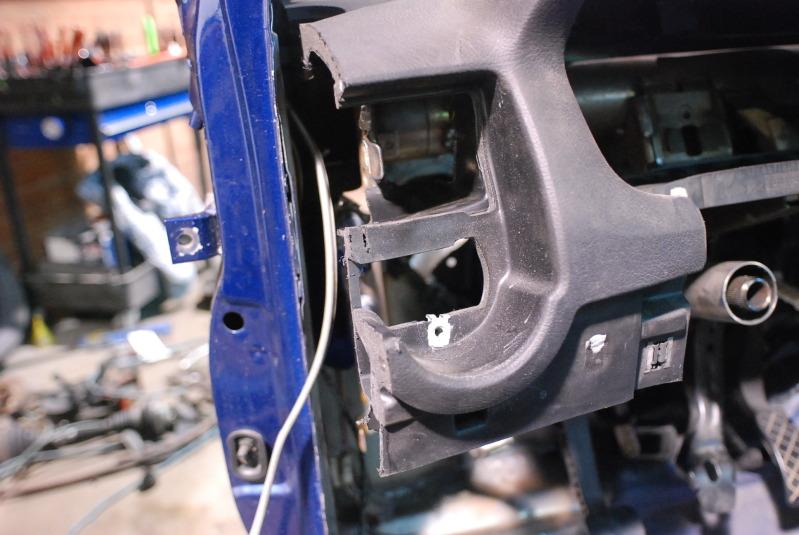
With the dash being almost 5 inches more narrow, the steering column stuck way out, so they had to modify and shorten the entire steering shaft, u-joint, and all the attaching parts.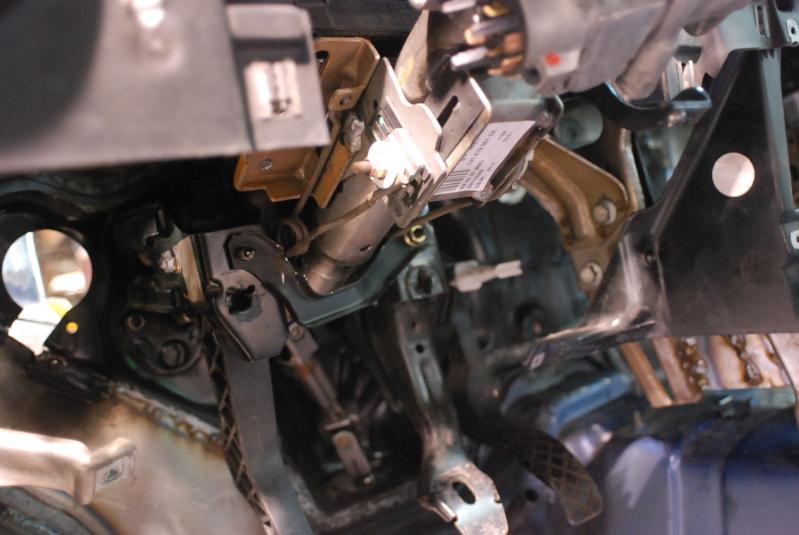
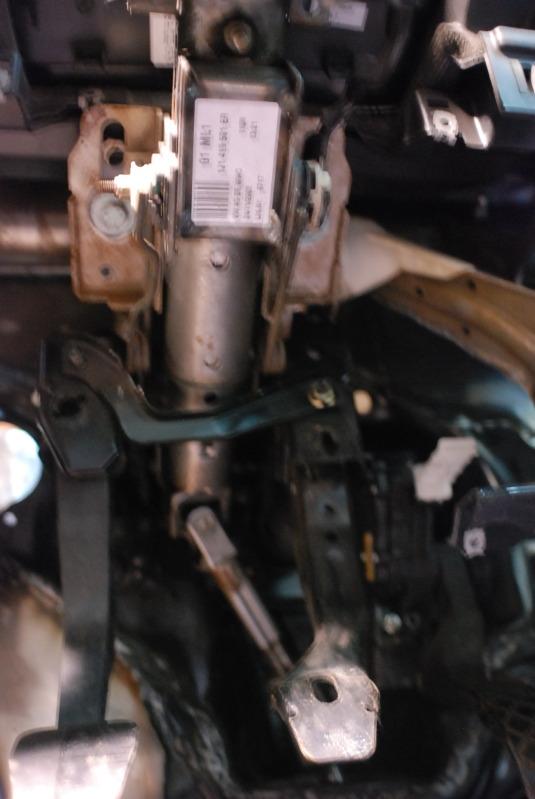
And now a steering wheel can be bolted up....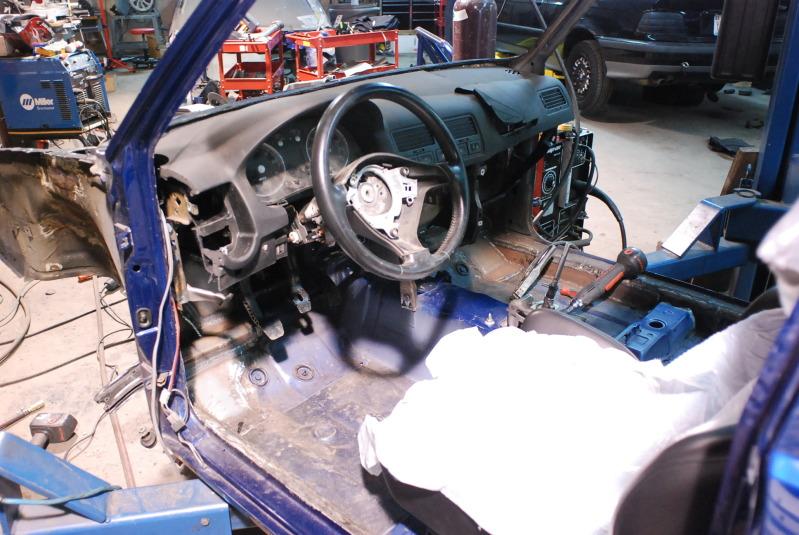
And one last perspective.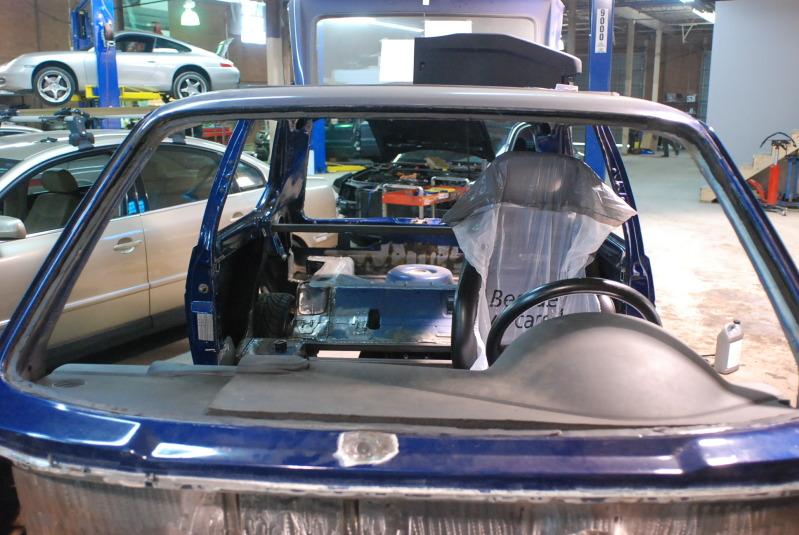
12/11/2010
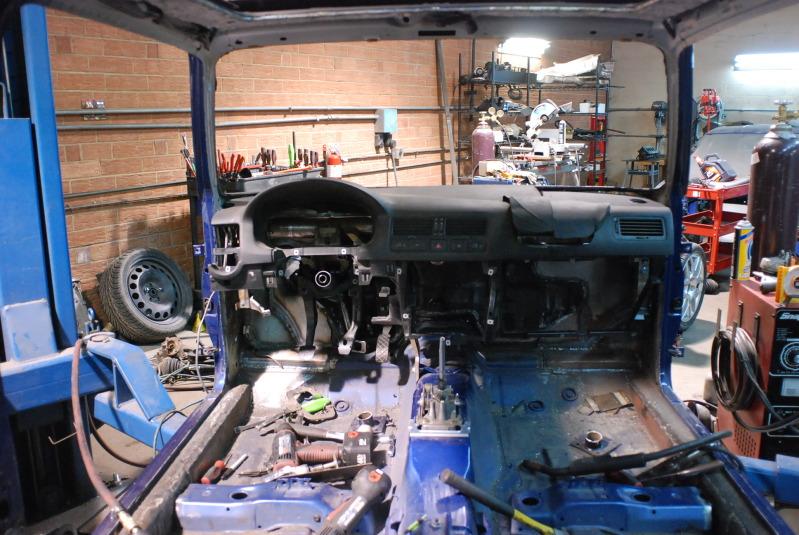
I was totally against the idea of running the r32 dash in the car, but both doug an mike insisted and asked me to drive up and entertain the idea..... having said that, it looks 10X better in person than it does in the pics, and i absolutely LOVED my old dash setup and am going with the r32 setup... having said that, i can see why the old dash would have more appeal, but hopefully you can see it in person and you might have a change of heart... If not, no worries, we all have our preferences
Anyways, me and marty drove up this moring and met up with mike (aka fouckhest). Thanks for giving me a peep of the setup and thanks big time for your mathimatical skills today
So, basicly spent an hour "discussing" wheel setups (i.e. backspacing, offsets, diameter, camber, turning radious, and everything under the sun in regards to set of frick'n wheels... ). We have some relatively serious issues to work out now (first of hopefully a few setbacks) but the long of the story is i'm going to run a staggered 16" setup.... It wasn't what i was hoping for, but it is what it is, considering the build will be both a comprimise of show and go. Again, big thanks for fouckhoust, doug, mike, and marty for the help and opinions
Enough jibber-jaber and some fun pics i took today.... Took the wheels off my corrado to help give us some relative perspective....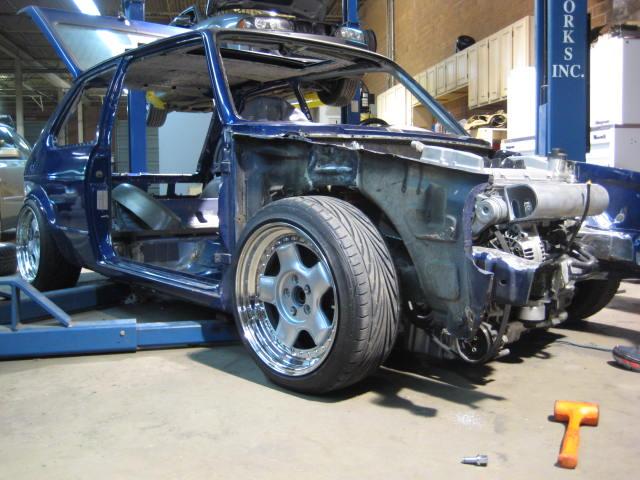
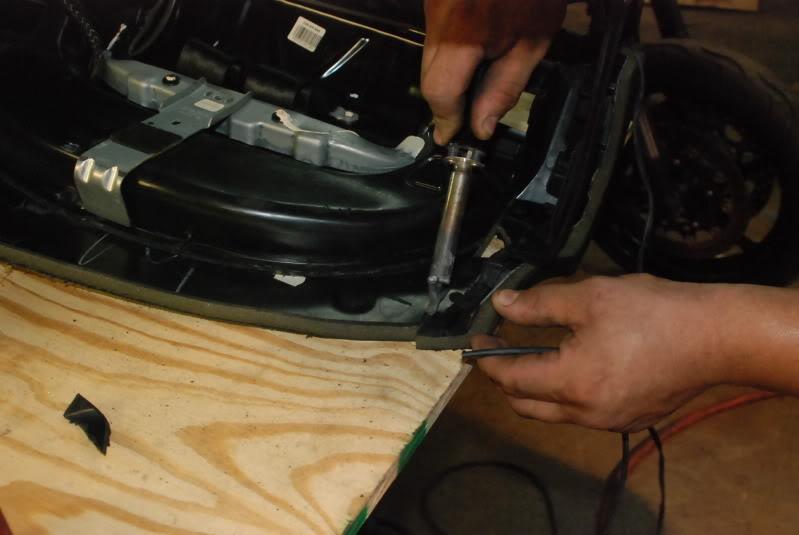
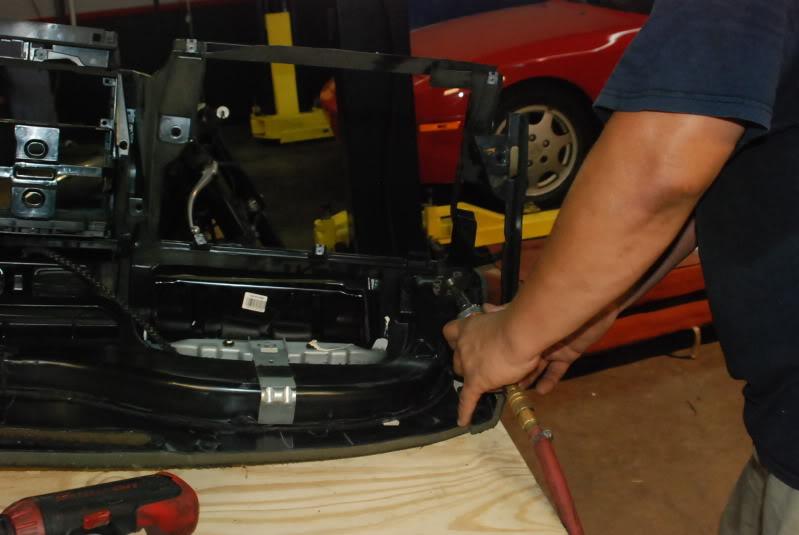
Motorcycle rear fender cut in half...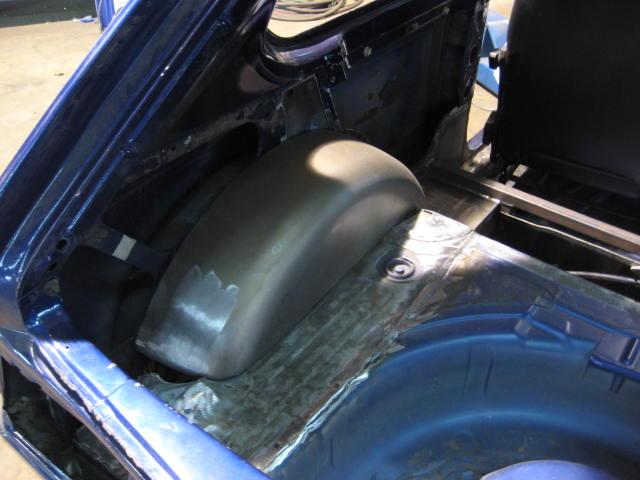
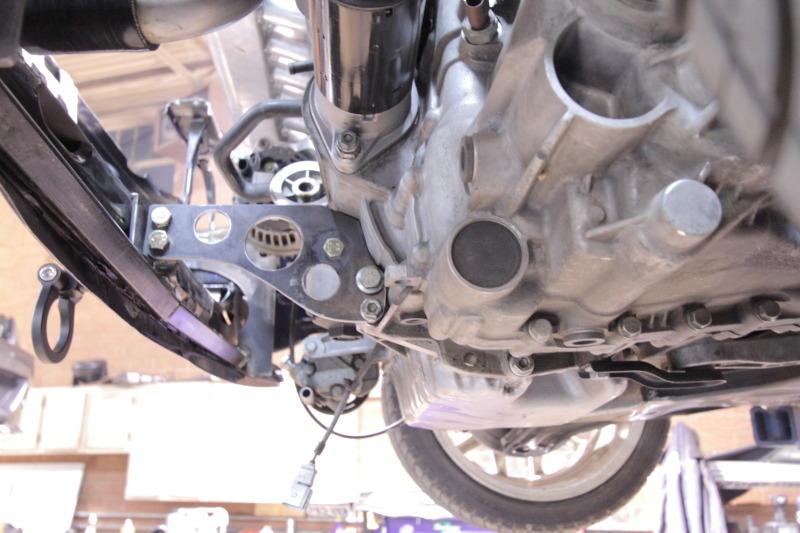
Oil pan clearance...
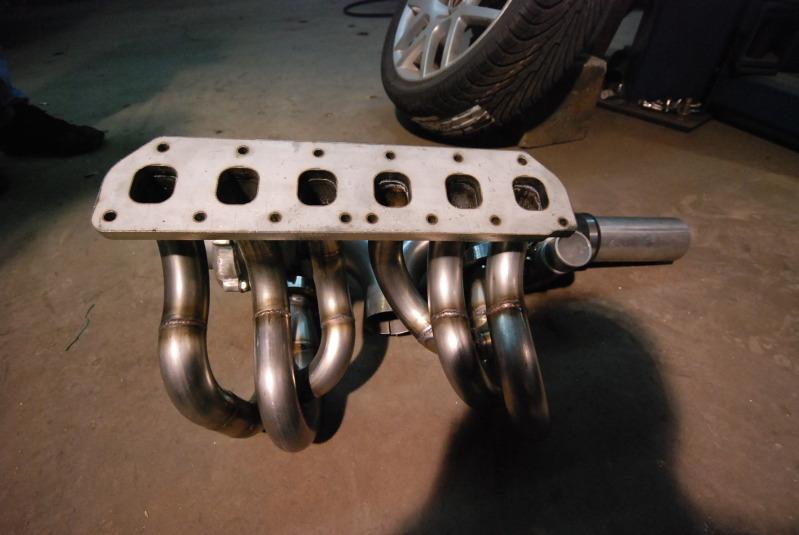
Doug began buildingthe eurowise r32 short runner mani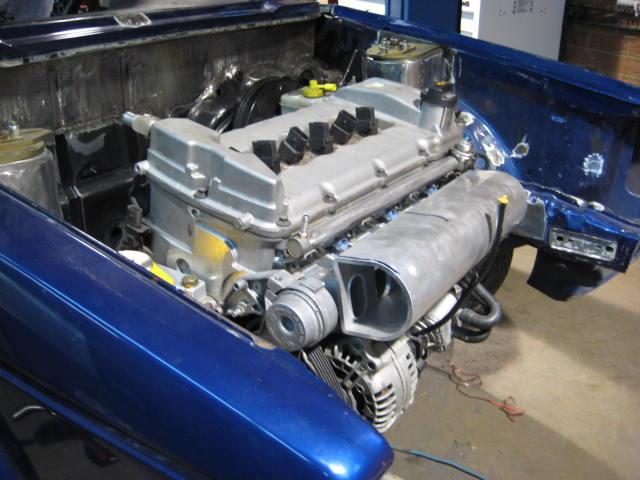
A pic of the what it will look like when done. It's one they built for a r32 turbo project not to long ago...
12/15/2010
jeremy, the ulitmate goals will be 800. why? whynot? but to start off with, going to run a head spacer and keep the boost down... need to figure what does what with the build and will give me time to save a few pennies to build the mechanicals to handle big boost... but expect around 450 to start off with...
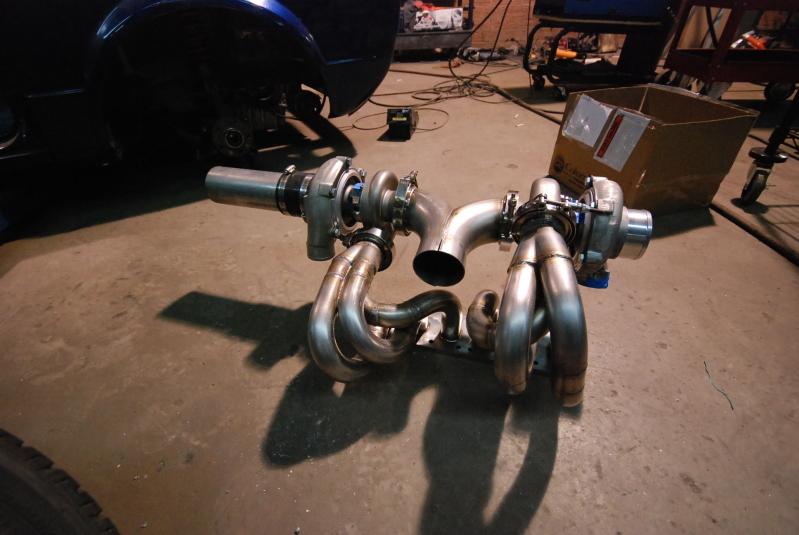
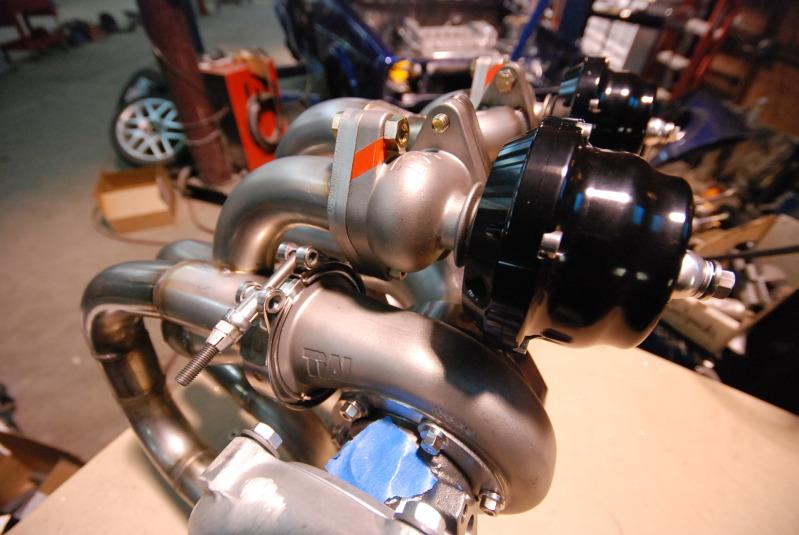
speaking of which, the turbo madness has begun...
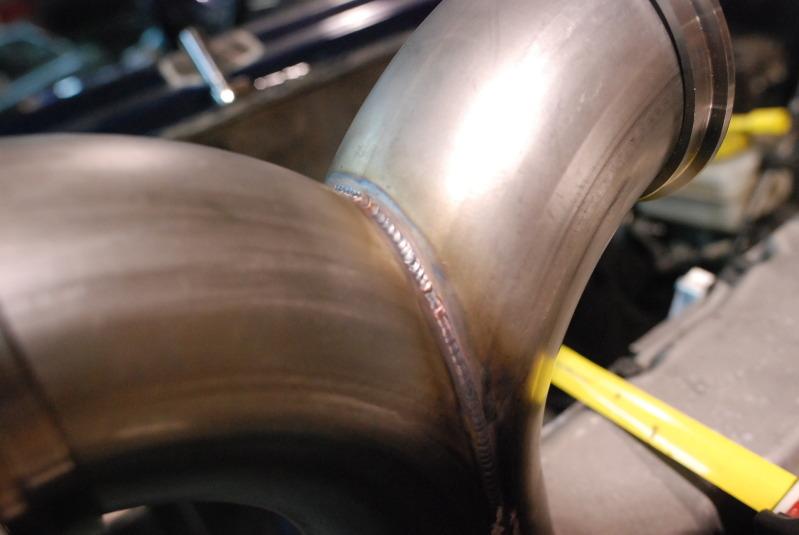
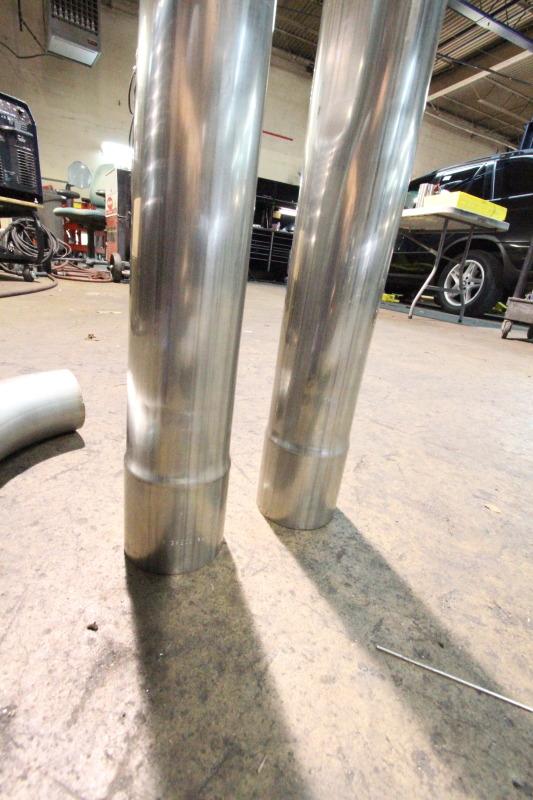
Yesterday, doug began fabricating the exhaust manifold and dp.
He used 3" 90 degree stainless bends, and split them down the middle to merge both downpipes together for both turbos.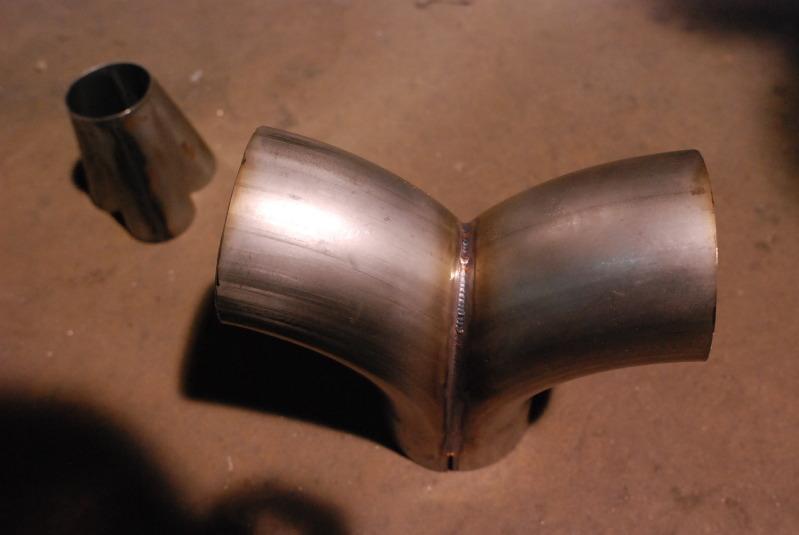

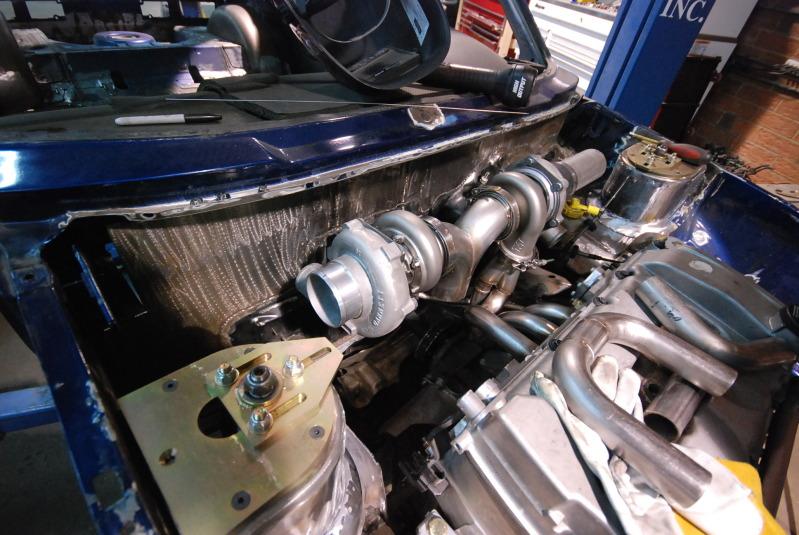
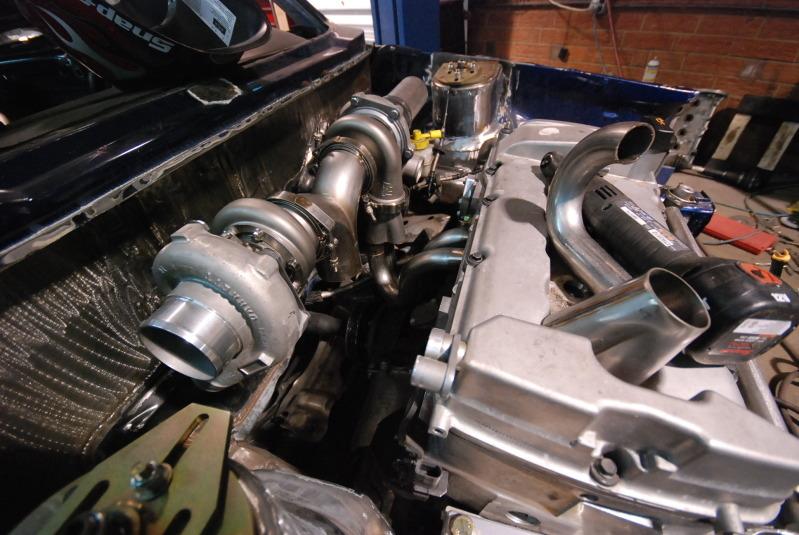
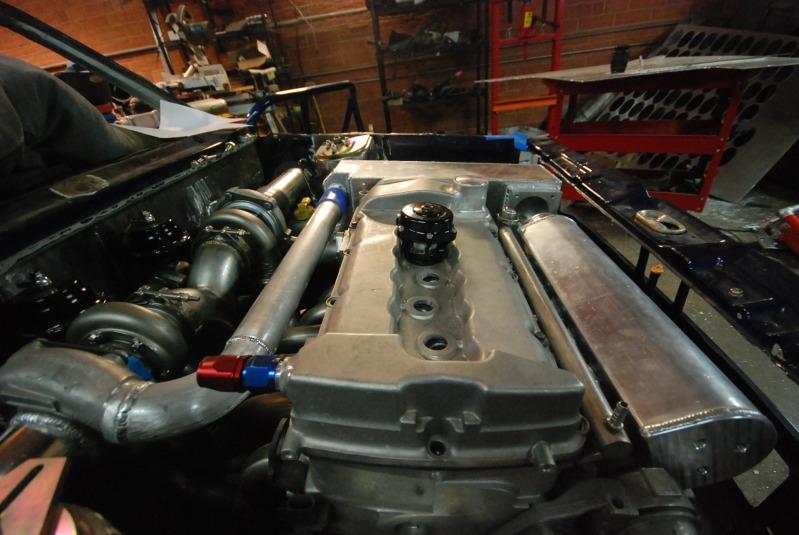
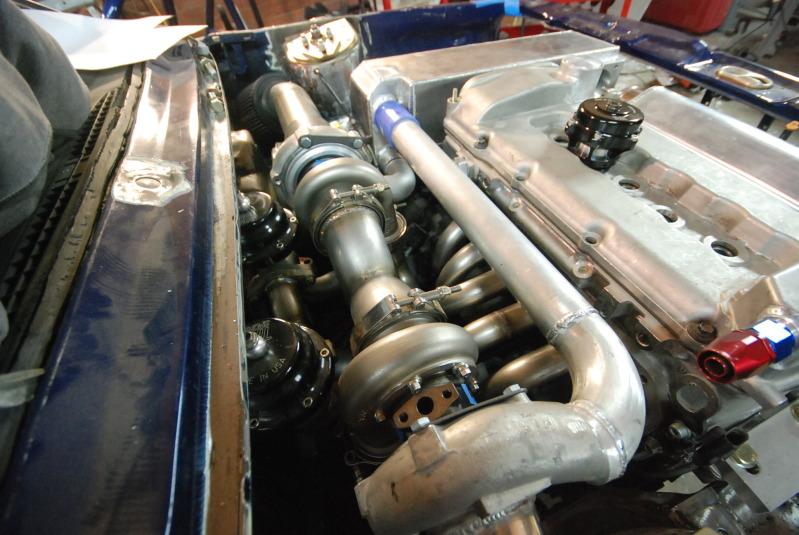
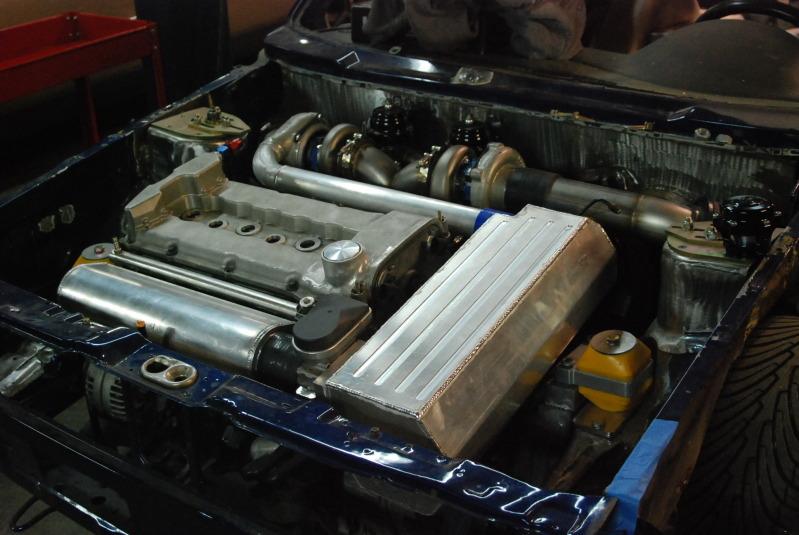
And a turbo mock up pic... imagine it all sitting behind the head.... giggity...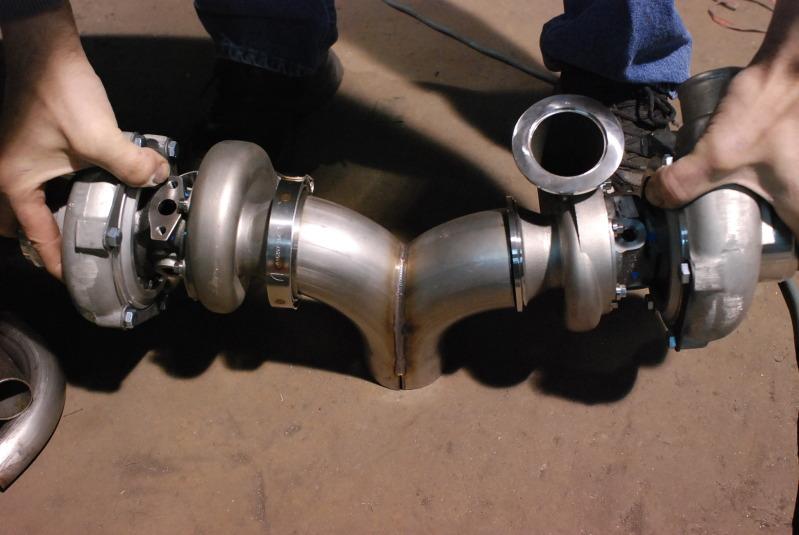
12/20/2010
not really sure if this needs much explanation...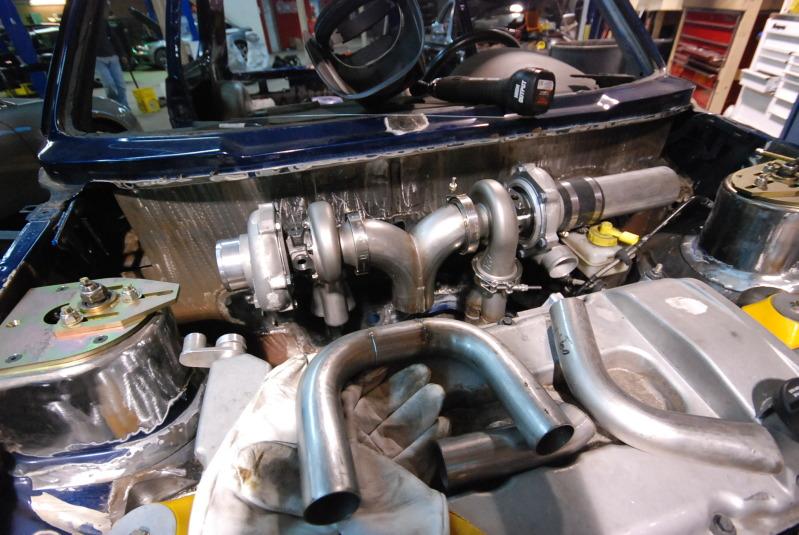
12/21/2010
so enough bullpoo and on to business. sorry the update was weak last nite but had a long day since its a short week for me. so this is what the knuckle heads up at eurowise came up with so far....
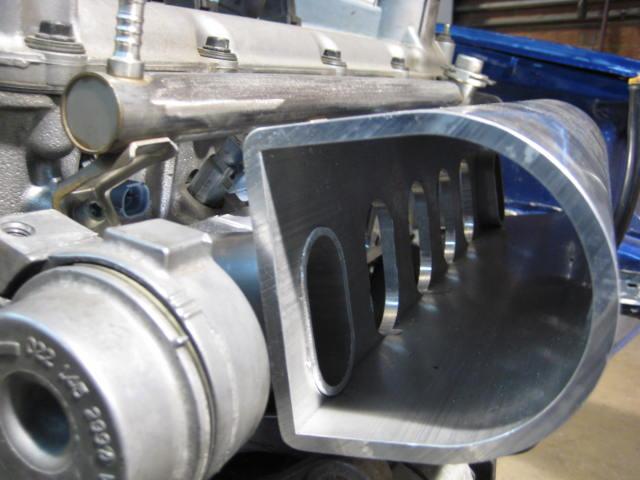
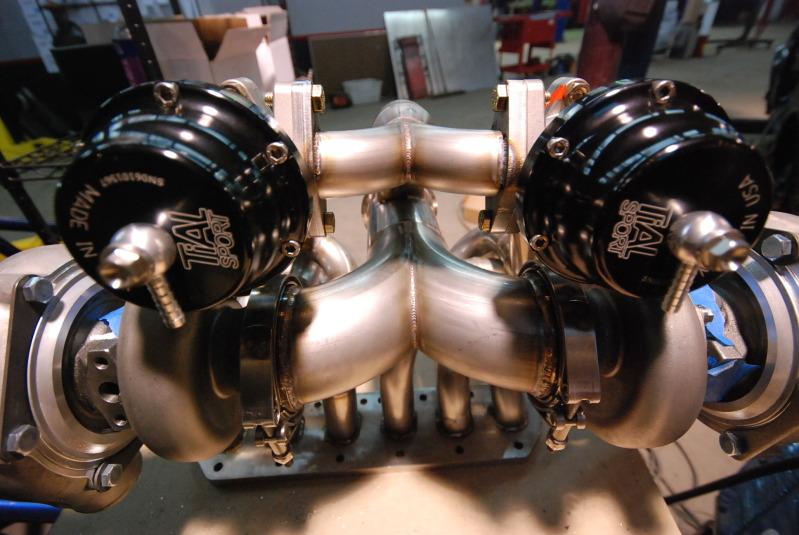
Due to the R32 cylinder head's rectangular exhaust ports, they formed 1.5in exhaust piping into rectangles and tig welded them to the flange. Due to the length of piping going to be used and the weight of a turbo and wastegate per 3 cylinders, they will brace the manifold and turbo once built...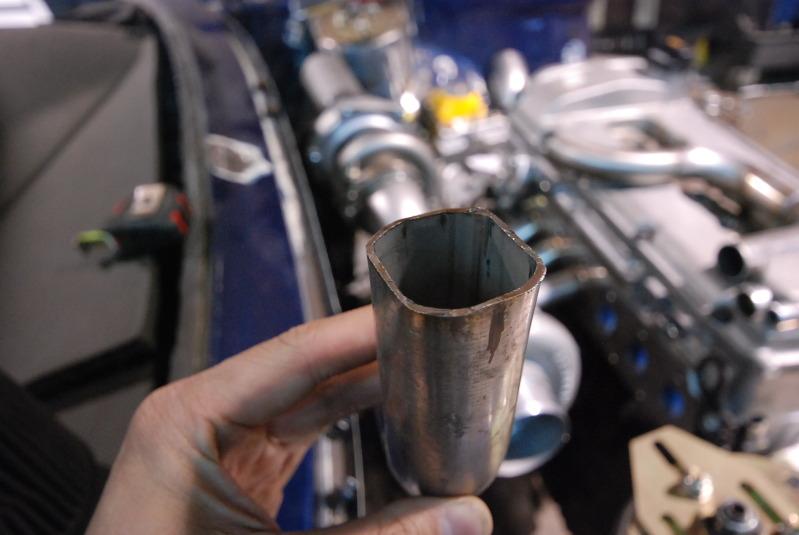
Bank 1 mocked up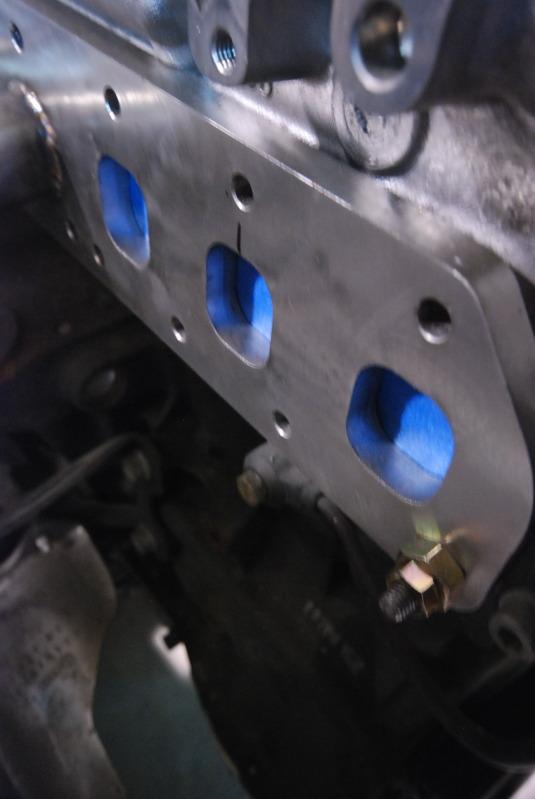
And the durty begins... a few different views to help with the perspective.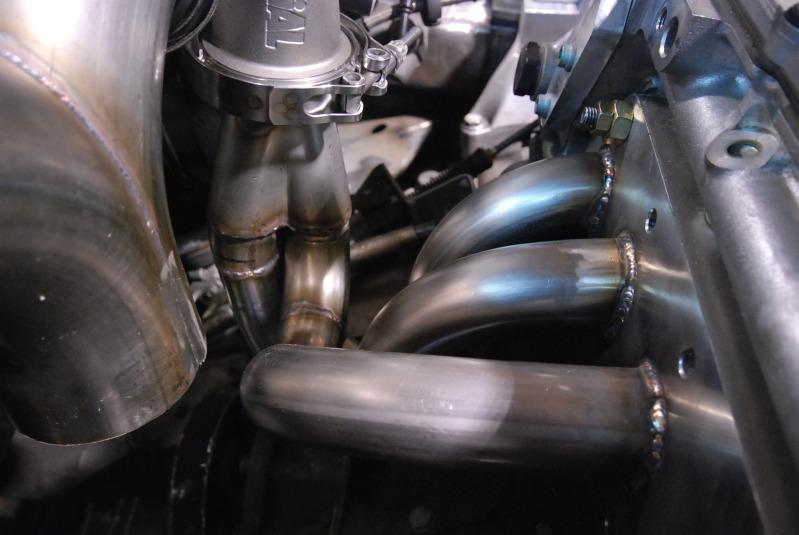
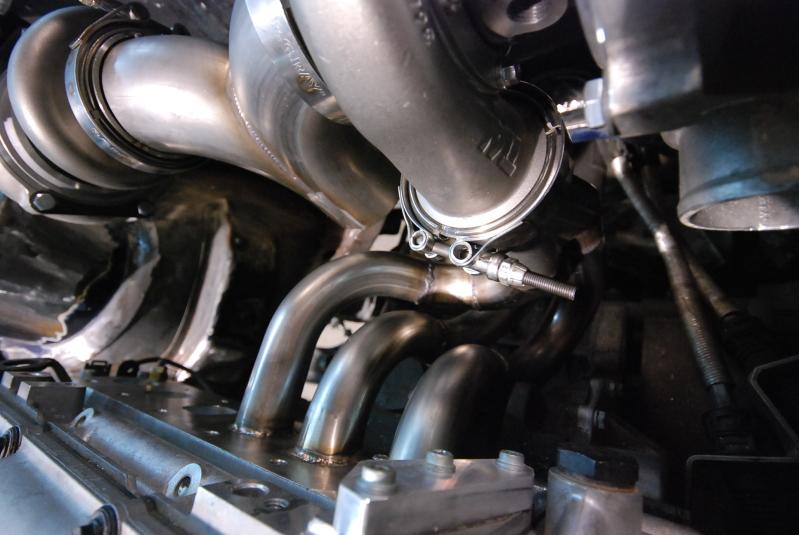
And a pic showing how far the cold side is from the brake resevoir....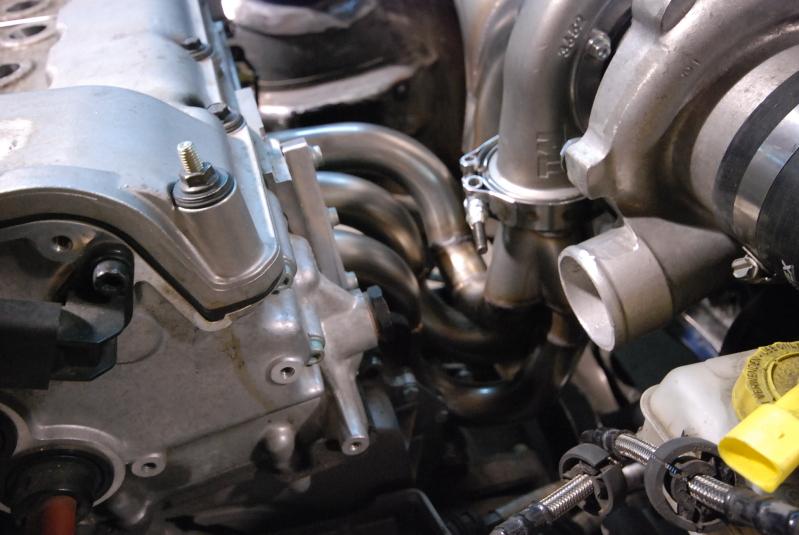
12/23/2010
sorry..... just got back from a little party.... only 3 more christmas parties left....
either way, they got a good bit down today... hopefully enough pics to turn your  upside down....
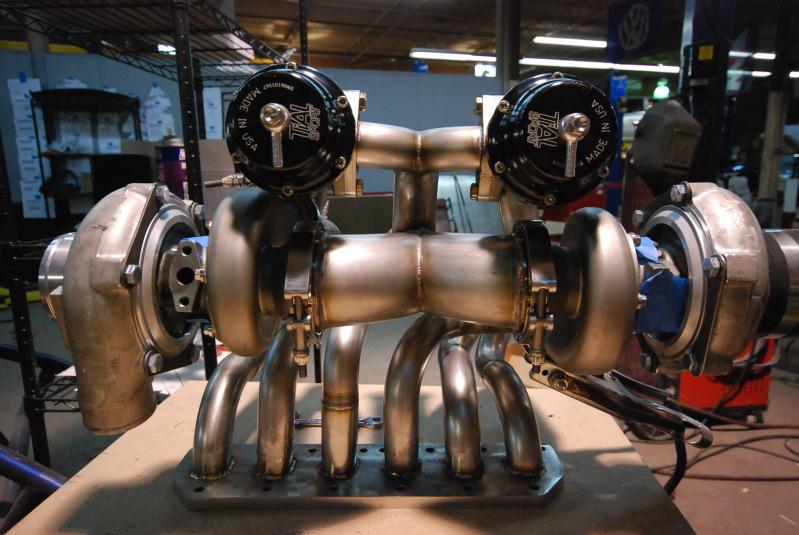
They began working on the last 3 sets of exhaust runners.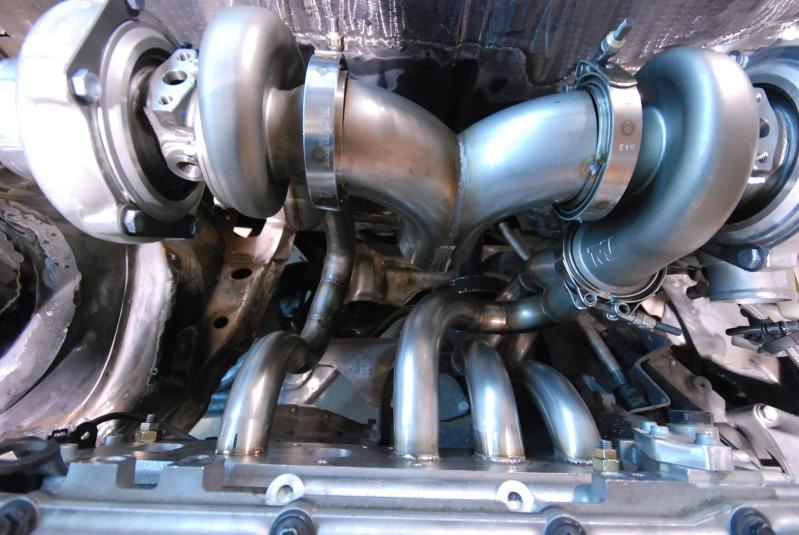
The special order k&n air filters came in. This will be the location (not sitting above the hood ) of them once the inlet pipe is fabricated.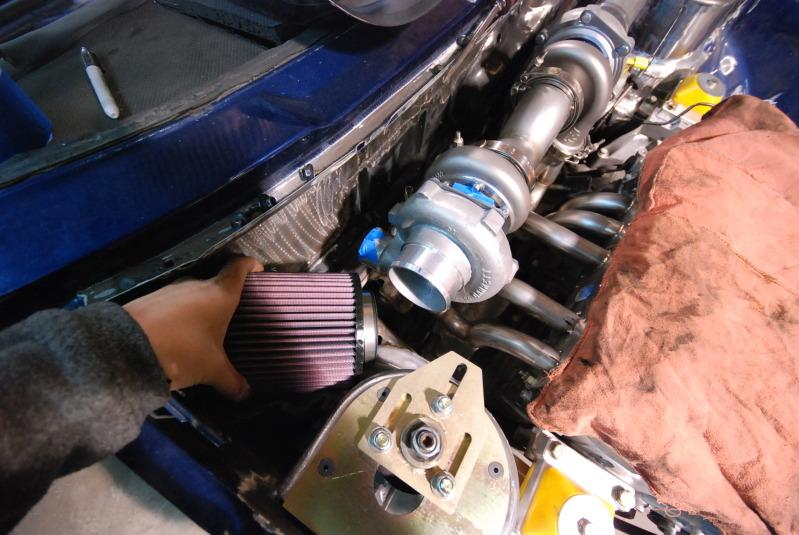
They started the build of the intake manifold today also.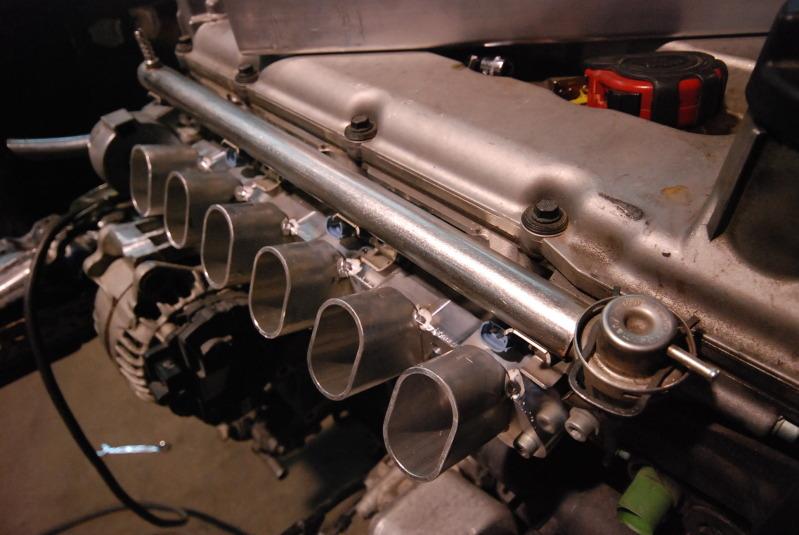

Doug tacking the plenum in place. Notice the earphones.... He's a big REO Speedwagon fan 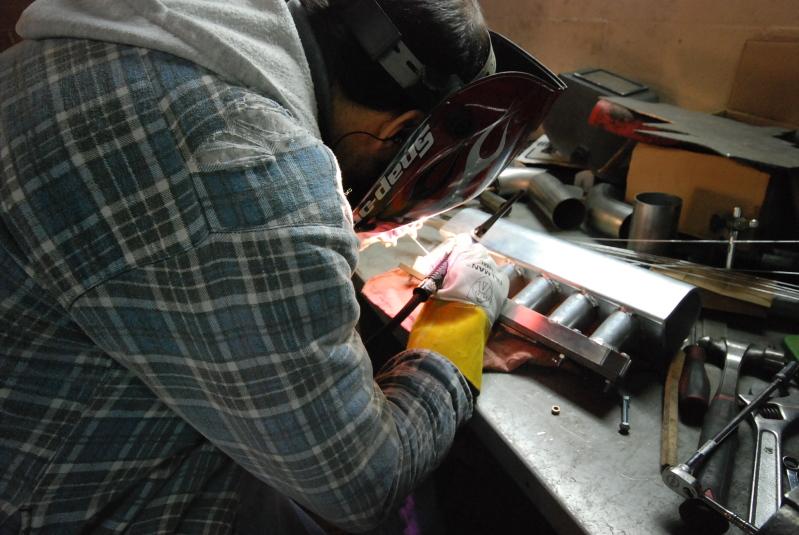
The end caps welded up and manifold mocked up.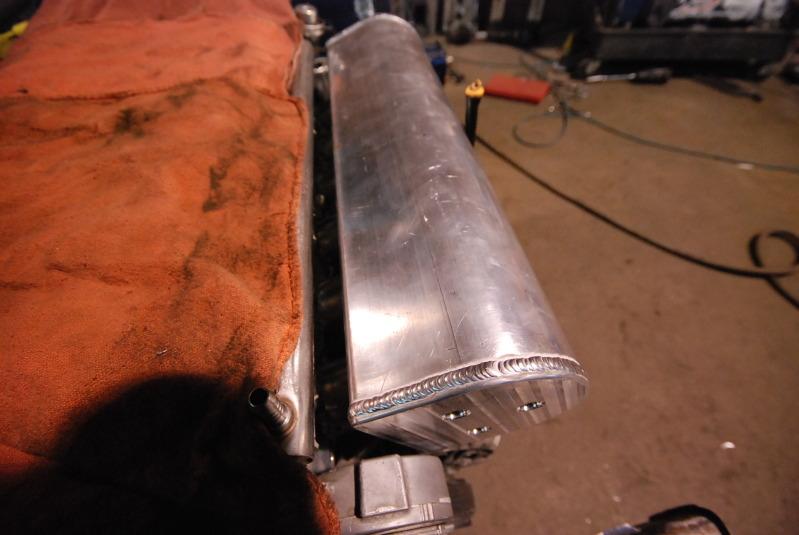
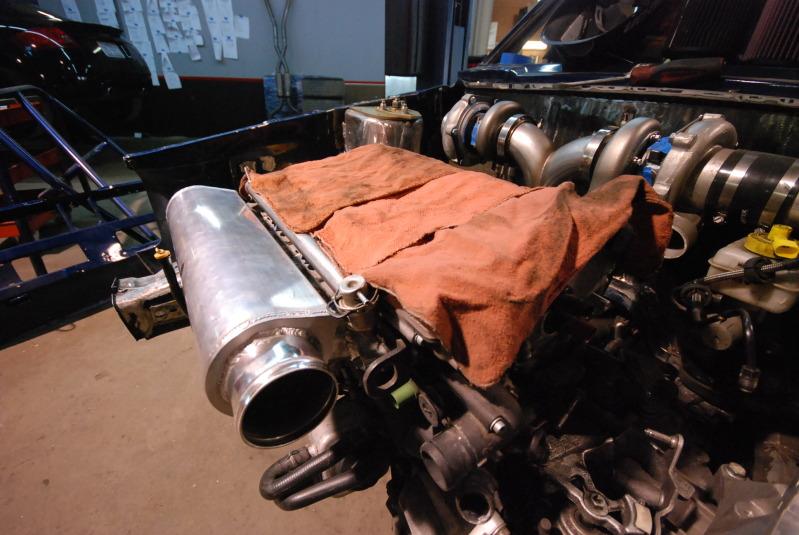
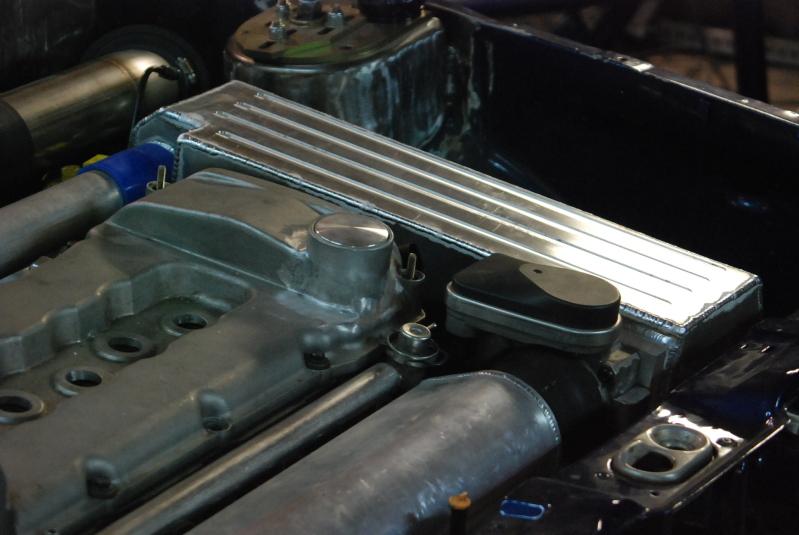
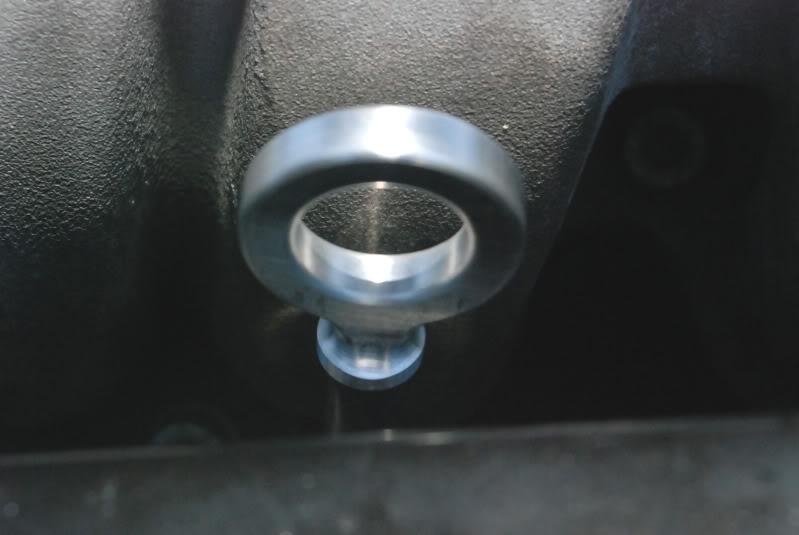
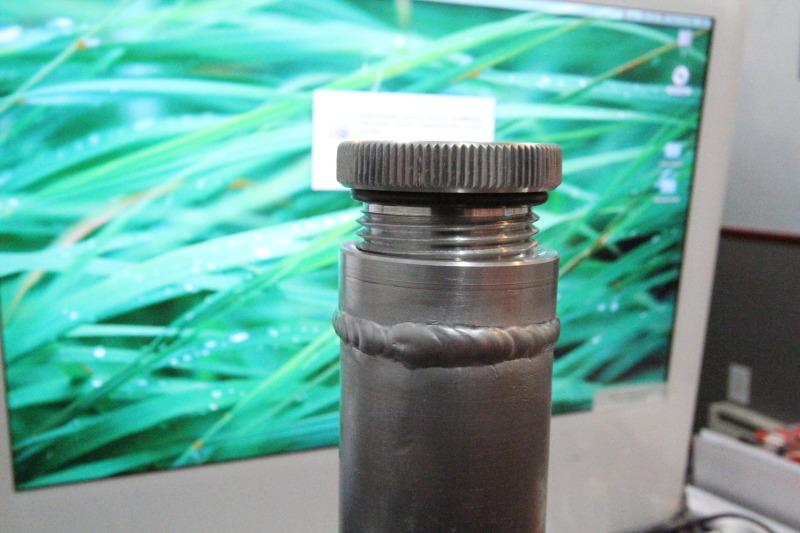
Next up they worked on the valve cover. With the engine raised for oil pan clearance, and with the stock oil cap on, the cap comes very close to the hood. So Mike had a trick idea and used a custom fill cap to solve the issue.... Way to use that noggin MIke
The current oil cap height.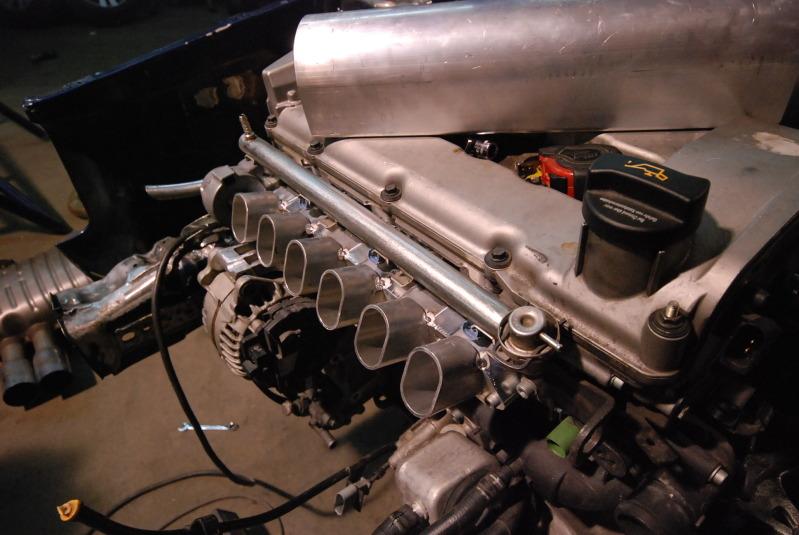
The pop up oil cap we're going to use on it.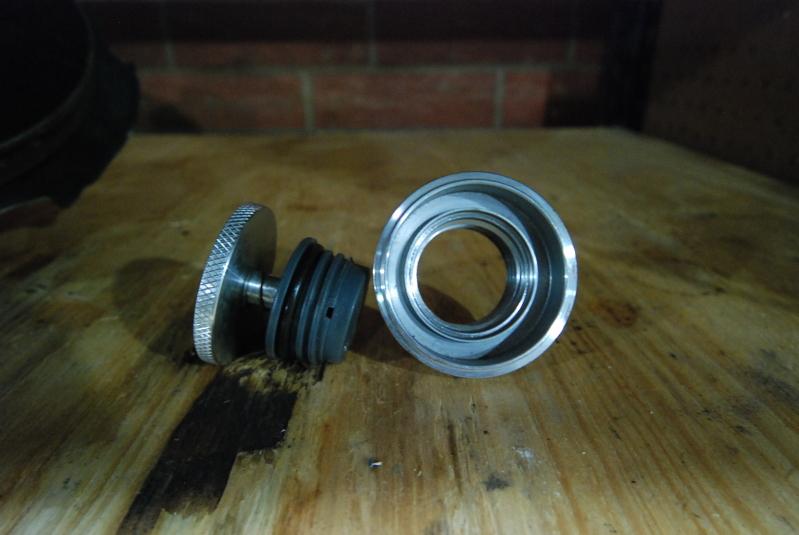
The oil cap screwed on.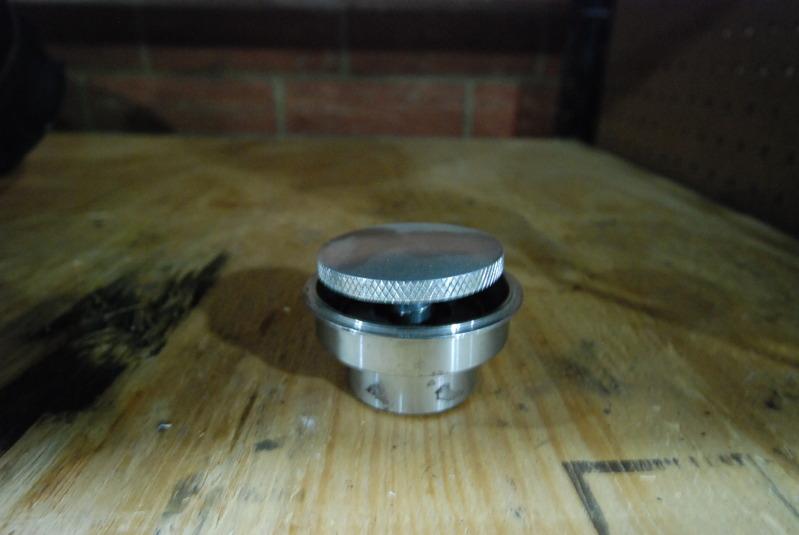
The cap in its completely seated position.
And the trick comes all together.... They machined the original fill cap off the valve cover and welded a piece of aluminum tubing in place, then welded the pop up cap on.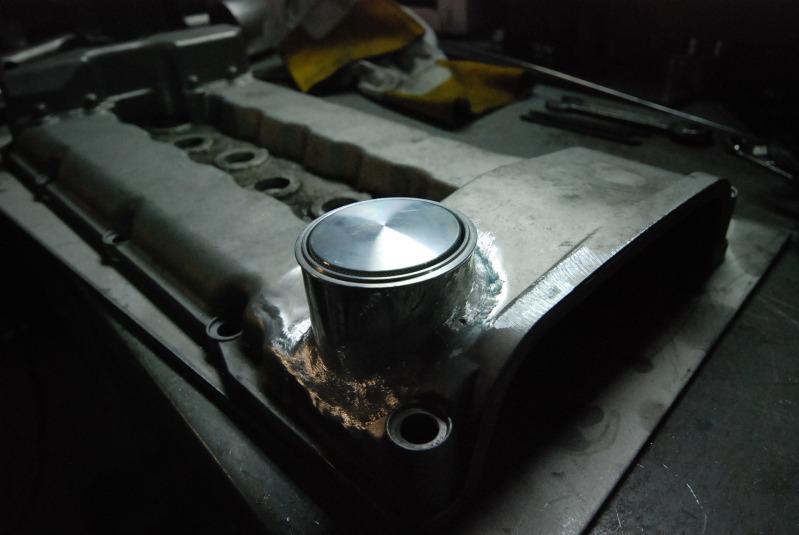
1/3/2011
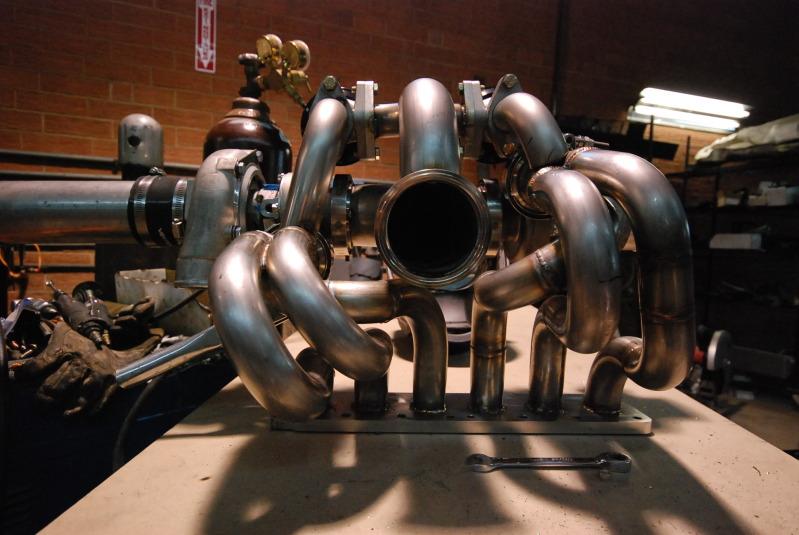
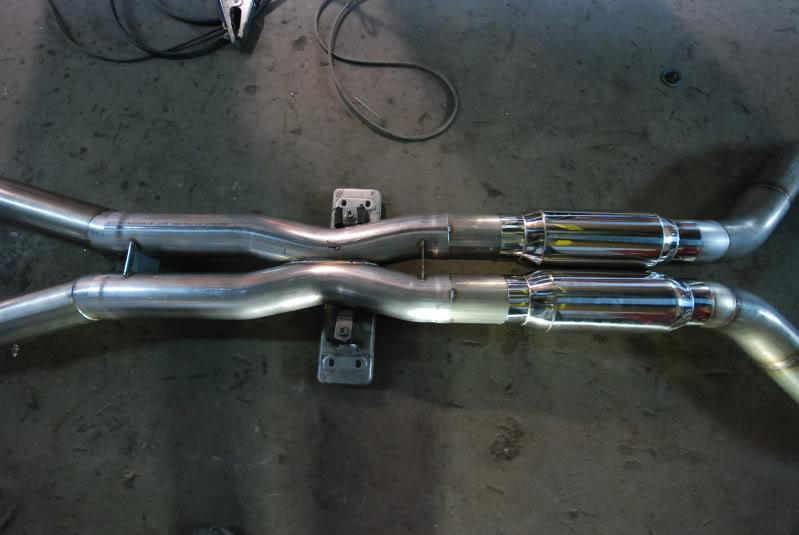
So what got accomplished today at eurowise..... exhaust manifold updates.
A perspective from the top.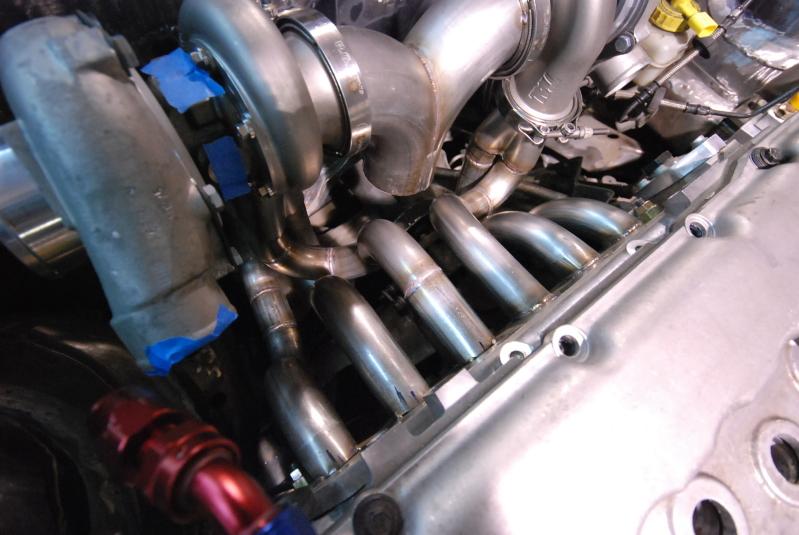
The exhaust taken off to show it off, mainly to compensate for my small gerbal like package... 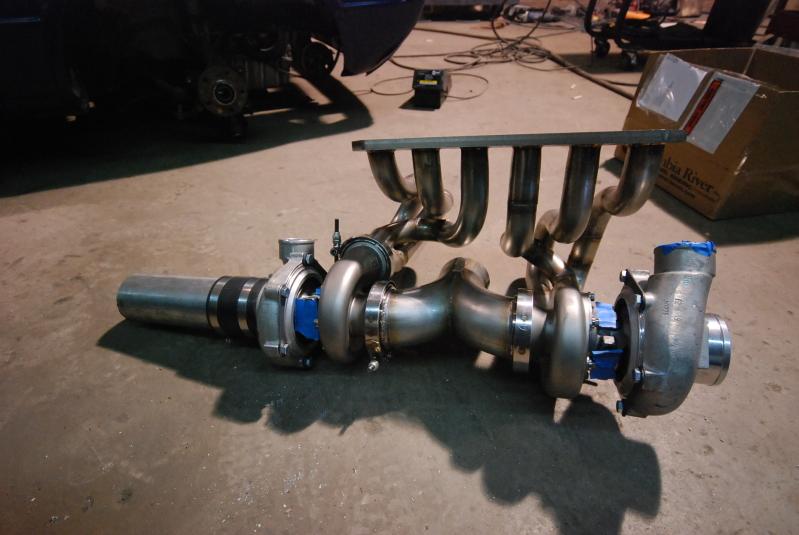
1/4/2011
so towards the tail end of the day yesterday, eurowise got the a3 application wilwoods in from momentum, thanks guys 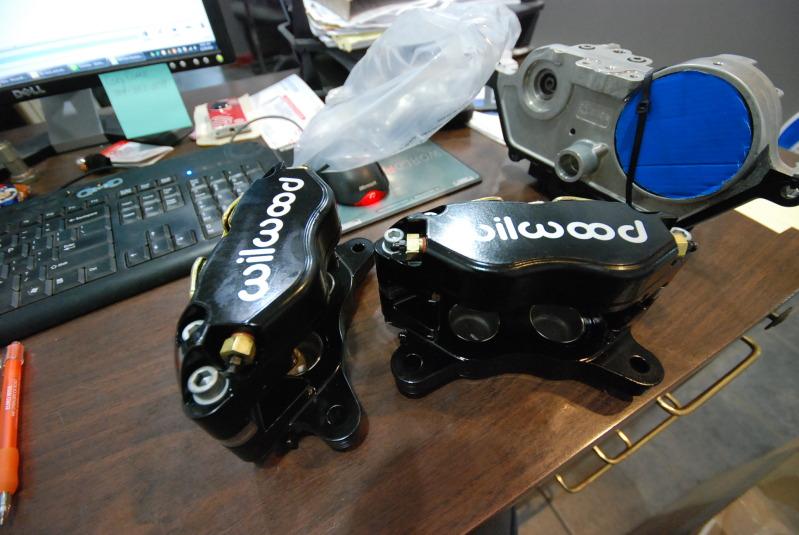
they also welded the oil return line bungs on the oil pan...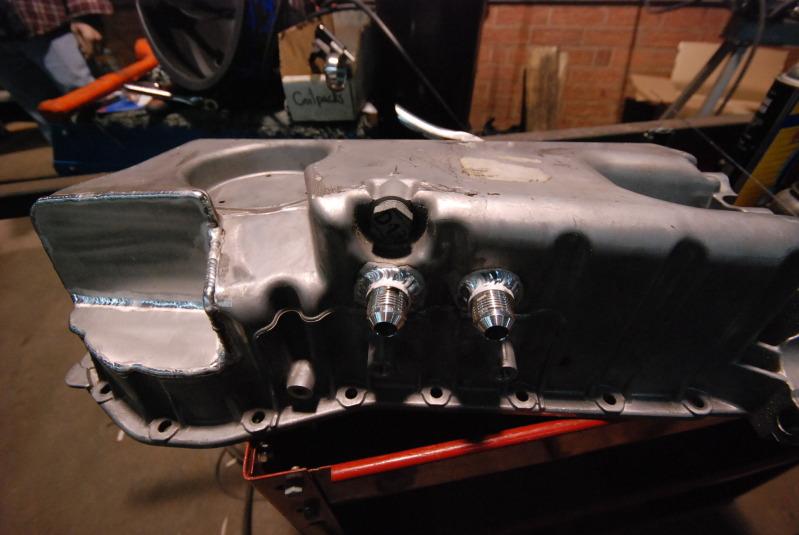
i know, pretty boring compared to the previous days work, but still very necessary and much appreciated....
1/5/2011
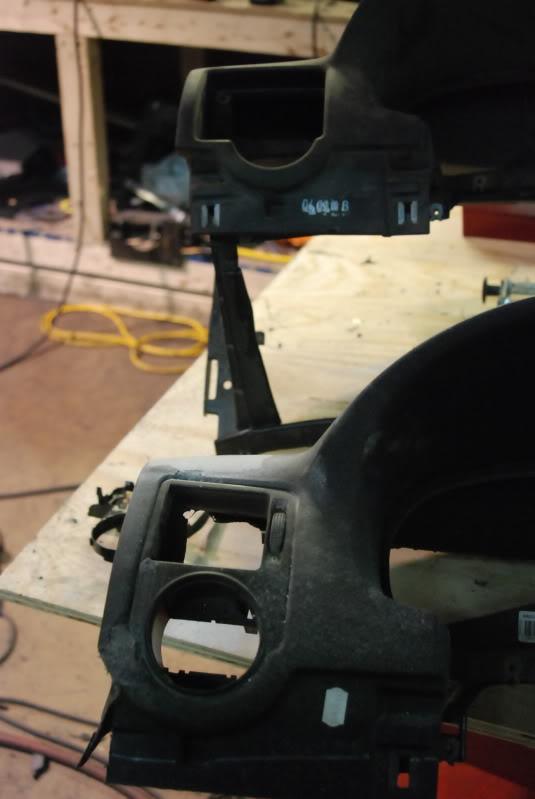
you might recall the original ruined dash that was used for mock up... it"s gone and the new dash was re-cut and fit into place. I'll probably re-upholster it with hair off esher's and tobi's chests... if it isn't enough, i'm looking for donors..... 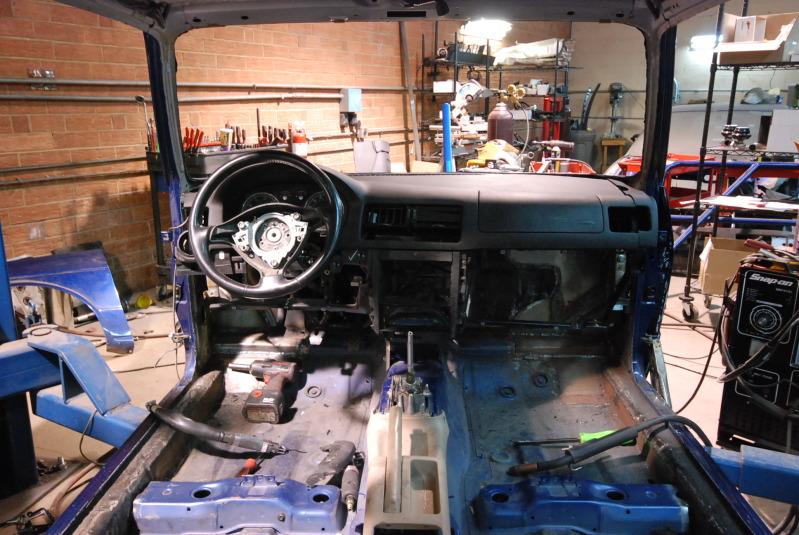
the last pic was a trick.... if you noticed the dash before the turbo's you're officially a knuckle head...
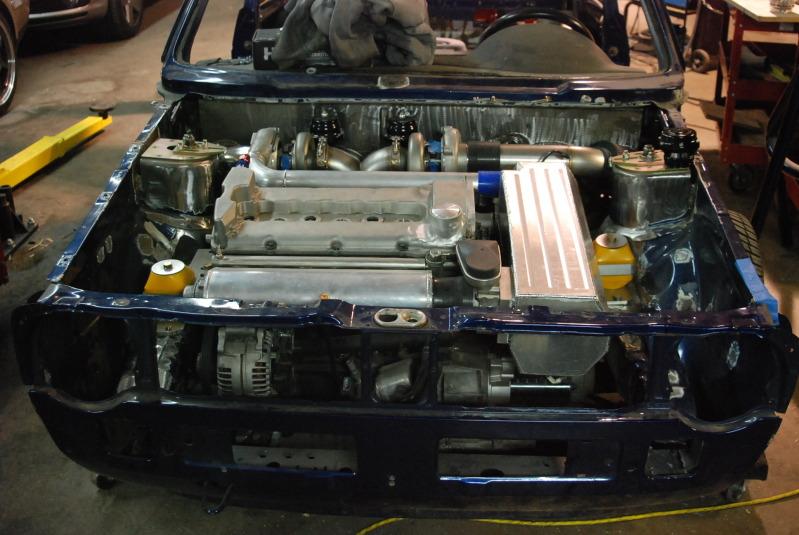
and finally everything, up to this point, back in the bay.... ANYONE notice anything a little different..... give you a clue, its yellow...
1/6/2011
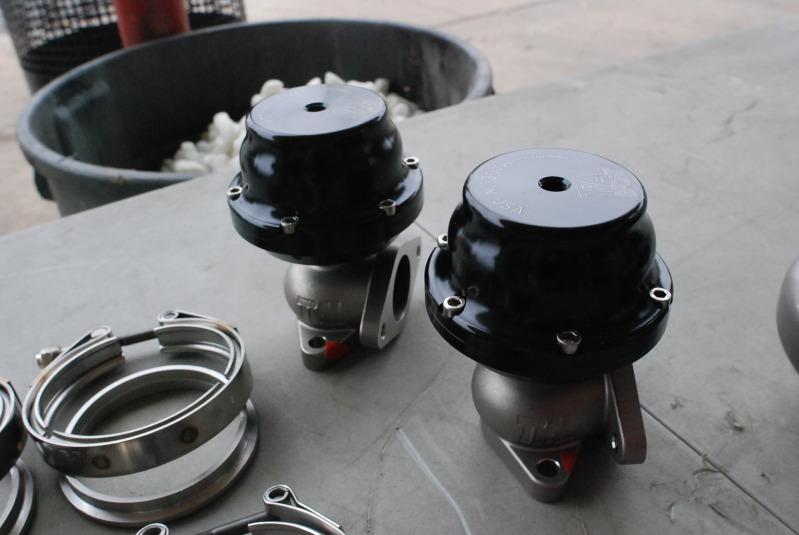
So they started working on the waste gate piping today. My only request was no open waste gate..... So this is how it goes...
They decided to go with the similar form and design from their downpipes. They will be 1.5 stainless 304 inlets and outlet tubes, and the dump tubes will merge together and transition from a 1.5in to 2.25 and dump into the downpipe. The inlets will come right out of the collectors. 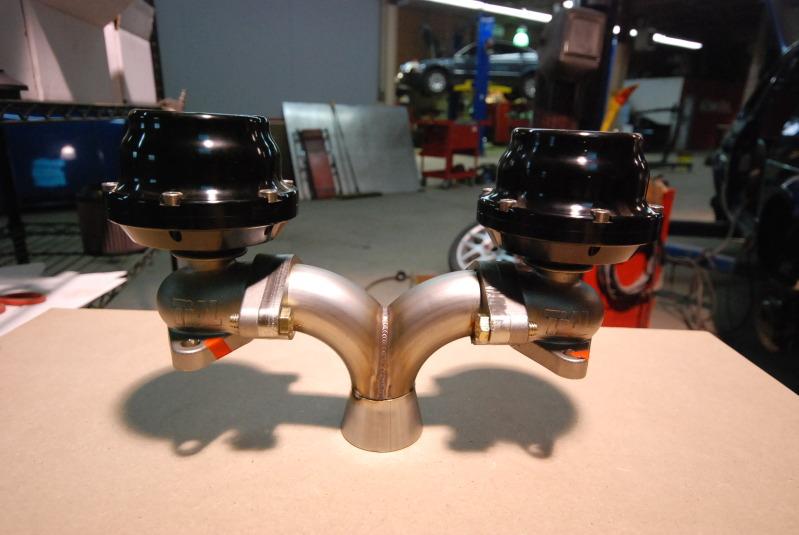
a close up of doug's welding skills.... 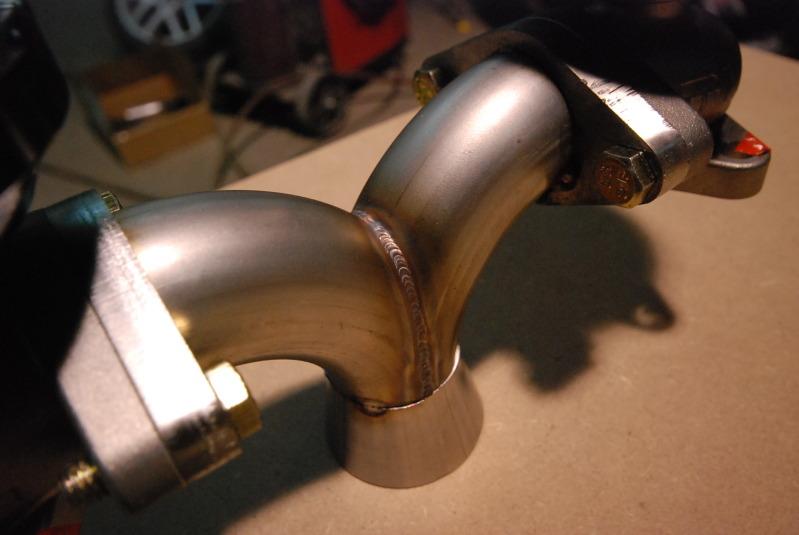
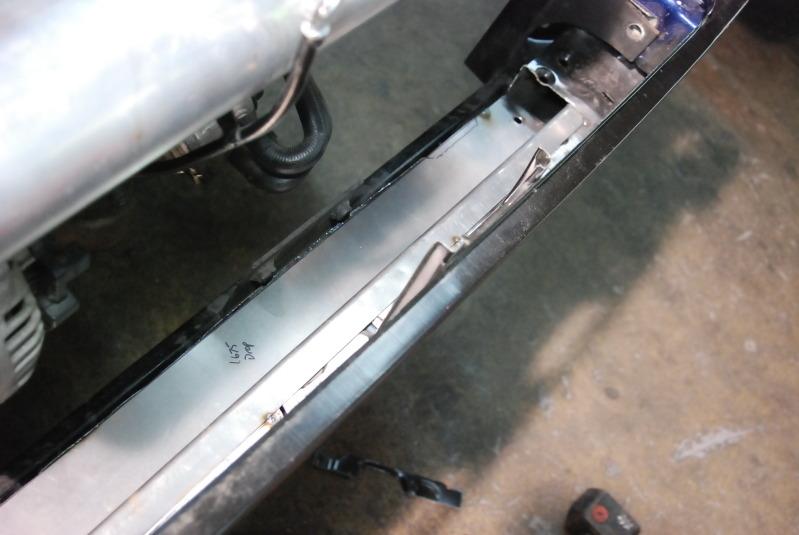
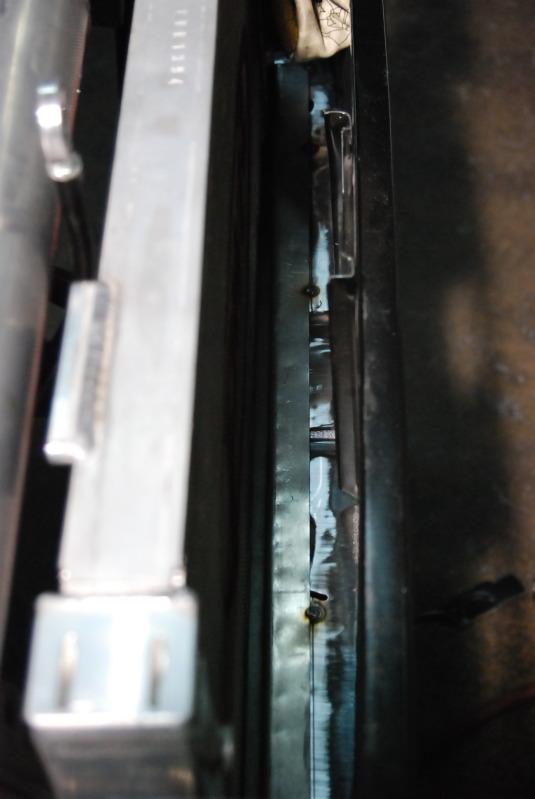
And pics of the single wiper hole shaved.... 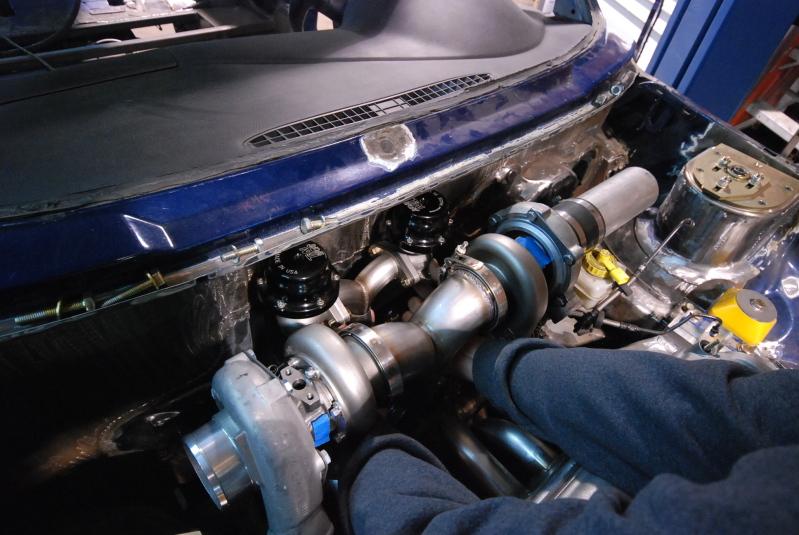
progress they've made today on the mani setup...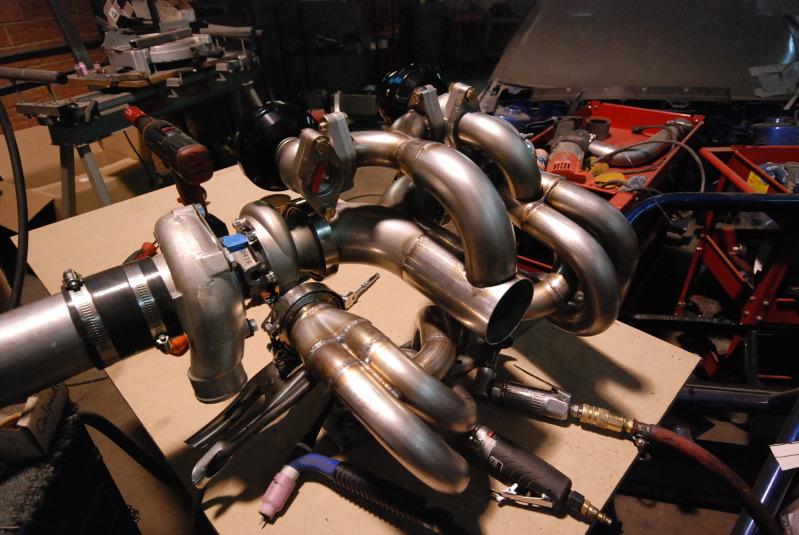

1/8/2011
So.... when things don't fit, make them fit...
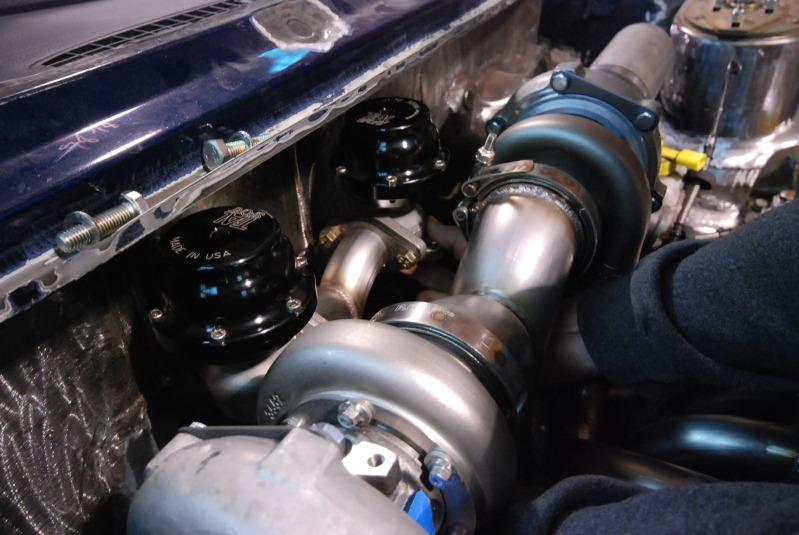
1\2 of the compressor housing was machined off due to the tight clearances they are working with. The room behind the valve cover was saved to run the charge piping using an aluminum 90 degree bend along with a 2.0 straight aluminum pipe. 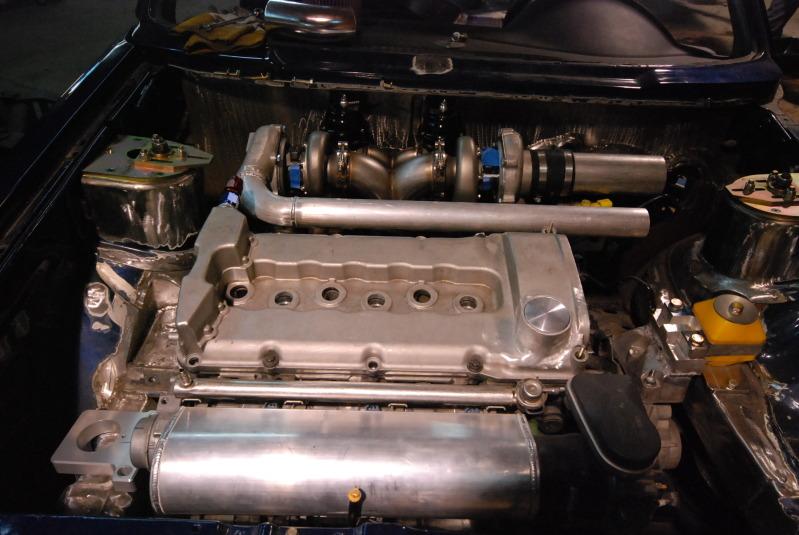
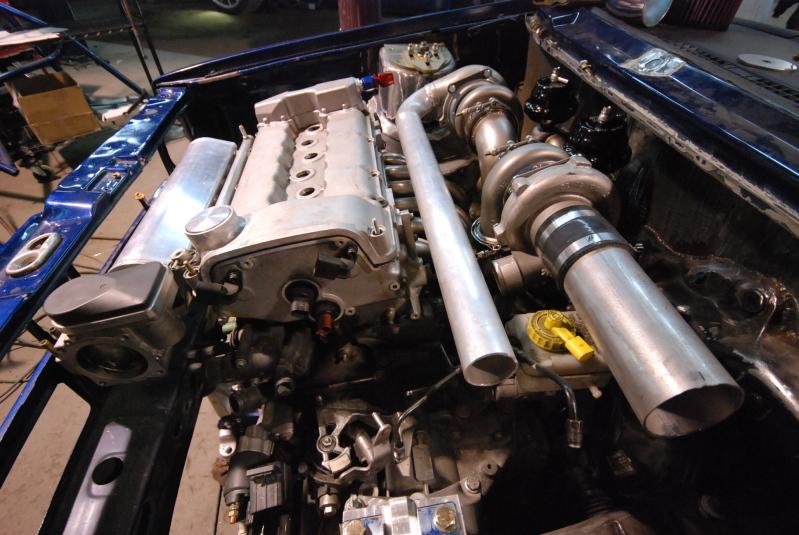
To address the issue in regards to the passenger strut tower, the turbo's were designed to sit further back and the snout of the compressor housing was machined and a 90 degree elbow was welded to it for the air cleaner. I had asked that the filter's be angled slightly downwards to add a little more dimension since alot was going on up top.... Mike agreed and below is the result....
snout shaved.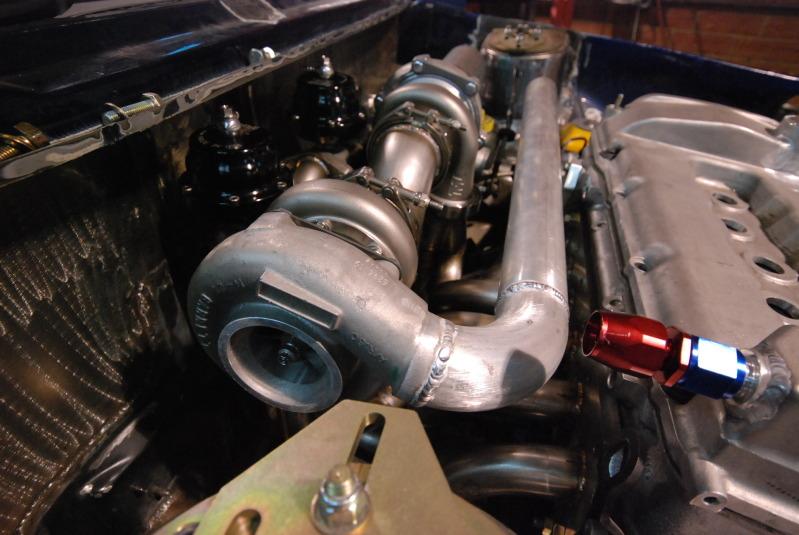
elbow welded angled downwards.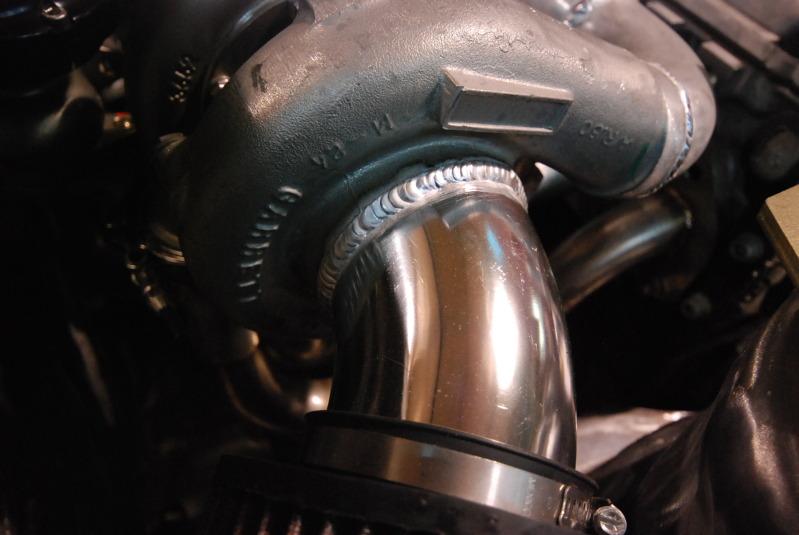
driver's side symmetrically angled down as well.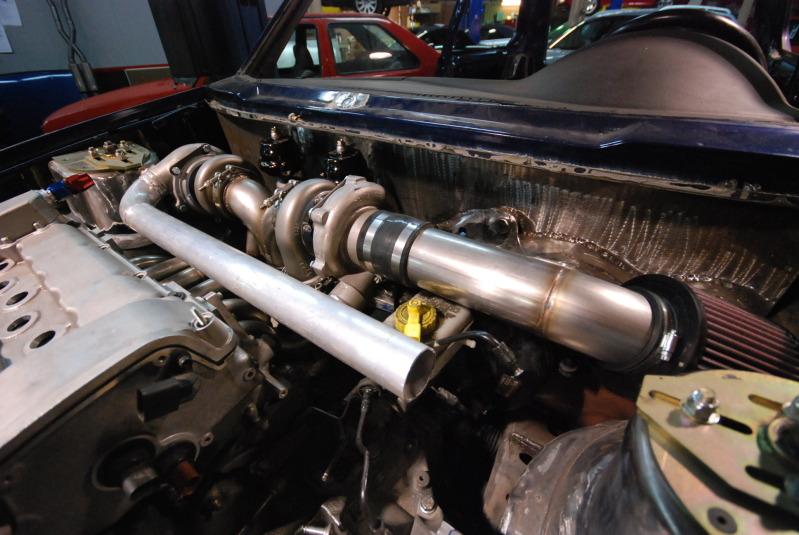
just a fun view of both filters....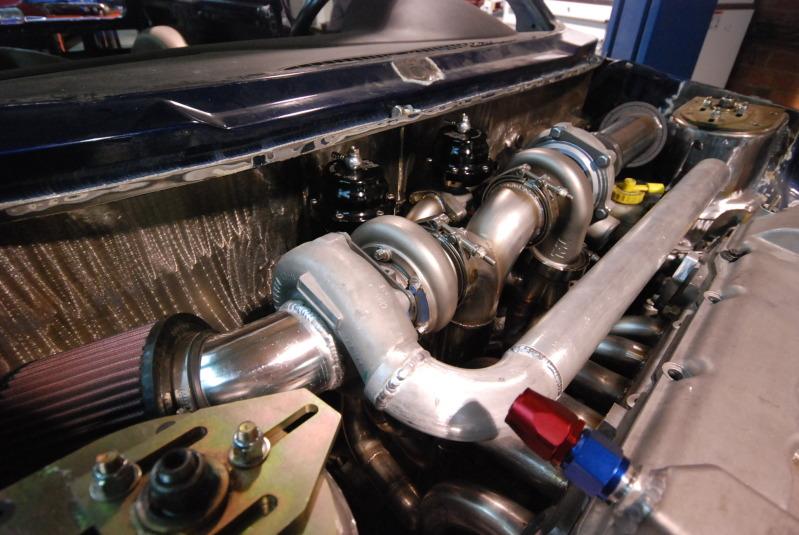
i also mentioned earlier that we had an issue with the turning radious, should have paid more attention to shannon's thread... so the passenger motor mount was relocated using brackets that they have made. it will be machine down and rounded off to match the drivers side once done. here is the rough base plate they made.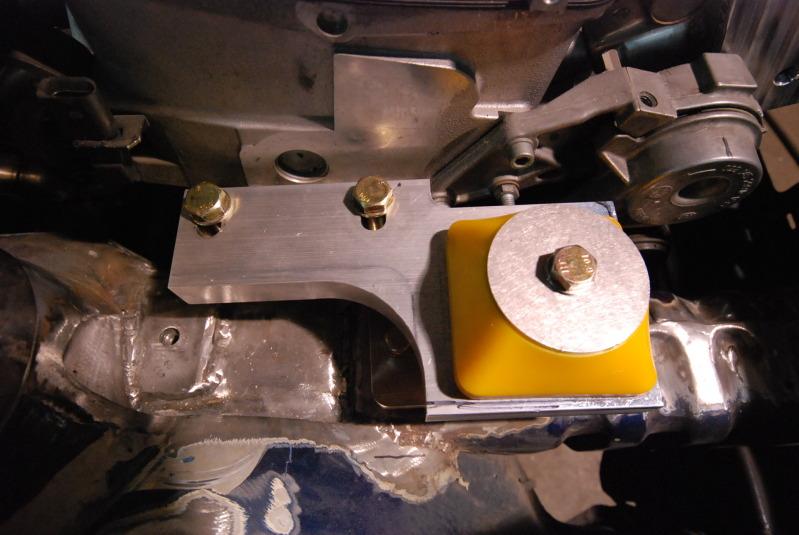
and finally. everything mocked up... 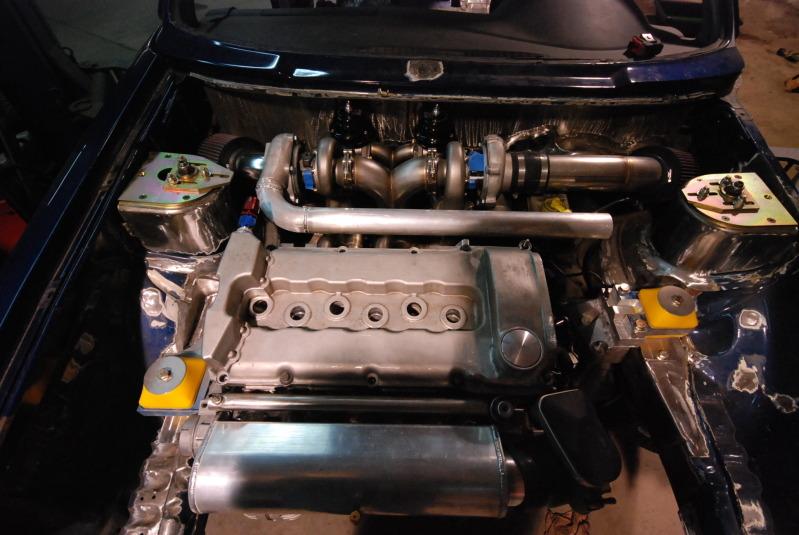
1/12/2011
so they began the downpipe today.... 
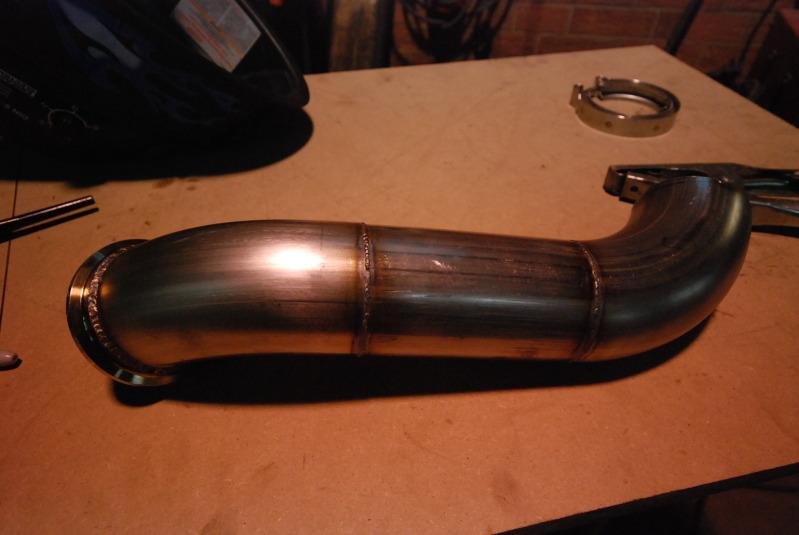
an it mocked up...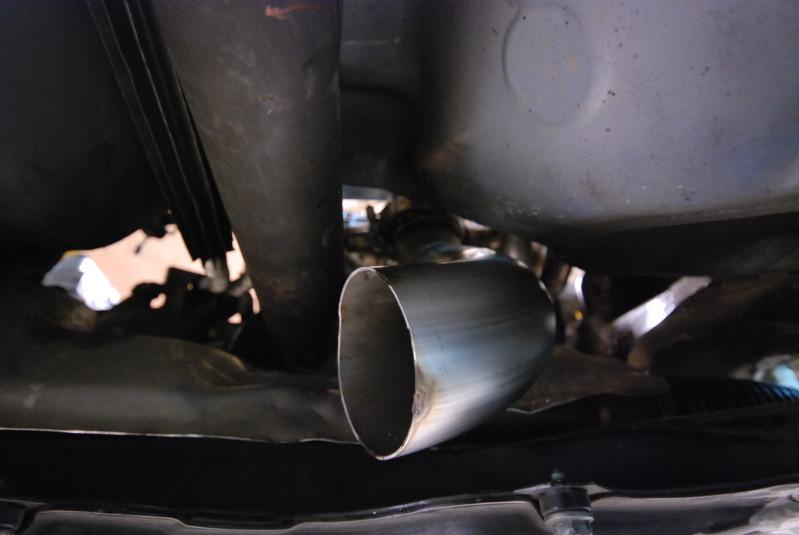
not much, but the weather has thrown them off a good bit, but once this mess clears up, they should be back on track...
1/18/2011
So some good news... Spoke with doug and the penicillin cleared that itch so he should be back in tomorrow.
Probably not the best idea to talk smack about someone that has access to a plasma cutter and my car...
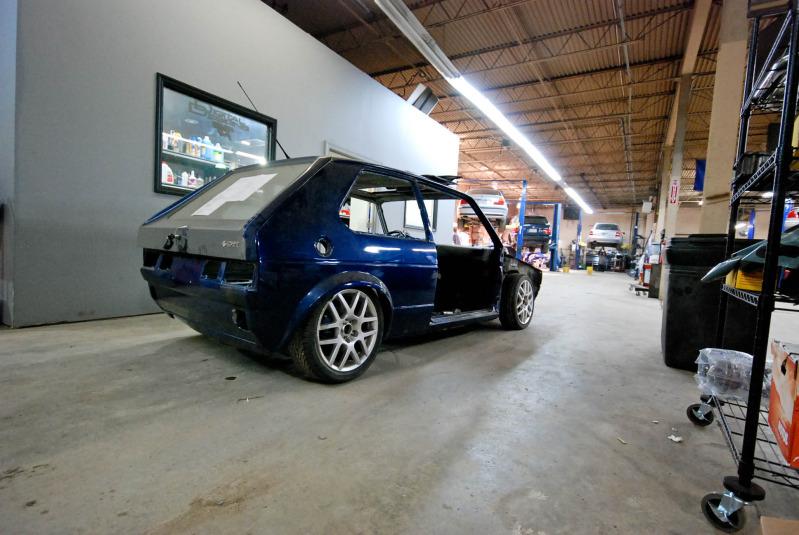
Either way, since its going to be a minute before any serious updates, to feed my need, mike took a few random shots of the car rolling on its on.... boy they grow up fast... 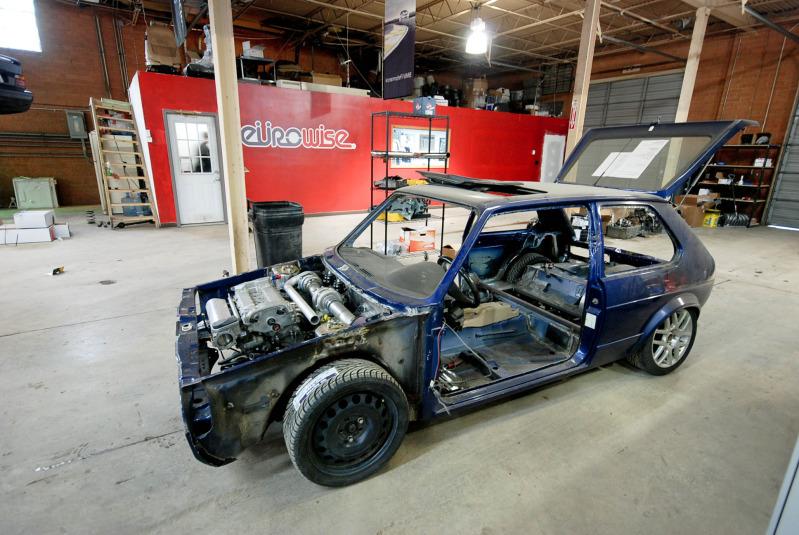

1/27/2011
AS FOR UPDATES: spoke to my wheel "builder" last night and looks like we're on track... hoping to have the new kicks in by SoWo....
AS FOR PICS: Again, till i make it up to charolette, they AIN'T touching my car so all you cry babies can kiss my brown persian bottom...
But will leave a few pics of the custome exhaust eurowise is building.......... 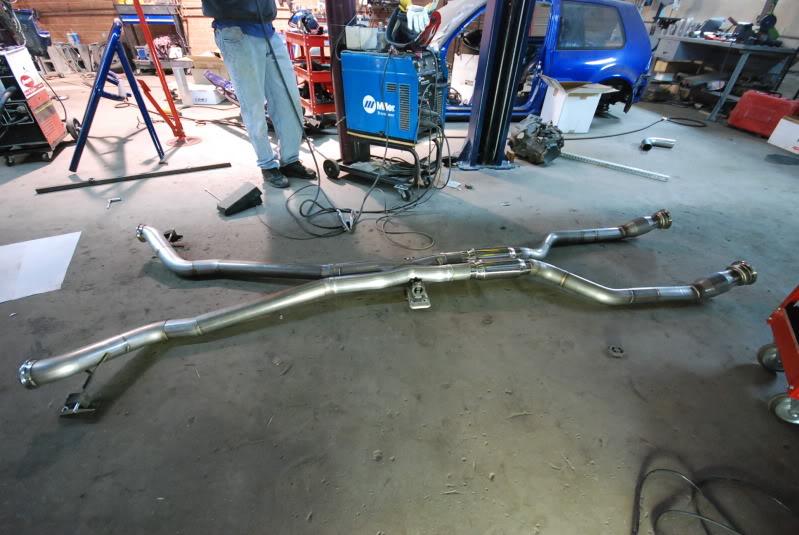
Keep your diapers clean fellas 
1/30/2011
So made it up to charlotte and had a good hour talk with doug..... Doug won today for the most part... 
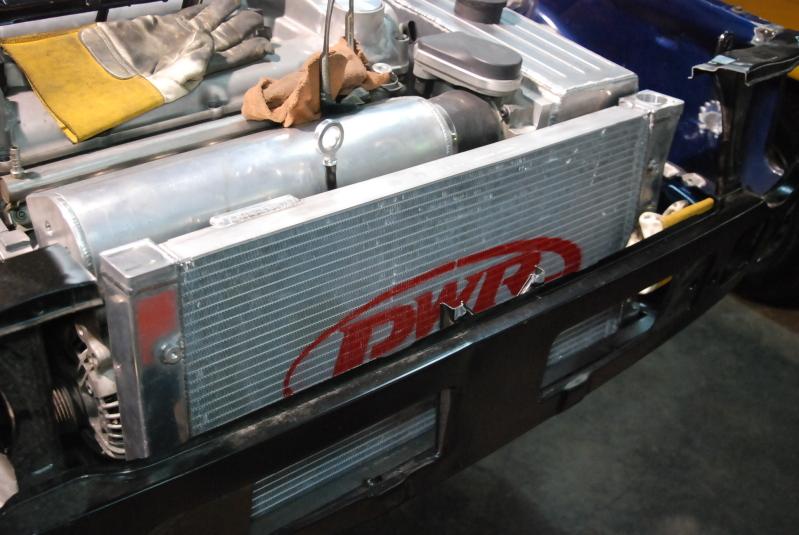
I really was hoping to run an air/air setup, but due to limited space, it is physically impossible to fit an appropriate IC and radiator up front. So the game plan is a big boy radiator of some sort and a doug special custom made air/water intercooler setup.... After he showed me exactly what he wanted to do, I agreed. Now that we have agreed on that along with the exhaust, he'll begin work on both this week so should have some pics up soon...
Also figured out the core support setup. The top portion of the core support will be removeable, for ease of servicing when need be. We discussed a good bit more, but we'll get there soon enough.....
Finally, the r32 has been put out for the voltures.... 
2/2/2011
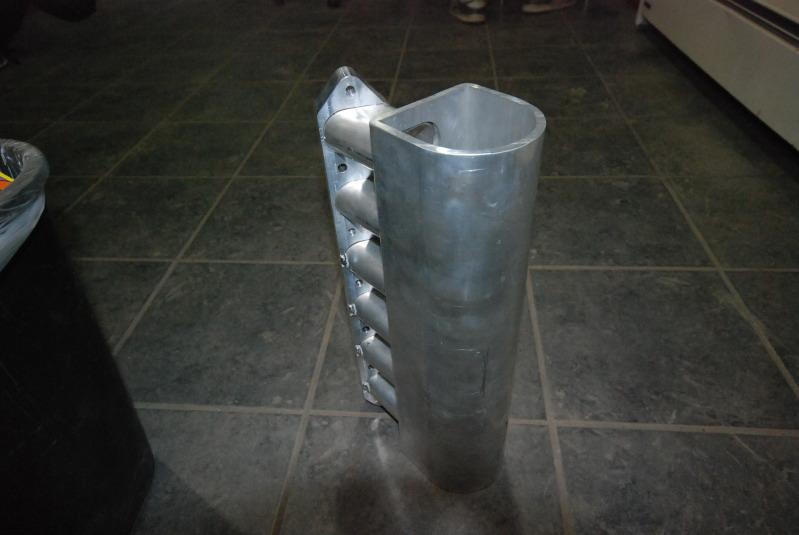
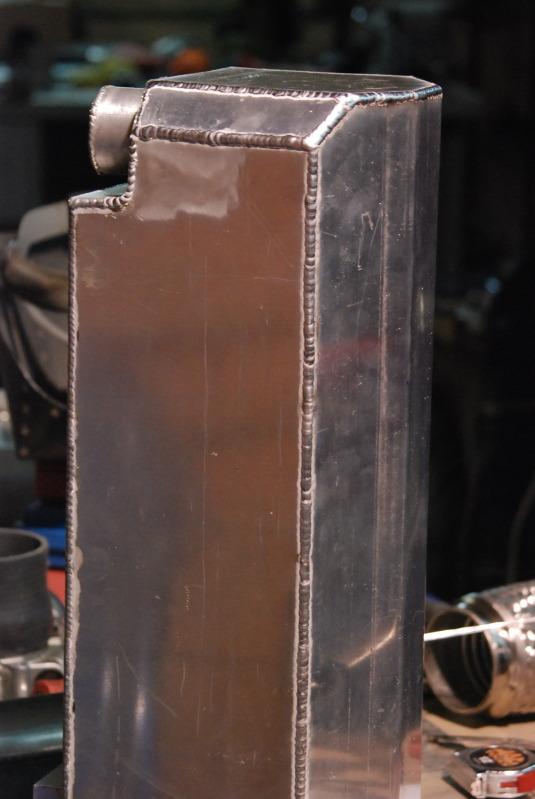
speaking of charge temps... after all my suggestions, doug got me to tap out and I gave him the green light for the air to water intercooler setup... nothing against the typcical "V" style intercoolers that many run, but i really didn't want that and doug had a great proposal and here it begins..... love ya doug... and you hugged me twice so i know you're starting to love me too...
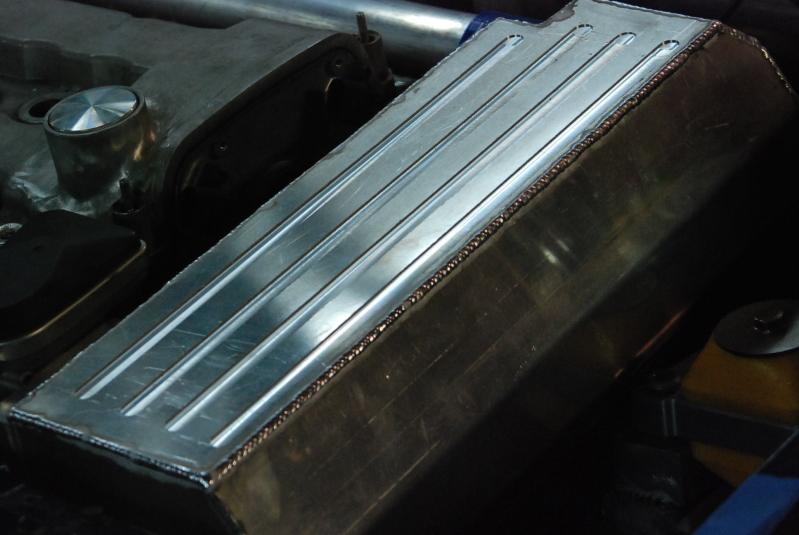
14 gauge aluminum sheet metal was used.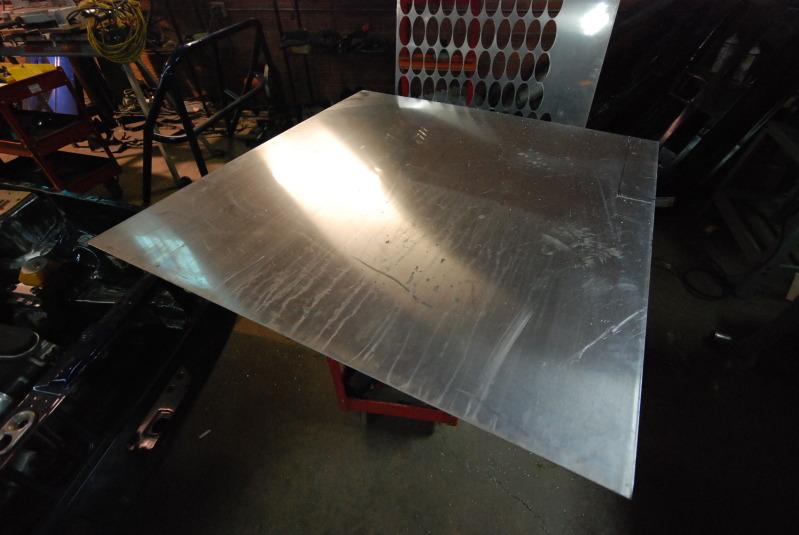
doug donated his bare intercooler core. Either it was an early bday gift, or like i said, he's starting to love me... 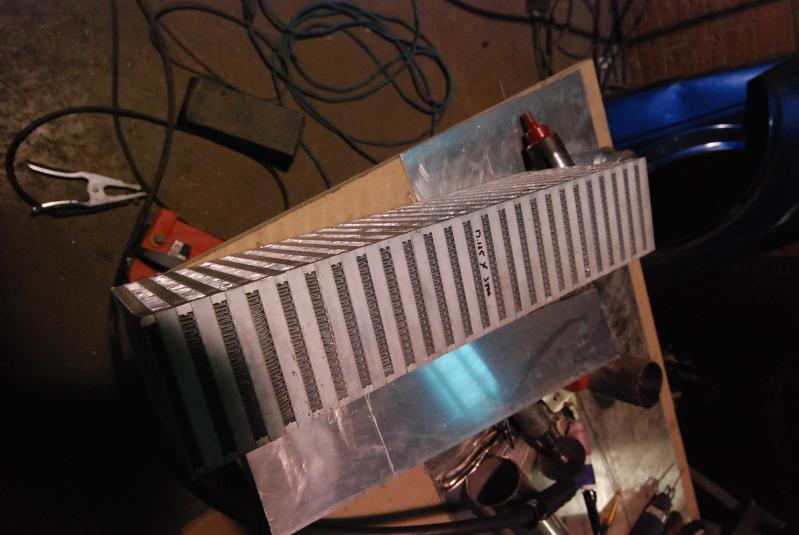
he welded the end tanks on.... not bad welds for a man thats been sick for 3 weeks...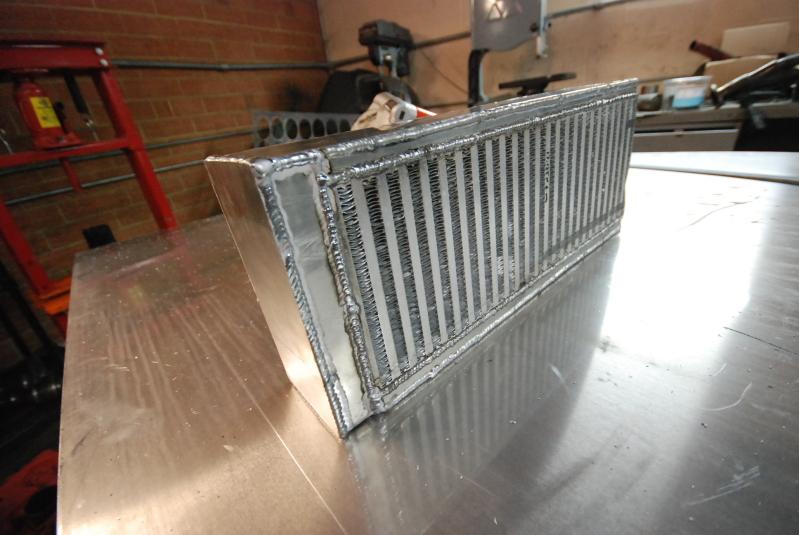
and an idea of how it will sit... the intercooler when positioned and finish built, will be contoured in such a way to compliment the rest of the motor... i hope... 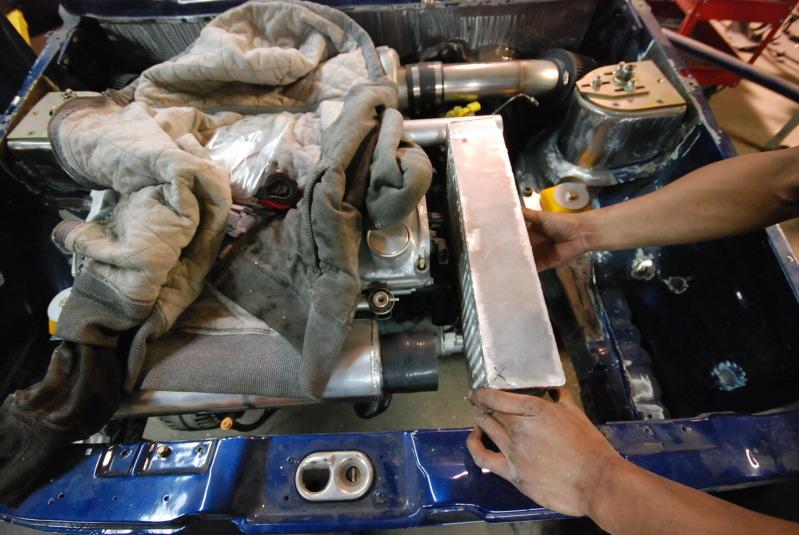
looking good fellas
2/12/2011
so the hold up came down to two things....
took a second for the fittings to come in.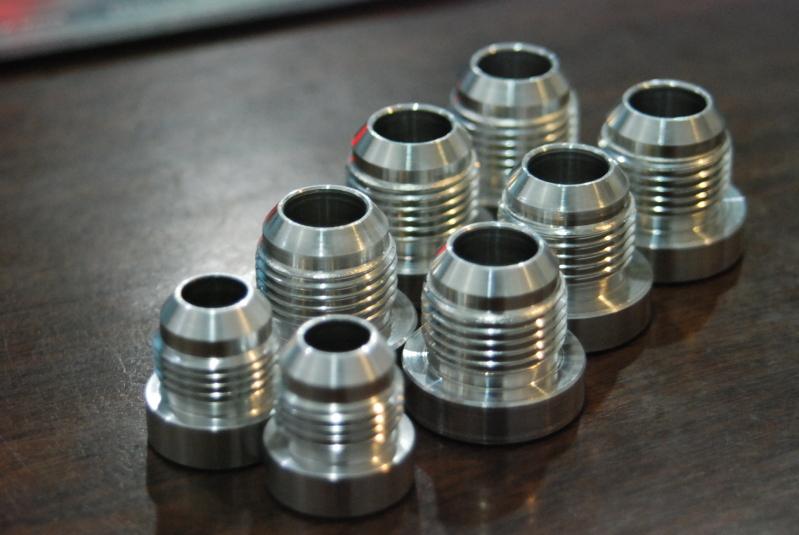
and their metal bending brake was broken when they tried to bend 12 gauge aluminium sheet metal.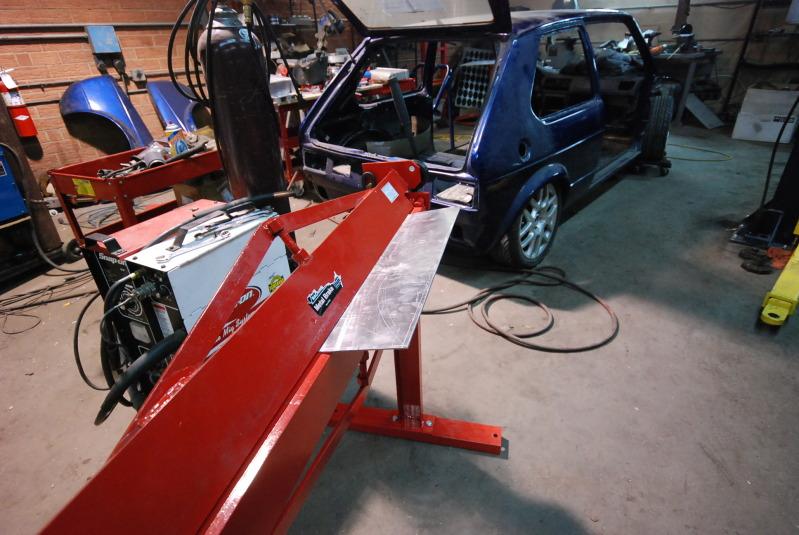
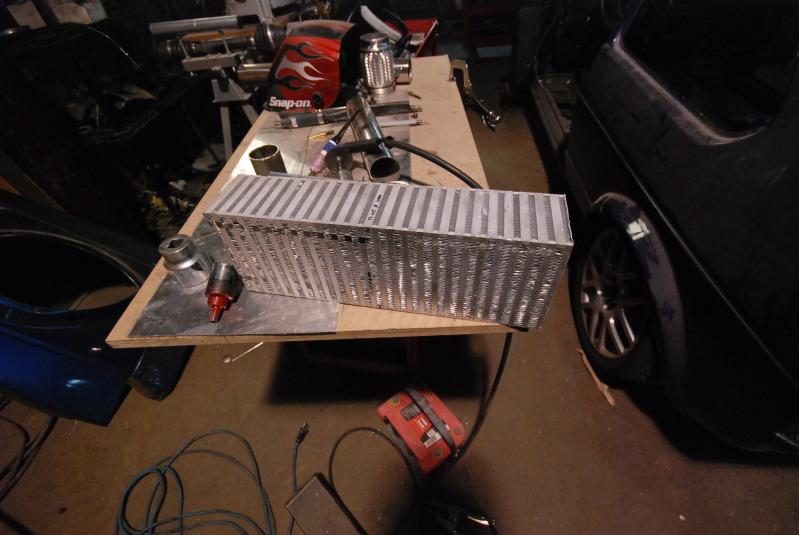
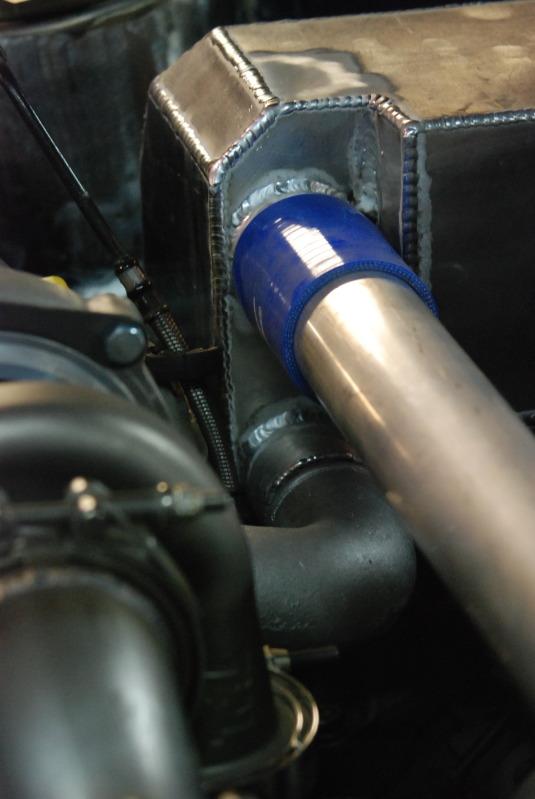
anyways, enough of the excuses and on to the good stuff.... They've gotten up to 80% of the air to water IC completed...
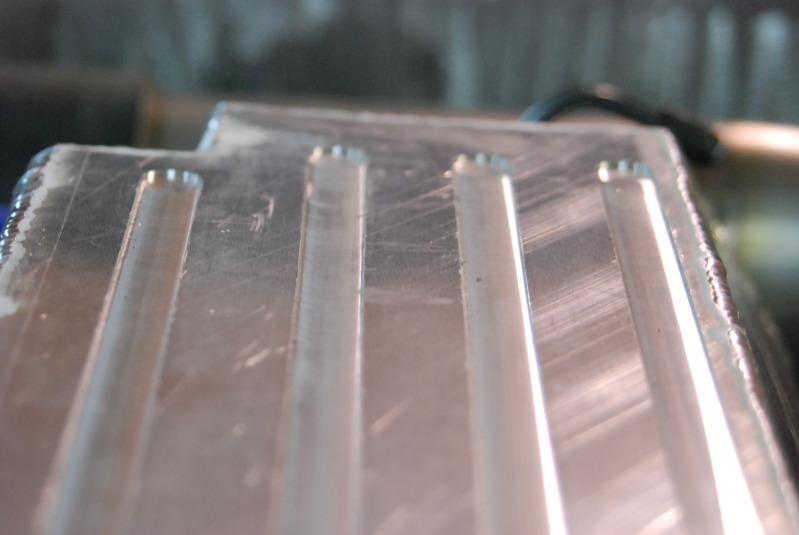
first, from scratch, they built the end tanks and charge pipe inlet and outlet flanges... 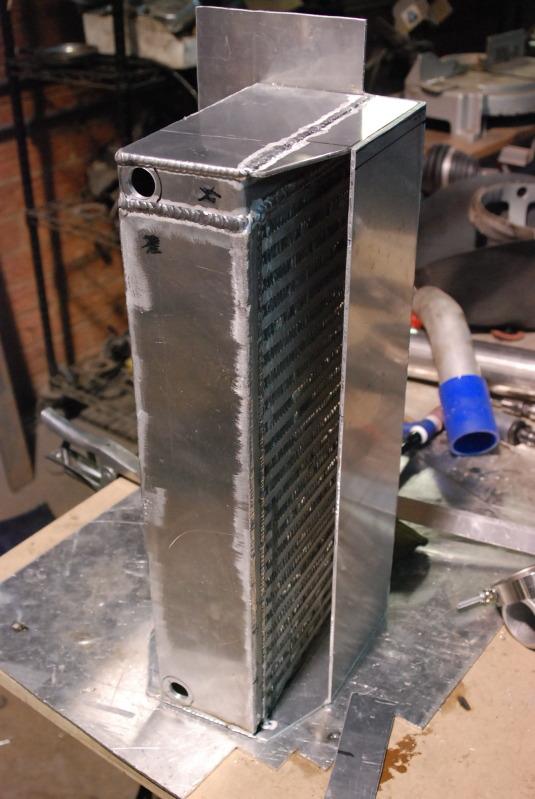
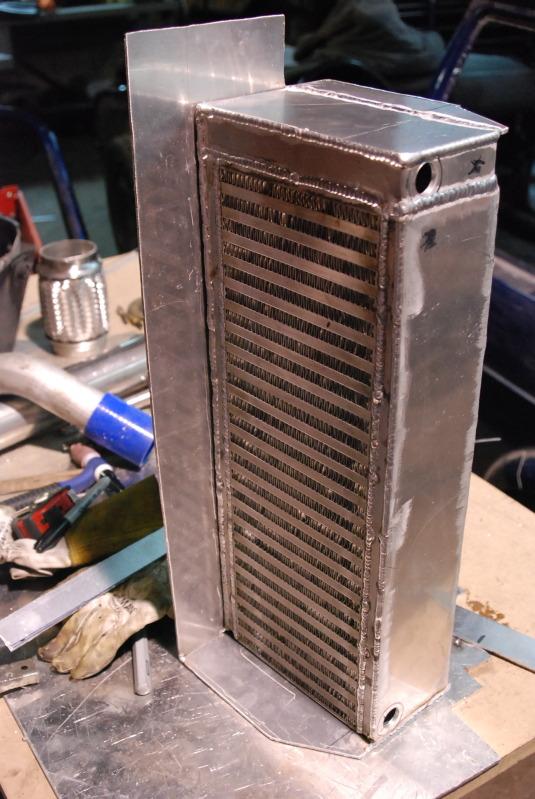

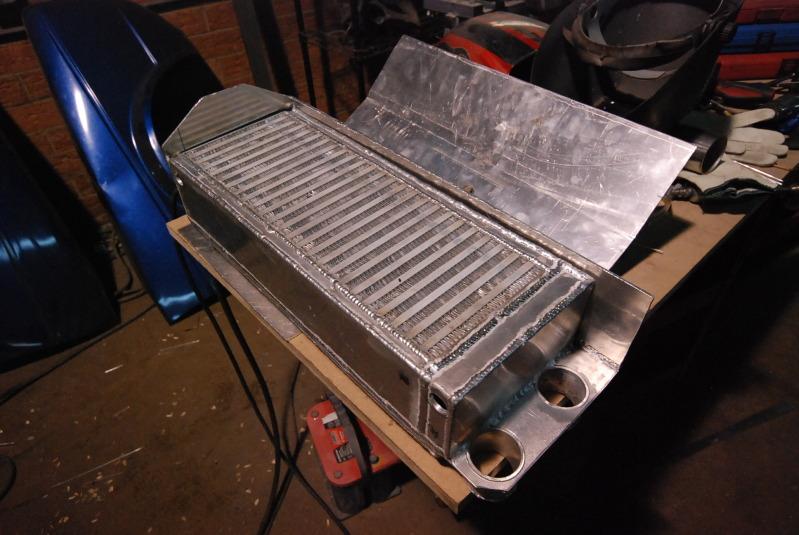
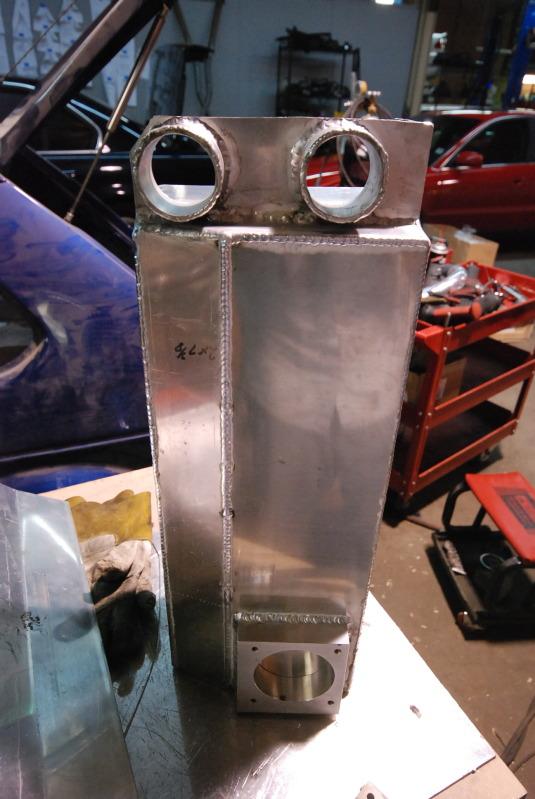
Then the endplates were welded on.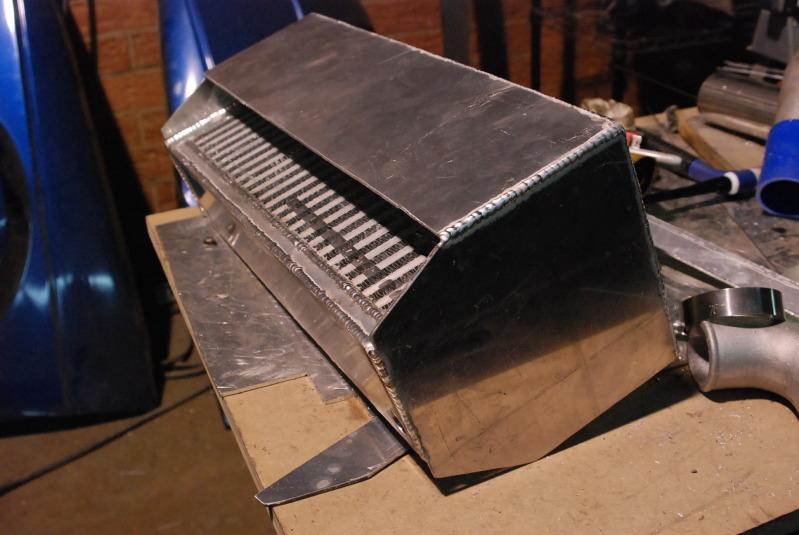
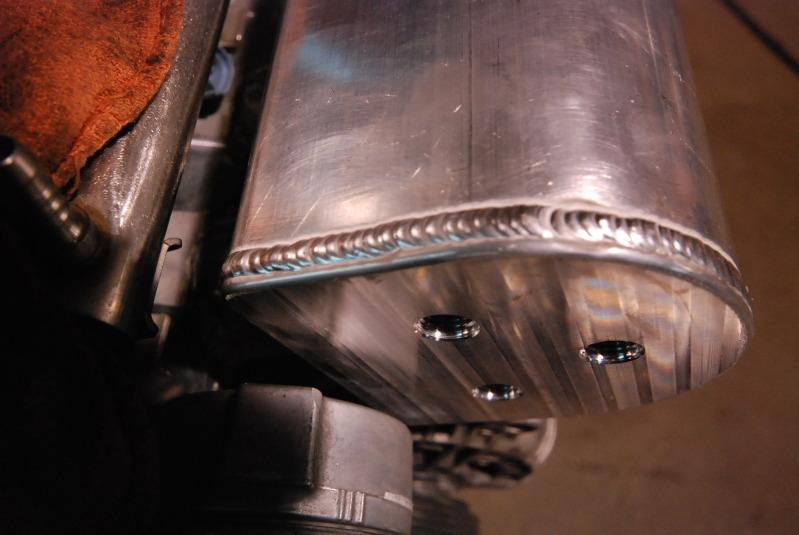
a close up of the compressor charge pipe inlets into the intercooler.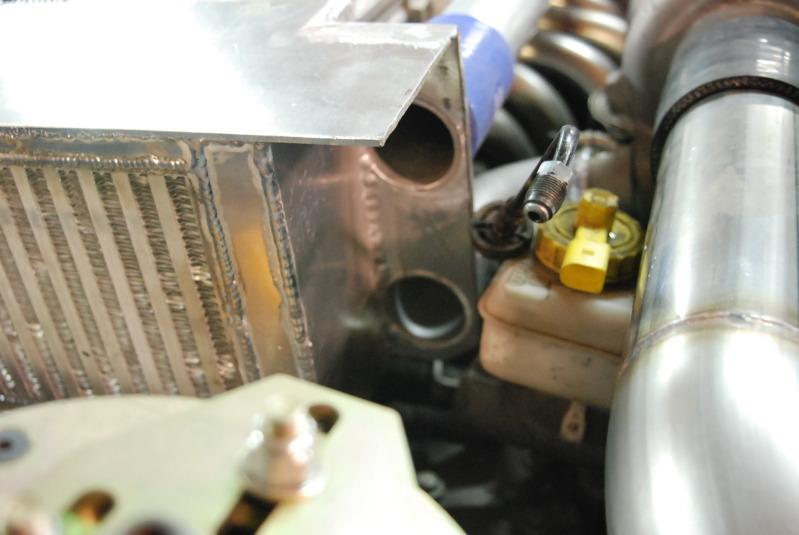
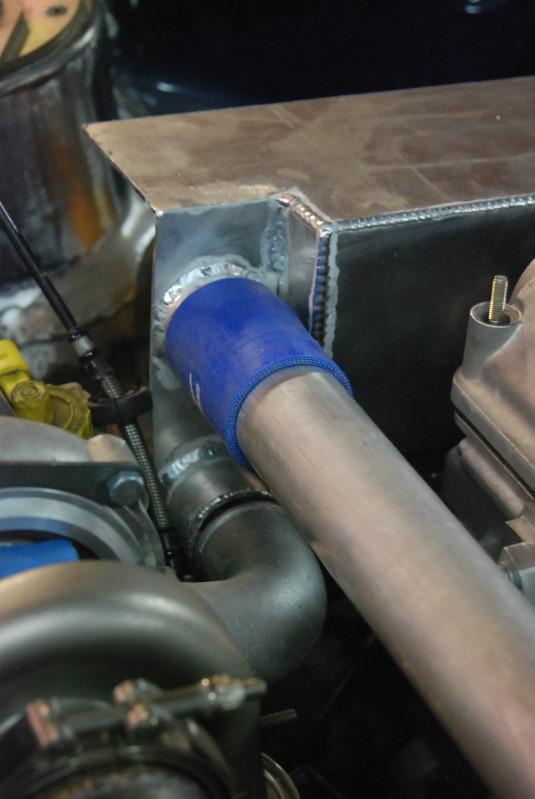
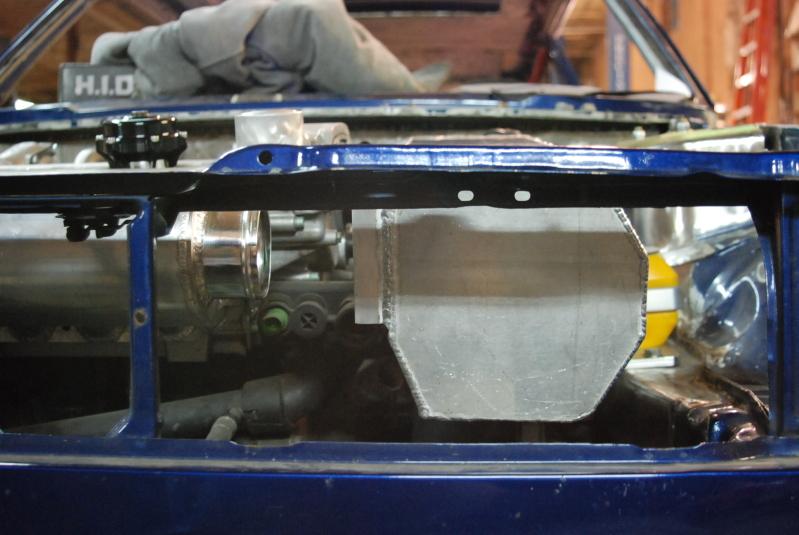
Due to the large size and boxy shape of the IC, i wanted something that flowed a little better so decided to give one side some "shape". Doug did so while still maintaining functionality by bending the passenger side... the picture makes more since. its seamless and clean also to change it up a bit... 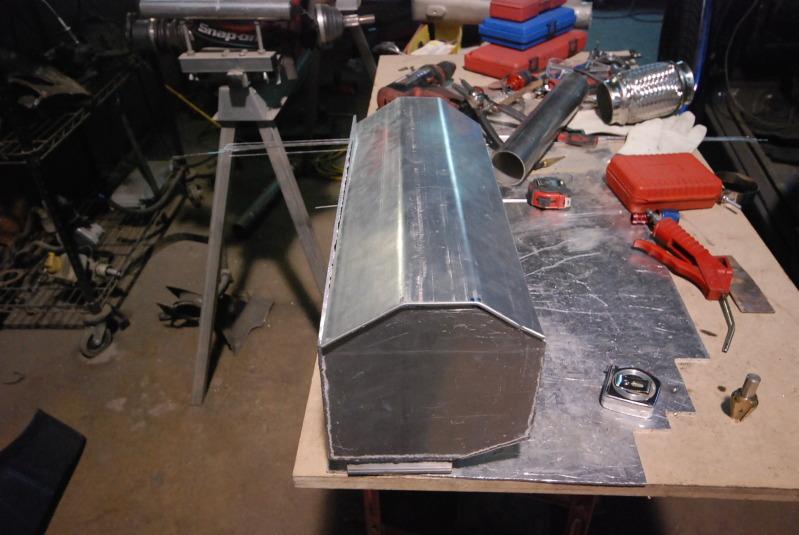
after that, they boxed in the charge section and finished the endcaps...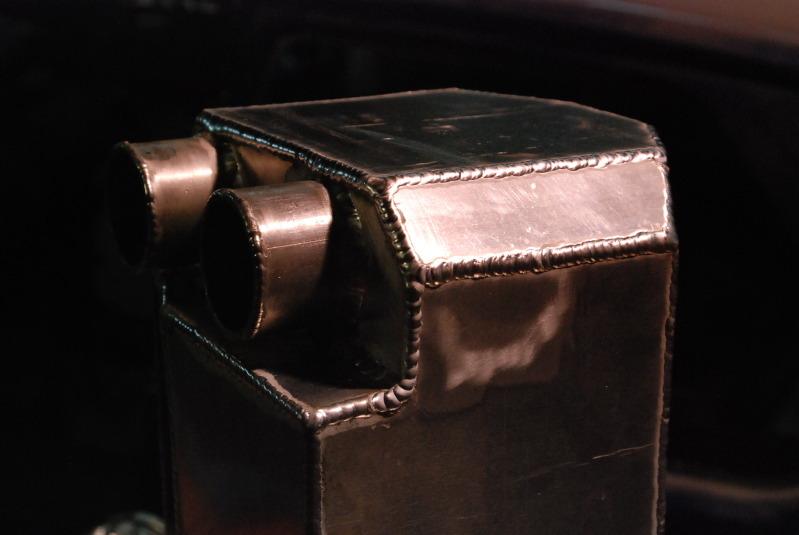
some ransdom detail shots...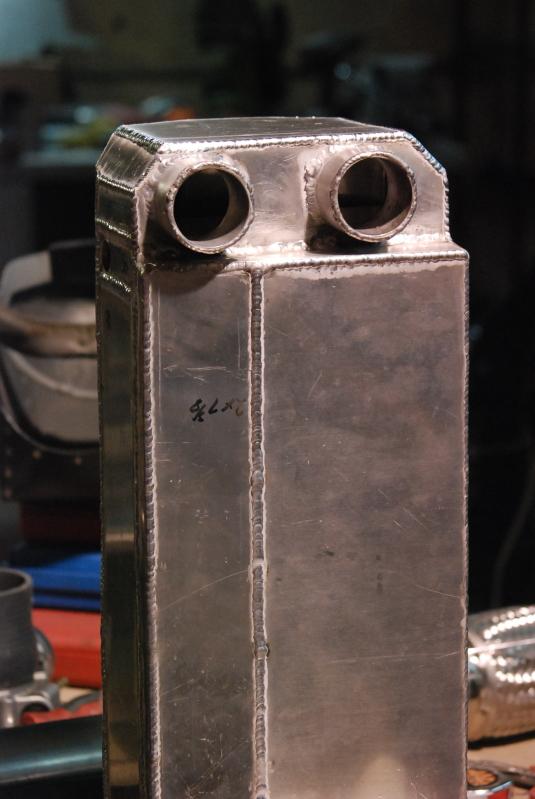
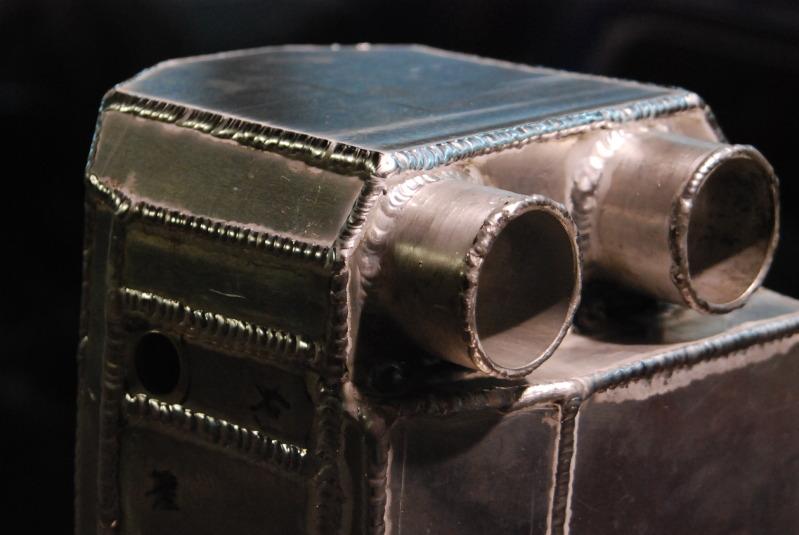
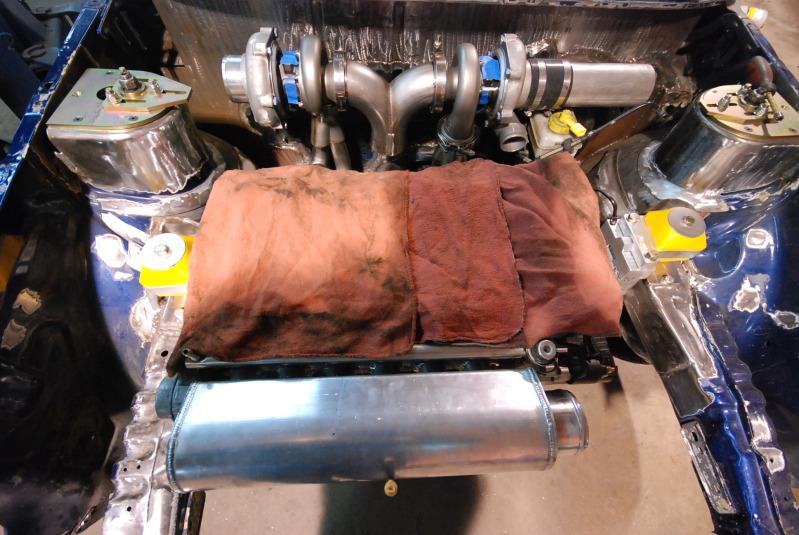
and some mockup shot of the IC in the bay...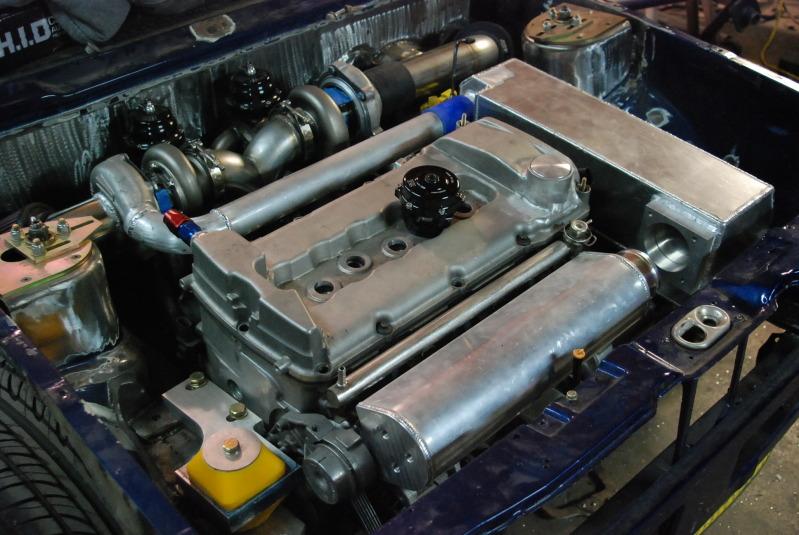
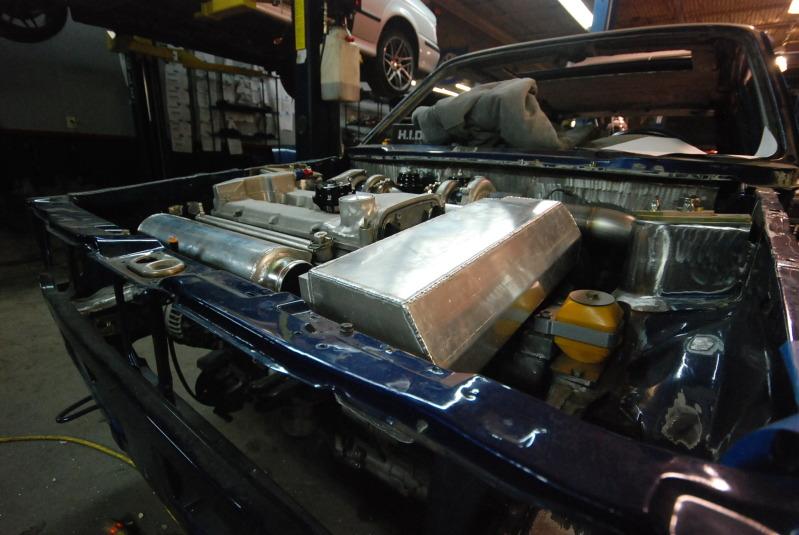
2/18/2011
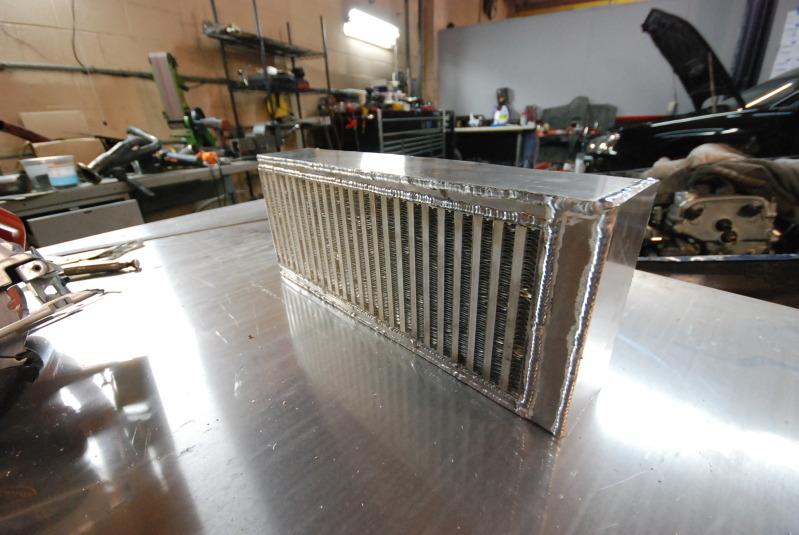
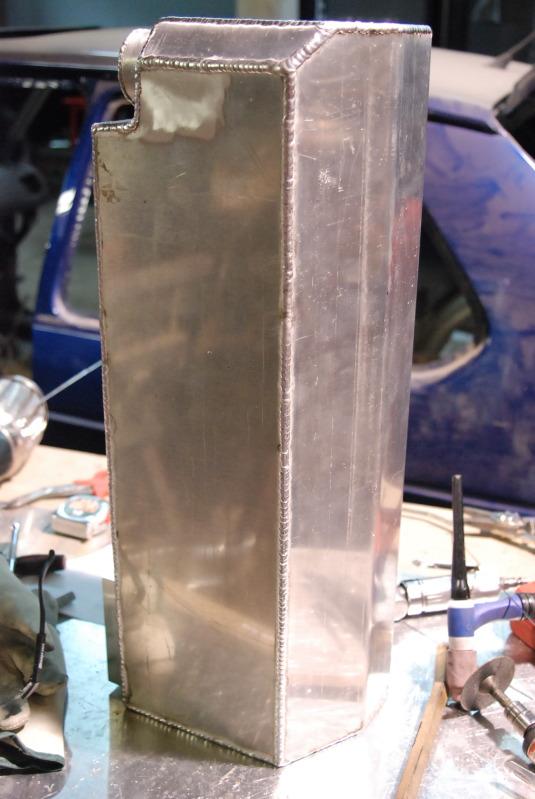
so...... as you may recall, i didn't like how the look of all the surface area of the top portion of the IC came out..... so the top was cut out and will be replaced with the new piece.... 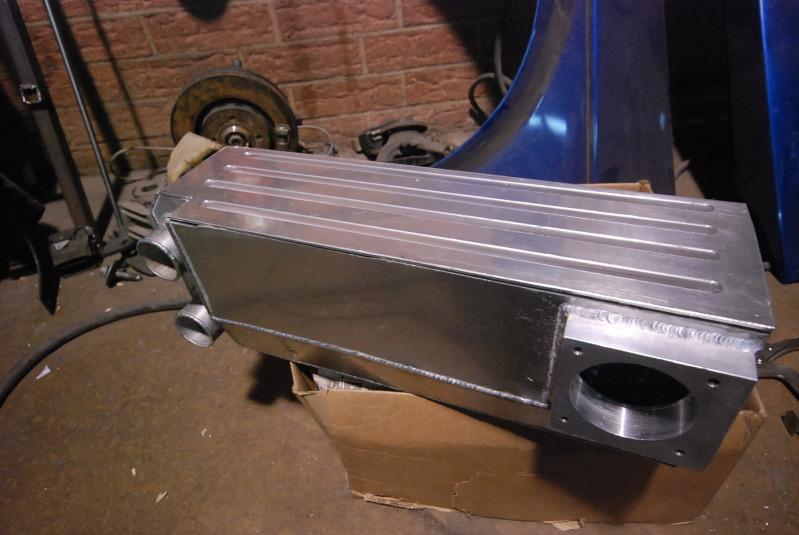
2/22/2011
In my opinion, it looks a thousand times better, but will let the pics do the talking... 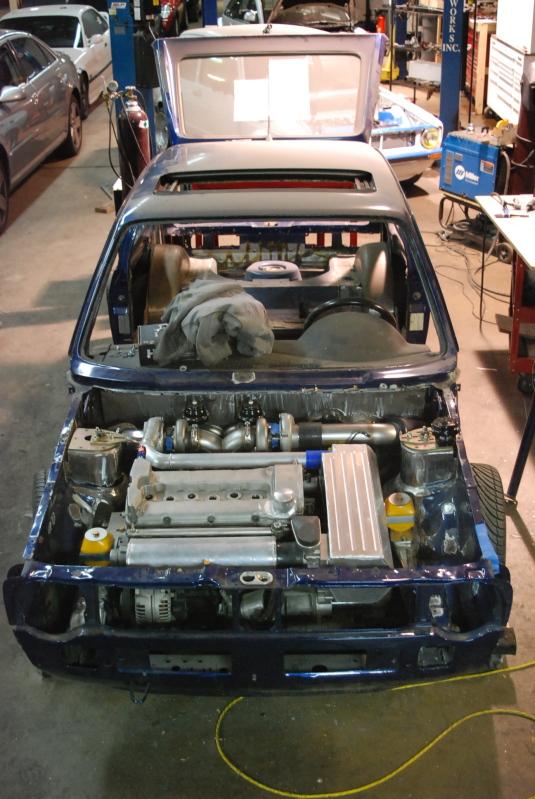
3/9/2011
Finally a break and i can breath... for an hour anyways...
So nothing glamorous like the last few updates. However, as important as the rest of the build, structural integrity....
Don't think anyone really wants to see this car twist into two, so for the last few days doug was busy boxing and bracing in the rear panels...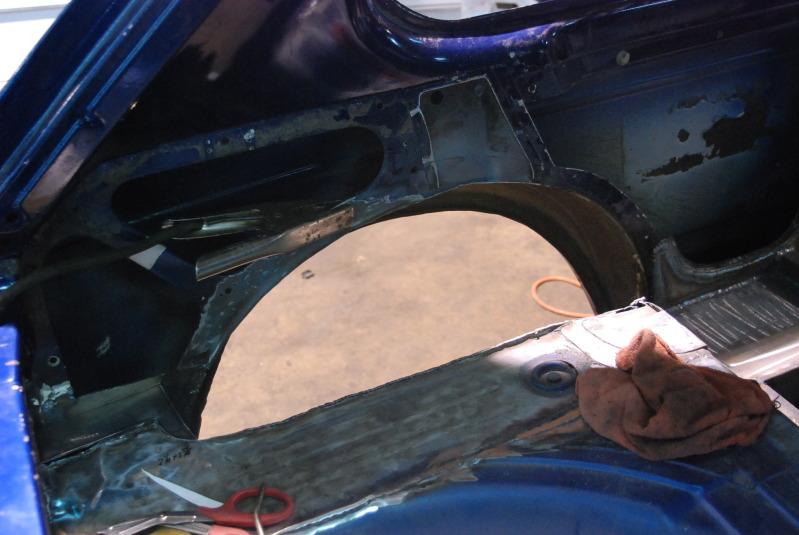
16 gauge steel sheets were cut from paper templates with the aid of the plasma cutter...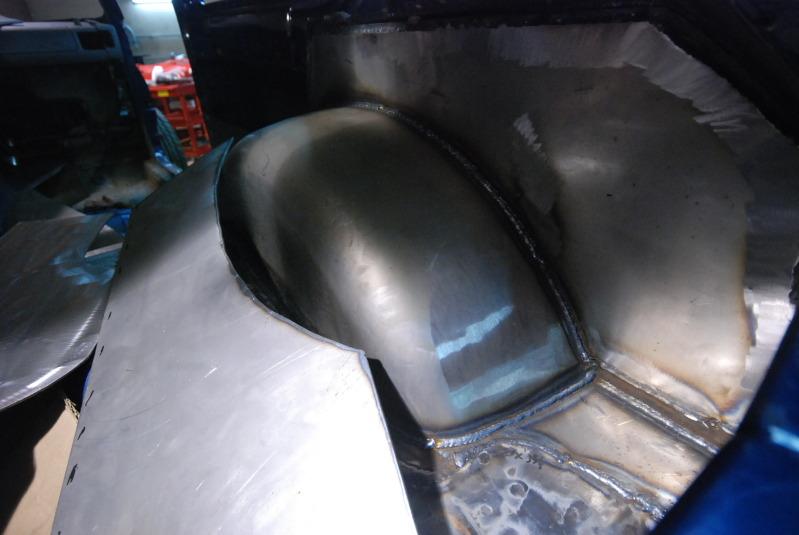
the body was prepped to weld in the new covers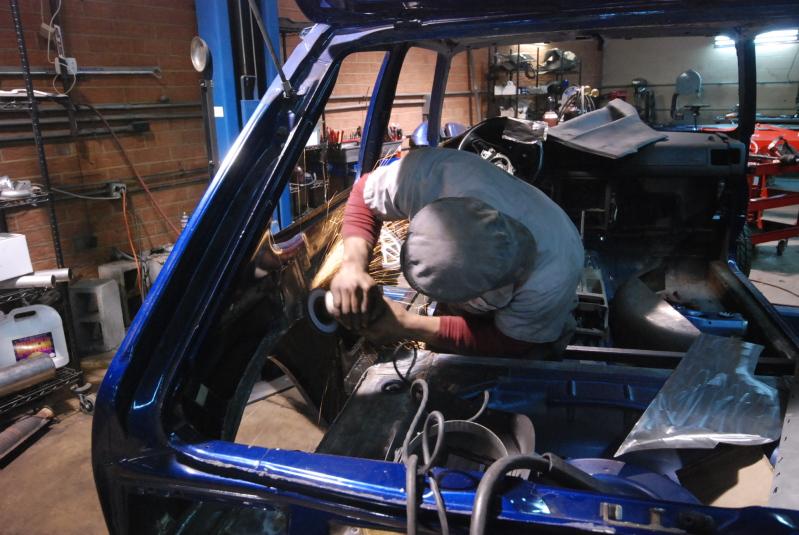
Mike couldn't stress to me enough how little pieces like this were very tedious and took time to fit and get perfect.... 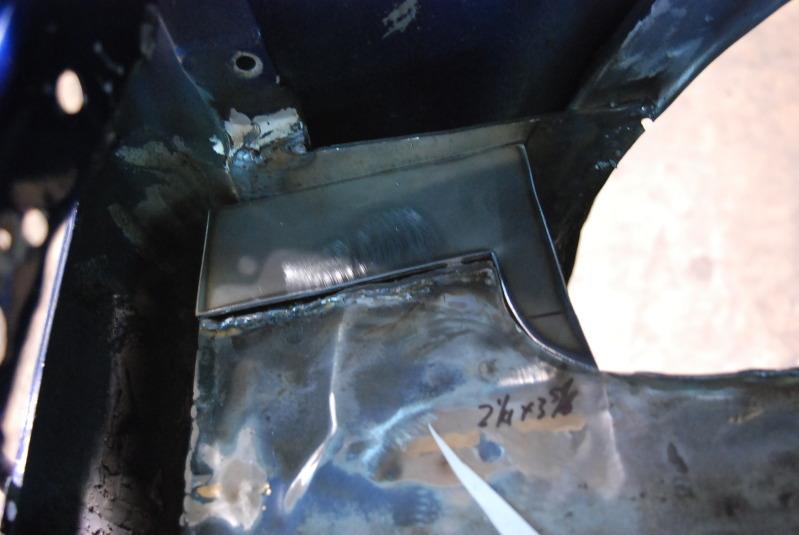
fitted product tacked in place...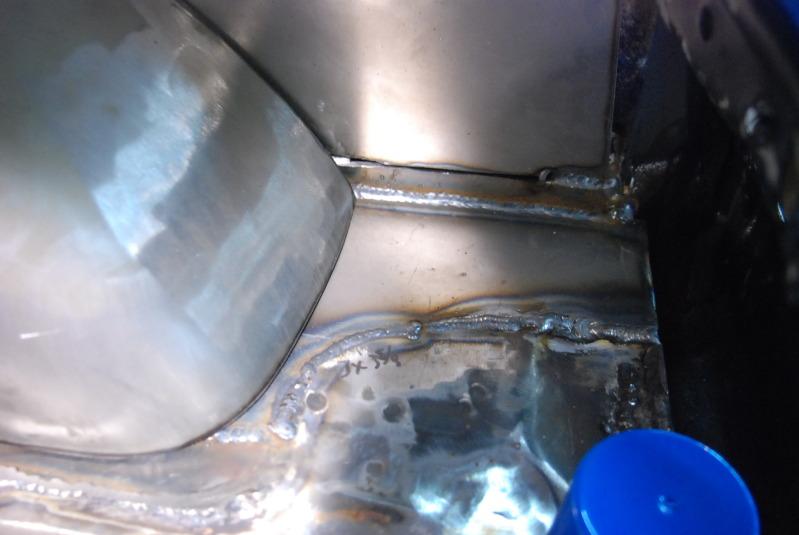
everything even up to the interior plate covers were carefully welded and extra time was taken to perfectly weld the seams. no shortcuts were taken to any panel in the entire car even if it isnt seen! 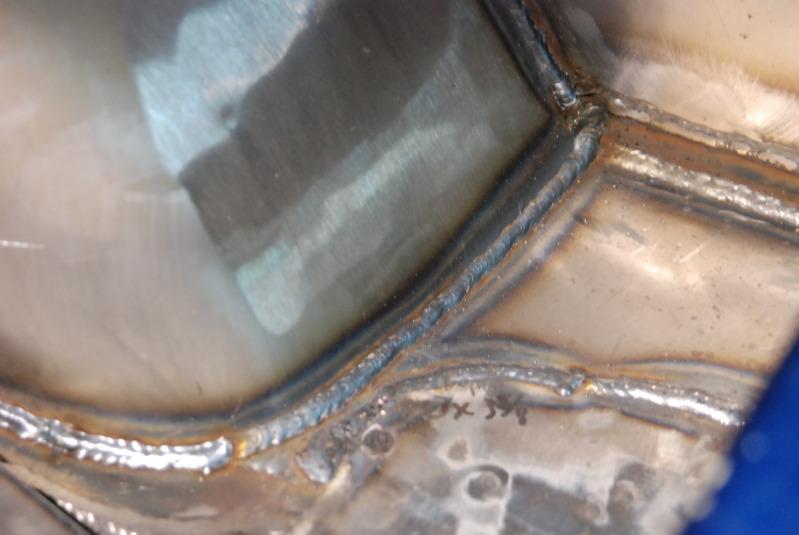
Sloppy isn't an option for this build or any build eurowise does.... 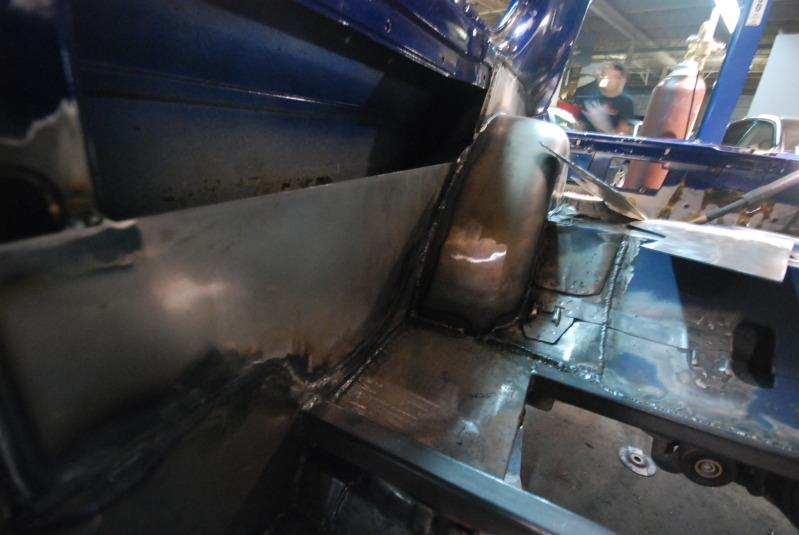
I had realized the amount of work that would have to go into this build to make this happen proper like, but the guys at eurowise have seriously gone far beyond what i had expected and can't express my thanks enough for making this grown man smile like a little kid in candy store.....
3/18/2011
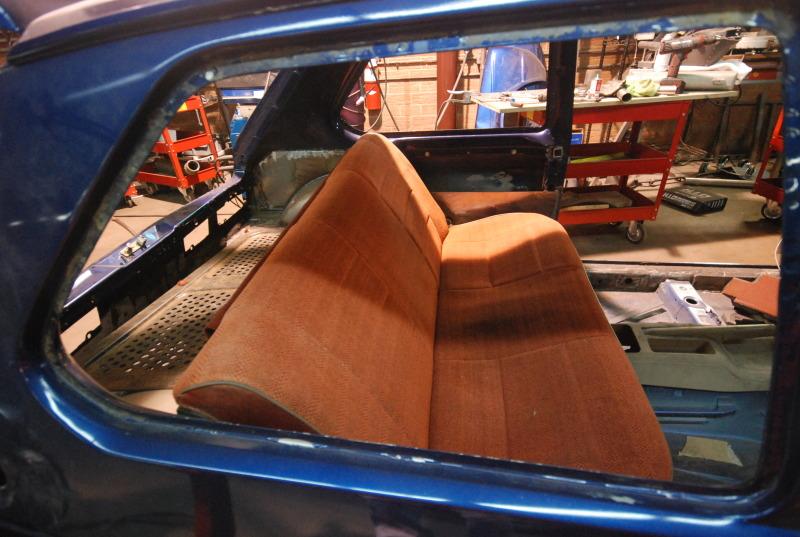
my friend jollie hooked me up with a rear a1 rabbit seat that will be modified to fit my rabbit... it won't really be the most comfortablest seast considering the cabin was pushed back 3 inches, but there for cosmetic reasons as opposed to profit making reason...
as for a full cage..... no! A custom "shaved" cage is in order for this adventure... for you diehard weekend race warriors, this car isn't that car so relax, again a compromise of SHOW and go....
anyways, LOVE this pic.... 3 cute rabbits to be, courtesy of eurowise..... 3.2ttAWD, 12v-t, and a 16v-t
gives a whole new meaning to "multiply like rabbits...." 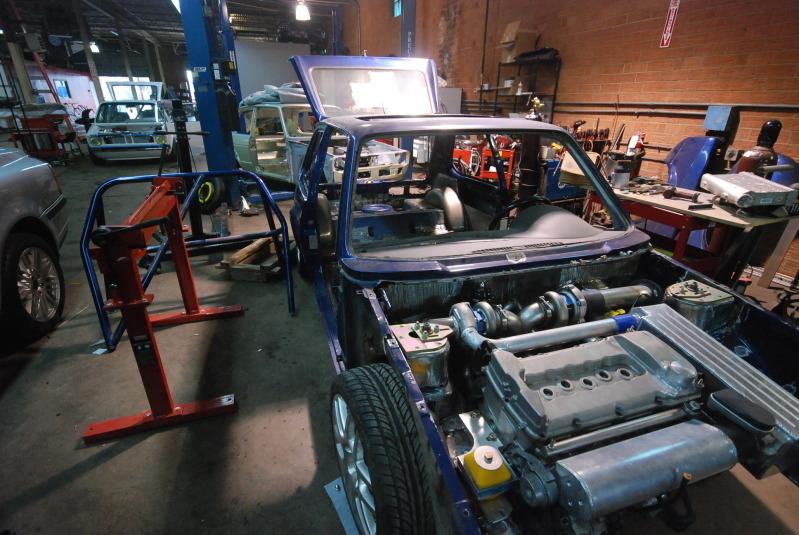
So VERY excited. I have finally opened up and E-bay account and made my first purchase... Can't lie though.. miss the old days of buying parts when they were readily available and could exchange cash for product in person... thank god for paypal and ebay...
anyways, enough of being a curmudgeon... i bought two sets of the lower window trim.... 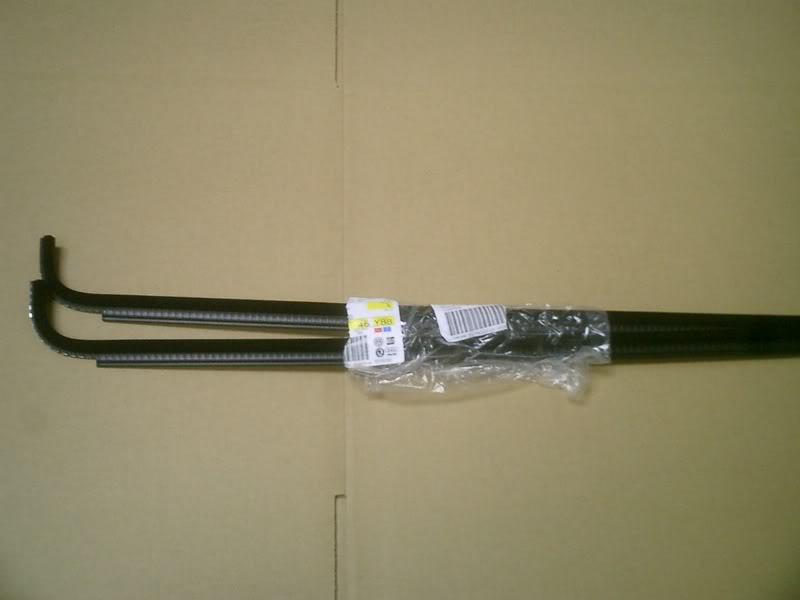
and now need to find the rest of the rubber that goes around the rest of the window and 1/4 window. guessing vintage rubber should have it all. if not, i'll just do a search.... or be lazy and call patrick...
3/29/2011
enough of the bromance.... so jollie (thanks homie ) dropped off the rear seat and rear tray and the boys at eurowise have begun to play. the rear seat is just sat into place and will need to be modified to retrofit the seat back in, but should turn out nice so..... 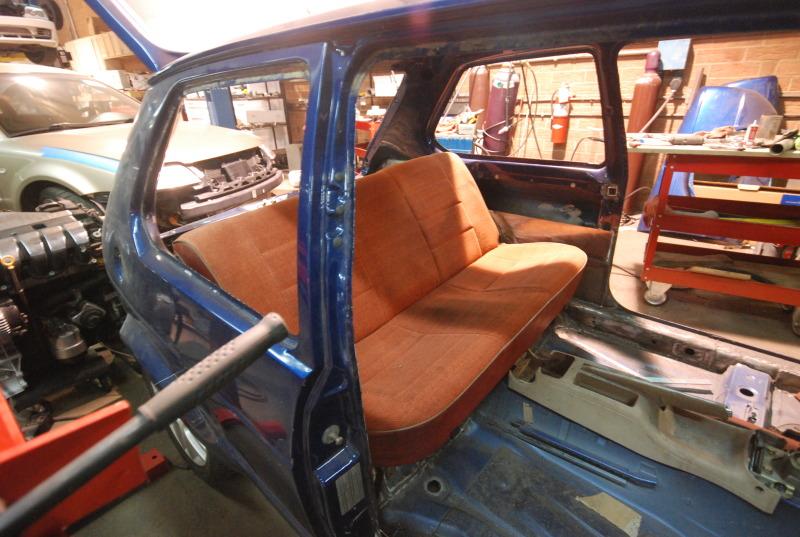
4/25/2011
big thanks to otti for selling me a set of the south african hella late euro tails.
I am going to take them up to my paint/body guys to have them smoked a little, and to see if they can do a little work with one of them that seems a little off...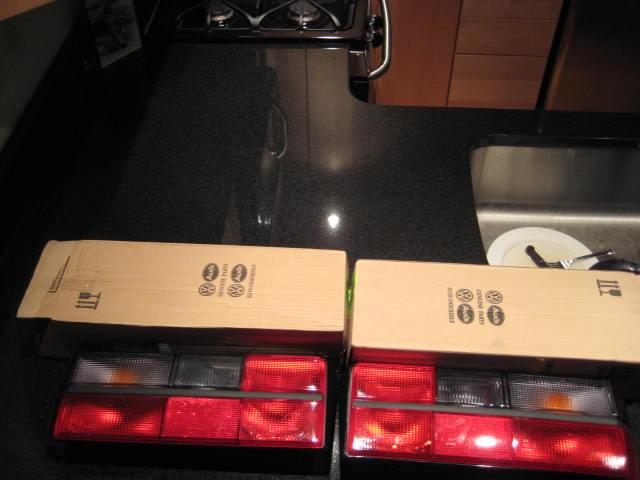
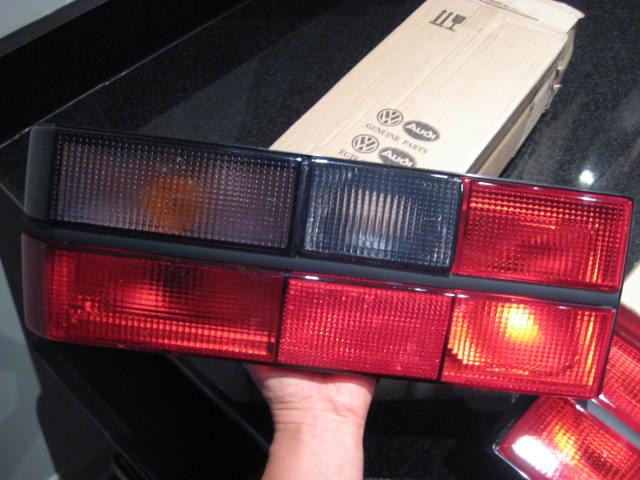
I haven't decided if I want the rear modified to make these work or find the correct rear panel... However, if anyone in the US has the rear panel for these lights or knows of anyone who does and is selling please contact me... thanks...
6/21/2011
anyways, sorry haven't been on here for a while, its summer time and my girl doesn't work so we've been doing alot of vacationing on the beach. going to talk with mike tonight to see whats the plan and hopefully the ball will get rolling again.
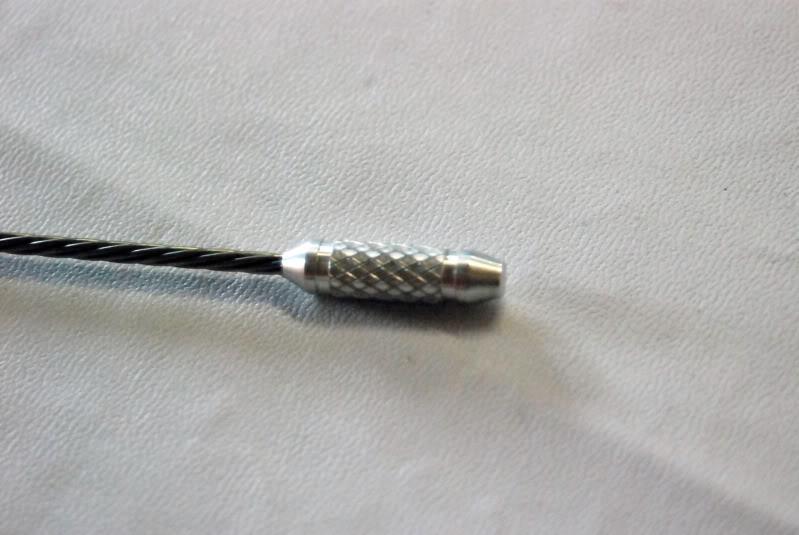
basiclly been collect random parts. mike finally got around to making the vr6 billet dipstick and i was the very first to purchase one... just not sure if i got a discount or not... 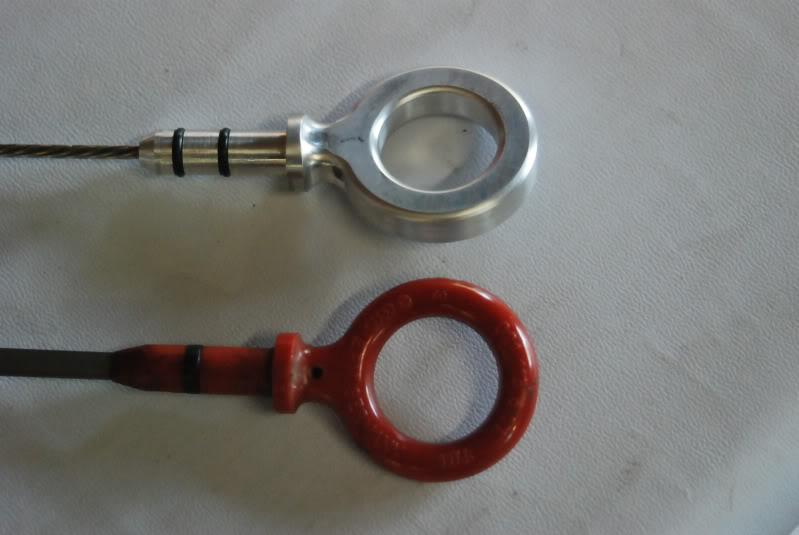
6/23/2011
Dipsticks are CNC machined
Stainless steel wire rope 1 X 7 Strand 3/32" Diameter 1200# Break
Handle made of 6061t aluminum.
MAX / MIN reading made of 6061t aluminum
O-rings are High temperature resistant
for only $49.95 and a lifetime warranty, i figured i could splurg a little for this project.... 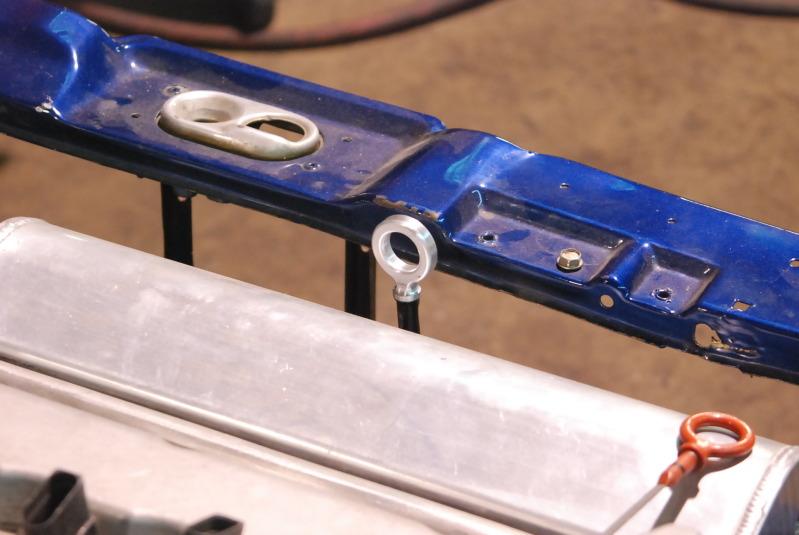
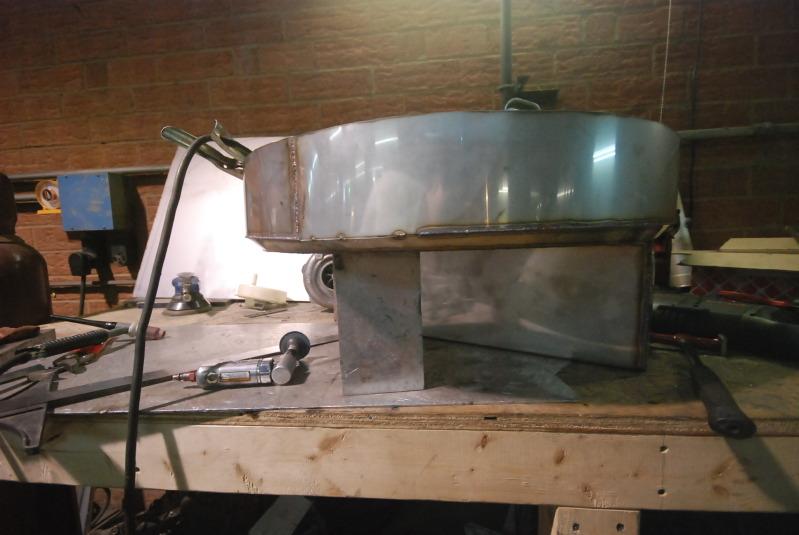
So doug began fabricating the fuel system yesterday and here is where he got....
Since the rear floor is raised and with the AWD suspension and drivetrain taking up lots of space, they had to get a little creative and utilize as much free space as possible for the tank. This involved building a gas tank from scratch...
First they removed the tire well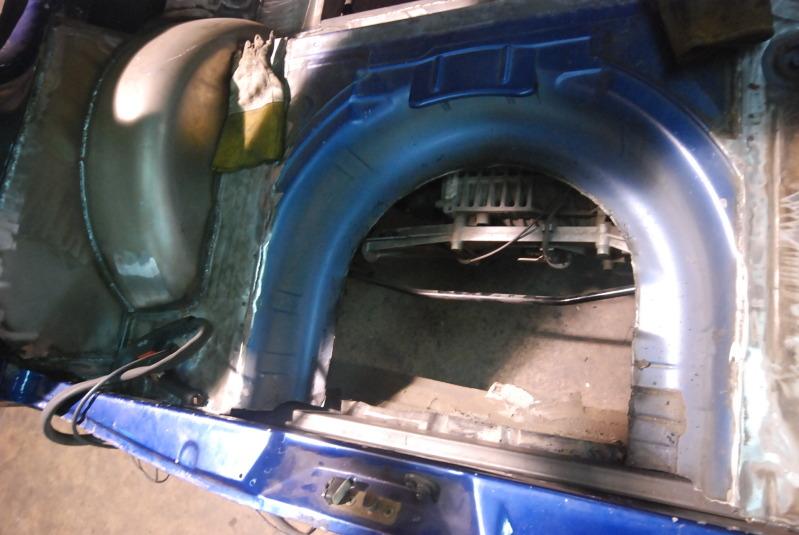
And for those not familiar with what was back there...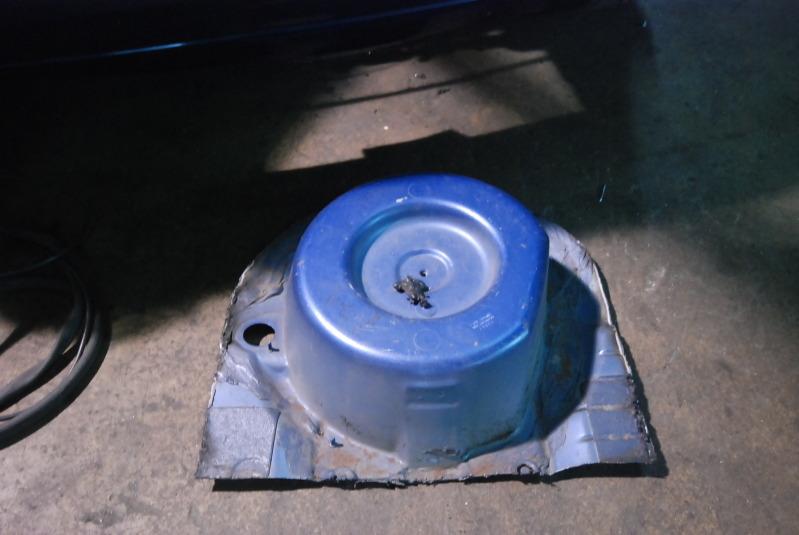
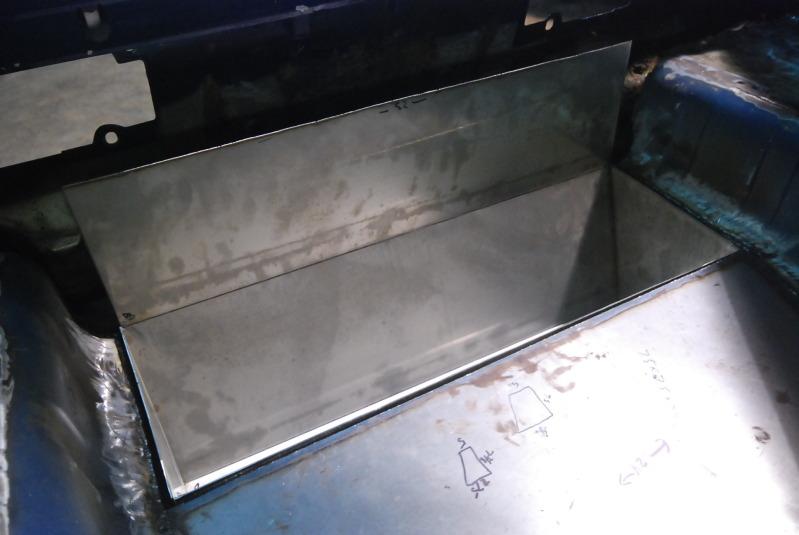
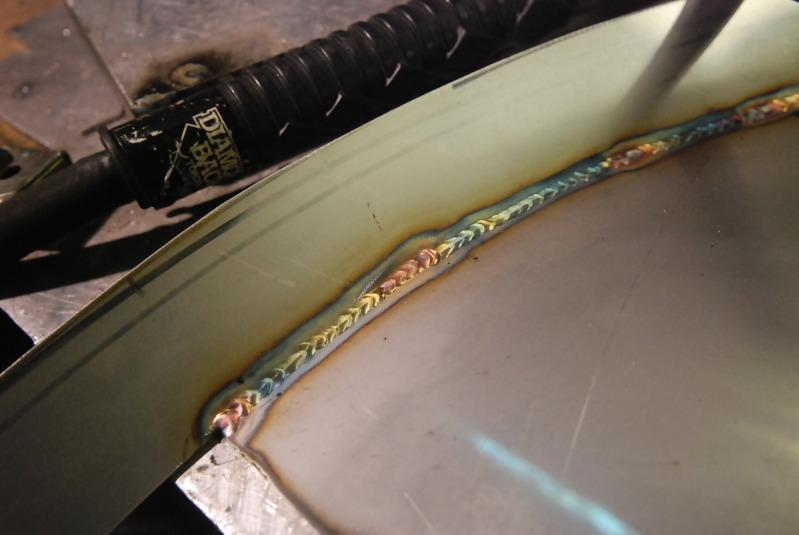
Next up was stainless steel time...
With the available open drop section in the rear they boxed in an area to utilize even more gas tank space. 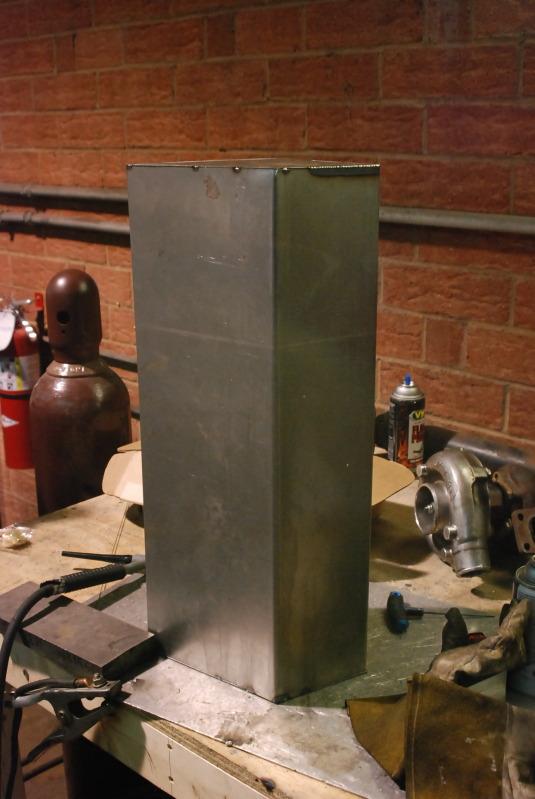

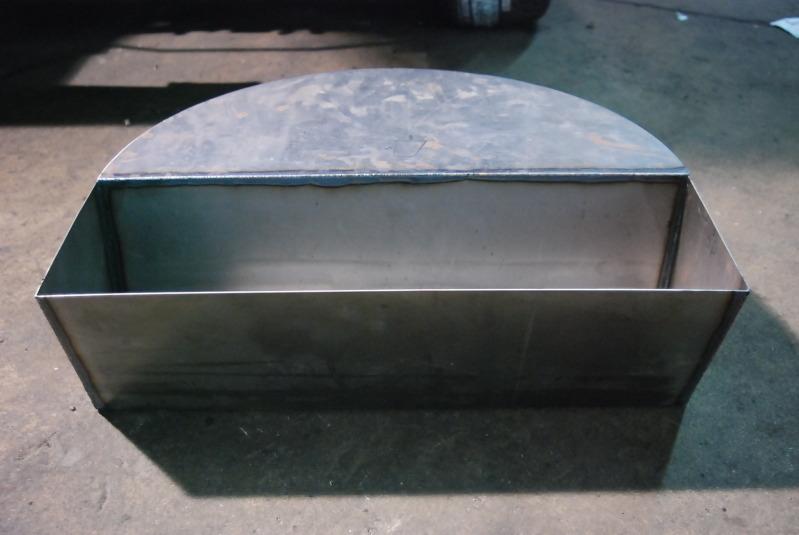
Here is the finished product...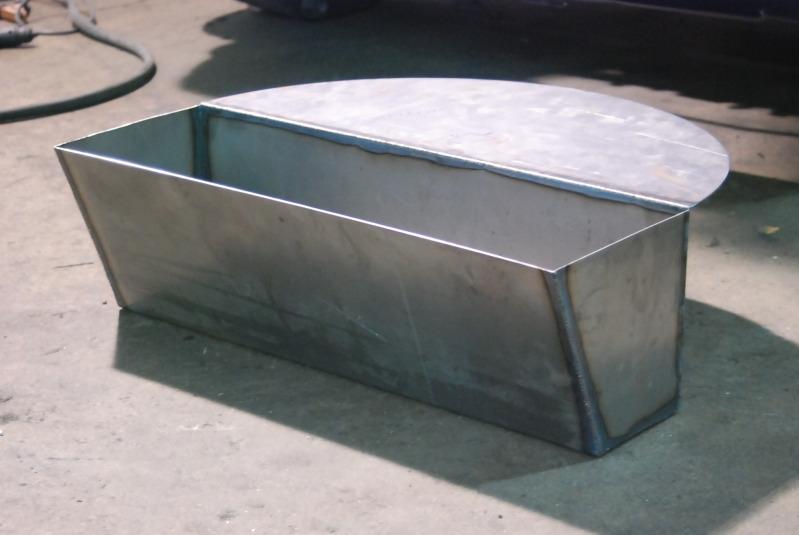

Some detailed shots of doug's skills... i never get tired of looking at his welds!!! 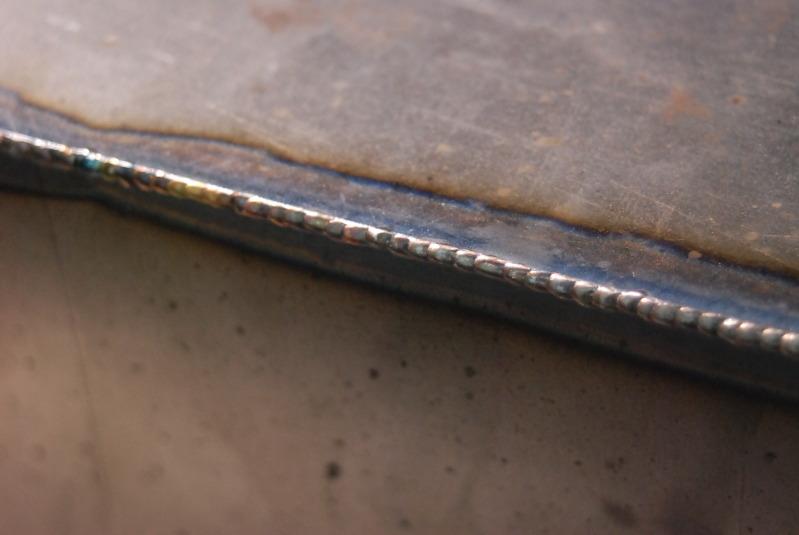
They then had to notch out the edges...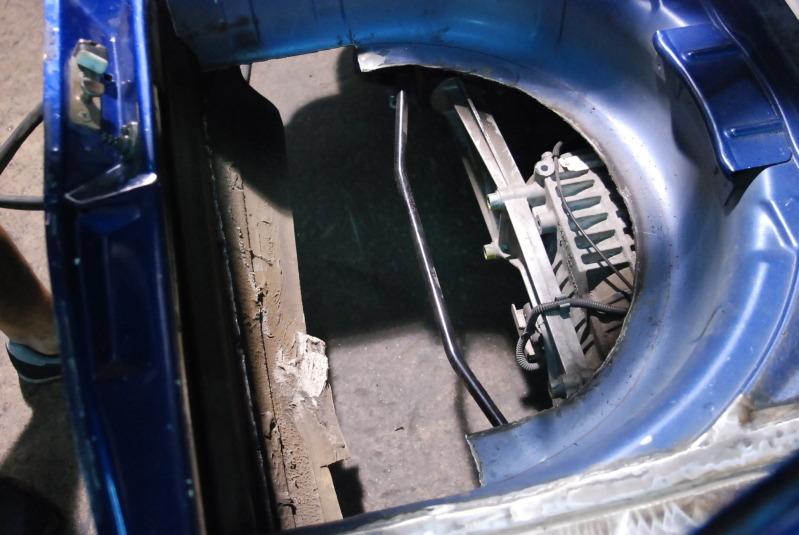
The new floor and tank laying PERFECTLY in place.... 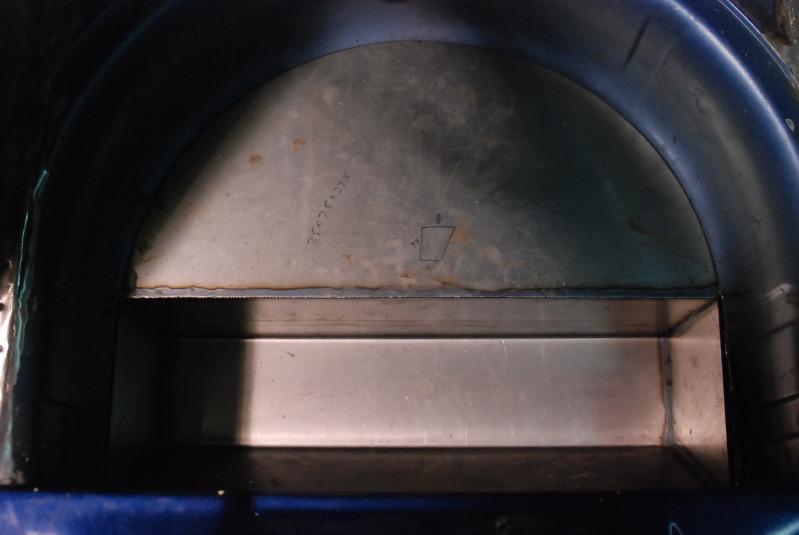
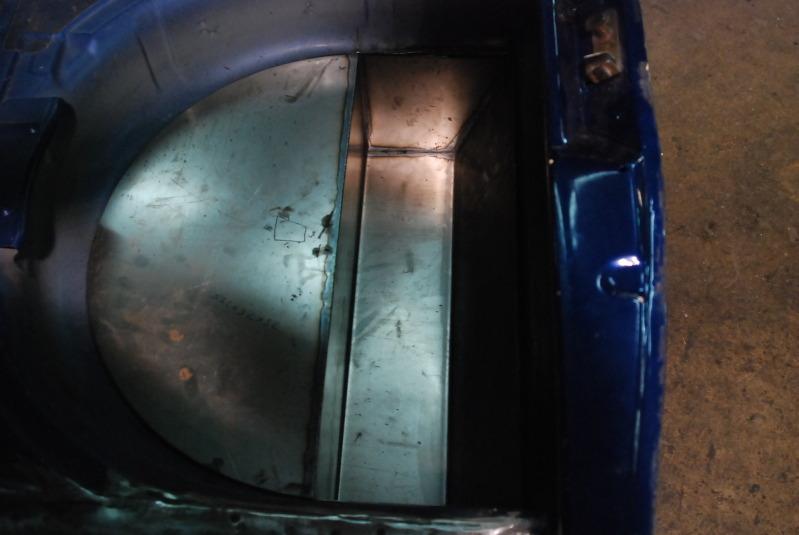
A little more detail of whats to come....
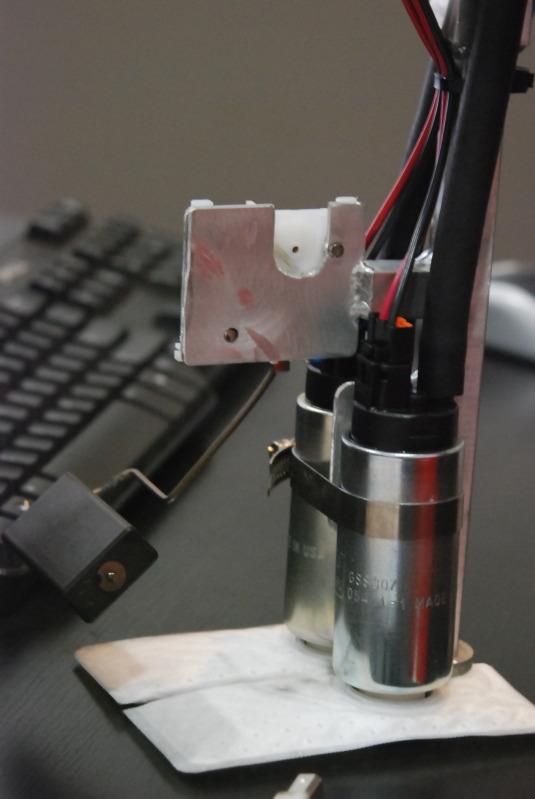
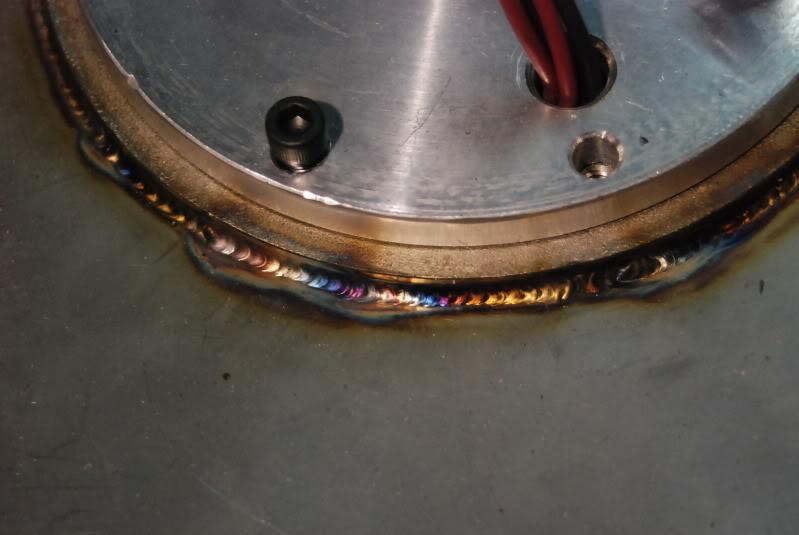
The fuel system will consist of twin walbro 255 intank pumps with -8 fuel lines throughout. They will use an OEM R32 fuel pump assembly to utilize the factory fuel level sender so the oem gauge works properly. In order to make it work with an all stainless fuel tank they will machined custom fuel pump hats...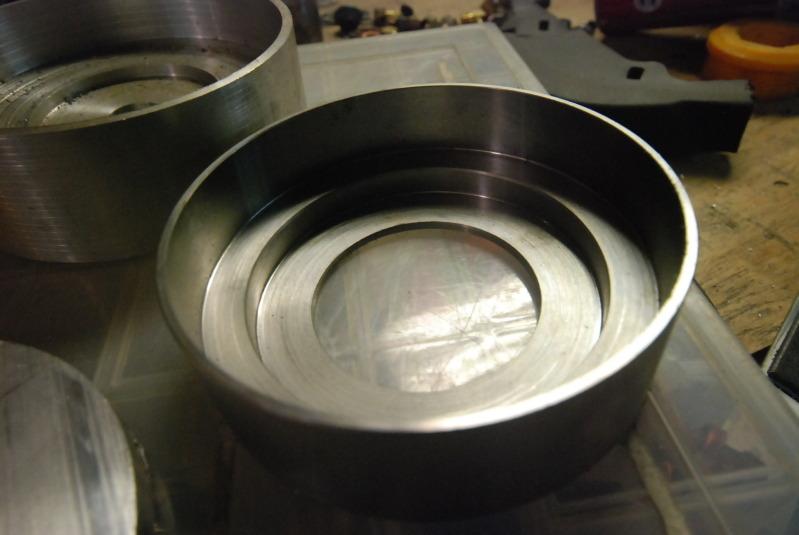
The lid will have all the all an bungs and fittings welded to it with functional oem connectors as well for power and sender...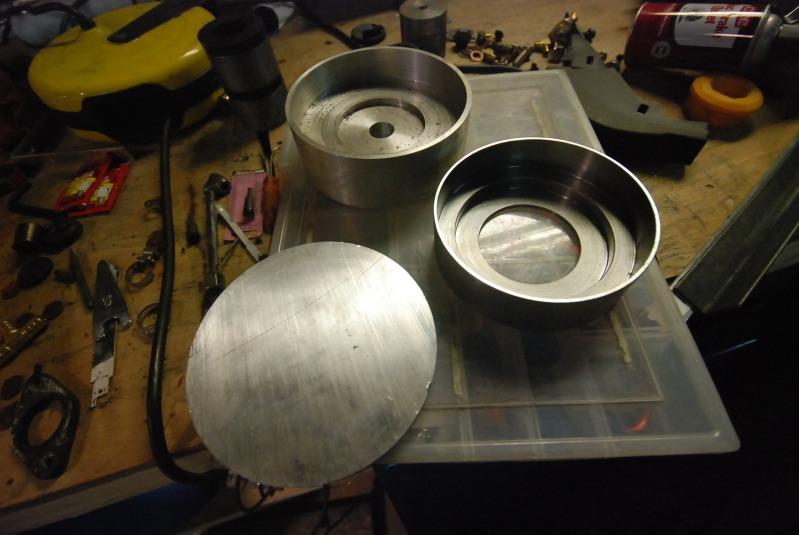
So that's it for now, but should have more goodness soon enough....
happy birthday again homie....
6/23/2011
anyways, sorry for all the confusion in regards to the build of the rear floor... but in all this confusion i have an update...
my 4X8 gas tank showed up today.... 
7/7/2011
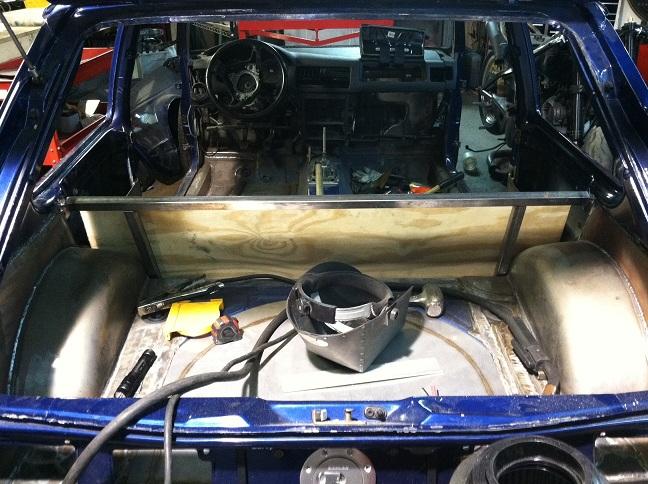
anyways, doug began with the "petrol suitcase" this week..... random shots of it....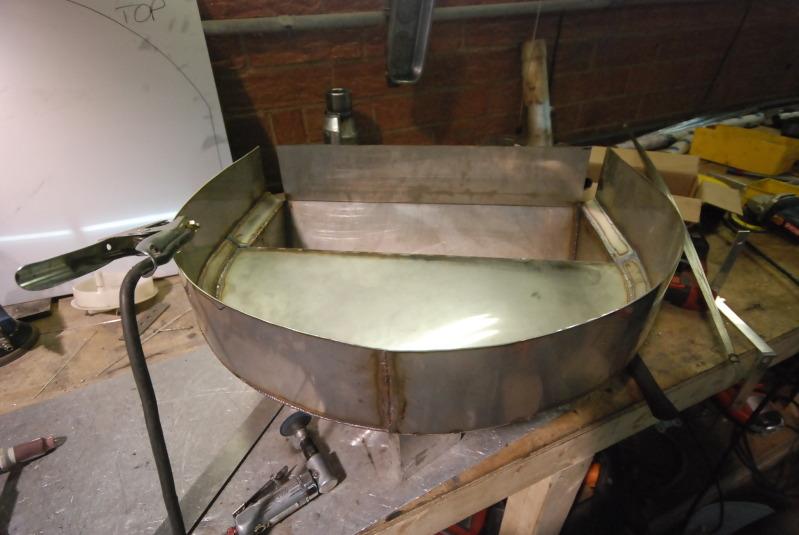
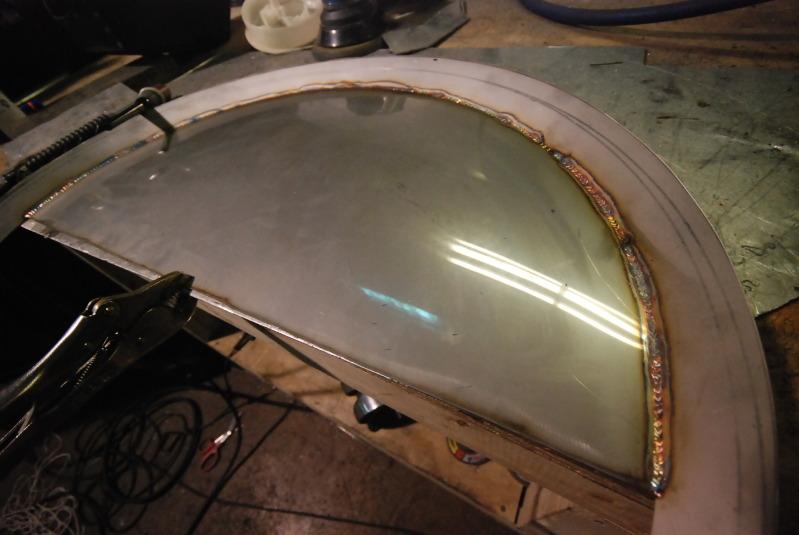
7/11/2011
As of last week they got the custom fuel pump pickup\hat\sender setup almost complete with the OEM r32 sender integrated...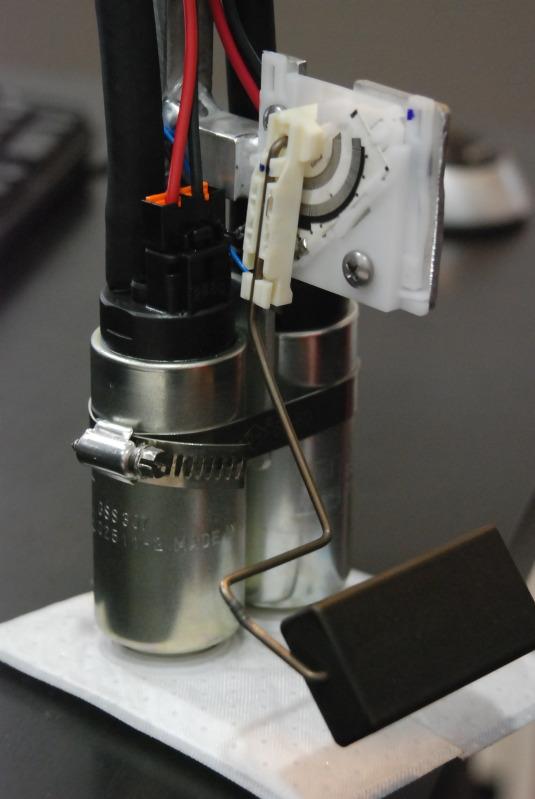

and a close up of the hat assembly using -8 fuel feed and -6 fuel return fittings.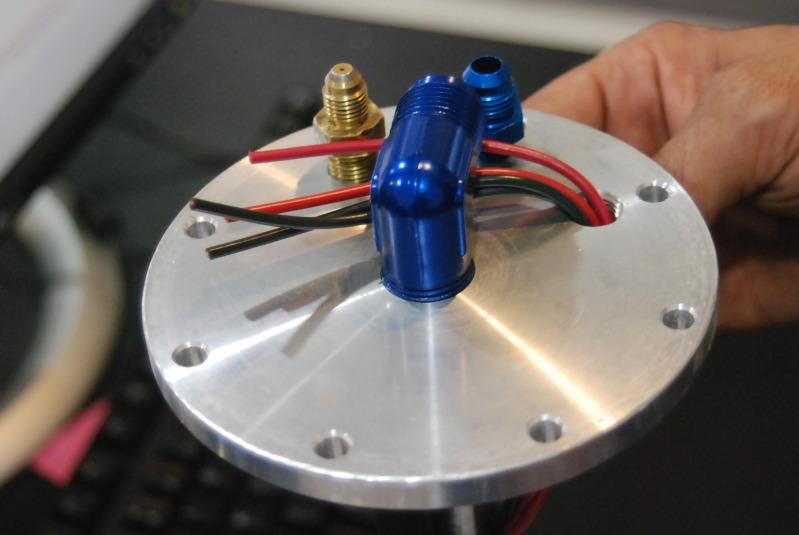
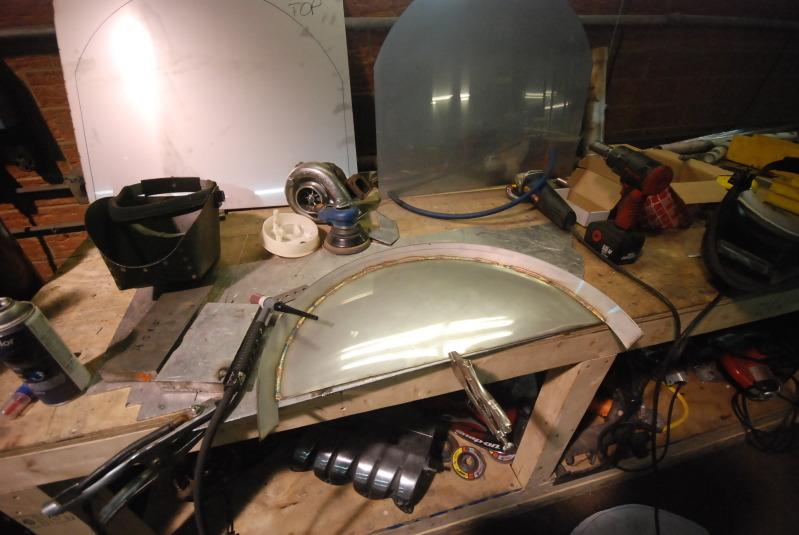
7/21/2011
so after seeing so many recaro swapped seats, figured i'd go a different route and have a custom old school wagen rear seat installed. just need to figure out how to make it rust....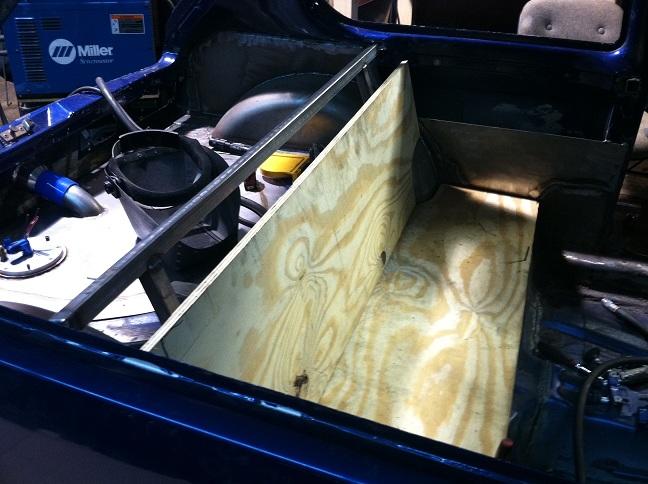
and two shots of the fuel cell setup. as you can tell i had the filler cap relocated and will be hidden by a 6 letter word...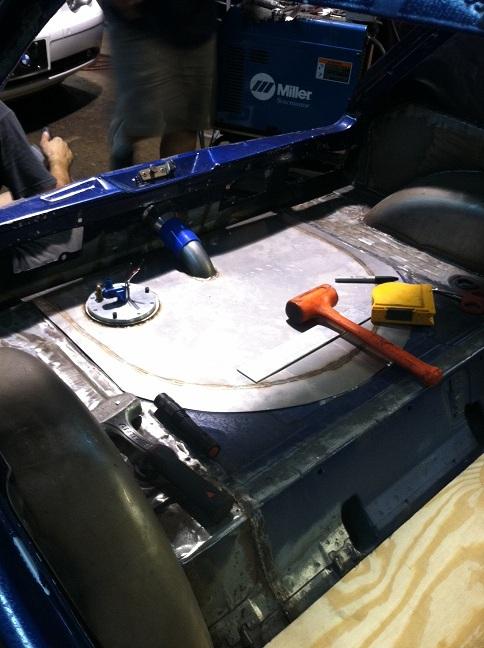
8/3/2011
apologies again for the late updates... just super slammed with all the fun and crazy changes ahead of me.
so about a week and half ago, eurowise got a bunch of random stuff done and should have more done soon....
not too much explaining required here so will basicly let the pics do the talking...
close ups of the tank: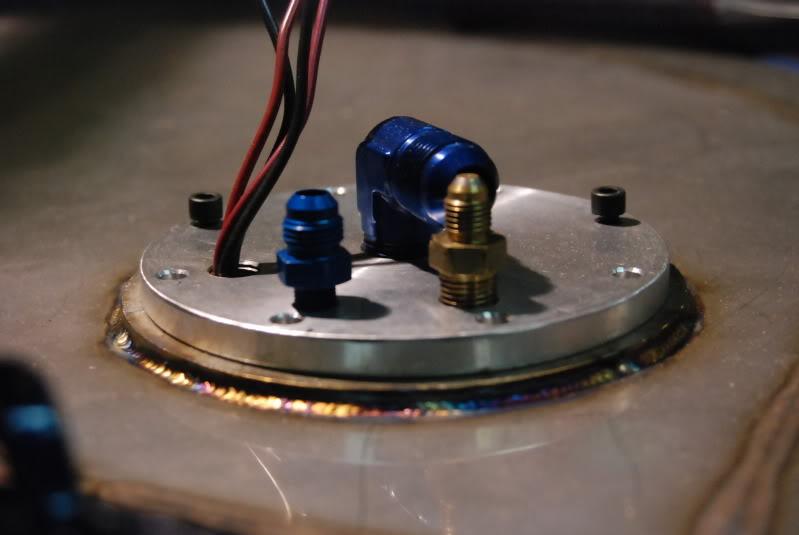
gas tank sits flush with the rear floor...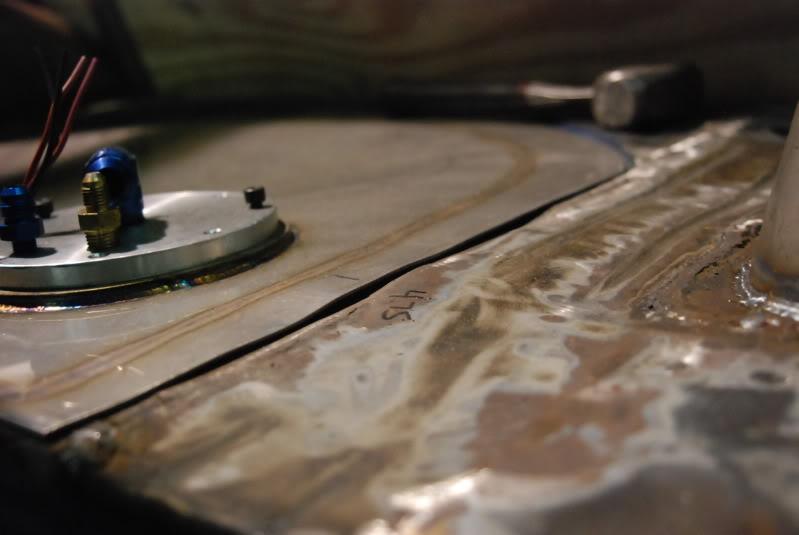
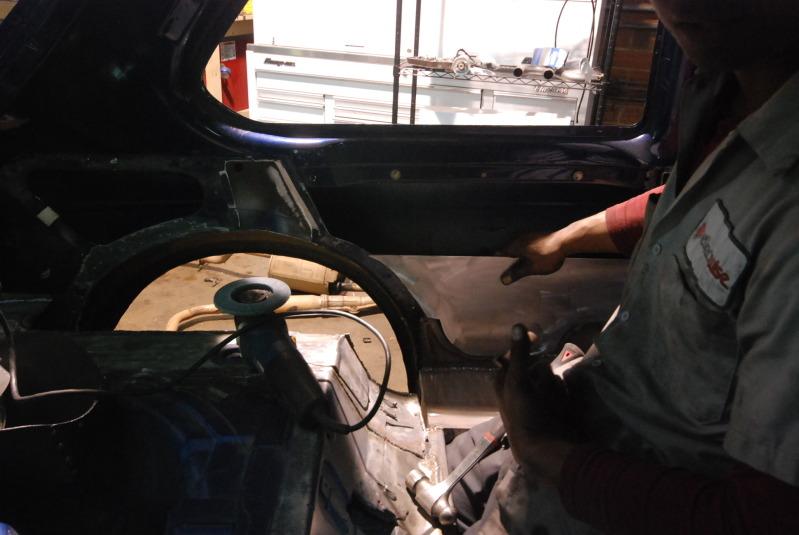
random shots of doug getting the rear floor ready...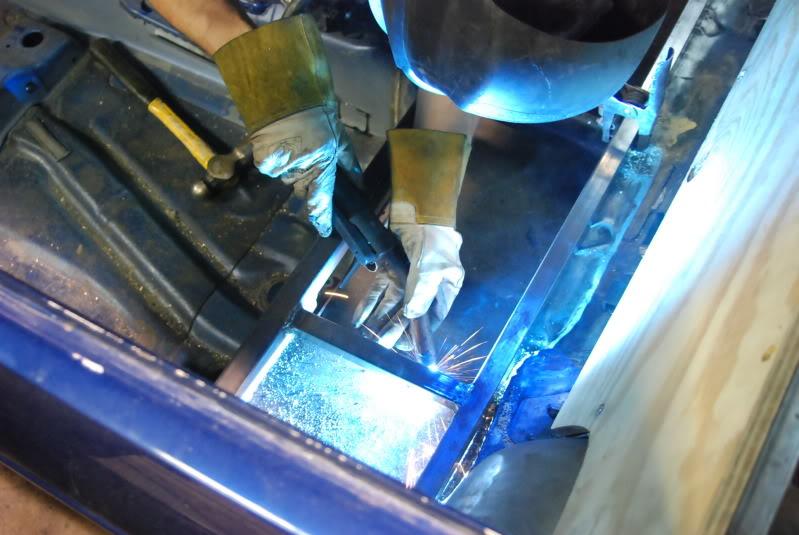
eurowise doing some detailed work to make the dash fit proper....
before: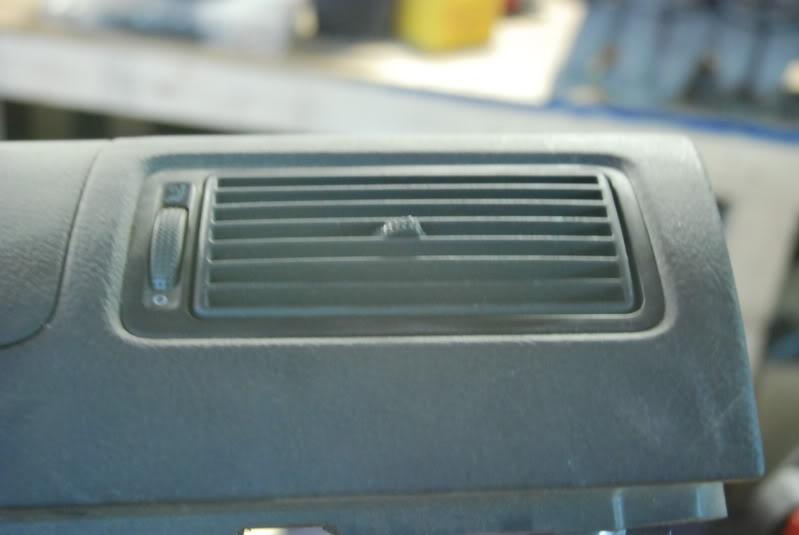
after: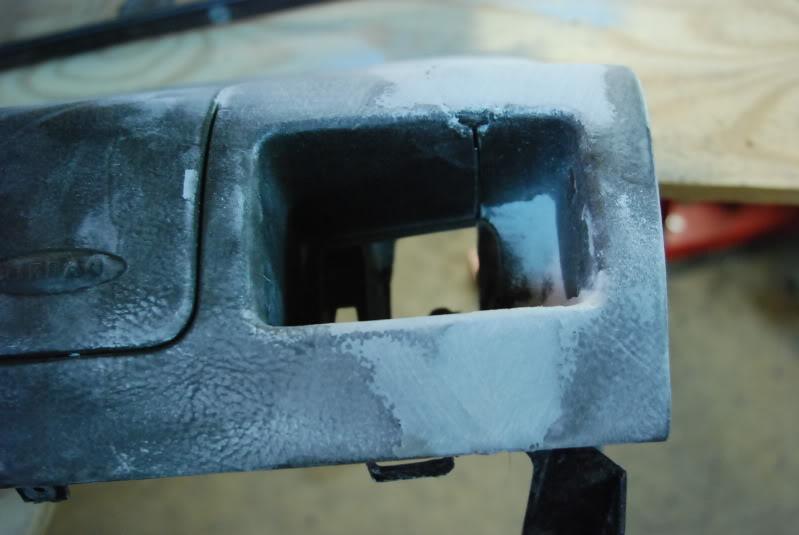
before: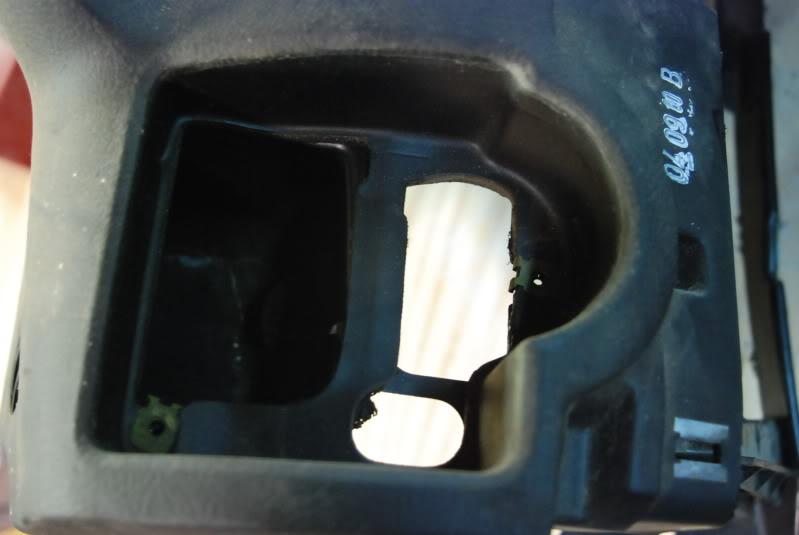
after:
they also sectioned the switch and plastic welded it back together to look like an oem switch assembly with bezel..... the devil truly is in the detail and the guys at eurowise amaze me!!!
a few random pics of the dash process...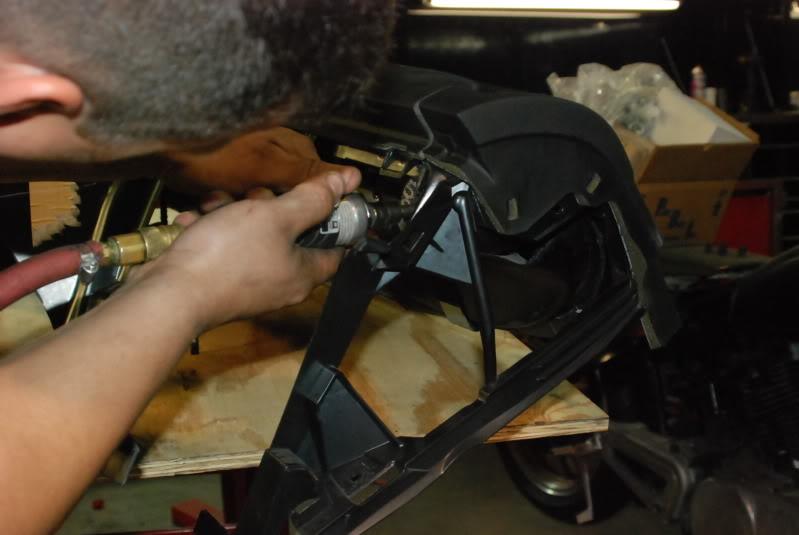
and finally, the rear seat. it is engineered in a way that if it needs to be removed it can be.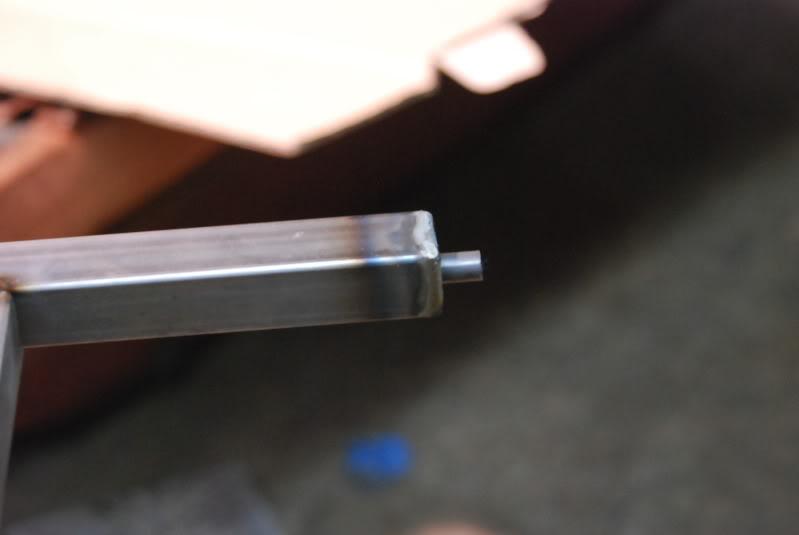

10/21/2011
anyways, i've been contacting random people for random parts and been talking with mike about random ideas and been busy spending not so random money on said randomness...
either way, the wiseguys are back on track in regards to my little project....
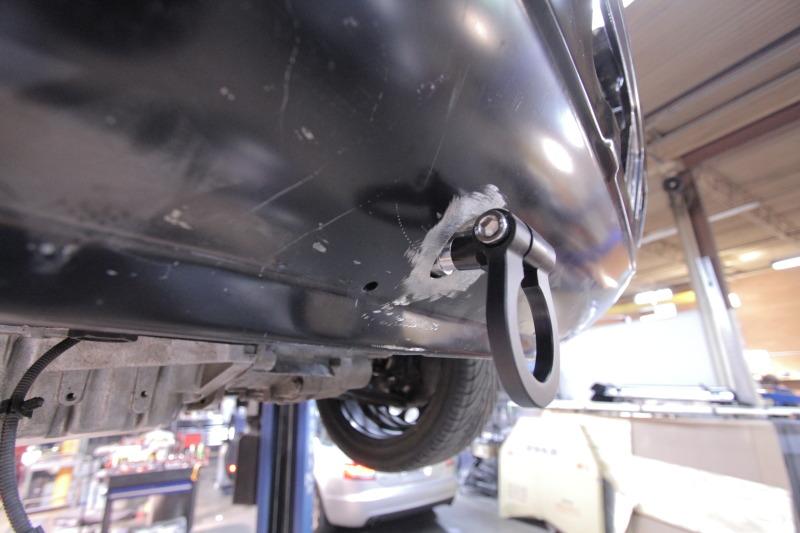
Never liked the old tow hook (not sure why), so asked to have it removed and new one relocated.
Pic of old tow hook removed and spot welded up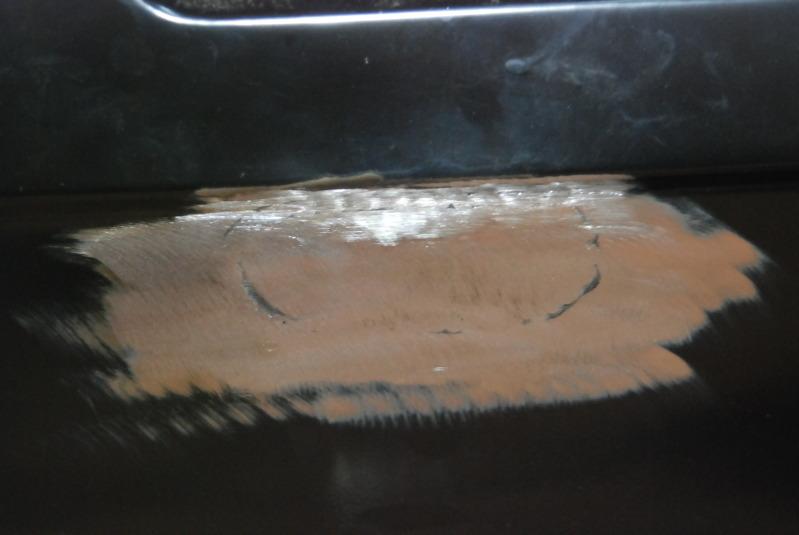
New location and pic of tow hook in place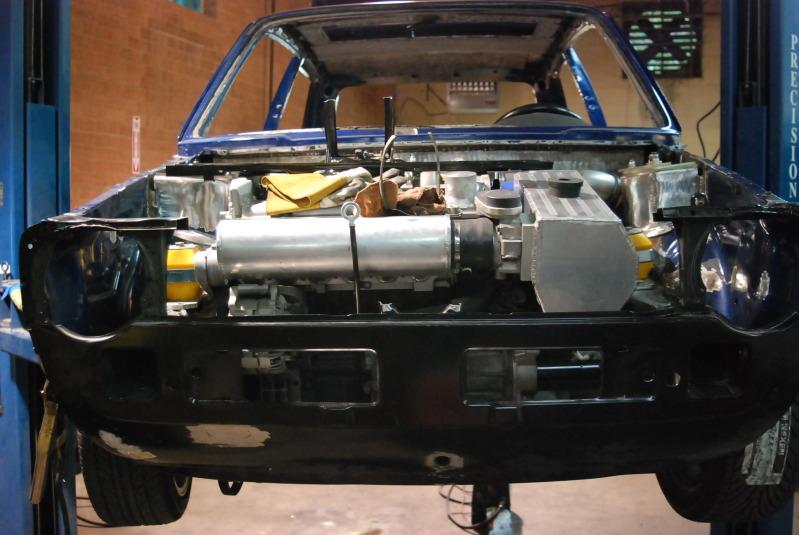
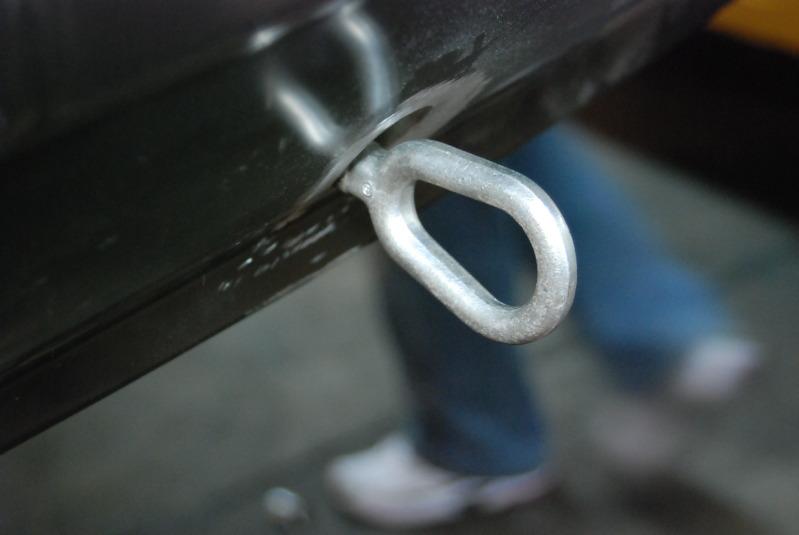
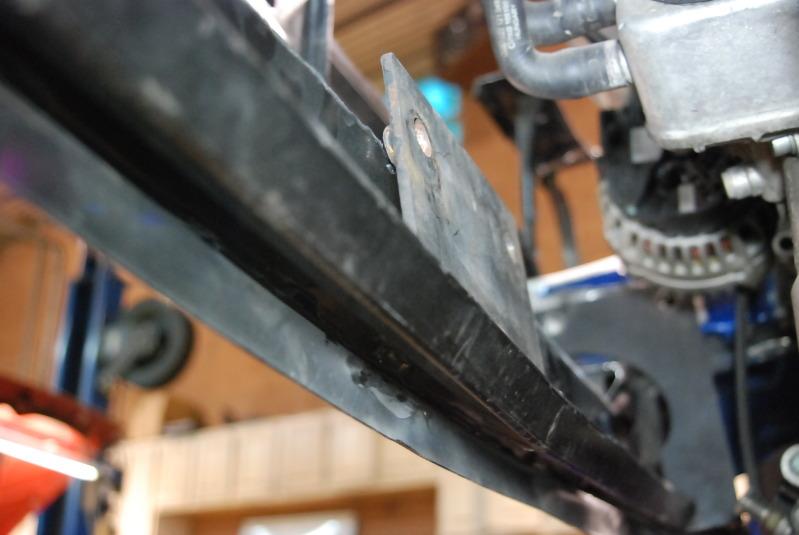
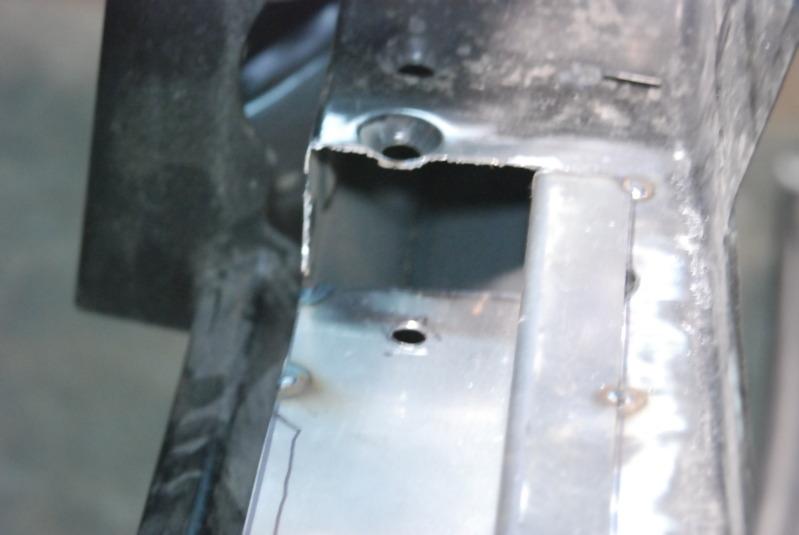
They drilled the hole where it passes all the way through into the front core support brace and that will be the strength point for towing 
They frenched the hole to give it a cleaner look. Ideas like this that they came up with is what really sets them apart, in my book anyways... 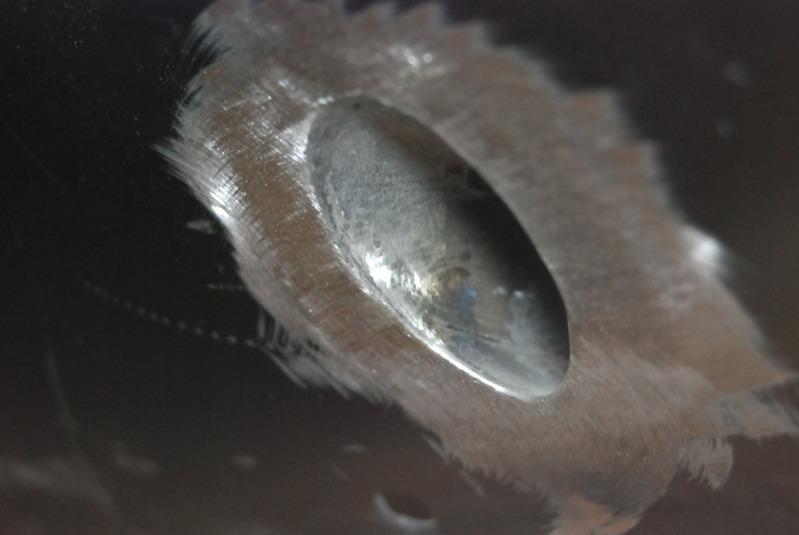
They finally got the tiny little fella delivered and have begun to massage it in....
They have designed the top of the core support to have a hidden removalable section to access the front of the motor and for ease of service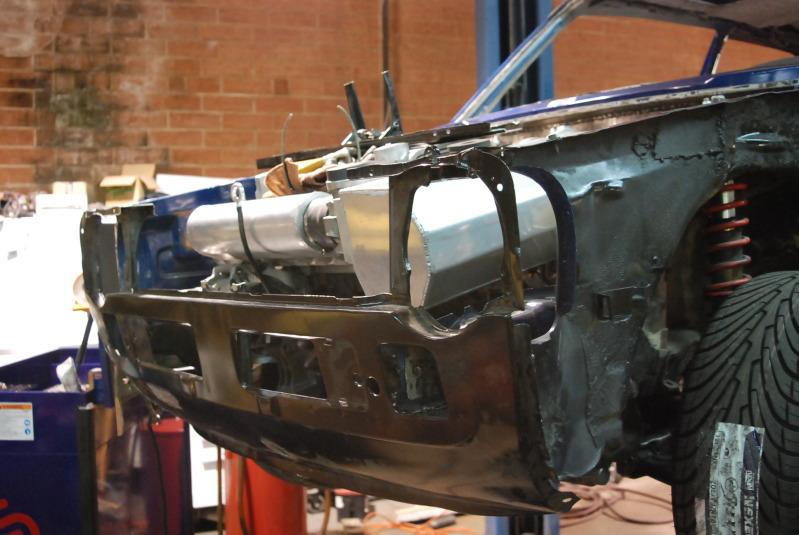
the lower section of core support was cut out to fit the radiator core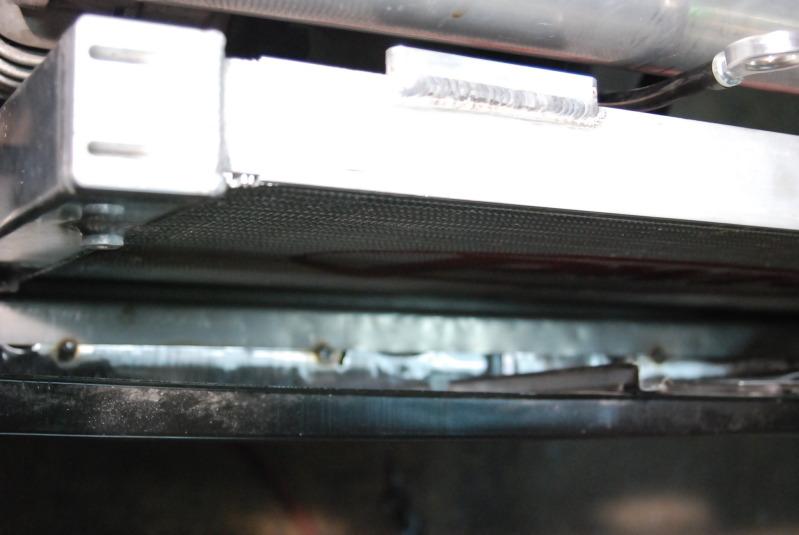
the lower core support sheet metal was bent in order to hold the radiator and also act as a mount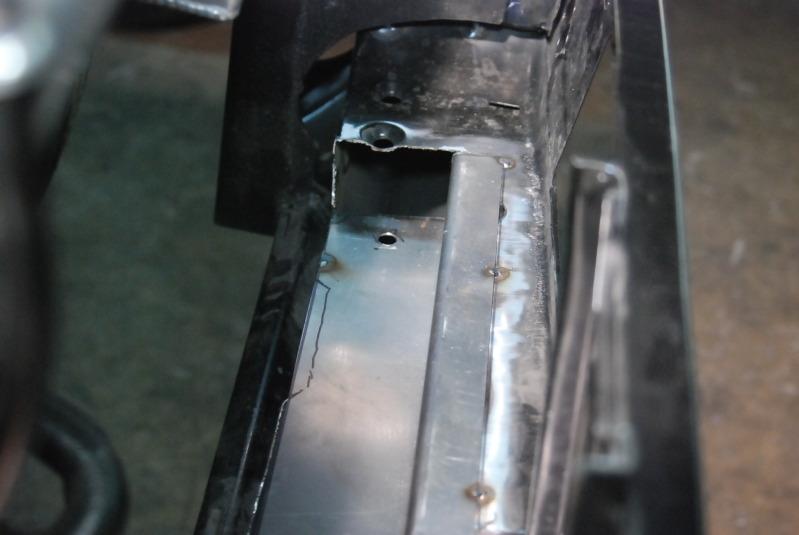
11/1/2011
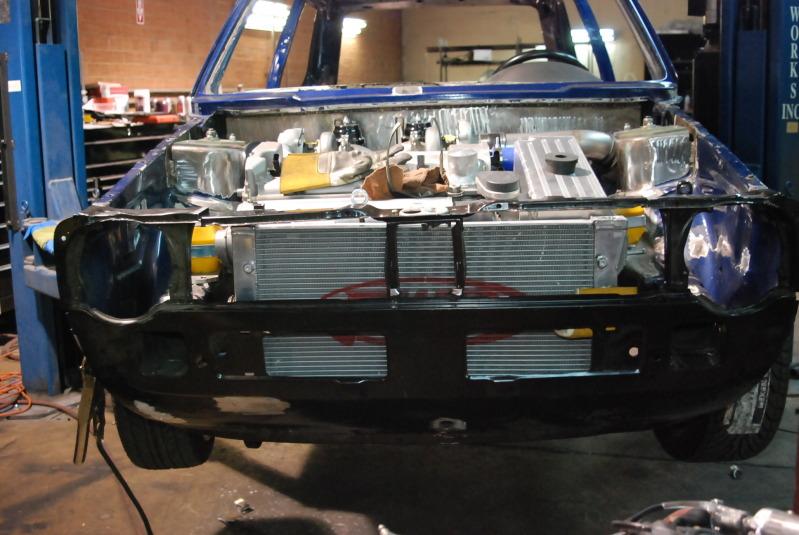
anyways, mike had sent some photos a while ago and here is a more proper update....
the radiator mock up is coming to an end, along with some pics of the fabricated inlet and outlet flanges.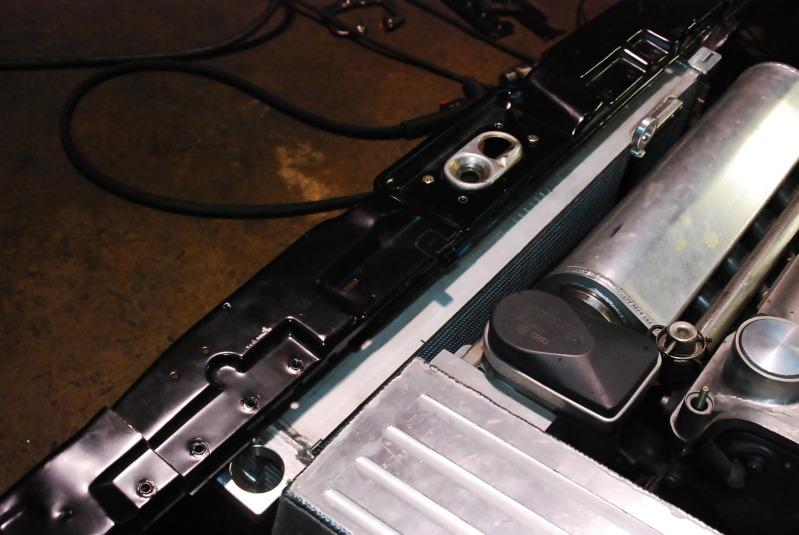
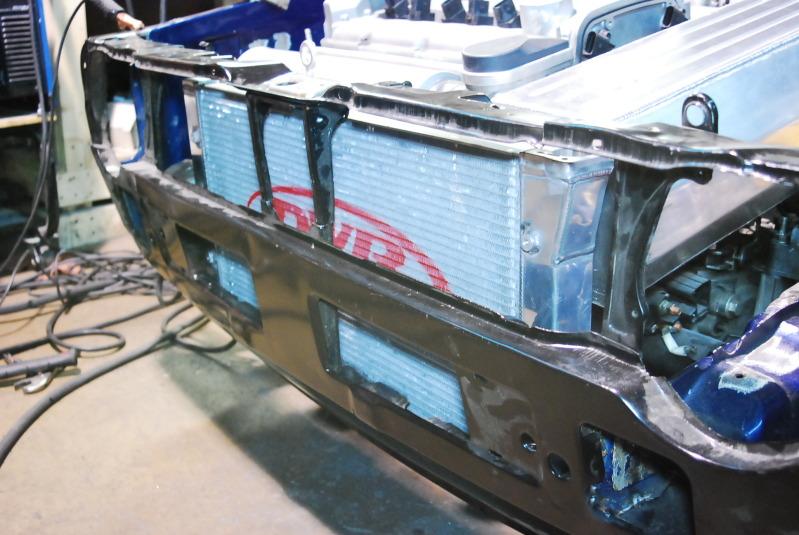

custom radiator finished up.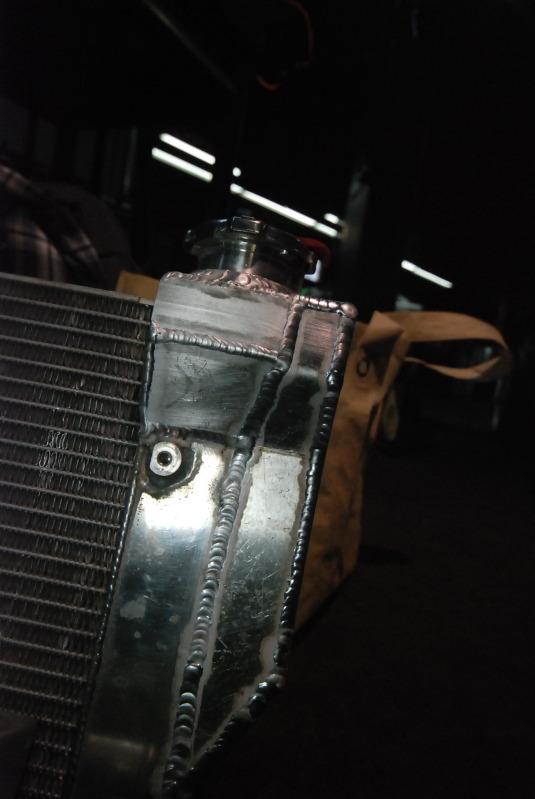
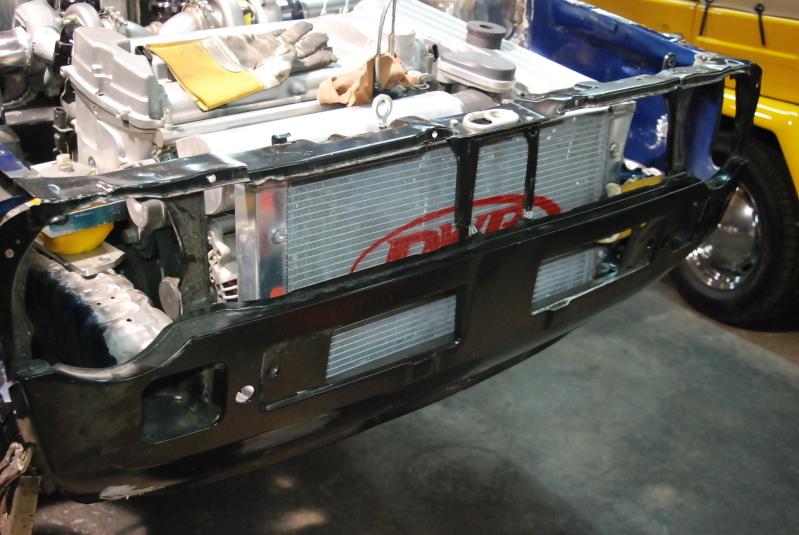
previously mentioned the removeable upper core support. more pics of the design.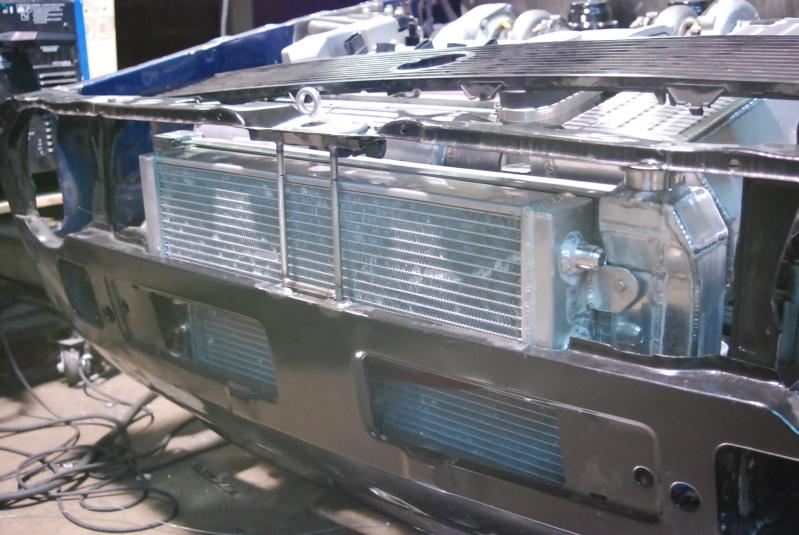
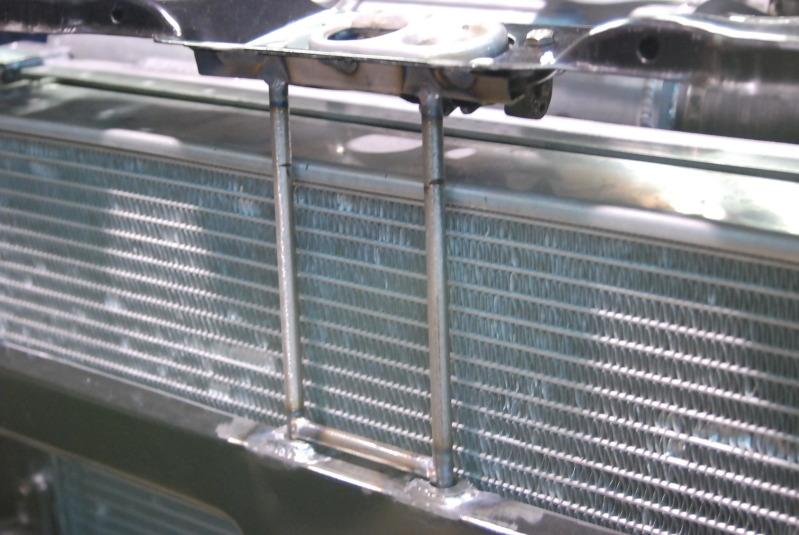
close up of the stainless round bars.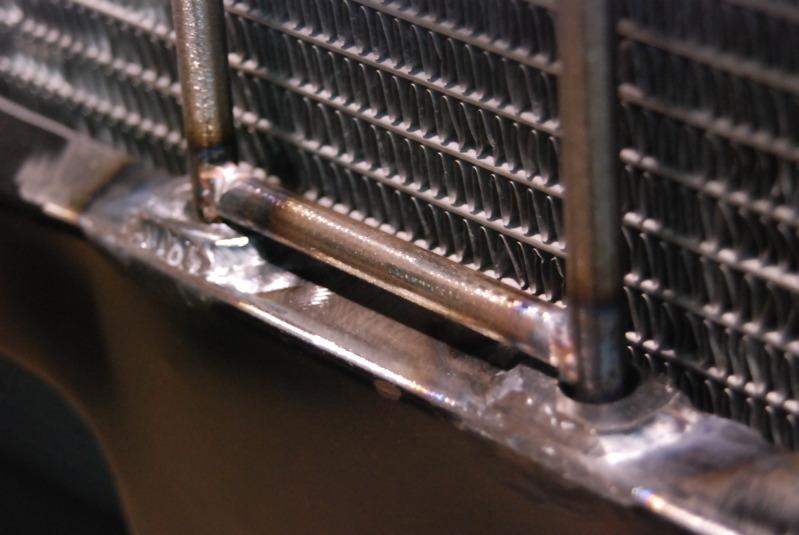
upper core support is secured by two 10mm bolts. remove them and the top slips right off...
got to give props to the wise-guys... alot of attention to the details and hope i haven't been too big a pain in the ass... i'm just a sucker for the details...
11/6/2011
"back in the day" i had an infinitey box in the rear and liked the sound in the little hatch so thought it would be plenty to keep me happy so i had eurowise mount a speaker and amp under the rear bench and doug placed the braile near by. some pics of it mocked up...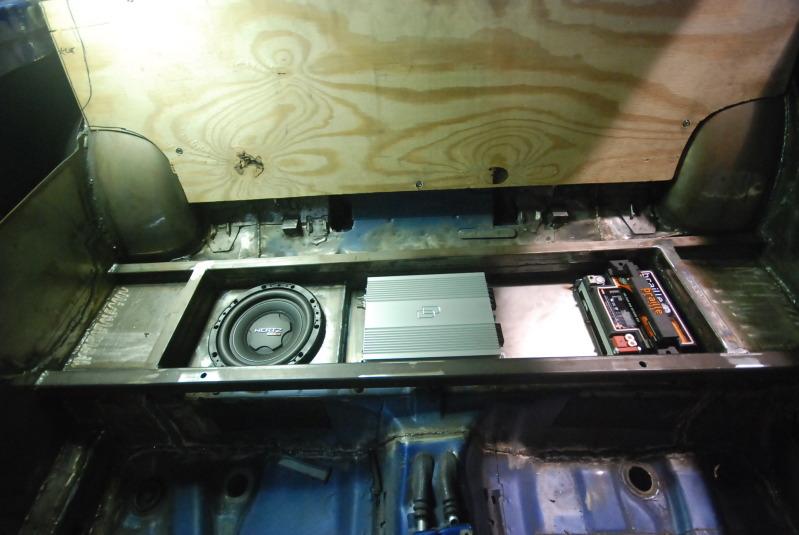
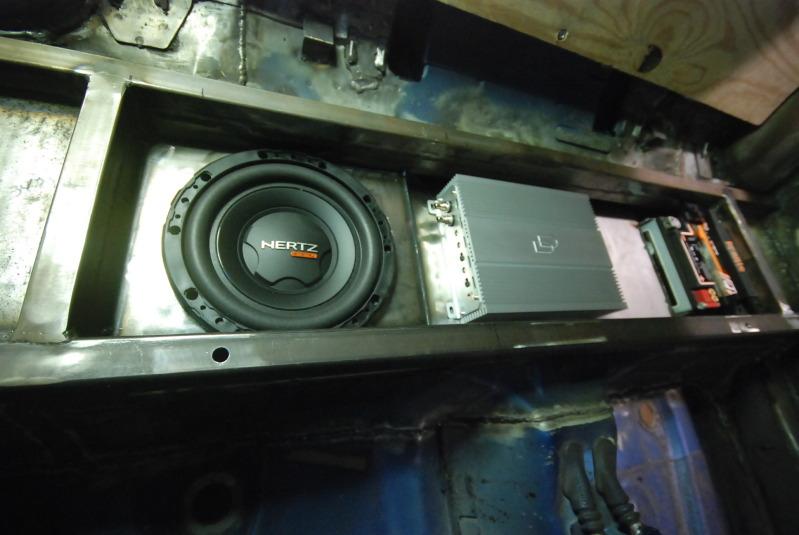
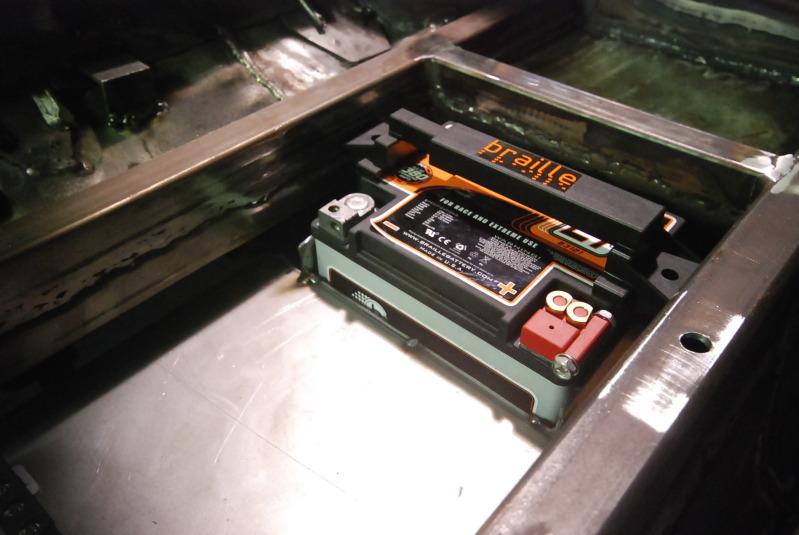
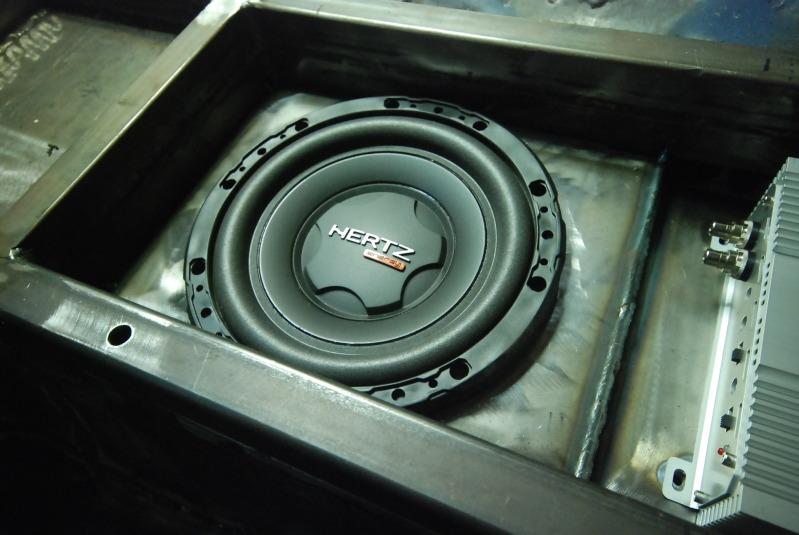
p.s. if anyone mentions anything about heat soaked amps, not enough speaker box volume, or death by acid from battery explosion behind driver seat i will keeeealllllll you..... 
11/10/2011
sorry about that tim.... been a very long week at work and think i might be losing it...
back on topic...
IC brace/bracket 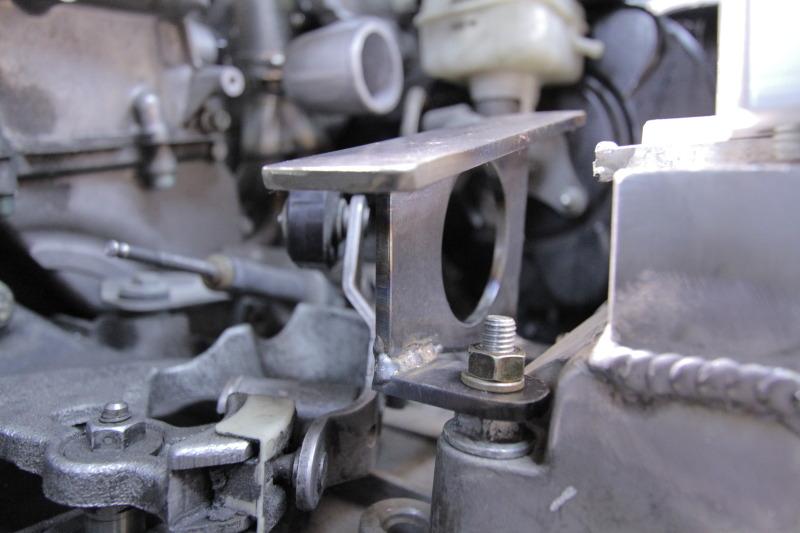
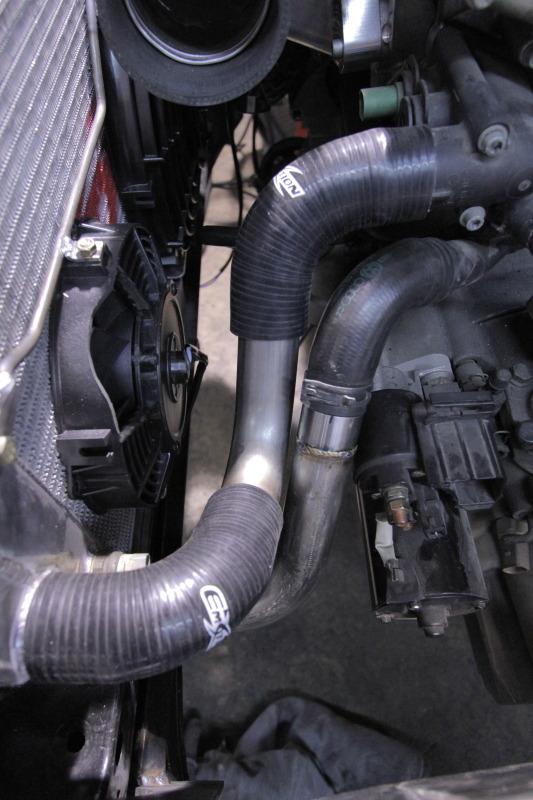
upper and lower rad hoses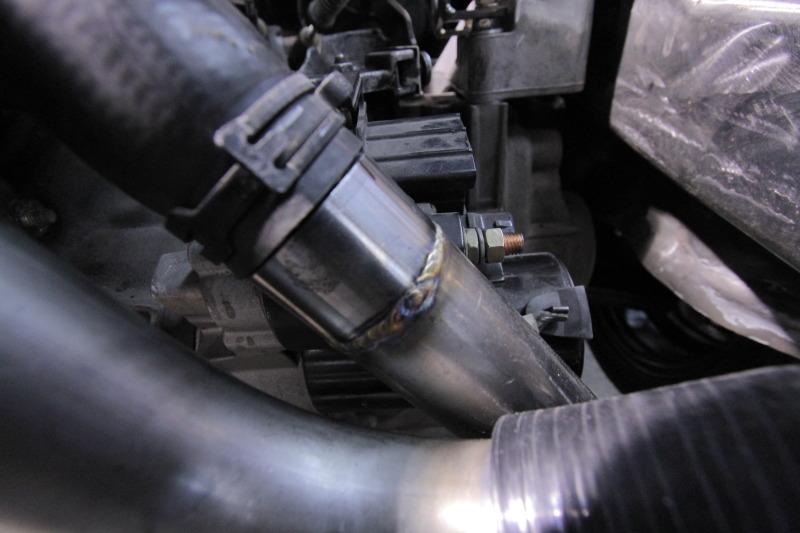
they are made using stainless pipe with silicon ends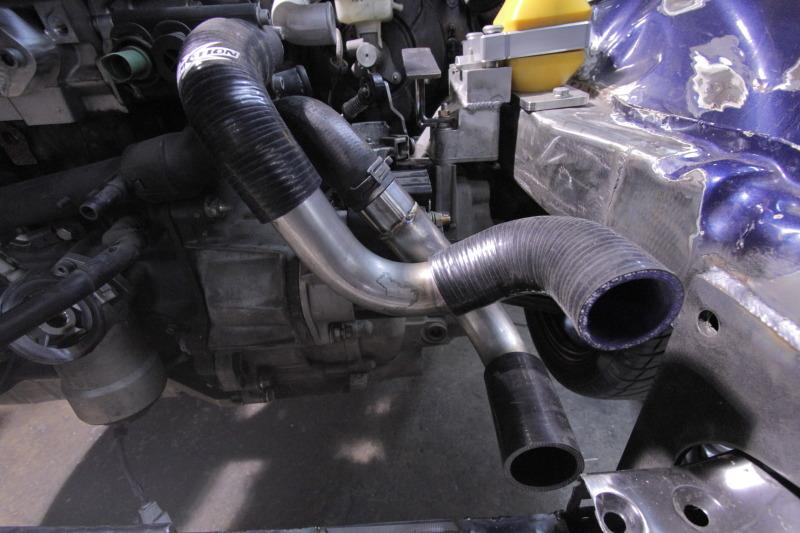
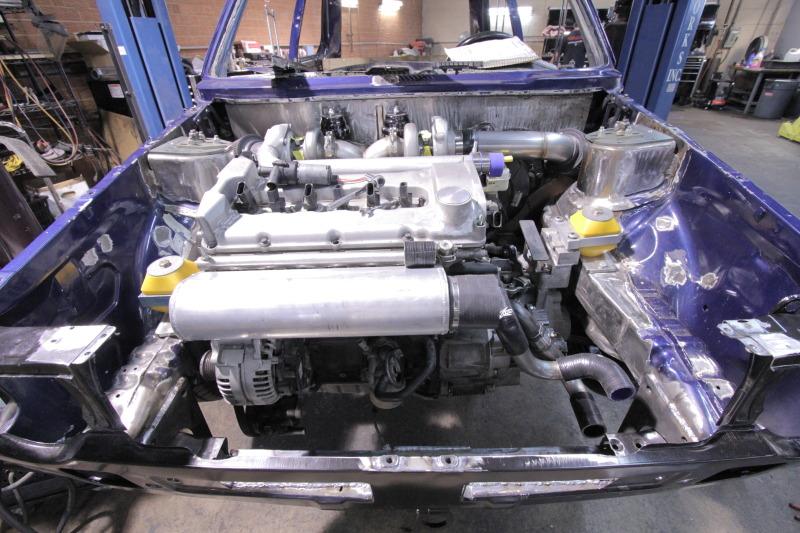
next up was the fans. due to the space issues, a staggered setup was used...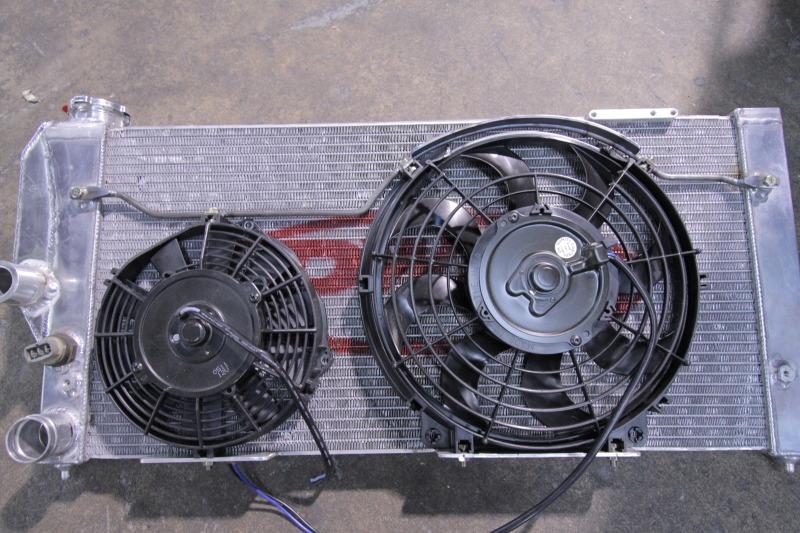
they had to modify the top of the fan on the passenger side to clear the intake manifold, as well to make room for any engine movement.
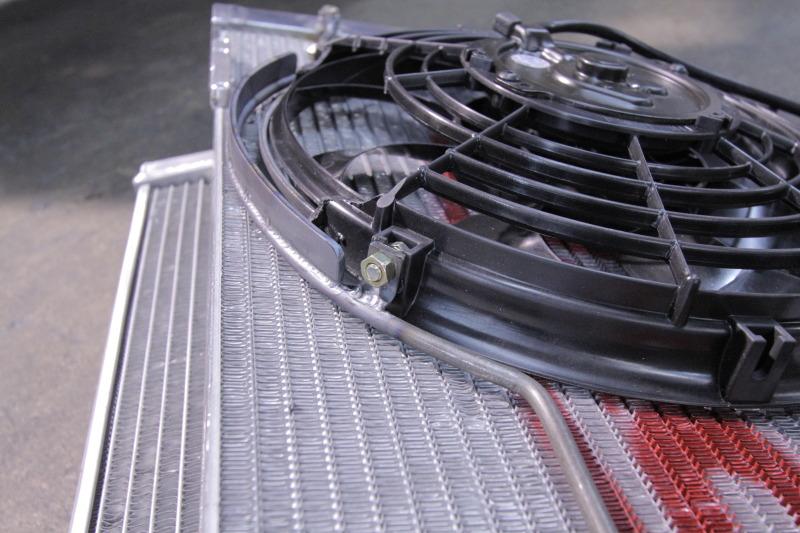
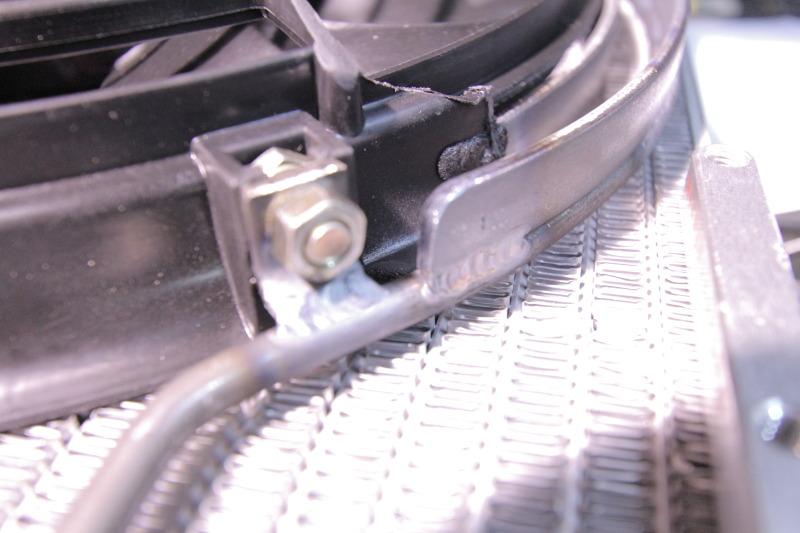
the fans are held in place with steel stock rod.
Brackets were made to bolt the fans into place instead of using zip ties.... thanks for going the extra distance guys.... 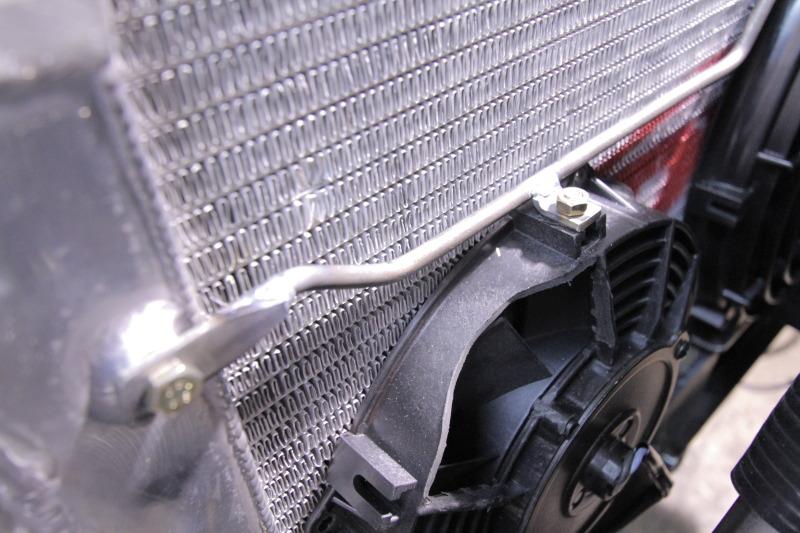
with material removed from the passenger fan they made a small steel shield to act as a cover to prevent anything from contacting the fan blades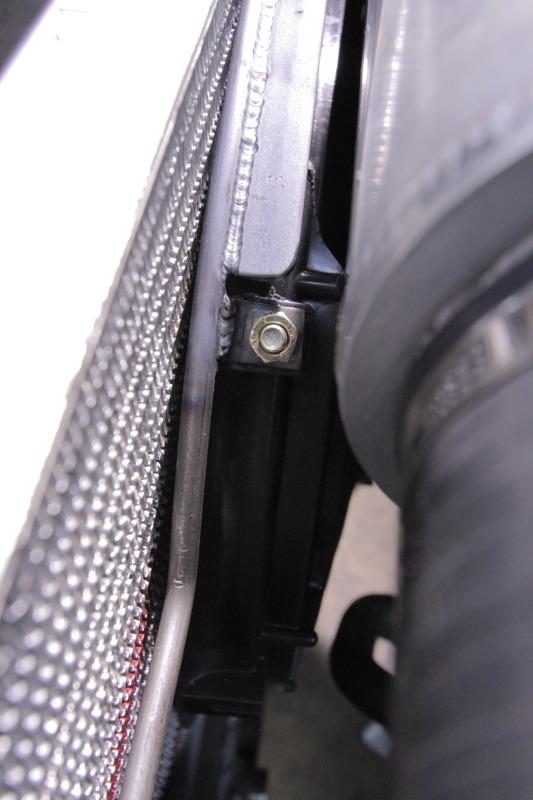
spoke with mike not that long ago and he'll be sending me more pics so will get them up tonight...
11/11/2011
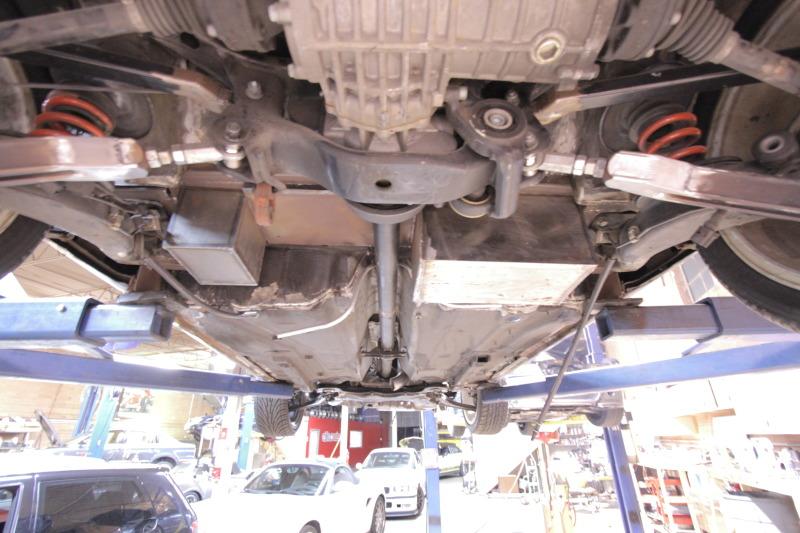
So everyone saw how the back seat compartment floor was mocked up with the speaker/amp/battery...
so here is a view of the compartment from under the car.
more pics of the removal of material from the rad fan...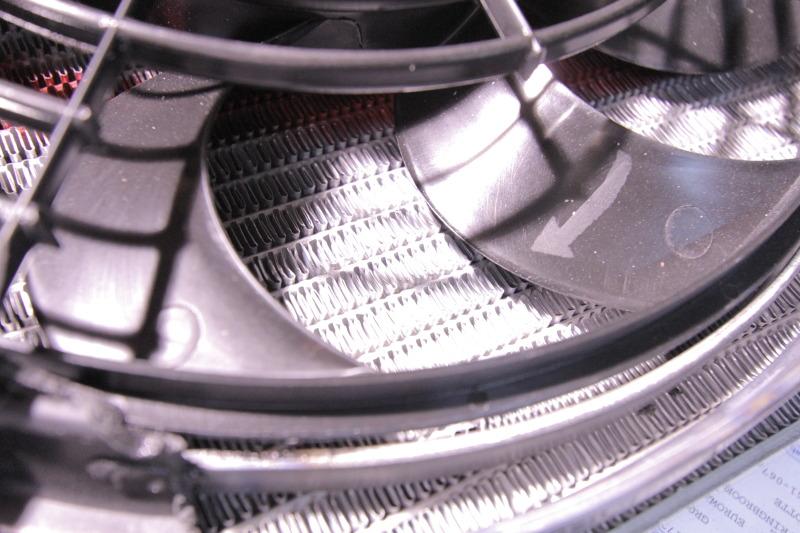
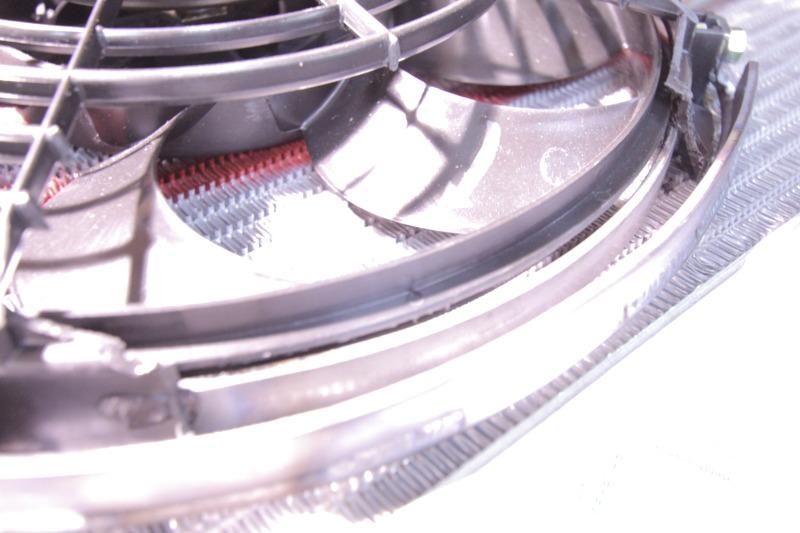
More pics of the steel shield built back into the brace to protect the blade.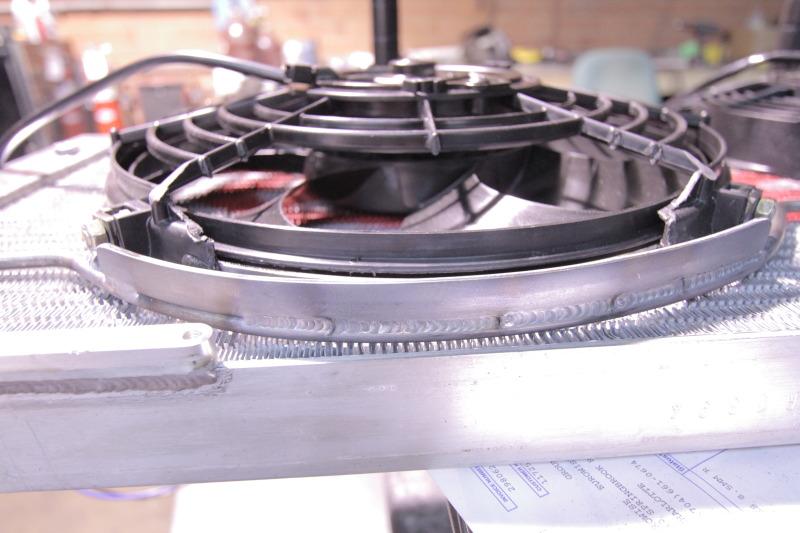
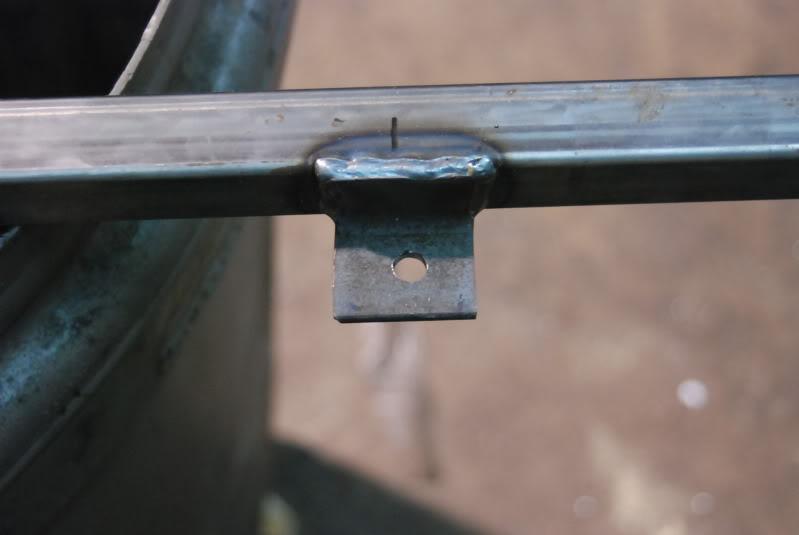
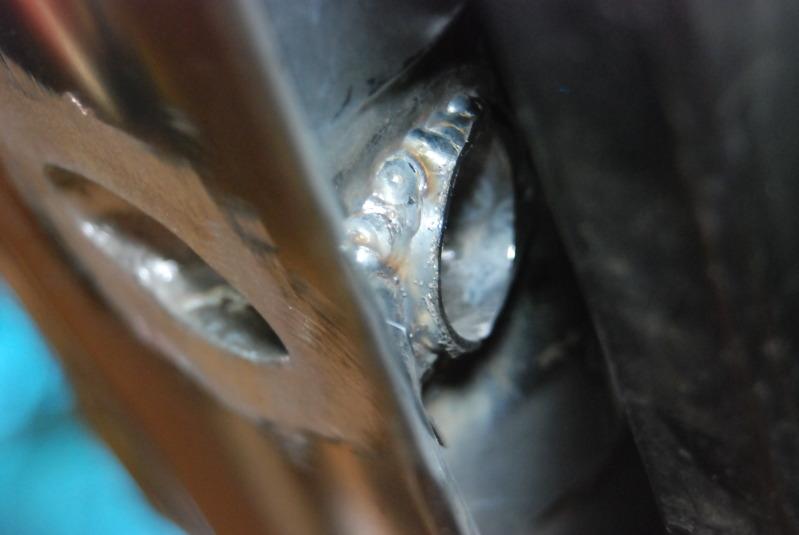
a few days ago i'd posted some progress on the new design of the tow hitch. here are more detailed pics of the design where you can see the tow hitch and the threaded stub welded into the front core support brace 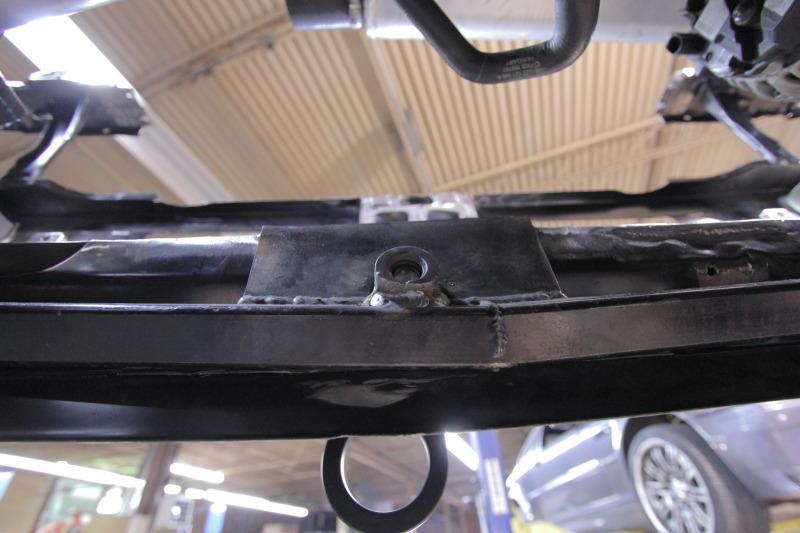
in addition to the 2 factory side mounts and the oem lower dogbone mount eurowise added a front brace as well..... for additional engine stabilizing...
Pics of the front brace in place...
mock up of how the cat bone mount will be bolted in place....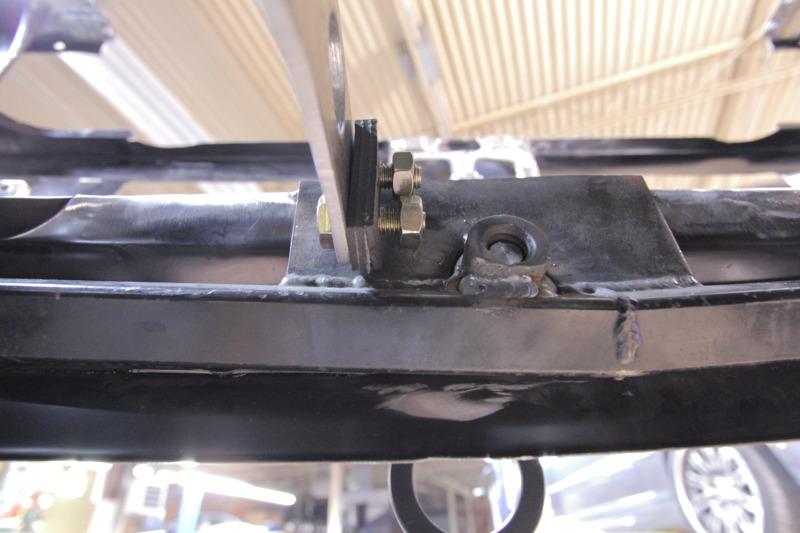
11/17/2011
So spoke with Mike and the guys at eurowise are trucking along... He's suppose to send me some pics today so should have updates up soon...
till then, my homie took a trip up there and is hanging out at the shop and he just sent me this great pic about an hour ago of the guys "brain storming" under the car..... I can think of a few funny captions, but think best i keep my mouth shout considering.... 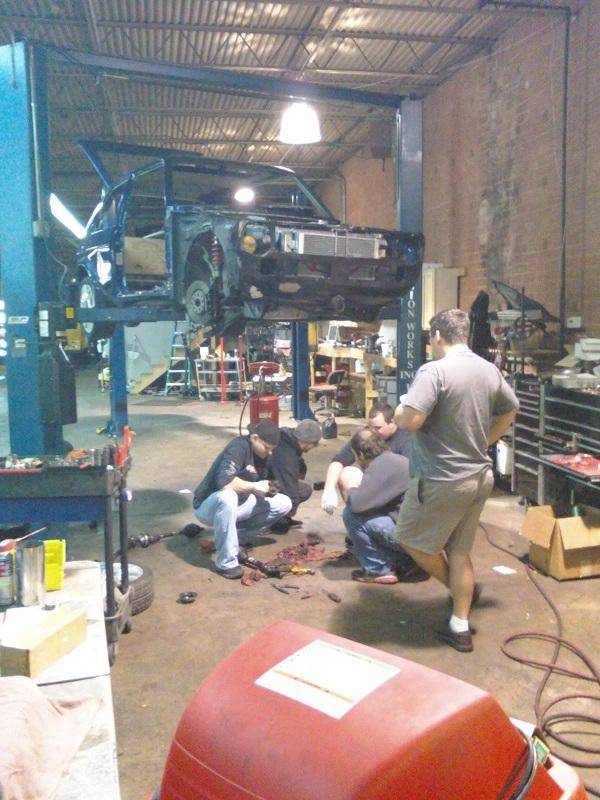
12/1/2011
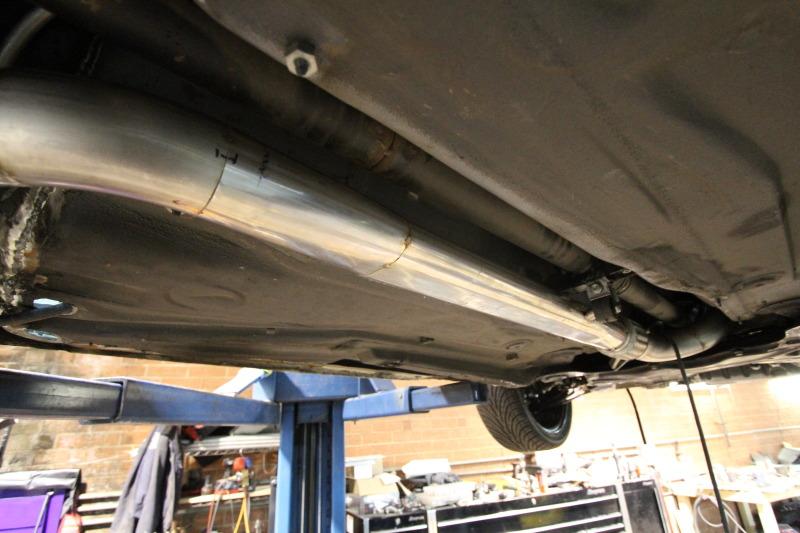
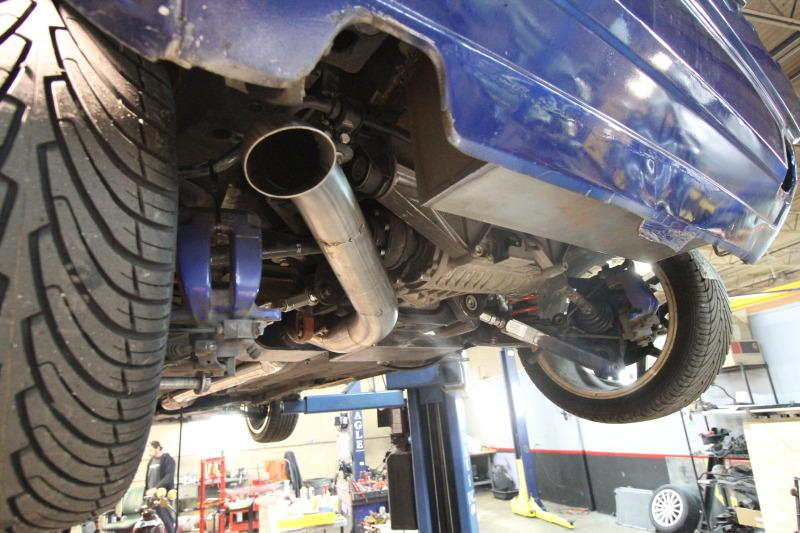
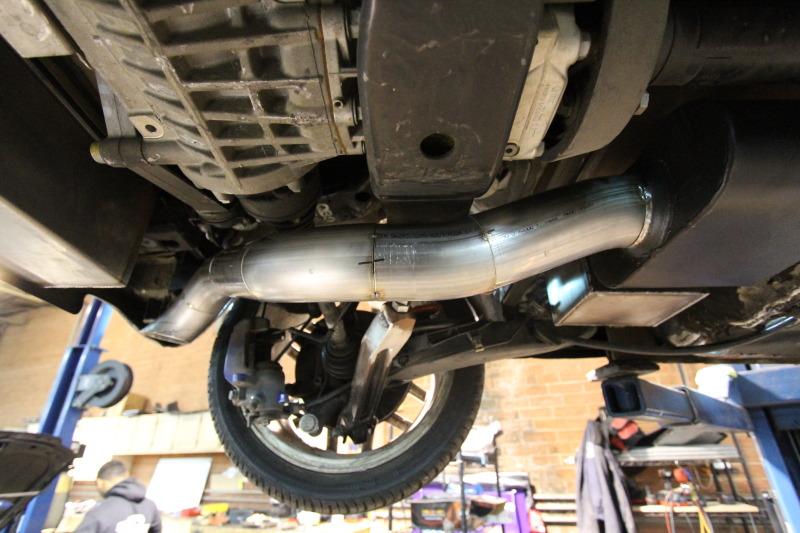
so car is making more progress... a bunch of little things here and there, but they have begun with the exhaust system....
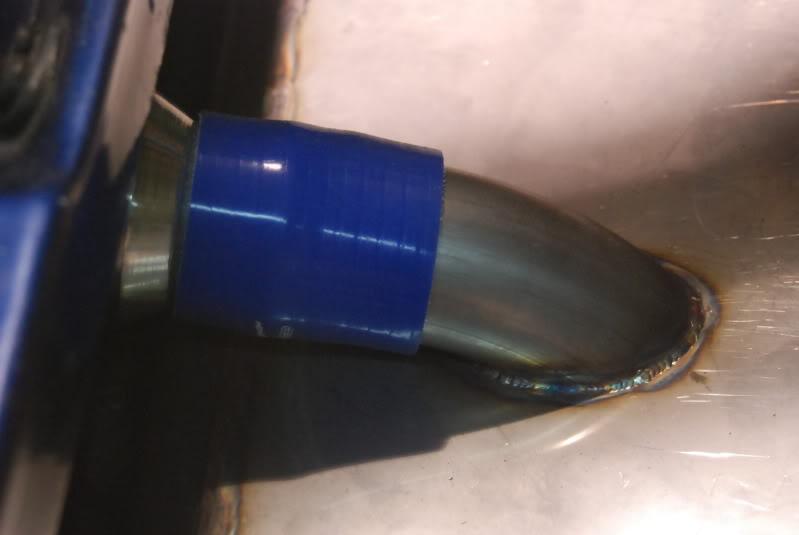
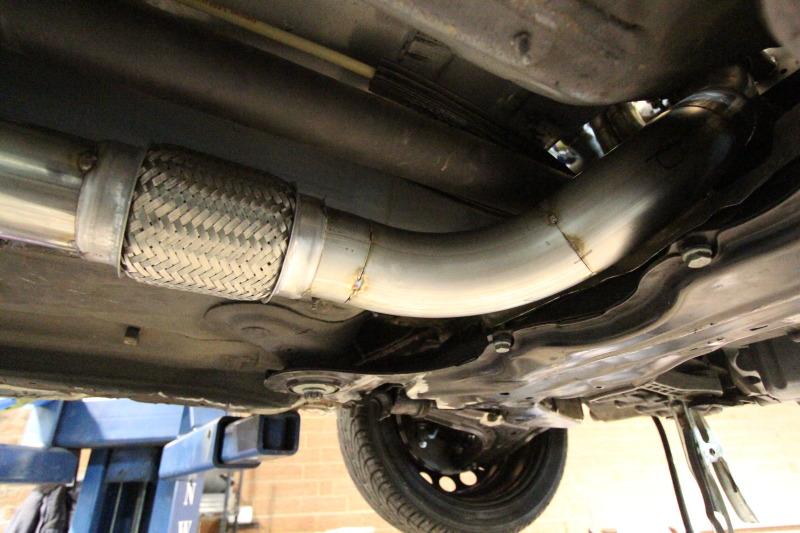
i know many of you are very familiar with ground clearance issues.... in regards to said topic, and the exhaust, they came up with a trick round stainless transition to an oval piping.... 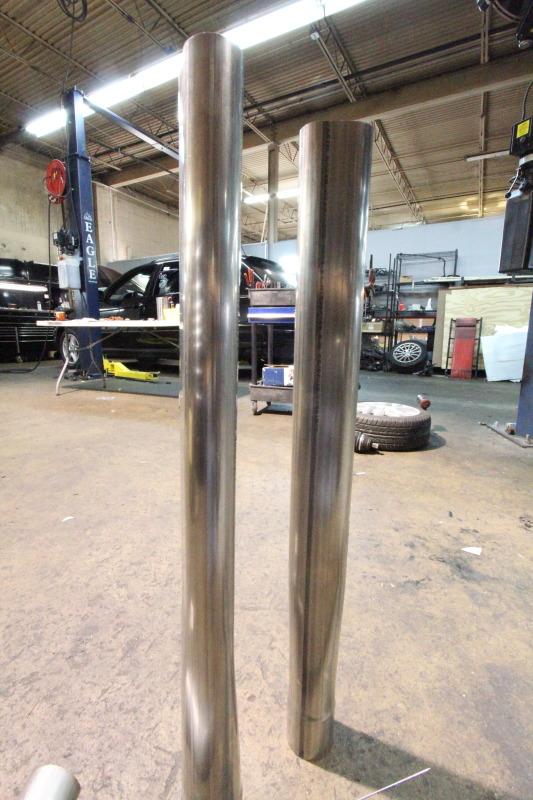
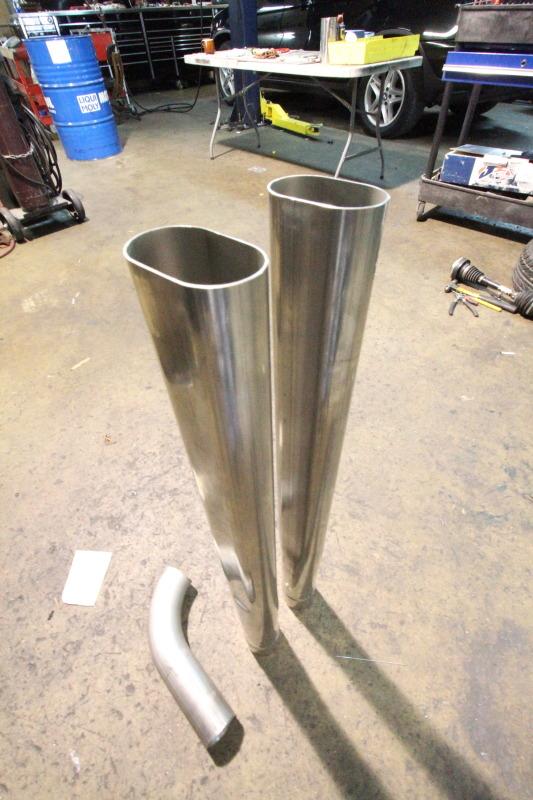
and pics of the 3â€Â stainless flex added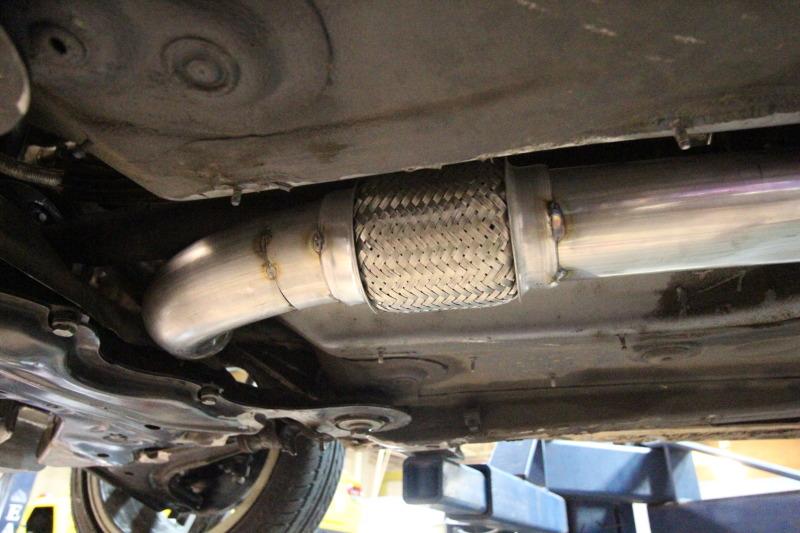
12/6/2011
anyways, most of you know the man himself, but big ups to Ben, aka moogie, aks Mk1 Autohaus (http://stores.ebay.com/Mk1-Autohaus). i got my first shipment of goodies from him and even though there is more on the way, got enough rubber here to even keep ron jermey busy for a nite.... 
12/11/2011
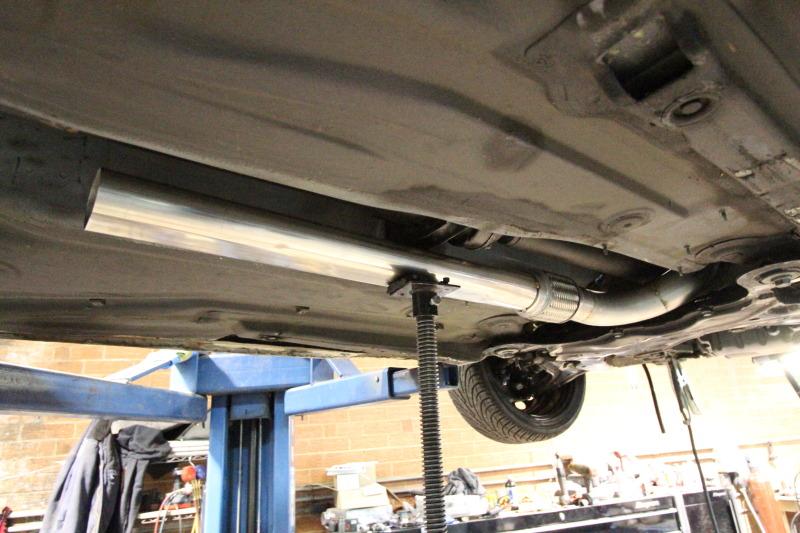
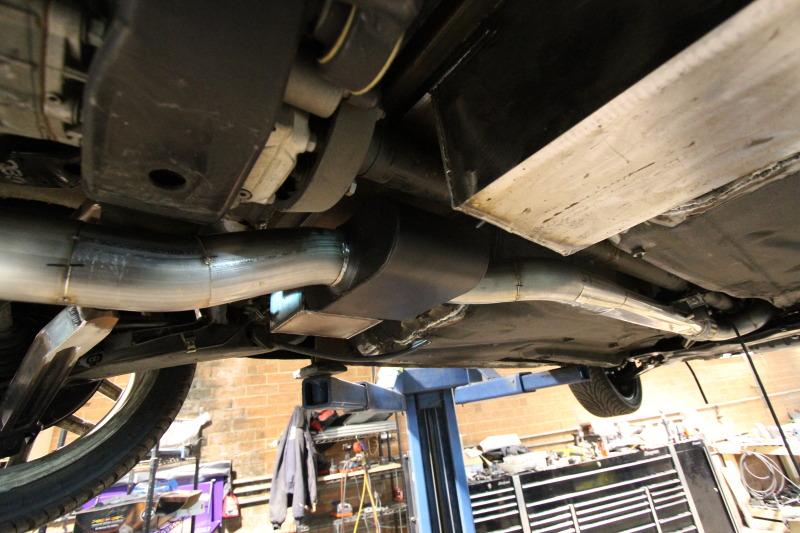
exhausted is mocked up'd...
Undershot of it.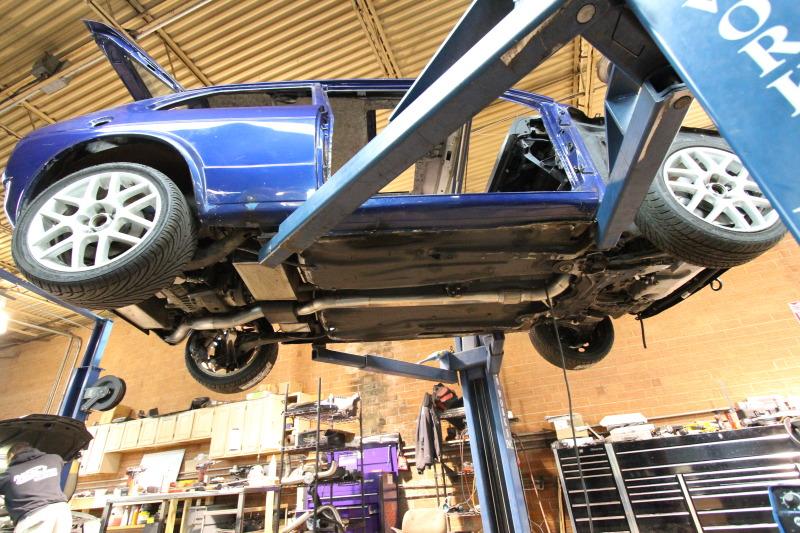
so consistent with the rest of the modifications for this project.... there is minimal room for a muffler.... A magna flow mini muffler was used to bring down the sound levels the best it could given the space constraints... to be honest, i look forward to hearing the sweet sound the turbos make coming out the rear end.... 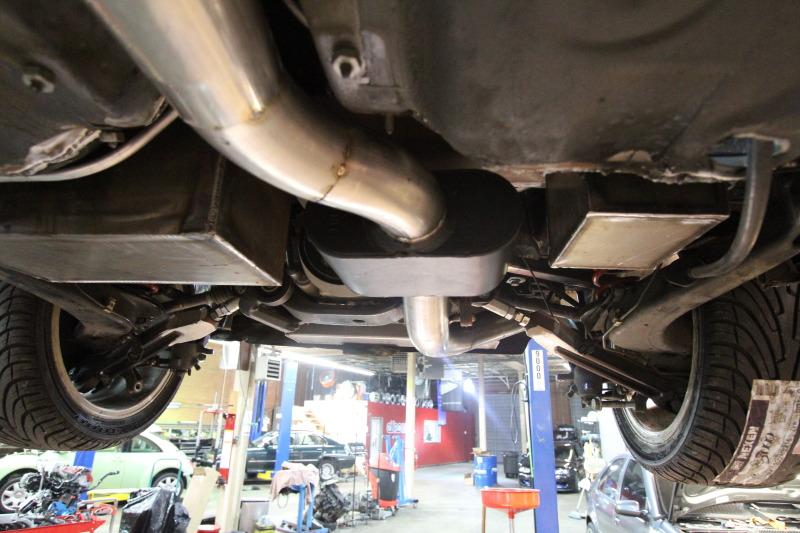
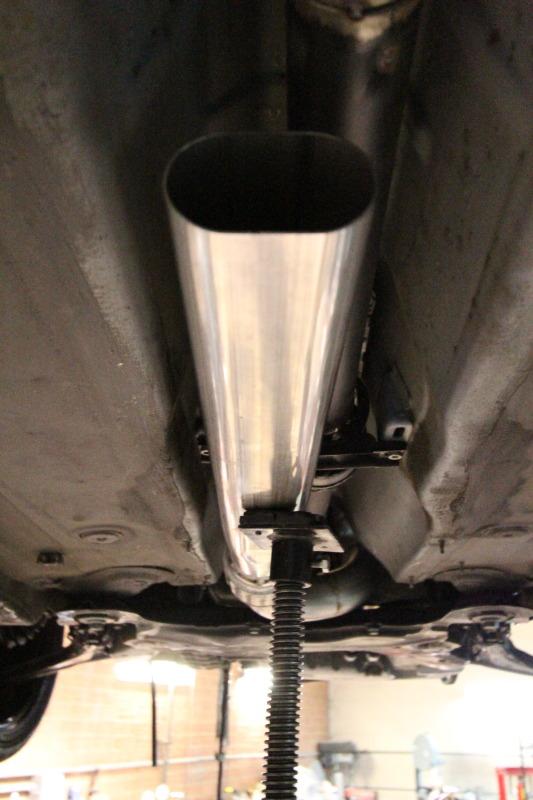
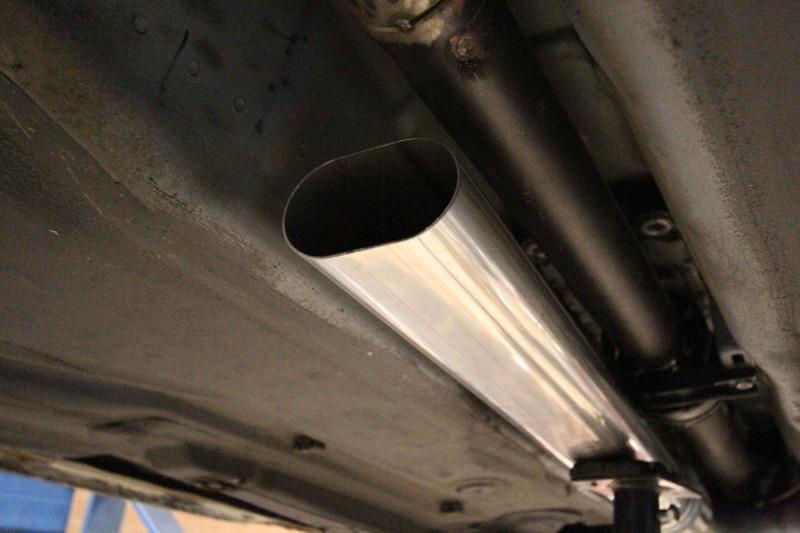
Finally, i plan on filling in the rear exhaust outlet of the bottom panel and asked doug to do a turndown. 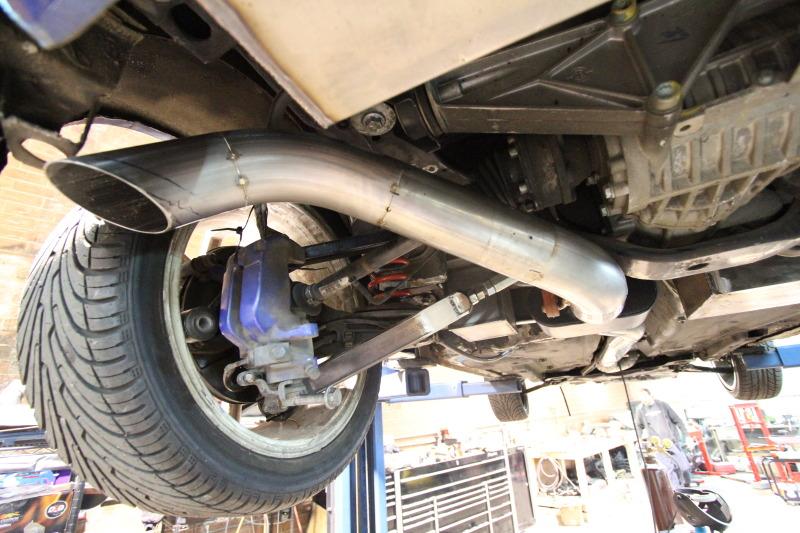
12/26/2011
anyway, back to your regularly scheduled program....
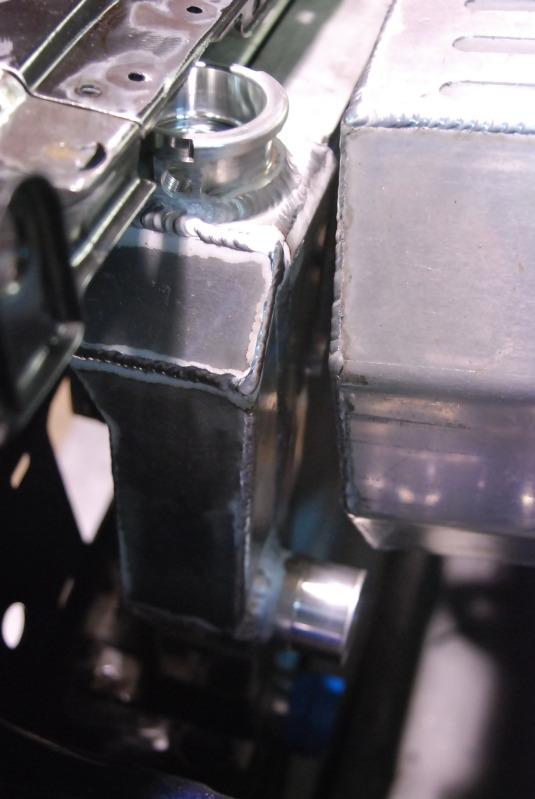
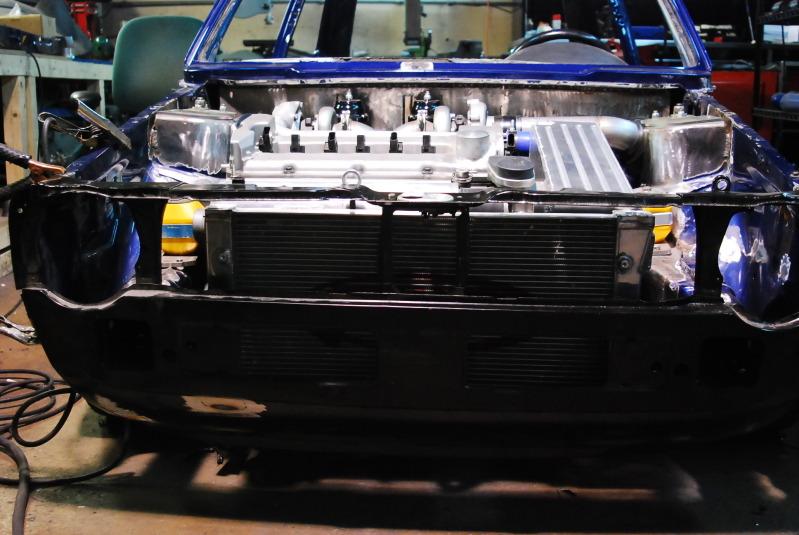
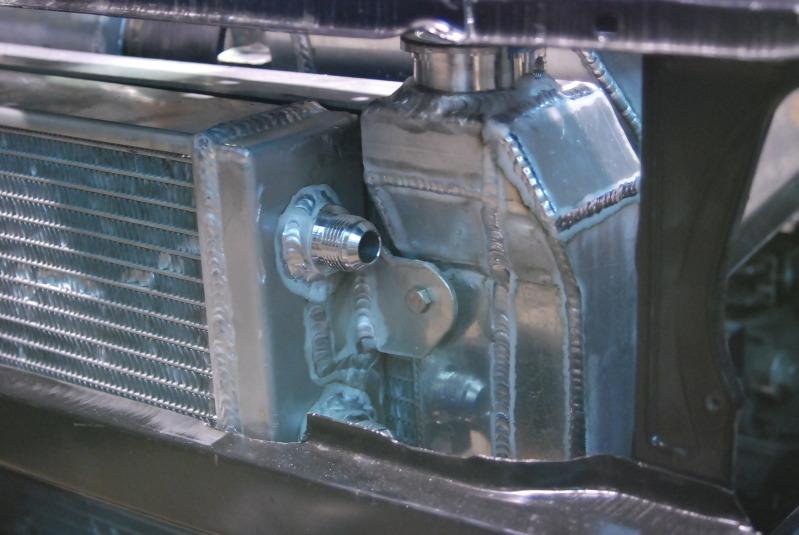
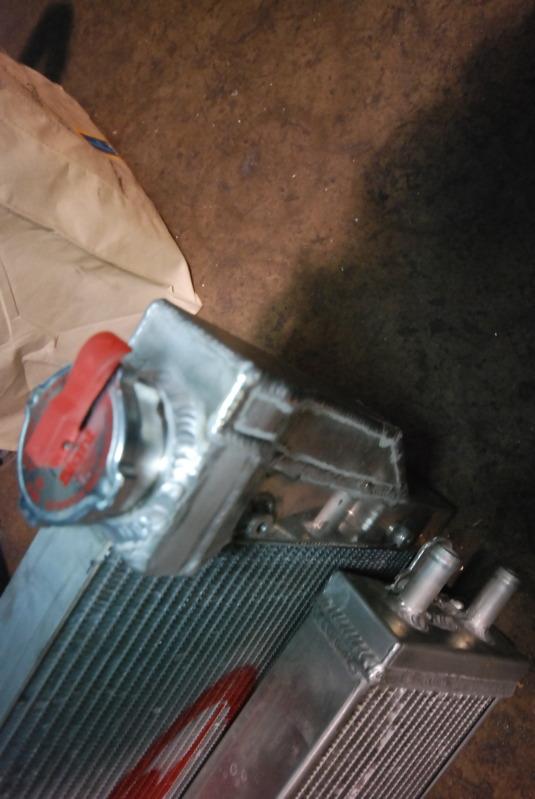
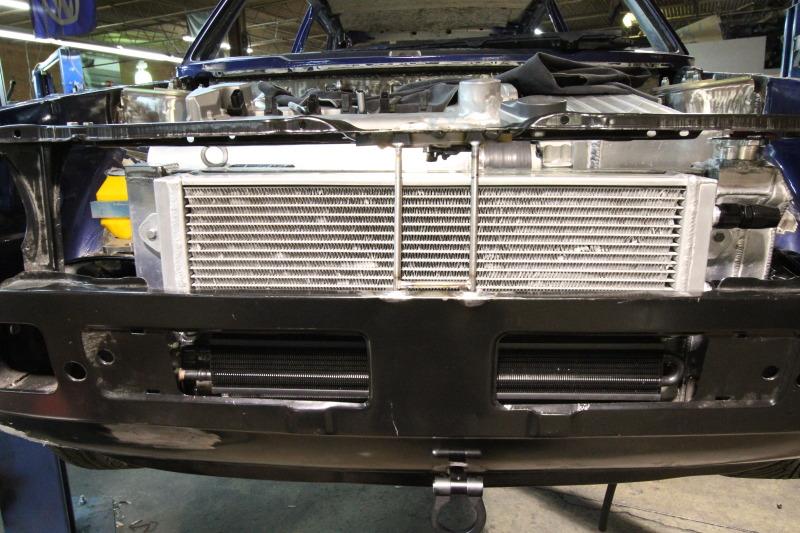
they mounted the new oil cooler, the front end was very tight and room was limited. So they purchased a slim oil cooler that fits perfectly in whats left in the opening of the rabbit front end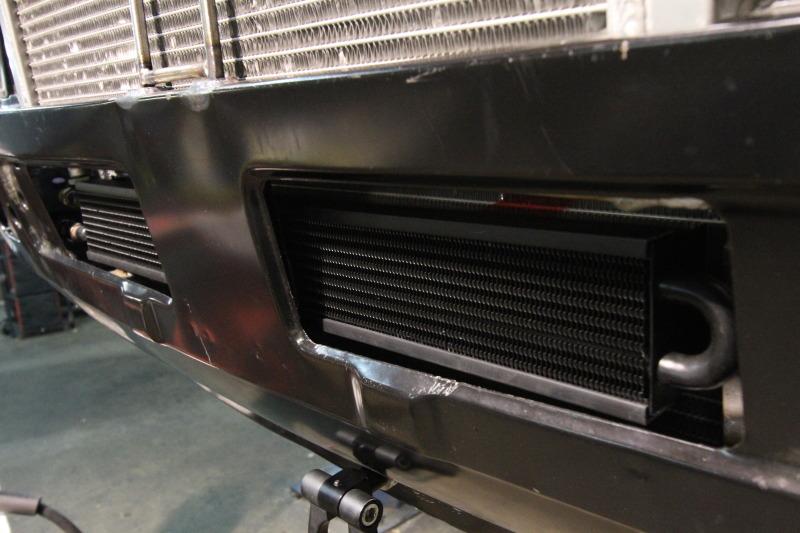
due to the additional weight, power steering was added to the car.
they began by making a custom made, from scratch, power steering reservoir and they re-used the entire r32 steering system except for the lines
building the reservoir the goal was to build a functional reservoir that was also stealthy and clean
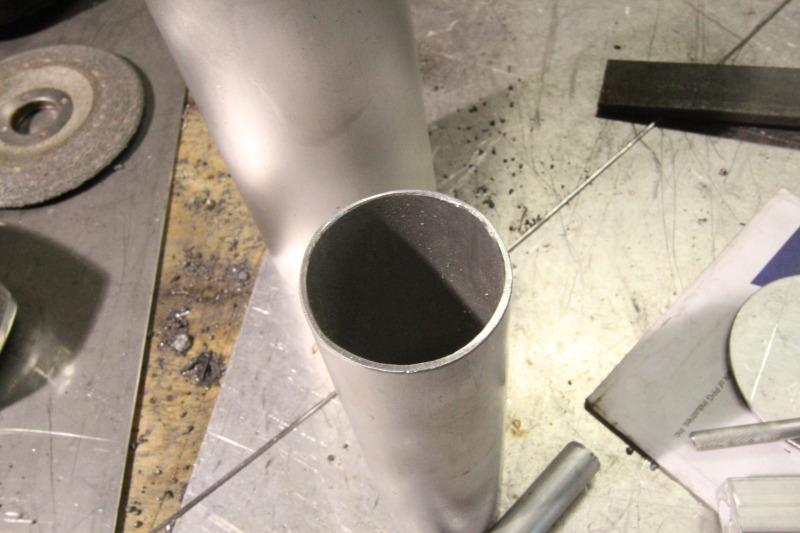
they started off with a 16 gauge aluminum round tube for the tank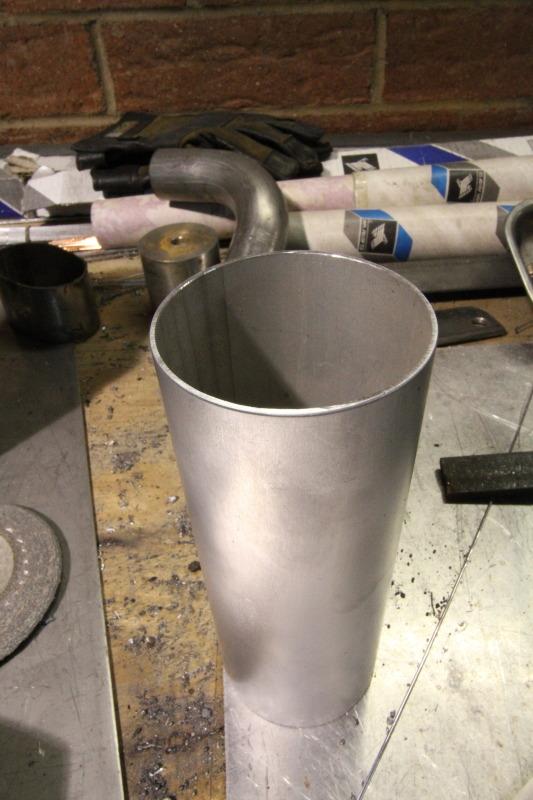
finishing it off with an aluminum round bung and cap
a piece of aluminum stock bar will be welded to the bottom of the cap and be used as a level gauge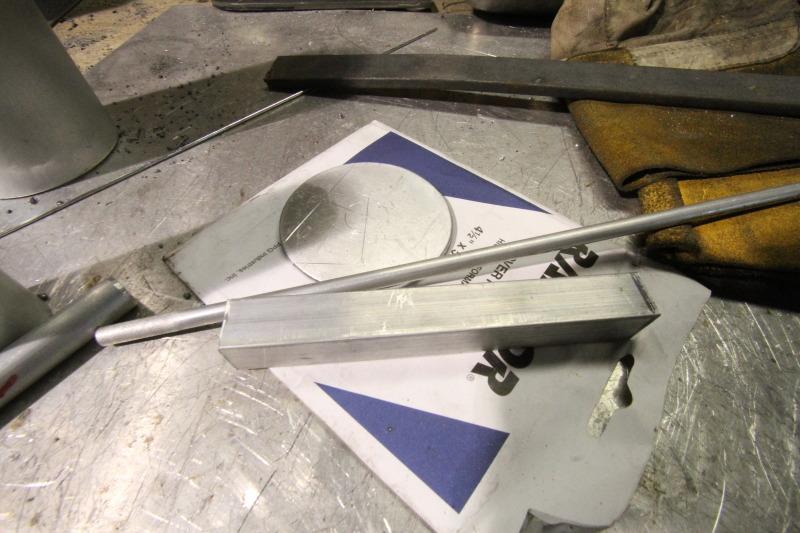
rod welded on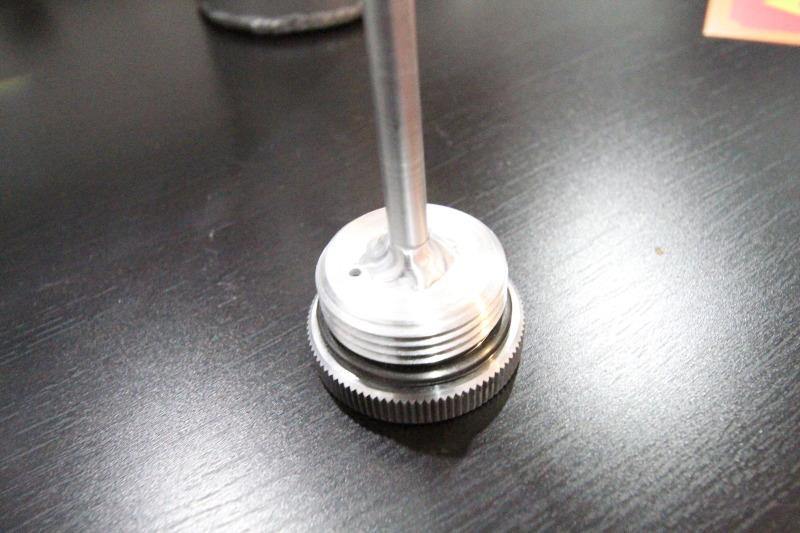
thry cross hatched the end to use as a sight
hand cut the top and bottom and they also built a baffle for the inside of the reservoir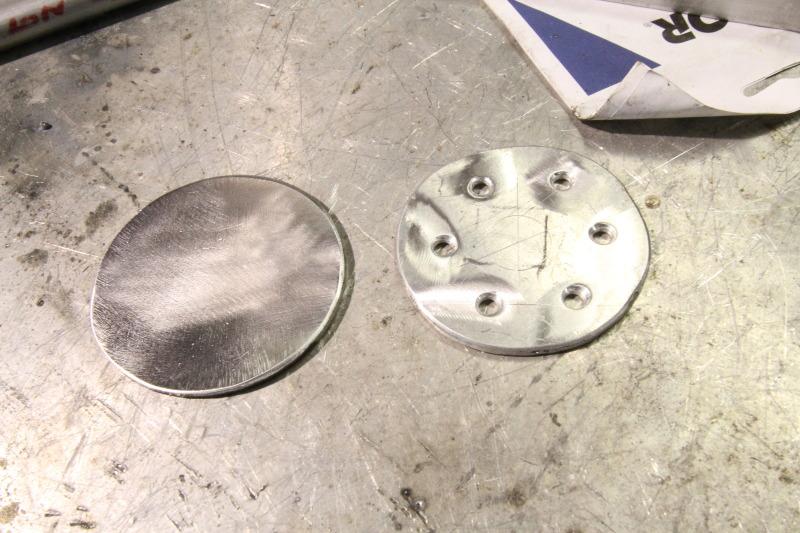
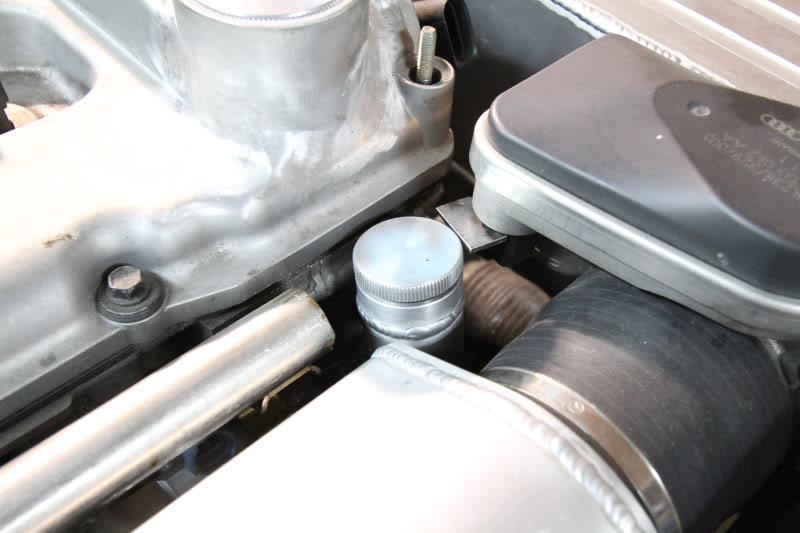
the neck which will be filler extension will be peeking out the front of the valve cover in-between the intake manifold. when completely finished it will be powder coated black... maybe...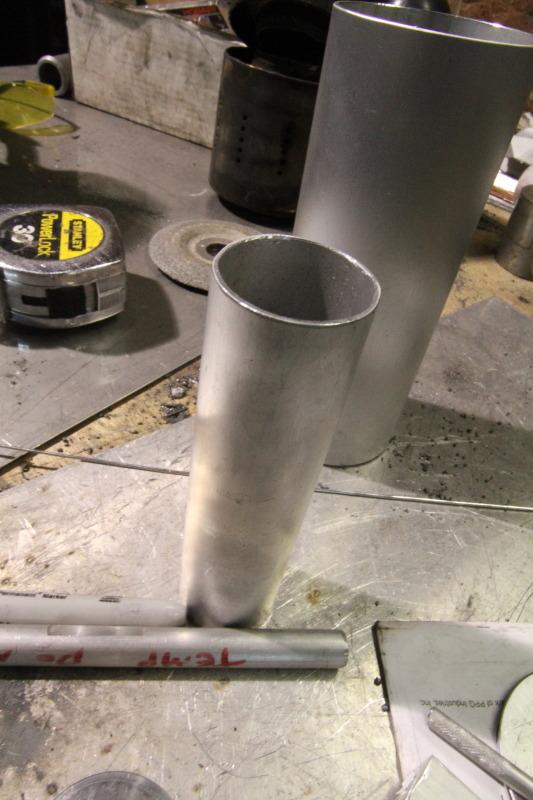
AN -6 bung welded to the bottom as a feed fitting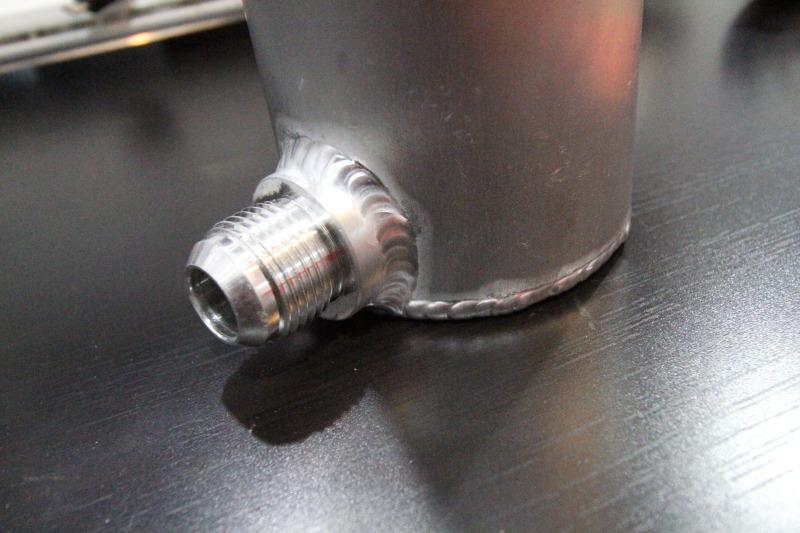
welded neck and cap on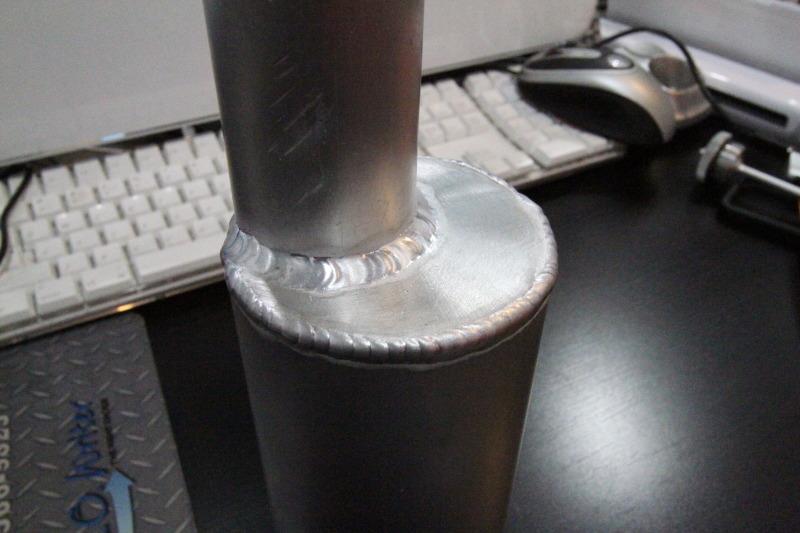
and finally a pic of the completed custom power steering reservoir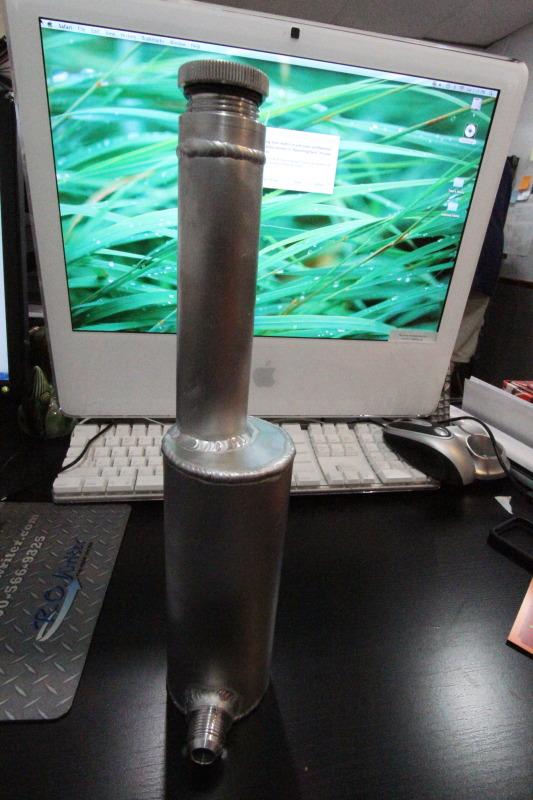
details, details, details.... i eurowise
mocked up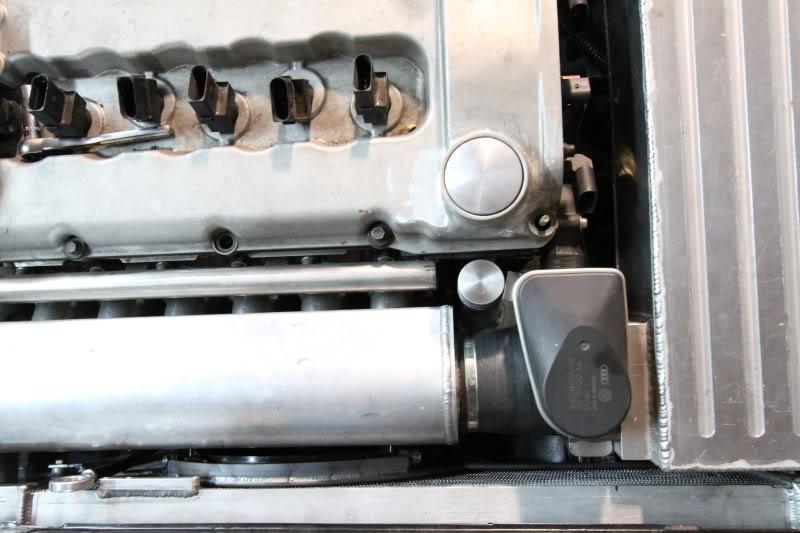
12/31/2011
just wanted to post one last picture of the car in its current state..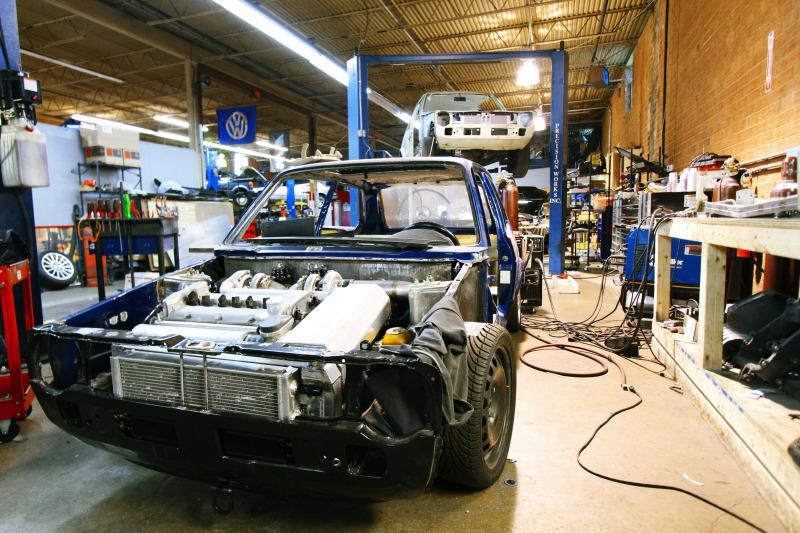
and also wanted to express my gratitude to the guys up at eurowise... mike, doug, ronnie, jp, and the rest of you guys are the absolute best!!!! i can't thank you guys enough for all the amazing work!
and wanted to thank all of you a1 knuckle heads for the past year for the encouragent, thoughts, ideas, and criticisms.... may you all have a great new years and look forward to 2012...
2/10/2012
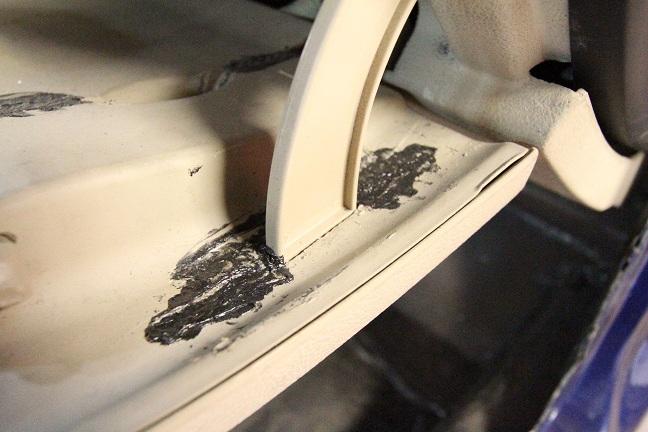
mike sent me some pics a couple days ago of the interior and here is what they did...
they fitted up the console and shifter surround. 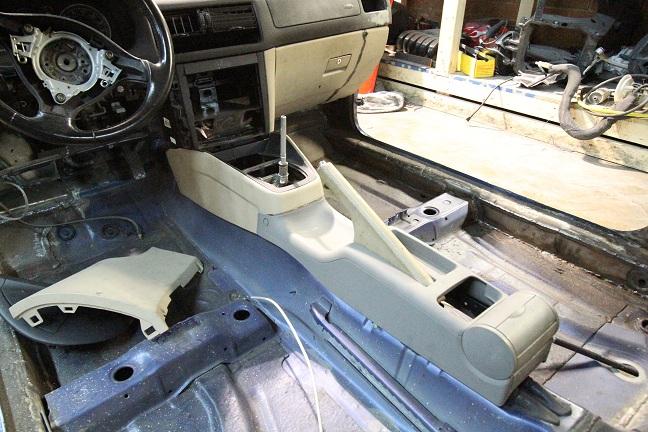
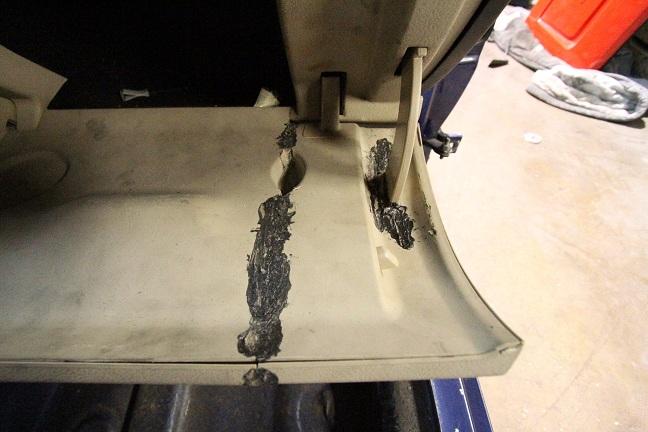
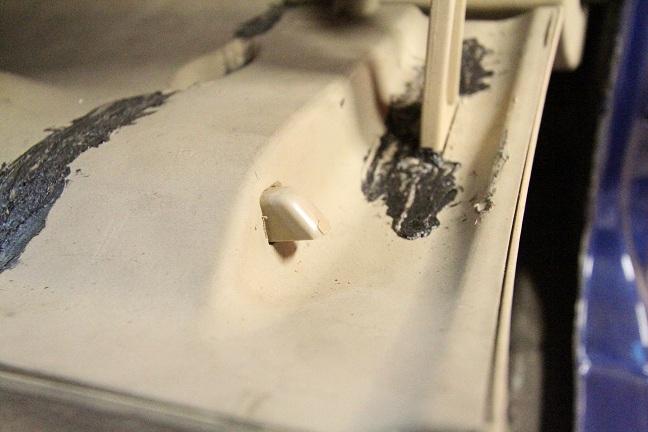
on the glovebox they had to shorten the door to match the dash that was narrowed. in order to make it a fully functioning glovebox door they had to perform some tedious surgery on the internals. the glovebox has 2 small nipples that move in and out when opening the glove box handle. in order to retain that functionality they cut open the box, shortened the locking pin. plastic welded the pin back together. Also they had to shorten the entire length of the door to fit the dash again.
i have no idea why, but this pic reminds me of the fish in nemo with the scare down its face... again, i have no idea why.... 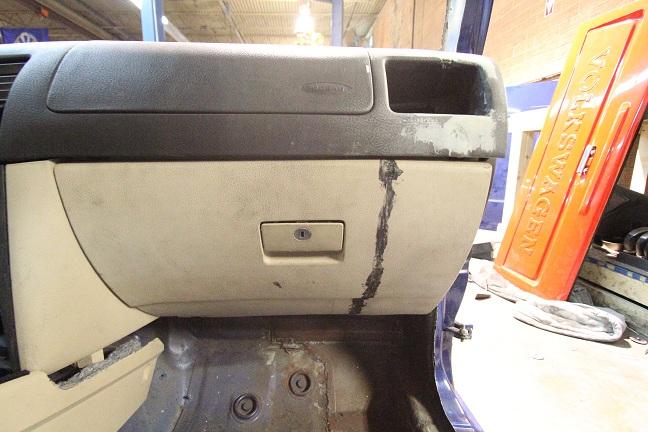
4/29/2012
mike did put together a small piece so this is somewhat of a blast from the not so distant past...
{disclaimer}I HAD NOTHING TO DO WITH THE MUSIC SELECTION{disclaimer}.... i forgive you Mike Ngo....
https://www.youtube.com/watch?feature=player_embedded&v=d6bwrtvEOlw
again, thanks again guys for all the interest throughout the build and updates should start back up in June....
8-13-2012
the suspense.....
the drama....
and the reality... lol...
sorry for the lack of updates but have some good news and some bad news...
the good news is I was up in Charlotte at Eurowise over the weekend and me, mike, and many others got drunk and had a great weekend!!!
the bad news is we never discussed this project... lol...
I will say, it hasn't been forgotten about, just other things have come up for both of us, but it will be completed....
anyway, shameless plug for my 15" Image wheels for sale...
http://forums.vwvortex.com/showthrea...1#post78586051
12-17-2012
Does anyone still even believe this heap will ever run? 
5-14-2013
So......
You all crack me up.
And no, Mike and I have not forgotten about this car. There has been some changes at Eurowise and me Mike are figuring some stuff out. Besides that, I adopted two cats from the shelter, got married, started a side career, left the country, bought a house, currently selling a house, and etc.... So yeah, this car is at the top of my priority list...


Sorry this post lacked any real update, but know that I appreciate all the enthusiasm and interest and should be back on track sometime this decade...
Either way, I hope to see many of you at the SoWo A1 gtg this Friday.
Good one!
Posted by Diggymart on 7/6/20 @ 3:16:11 PM