You must be logged in to rate content!
92 minute(s) of a 190 minute read
1-12-2021
2004 STi Twin Scroll 6262
Compliments of Layvon @ www.nasioc.com
I recently decided to build up an engine for my 2004 STi. It is going to be a long road ahead, but I'm excited none the less.
This build is going to have quite a few one - off parts... made from me, a new exhaust man on the Subaru block, and a very reputable shop trying to make their abilities known in the Subaru Community. This build will be all done out of my pocket, just getting established into the real world, as I graduated school in May 2011. Have nothing better to do when I'm home than tinker in the garage, and since I got my 2004 WRX in 2009, I've wanted to have a quick car.
I don't expect this build to be done done till September of 2012, but It could be running on the new motor by the beginning of May.
Goals for the car are to have a fun car to drive on the weekends, that I can change the map at the track, and go to the 1/4 mile, go to a road course, and maybe autox... I think my turbo is going to prohibit me from being competitive... but it will still be fun to do.
Anyways - here is the mod list for the engine, along with the rest of the stuff that has been done / will be done before I consider this build to be done done.
Short Block
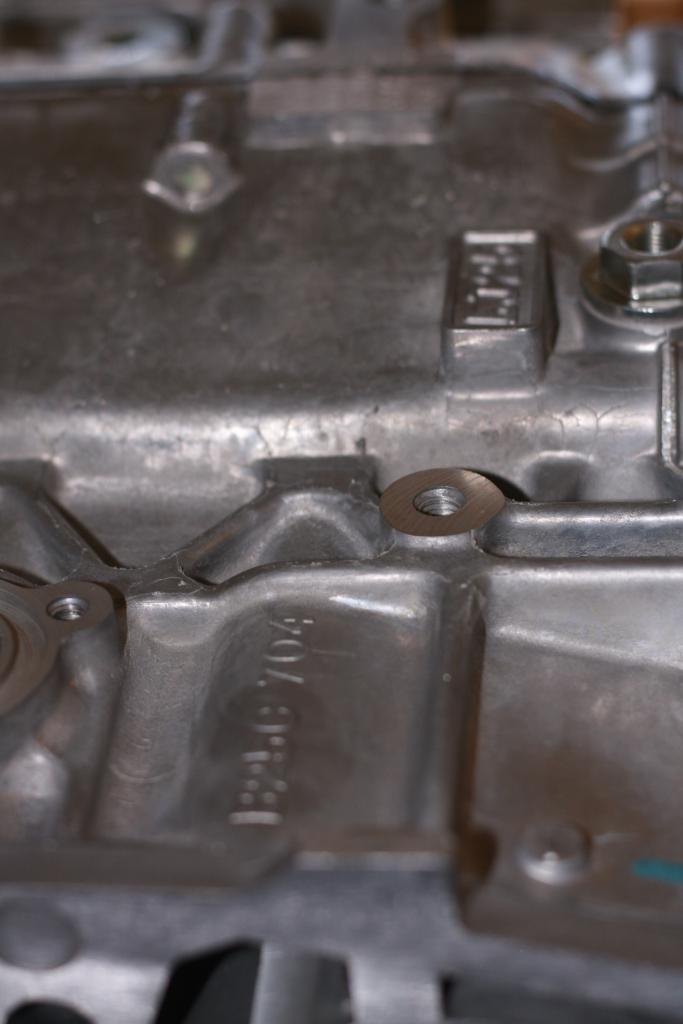
- 701 EJ257. If I use the donor block I bought - It will have to be bored to 100mm, I don't really like the idea of this, I'm going to be talking to my builder about his confidence in the stock walls at whatever hp my car ends up making. Unless I end up buying a new block, this block will be "decked" and cleaned before assembly begins.
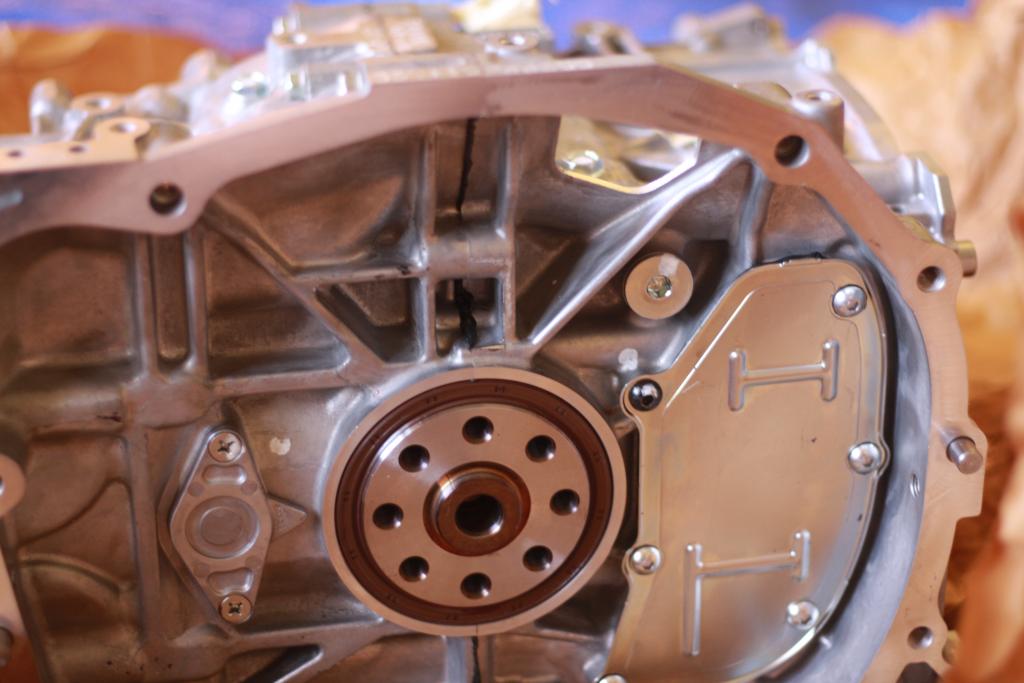
- New OEM Shortblock, 704, includes Crank, bearings, and misc gaskets, Nitrated crank
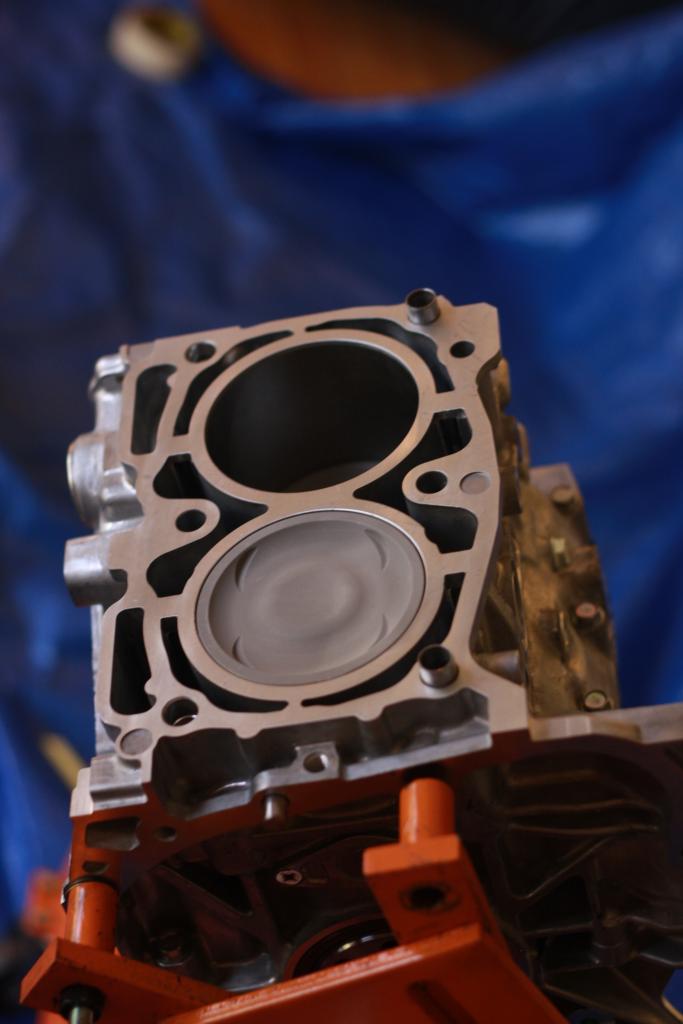
- CP SC7420 Pistons 8.2:1 CR 99.5mm Bore
- Manley Turbo Tuff Rods.
- ARP 2000 Rod Bolts
- Coated Piston tops, and possibly skirts
- ARP L19 Head Studs H11 Studs now.
- KillerB Pick up
- Koyo Radiator
- Gates Timing Belt / New pulleys / water pump
- Mishimoto Radiator shroud and slim fans.
Heads - Plan on tuning to 8k, but setting rev limit to 7750 for safety. It will depend on where it quits making power.
- 2007 STi Heads - bought from Sean18337 here on NASIOC
- Cosworth S2 278/274 Cams
- Cosworth Springs and Retainers
- Element Tuning Big Valve Heads
- +1mm intake valves w/ 5 angle valve job
- +1mm exhaust valves w/ 2 angle valve job
Air
- PTE 6262 Twin Scroll .84, Vband Down Pipe
- fobia WRX Headers / Down Pipe.
- APS FMIC - Likely going to ceramic coat the FMIC piping.
- Reverse IM
- Grimmspeed TGV deletes
Fuel - E85
- FIC2200cc injectors. Overkill - yes.
- FIC fuel rails.
- Fuel lab FPR
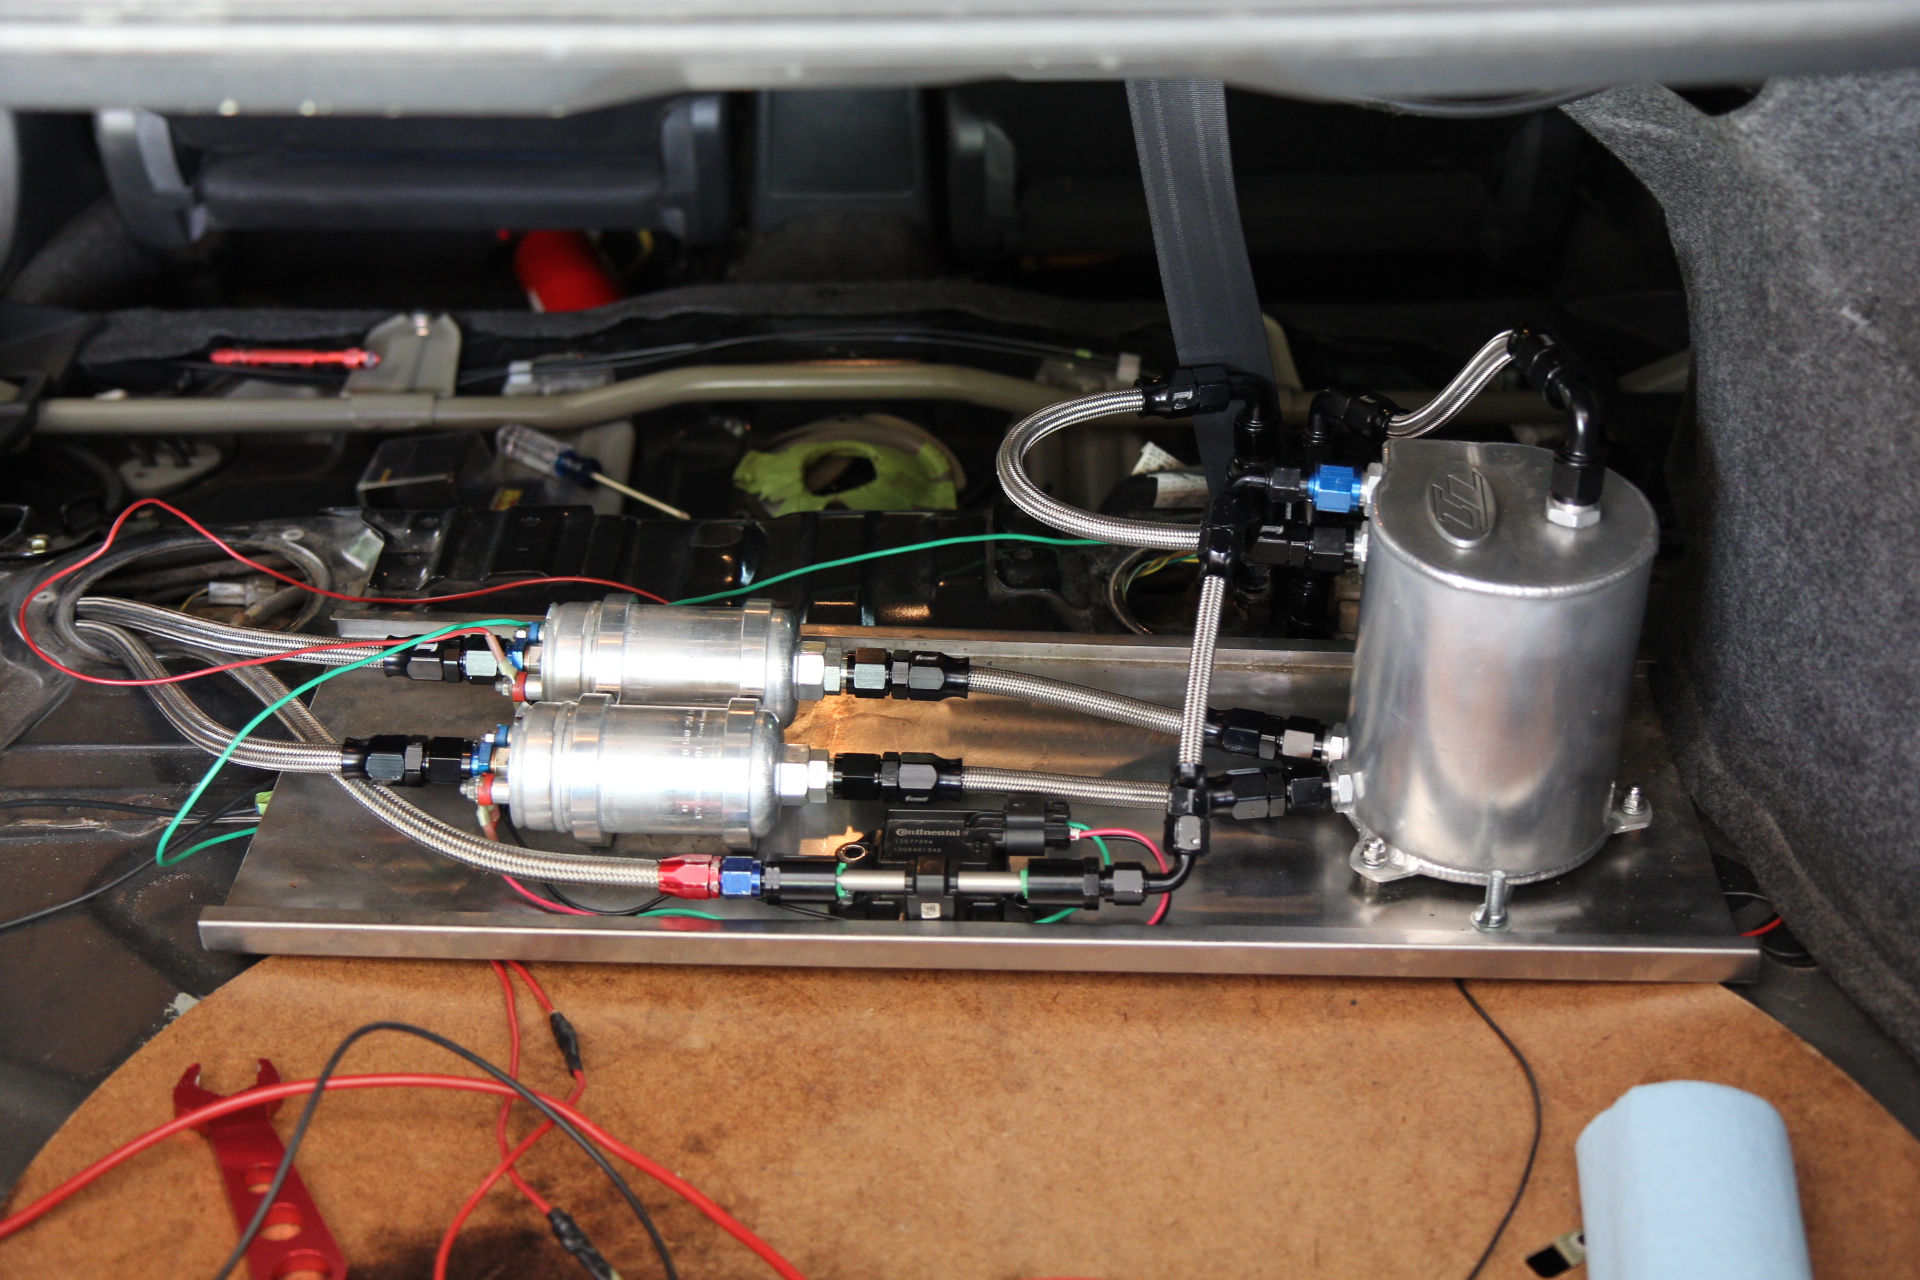
- Custom Surge tank setup (pictures below) W255 in tank w/ 2 Bosch 044 feeding fuel rails w/ inline fuel filter.
Suspension & Driveline
- Stock STi Struts getting valved by feal / Maybe getting Feal coil overs.
- Epic Engineering Springs
- Whiteline Front 27mm Swaybar
- Whiteline Rear 24mm Swaybar
- Kartboy endlinks for all 4 corners.
- Torque Solutions Motor Mounts
- Torque Solutions Pitch stop
- Torque Solutions Trans Mount
- TiC Diff Mount Bushings
- TiC Shift Linkage Bushings
- TiC Pivot Bushings
- Kartboy Front / Rear Shifter bushing
- Kartboy Short Throw
- Kartboy Shift Knob
- ACT Sprung 6 Puck
- ACT Streetlite Flywheel
- 5*114 Hub Swap completed
- 2007 STi Transmission
- 2006 STi R180
- DSS Aluminum Driveshaft
Electronics
- Junior Tuned
- Vipec ECU
- AEM Wideband
- AEM Oil Pressure
- AEM Boost
- Constant Motion Performance ECBS
- GM IAT
- Omni Power 4 bar
- Relocated battery
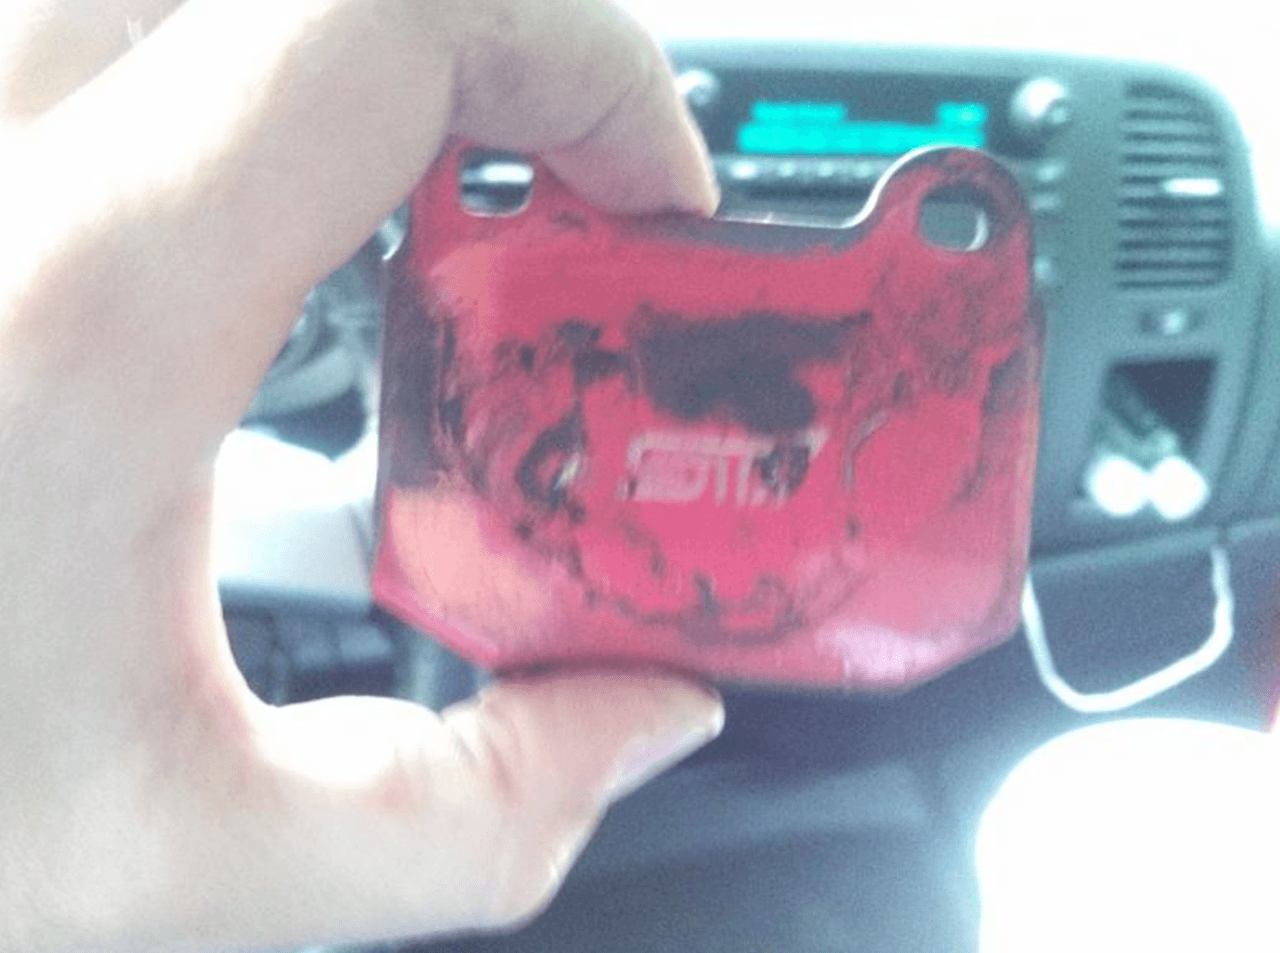
Brakes[*]Goodrich SS Lines[*]Grimmspeed Master Cylinder Brace
Cooling[*] Koyo Radiator[*] Samco Hoses[*] 11 Row Oil Cooler. Unsure if I'll use this at first start up.
Please please advise if you see something that isn't going to work / you have suggestions as to what could be done differently. I already know who i'm going to be purchasing all of my goods from, but if you see a part change out that could be better for my build please let me know.
11/12/2011
Heads:
Whole Album
http://imageshack.us/g/207/photo1gof.jpg/


Fuel System
whole album http://imageshack.us/g/254/photo1ou.jpg/


Tank close up

Mount using the washers to provide pressure to carpet to hold stable. I will probably rubber coat / plasti dip the head of the bolt to that it doesn't rattle / scratch stuff


1/21/2012
Well ECU dilemma has been decided.
Going w/ an AEM EMS v2. Even though the cobb SD is appealing, I don't think I can sleep easy going that route.
Junior is going to tune it for me and get me all situated once it comes time to get everything hooked up and go.
Ran through the numbers today, still have about 10,000 dollars to finish this build so it's going to be a while yet.
Layvon
3/13/2012
Pistons and Rods!! Thanks for the pictures Mike!
Manley Turbo Tuff w/ ARP 2000, and CP 8.2:1 w/ coating


3/16/2012
Trans and rest of driveline are out!! time to reassemble!
3/18/2012
Epic day! Dropped off my transmission, R180, and Flywheel in Milwaukee, Picked up my new diff in Chicago, drove to South Bend Indiana and met thefoos, talked to him for a half hour about his build, then I met coolblue05, near toledo and bought a koyo radiator and samco hoses! Ended up in Bowling Green to find out that the NCAA tournement is here... with the Florida Gators womens team being in my hotel. Kinda neat.
750 miles today, got to meet some cool people today that hopefully I will get to talk to again!
3/29/2012
Grimmspeed Master Cylinder Brace here, and installed. Fairly easy w/ no motor / trans in there!
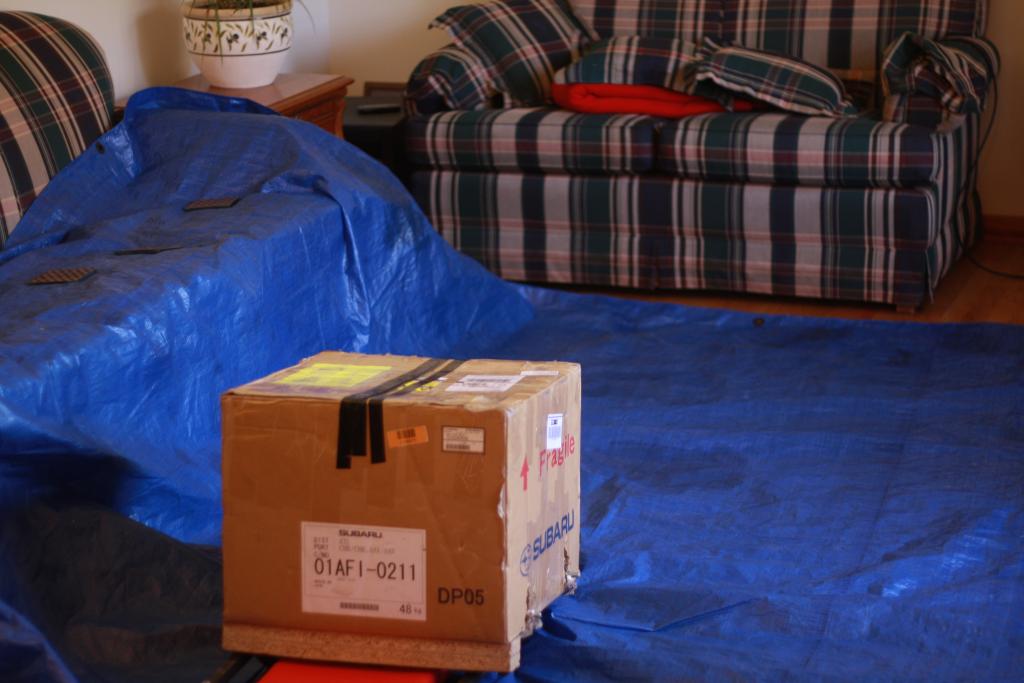
Short Block to be here Monday. So pumped. Should be getting Clutch, motor mounts and all the other stuff from Built here soon too. Once I get done fighting my rear diff, I'm going to start installing the fuel system, hopefully that goes okay
4/2/2012
Yeah Yeah Yeah!!! 
Pictures! So pumped. Only got the pickup and baffle on tonight, waiting on gaskets and an oil pan to start w/ the rest of the stuff. Should come together pretty quick I'd think. Hoping to have heads on it by the end of the weekend. Depends on how my buddies EvoX downpipe install goes.
I am planning on hooking up the dual catch can that I have:

Routed like this

4/11/2012
One head is on!
Been cleaning up the sealing surfaces for valve cover and getting oil pan on tonight.
When I was torquing down the head studs, it was the absolute most nervous I've ever been working on a car. ... And no matter how many times I read the instructions... I still missed the friggen bold statement right in the instructions..."If protruding into the waterjacket, use ARP thread sealer"
My dumbass didn't catch it even though Ive seriously read them like 4-5 times since this morning, trying to avoid something like this. Any tips on what to do?
4/12/2012
Motor just needs to be assembled; should be this weekend.
Waiting for transmission funds yet. Waiting for Turbo funds
Waiting for exhaust funds
Waiting for ecu funds
Waiting for tune funds.
That's "it".
4/15/2012
Well - waiting on getting some camshaft seals for exhaust. Kit came with 4 AVCS sized seals. . . Bummer. Other than that, I might throw on the Intake Manifold tomorrow just to take a sneak peak. Ultimately waiting on money for my transmission right now. I'm struggling not to buy the little things right now so I can get gtasti his money for the trans.
Battery relocation to trunk completed. Thought that it would have to be moved 100% for sure to run reversed IM. Well... Guess it is just easier to remove it now. Might put that Catch can in that location instead.
Interior cleaned up from all the bull**** that has accumulated since September '03. Found a previous owners pocket knife under the carpet 
Along with the battery relocation being done, I think that I got the electrical portion of my fuel system complete. Taps into the relay for fuel controller so that it primes then shuts off like oem, though once the AEM is installed this will be gone anyways. Should be all good to throw the carpet in once I get my walbro (another small thing) and set the system up.
Can anyone else comment on the Stud torque? I'm sure that before I get my final tune that I will have the motor out again to fix the inevitable leak out of a seal or something else. This would fit in line with retorquing once heat cycled anyways.
4/24/2012
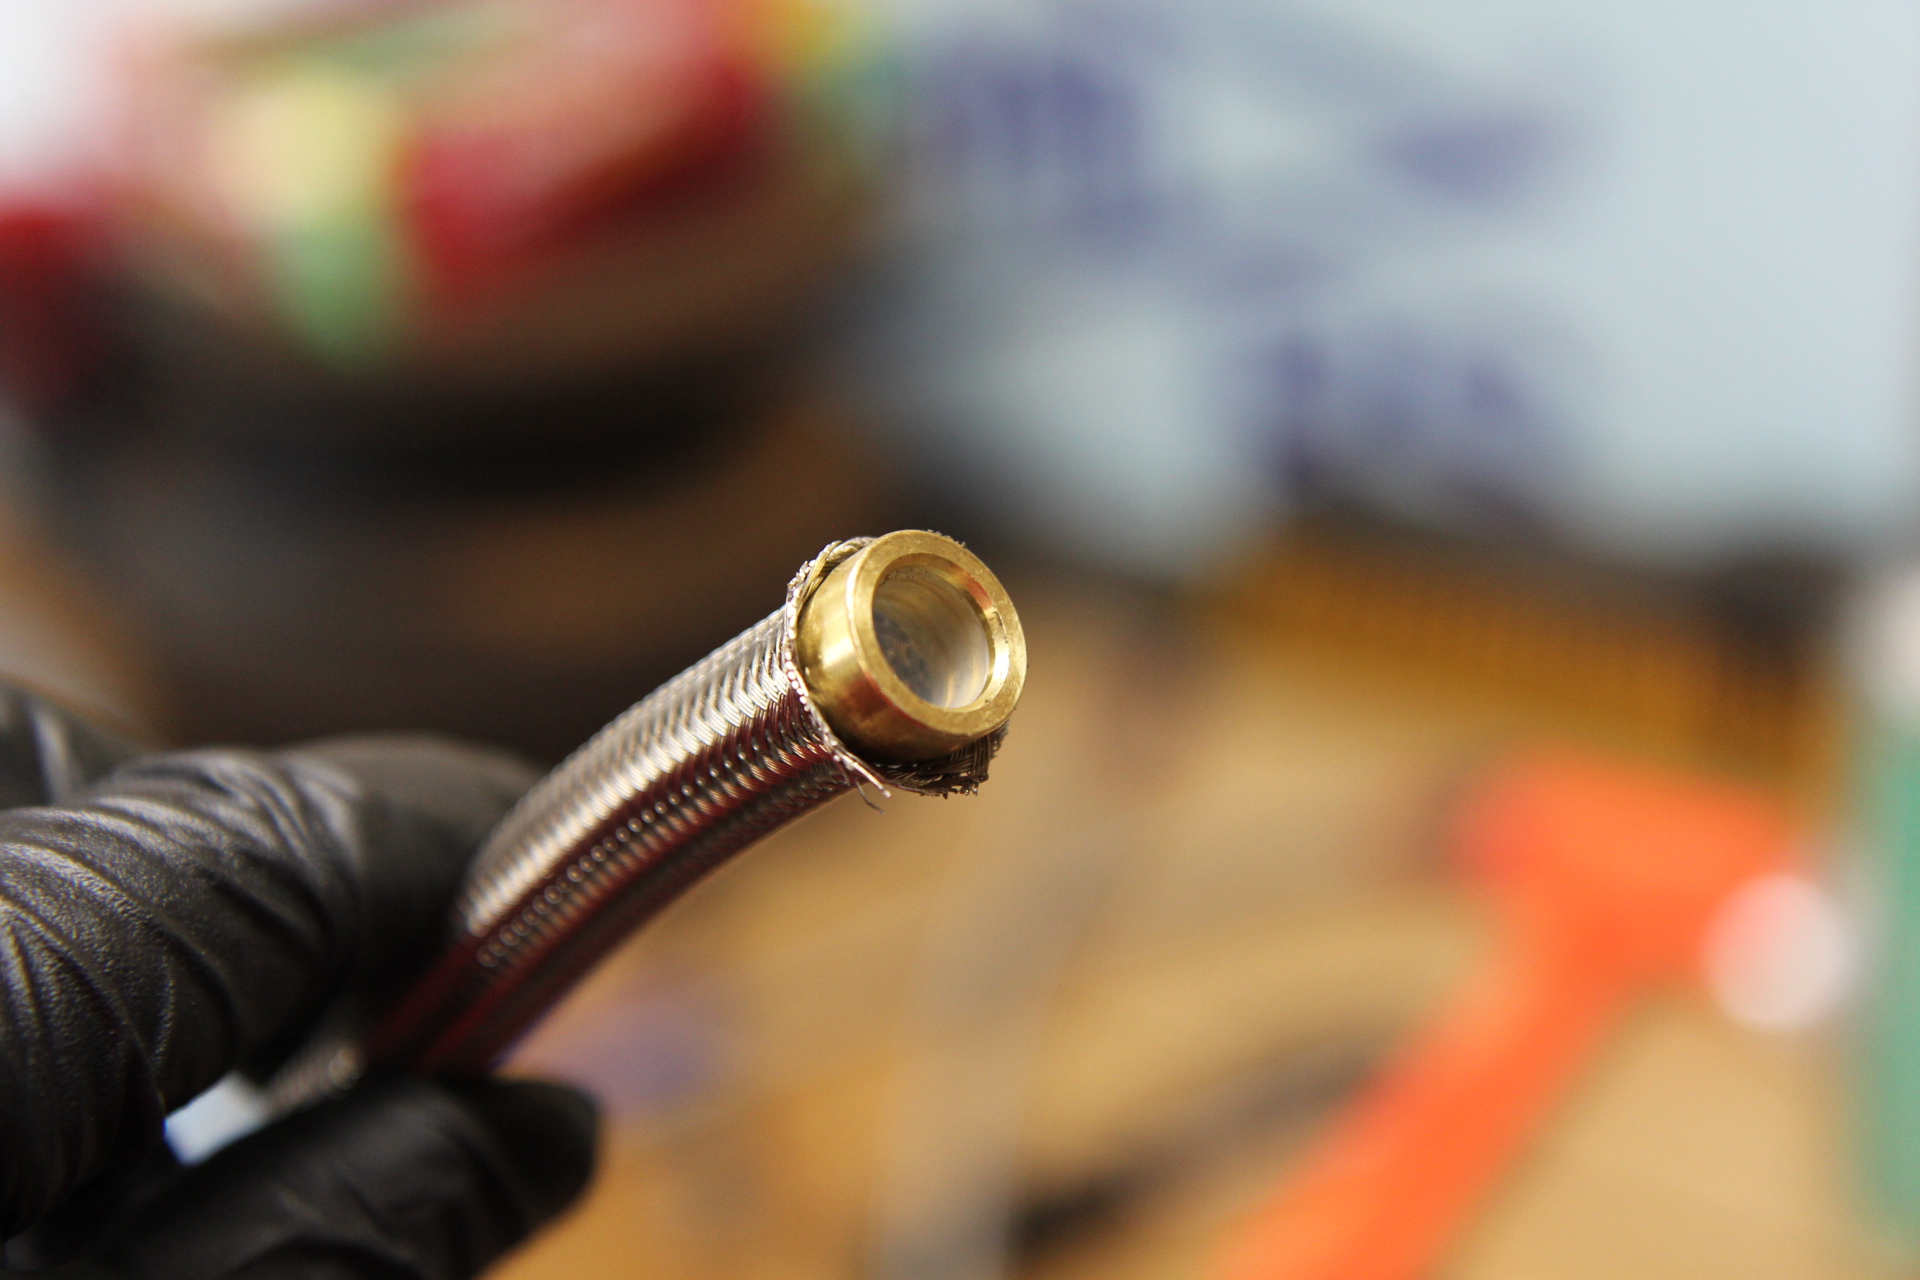
Little update for tonight. Fittings came in that I needed to complete everything so here it is put together (Minus the 6-7 foot piece w/ the filter)


4/28/2012
No true problems, just getting rid of the extra sensors, and getting rid of the 7 year old electrical tape and making sure that they fit for the reversed intake.
I seem to have misplaced my crank position sensor socket in the loom, so I decided it would be a wise idea to quit for the night. (Are the injector and CPS the same socket??)
Removed -
Both TGV Motor sockets
Both TGV Sensor Sockets
PCV valve socket
Air solenoid socket
Possibly the oil pressure wire, cause its unplugged anyways and can run the ems off of my gauge.
I think that is it for now, but I would like to secure it using the little wire ducting that is on the intake manifold when stock if possible.
Outside of the wiring, got all timing done and covers on, put intake manifold on, and now just have to get this wiring situation figured out and I think I'll be done with this piece of the puzzle. I should have bought about 25' of every diameter hose at the store, and 20 clamps a piece. Getting sick of running to the store.
Edit - Per FSM - I'll be looking for the Orange / Blue and White / Blue. Note - I have 2 crank sensors. One is from a 2.0 and it DID NOT FIT.... and is why I was having issues finding the right one.
5/5/2012
Little update. EFRs are supposed to be here end of May, so that means I only have to wait 8 more weeks to get it! Going to get my transmission Memorial Day weekend, so that is exciting. Motor is 98% complete, need to install spark plugs, and get my serpentine belt system done.
Had a 3/8" spacer made to rotate the throttle body 90 degrees. Would have liked to rotated 180, but I don't feel like getting a 19mm set of spacers and risk hitting the hood with myintake manifold.
Few fun pictures. Hope to get the AC, Alternator, Powersteering torqued down today, but might go for a bike ride instead.
When I was running my breather lines, I almost put the lines right down on the block, but then I figured oil would pool right at the T so I put them up where they are currently located.


5/6/2012
Fuel Pressure regulator bracket got coated and baked today, and warranted a few photos. Fuel pressure gauge is taped so I dont whack it with something.
I'm debating bead blasting my AC / Alternator / PS pump pieces and doing those too.


6/4/2012
UPDATE! Been almost a month.
Motor is and has been done sitting in my living room, All that is left on that is to solder on my new connector for spark plug and to get my spacer that still hasn't been made yet.
Went to Toronto to buy my transmission from gtasti. Nice guy and had no issues dealing with him. Buddy and I tried poutine. (salty cheese curds and gravy over french fries). It wasn't that good.
Put my axle seals in my trans for the 05+ Axles and began the trans install. It was a fight, because I did it by myself, but I finished the install tonight. Have a torque solutions trans and pitch stop in place, pretty nice pieces. My shifter has every TiC / Kartboy bushing made and it felt really nice once I got it into place. I wanted to rake the gears pretty bad, but with no fluid in the trans, I figured confirming it went into every gear would be the best idea.
Changed out my clutch line late tonight also, that wasn't fun and as always with those little lines, nerve racking, one slip and you have a nice kinked hose. Used a flare wrench to bust it loose, then it was cake.
Finally, I went to connect the electrical portion of the trans, and for the first time of the night, I was stuck and bummed out... Can anyone advise about the NSS and the back up lights comign out of the trans? I dont know if I am going to need a new connector on one end or the other or what, but I couldn't seem to get any of the 2 extra plugs next to the dipstick to go anywhere. I did have the plug for the Vehicle speed near the dip stick, but nothing else.
Any help , much appreciated!
6/9/2012
Well, today was going to be the day to get the driveline back together. Or so I thought.
First started out by replacing ball joints. Old ones came out fine, but the ones I bought at Advanced were too big, so I'm going to take those back and try some others. My thought was to get some to get me by, and once I get some coils, get the whiteline tie rods / ball joints for having a slightly lower car, wont be hellaflush by anymeans, just a nice drop.
Then, since I canned that idea for the time being, I thought it would be a good time to throw on that DSS Aluminum shaft. I knew some minor adjustments would be made so I got out the grinder, plastic mallet and started. Had to grind the front of the rear sub frame, hit where the e brake cables go into the cabin, and it one of the rivets that has a bolt on it for tightening down ebrake cables. Wasn't that bad. I think I will get a utility knife and lob off the corner on my rear shifter bushing cause there is a small small rub there also.
The real problem is the fitment of the shaft. It might be okay... But It seems iffy.
This is with the shaft pushed in as far as it will go.

This is once I suck it back out to bolt up the DS to the rear Diff.
I know there is a seal there, but I think that the boss'd part of the splined piece is supposed to be fully seated is it not?
... Without asking the guy I bought it from, I'm guessing that this shaft is for a different impreza than what mine is or something. It was on this transmission at one point though, so thats why i'm hoping it is fine.
Layvon
6/14/2012
Called and talked to drive shaft shop today... explained the situation and they said that if it was pushes up against the output shaft it would bind up an break.things. the dust shield is nice to have but note entirely necessary. This weekend ill get out the grinder one more rime cause its running rear shifter bushing a bit, and that will be that.
Onto bigger and more fun things.
90% im Ditching the EFR. Really don't want to.. but I just feel that every two months, 2 weeks before BW is supposed to release them, the date gets pushed back. ... I won't have all my money saved by the end of august, but at the end of august if the EFR isn't available .. I'm going to the gtx35 or a PT 6262 or something similar.
Just not loving the idea of all the perephenilia you have to have with them. Exhaust plumbing and bov.
We'll see... still two months away.
6/18/2012
Got sick of waiting and liked the thoughts of only pushing 23-25 psi vs 27-29 on the EFR.
Have a PTE 6262 with the ported inlet and billet wheel, ceramic bearings on the way. T4 .84 trim. Should spool up decent with the smaller AR and still being twin scroll.
Losing some of the fun factor of having something "new" but I guess we can't all be paving the way. jsard proved this turbo a while ago and my setup is quite similar to his.
Getting a 46mm PTE EWG with it and just putting the two scrolls to one Wastegate. Turbo and EWG were still 250 less than what the EFR was going to cost. I already have a boost control solenoid so thats not an issue, and I need to find a BOV worth putting on which will make it about even compared to the EFR. (ANY SUGGESTIONS? Thinking TIAL)
Hopefully will have turbo by July 4th weekend... depends if I still get any bday gifts that cause me to ... accessorize and spend money haha.
6/25/2012
Well... Got the fuel system setup tonight, at least the pumps and FPR.
Calibrated the FPR to about 43.75 psi if I really squint at the gauge, and confirmed that added pressure / vacuum changed the pressure. So that was a bonus.
I bought the lines to this system used and put in new pumps. Talking with the previous owner, he ran both pumps 100% of the time, which is what I'll do initially to eliminate variables. I'm curious though... What is the general consensus on throwing a check valve in front of one of the pumps, and putting a pressure switch on it so that it only comes on with boost?
Thinking something like this
http://www.summitracing.com/parts/EDL-72214/
At 50 PSI, it woudl be coming on at about 6psi of boost. My thoughts are to save wear and tear on that pump. I'm not 100% opposed to leaving them on 100% of the time, but just want to know what is a good / bad idea when it comes to these pumps.
Another option would be to use a oil pressure safety switch that activates at 5psi, but using air instead. This would be easier and cleaner to plumb.
Thanks again fellas!
7/15/2012
Drilled hole in my spacer today. Was aiming for 62mm. Got close enough with a 2-3/8" hole saw and used a 2-1/2" flap wheel to get it the rest of the way. Then finished with 1500 grit sand paper.. Motor will be hopefully 100% ready to go in tonight! Going to keep it in my living room till I have my Turbo and exhaust back so that it can keep the dust out of the.motor

7/18/2012
Well ... time to complain about that drive shaft again. I thought I only had a little nit of grinding to do to finish up, but ended up needing to cut a good sized chunk out of the rear subframe to get it to fit with some clearance.
Then I noticed it was rubbing on my rear stay bushing on the shifter, so I used a fresh blade on the utility knife and shaved a bit off that. . . Then, I had drilled my rear diff out previously because DSS decided that they would use bigger bolts than what is on the diff, so that had been done... but I didn't think about the collars on the bolts being a bit bigger than the threaded shank, so I need approximately a 25/64" (10mm) bit to drill out the holes the rest of the way.
Mike at built industries is about 2 days away from my last payment ( I think) on this build. Turbo and assorted fittings will be paid for on Friday. I'm going to have the Turbo sent straight up to "Fobia" to get my twin scroll setup made. In the process, ill be getting my vipec situated. Waiting to gear back from a few people I've been talking to, or trying to talk to about tuning the vipec.
On a side note... the new AMS intake manifold looks sexy as hell. Hoping Ty will let me be the GD demo cause other than I don't have stock rails ... I'm exactly what he's looking for.
7/19/2012
Paid for the Turbo today and Candy at Built hooked me with shipping to fobiawrx so I'm hoping that will be there next week.some time so he can start on my exhaust the following week. In theory that will be here by the end of August.
Also drilled out those holes today. Put in the front diff cover and there was only a little bit of grinding necessary for that, I just took out the metal guide on the bottom cause it was hitting the u-joint.
Gave it a minor rust protection and finally done and bolted up. Added some fluid to the trans and didn't see any leaks. Next week ill fill er up. ... I'm broke right now.
In the interim between now and ordering my vipec I need to get a map sensor, and an IAT sensor so that I can 100% finish my motor. Had to do some minor grinding on the alternator bracket this weekend. Not positive it will fit once its assembled but I can always take more. A much simpler solution would be the kstech 9.5mm intake manifold spacers cause that is about all I need. The 8mm don't have quite enough to get.over the alternator with ease. If any vendors are reading I feel a 12mm would be the perfect size to avoid hitting the bracket and to keep clearance on the hood.
8/12/2012
Well, small update, but an exciting one. Through the work program for my truck, I get paid around $0.31 a mile, and last month when I went on storm work in West Virginia, I drove 5,000 miles. Between that and selling a few things, I'm going to pay FobiaWRX the rest of the money I owe him Friday, and Send Mike at Innovative money for the Vi-Pec Next week once that check for the fuel comes in. Very excited!!
I'm trying to get my car running at least enough to go up to Matt Markers Memorial Cruise in Elk Rapids, so I would like to have my car able to turn on the weekend before, so I can owrk out some kinks during the week, and do my 50 - 100 mile oil change. I am very excited to be able to say this, because my time line just got pushed up by 2-3 weeks, which is a big bonus to my personal morale.
I've got the IAT wired over onto the drivers side of the trunk, and the Signal Wires from my gauges over to the computer area waiting for the Vi-Pec to arrive. WB02 should be easy, and so should the Oil pressure. I have not confirmed this yet, but I would imagine I can use the stock wire for the oil pressure signal and configure what to do with the pin out. Same thing for the WB02. I am going to rely on Mike @ innovative and possibly bug kelly again since he's been a huge help so far on questions with the Vi-Pec
8/13/2012
I was talking with Mike at innovative tuning today, sounds like I've still got a long road ahead of me. Plan on having the vipec here by the end of the month, but then ill have to get my car to new York for a base tune, which is a day and a half ordeal. Trailer it back home, break in for 1000-1500 miles then trailer back it there. Sounds like a good time to take a couple days off from work and familiarize myself with some fun roads.
Don't think I want to go for a trip and get broke down in between A and B.
I've got nearly everything dongle that I can before my exhaust comes. Don't think ill make it to Matthew Markers Memorial cruise in my car, maybe a buddies.
I cannot hardly stand it I'm so close, not with excitement either. All I can picture is blowing up on the dyno and having to start all over. About the only critical.steps I've done that would really affect much is install my heads and timing belt, which I'm fairly certain head studs went in fine once I figured out where the torque lube went and I had an exhaust cam that didn't want to rotate as smooth as the others, so I tried an exacting knife and some steady hands to deburr an edge. All of the buckets and valves and all that jazz were setup from the Guy before me, and he had no issues so that leaves timing.belt. . . Which I can give that a visual at any time.
Whew. Still a nervous wreck.
9/9/2012
Bump for boredom.
Fuel system is all set to go, just need some E85 to test things out and pressure check.
What's the longest you want e85 sitting in a tank for? I'm hoping to be running base map by end of the month.
We'll see though.
9/24/2012
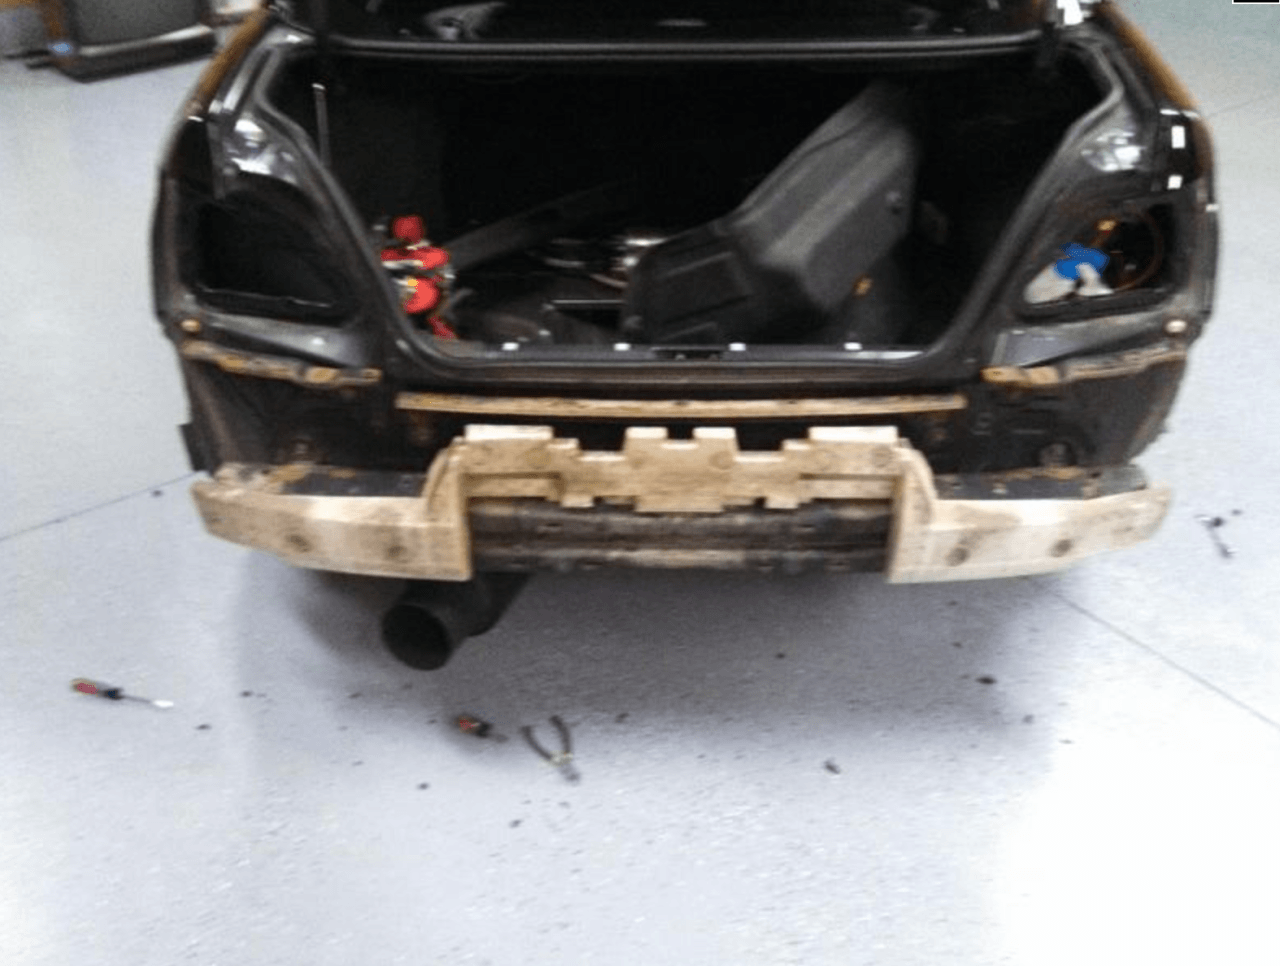
Got my fmic pipes all fabbed up yesterday, glad to have that monkey off my back. I have to finish trimming bumper to fit the FMIC behind it, and it'll start to look like a car again.
Can someone measure the OD of a stock MAF Size short ram? I'm hoping I have a coupler, but cannot find what size it is for some reason. Excitement is building now, Oil, coolant, PS Fluid, Trans fluid are all being purchased this week. NEVER know, next weekend could be the start up if the moons align properly.
Truly the only things left to do are:
Install all FMIC pipes once Rich welds on the coupler beads.
Re-install the MAF connector wires
Tighten down suspension components in the front
Fill all fluids mentioned above, and snag some E85
Flash Break in Map
Prime & Pray
If anybody has an AP V2 that would work with my car, and has their car out of commission right now, I'd really love to use an Accessport for break in, but I don't want to shell out the coin, cause quite frankly, I don't have it right now. So a 4-6 week rental would be sweet. I dont want to deal with romraider again, but I know how to use it so I will if I have to.
I got my JDM V8 seats monday, and thought it was a little intriguing that the drivers side had ridges in the bolstering to hold the driver in a little better. Didn't matter to me too much, since I'm getting a Carbon seat for my side of car for track days, passenger can have the height adjuster i suppose.
9/29/2012
Getting everything buttoned up today, will be waiting on my break in map for next weekend!
Added some blood to diff / trans / motor. Might seem goofy, but is it advantageous to pour oil in thru the head breather on the passenger side to get some oil over there. I doubt it is practiced often, but just something I was thinking about last night as I poured the first two quarts in.
10/6/2012
Well, patience paid off. Got it primed, reinstalled spark plugs and prepped for start up. Have a super small fuel leak, which I will fix with a new AN fitting.
The main issue I have is the wastegates. They are tials with the 5lb spring for break in. At idle they are open and blowing everywhere. Scared me $hitless at first when I started and heard that.
I initially thought I hooked up hoses wrong, ie switched top / bottom ports .. so I changed that, still no luck.
In a last resort before I left for family function, I hooked the top ports right to Turbo... still letting exhaust out.
Meanwhile, idling afr is 14.5-15.0 . Though I don't trust it because I have to believe that the wastegate taking most of the exhaust would.change something.
Any ideas fellas?
10/7/2012
Well, Day two of motor being alive has been interesting. Trying to figure out why everything is so noisy on the exhaust side of things. Not the tail pipe either.
I'm thinking I have a combination of a leak (fish eye in a weld) and new exhaust ringing. Buddy suggested that it was new and that there isn't anything to stop the echoing, but my gut tells me otherwise. I hope he's right. My first thought was that it was the throwout bearing not clipped in and the fingers on the pressure plate hitting it, but I put a stethoscope on the bell housing and couldn't pinpoint it. I installed a ACT Streetlight flywheel and 6 puck clutch, so I was expecting some noise, but not this much.
In other news - I have an AEM Wideband, and am having one heck of a time getting it to communicate with romraider. Any tips?
**Edit - I was doing a couple investigations about the USB - Serial Adapter that I have, and it turns out that if you get a yellow ! and a code ten, it isn't any good. I've been trying to get hyperterminal to work and fighting it and it is a darn hardware problem. The worst kind. Thankfully Amazon came through in the clutch, and I'll have a good one here tuesday.**
Thanks fellas for reading my pleading for help.
10/10/2012
The final goodies have arrived!

10/13/2012
Got to drive today! First time since January 29th she's left the garage!

10/21/2012
Gah! I'm getting stressed out. Between working 60+ hrs a week and middle of November only two weekends away I'm getting nervous.
Found a leak tonight under the throttle body, which means I have to take my FMIC pipes and alternator out to get in there.. thankfully Dom made me look into my MAP low voltage code, cause that thing was leaking like a sieve. I hope I didn't overlook a channel or something in the throttle body when I rotated it. I don't have much time to spare any more.
Things yet to do -
Find boost leak, address, and fix
Figure out which 02 sensor I have is bad.
Drive 900 miles
Yank motor
Tighten head studs
Confirm valve lash is correct
install motor
Test drive to verify nothing else went.
Debating on installing my computer here or down in Chicago... but that can go on the list too.
10/27/2012
I'm about to say **** it.
For some reason, from the throttle body back wont hold any air now. I tested from the Throttle body going towards the turbo and was able to hold 5psi back with my hand, so that eliminates big huge gaping hole there. From the throttle body though it just sounds like air is just rushing though, yet I cannot find a hole that is making any noise. the little ****ing aircompressor that i have kicks on every 45 god damn seconds so as soon as you can make any progress that sonofabiutch kicks on.
Stupid question, but if the engine shut off just right could that affect why it wouldnt hold air? I apparently dont know **** about these motors, cause Im so fed up with chasing these gremlins. Pressure is ****ing on too to try to make it to Chicago in 3 weeks otherwise i'm going to look like a fool when i get down there.
Got my Alternator remount bracket and that installed fine also. Used the new bracket and an old timing belt pulley to make a tensioner in conjunction with the outfront bracket.
https://docs.google.com/open?id=0B79...Ww0cXYxaTJ0Mmc
Anyone willing to look at logs for some help would be much appreciated...
11/6/2012
Well glad I took the time to check.. valve lashes were less than perfect.
According to the documentation I have from Cosworth my cams should be .008 +-.001 and. 010 +- .001 for intake / exhaust respectively. Can anyone confirm for the 278/274 cams?
I took good notes and will be tightening head studs tomorrow, hopefully I can mix and match with what is on my car and the 15 extra buckets I have to make it work. Otherwise Jamie at SGP is getting a call!
11/9/2012
Got everything buttoned back up tonight. Got buckets from Angel down in detroit, and everything measured up right at .008 or .007 for intake, and .010 or .009 for exhaust.
Put roughly 15 psi worth of springs in the wastegates too, hopefully a good level for 22-25 psi with boost control.
Head studs are torqued to 98.6 ft pounds a piece, for a little added assurance.
First positive night I've had in the garage in a while. Hoping I can get a hold of Dominic tomorrow to get my base map, because with some luck, I'll have my car fired up again tomorrow afternoon and driving sunday would be nice. Dyno Thursday and only have 135 miles on motor
11/11/2012
Everything went well today! Took a little longer than expected but that's okay. Pressure tested to 25psi and everything held tight. Fired up and idles about the same as it did. Will start and idle fine till you hit the throttle then it bogs down and dies.
Have to blip the throttle to get it to turn on too..
11/15/2012
Well.. Shes running well. MAP error was taken care of by Dom, nothing major or leak based, just minimum voltage. 200 miles down. 800 to go.
Hitting roughly 10-12 psi for break in boost. Hit 15 once... that was a tempting oops. Kinda like having sex the first time without a condom. You know you shouldn't but it just feels so good!
11/15/2012
Meant to post this too

I haven't had the camera out much lately. . . but I should here soon. Here is what I do have from my cell phone. Once I get done on the dyno, I plan on making things look a little prettier. If I wait long enough for the dyno, the Tee fitting that people are going to say is a problem will become a Y. If I wait a really long time, I'll run both to the FPR. I'm just tired of spending money right now

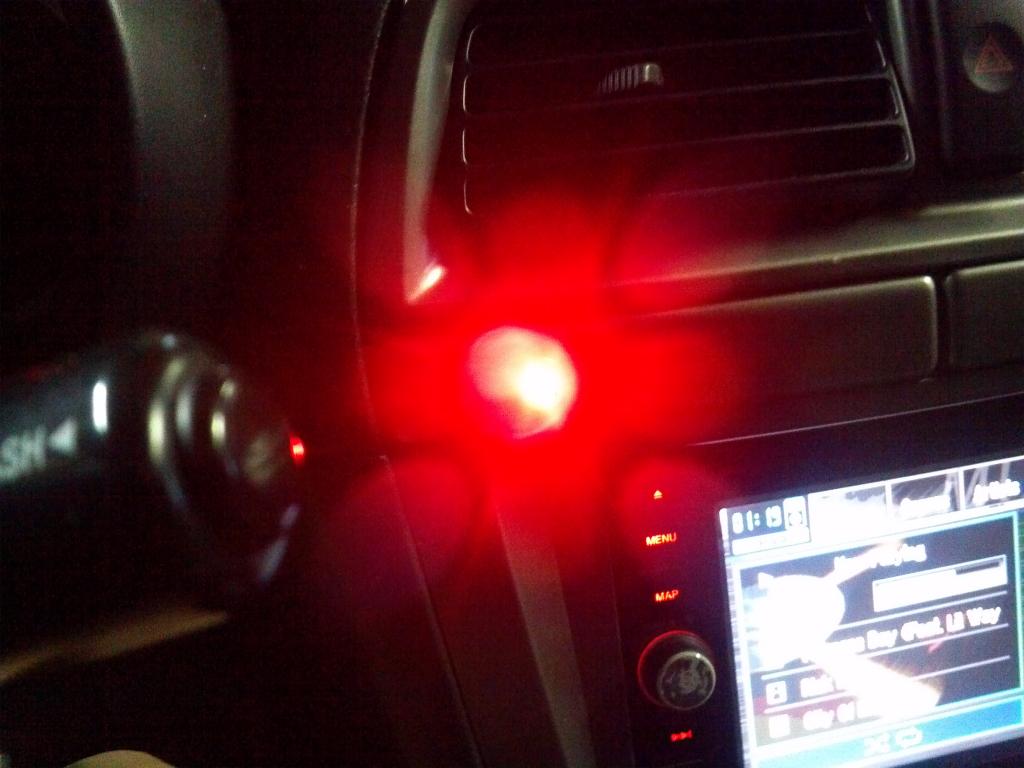
To anybody curious about the knock block questions I was asking, Simon from link said that if I hooked it up to the stock knock wire, it'd work great. since it is only a one wire knock sensor he said that you don't need to hook the negative side of the knock block up to anything. I plan on using one of the TGV auxiliary ports, and DI 6, which was one of the cruise control inputs. as long as I don't cut the wrong wire, it shouldn't be too hard to wire that in.
I think that I will be hooking up oil pressure to the another TGV input AN4 or 5, I'm in the process of tinkering with my map that I've "made" seeing what link can do. I think we all know that Bariga voices his opinion, but I do think I have to side with him on this software structure. everything is so intuitive it makes me feel dangerous.
Levon
12/2/2012
Still no Dice.
AFRs are all over the place as soon as the computer switches over to the 02 sensors vs the map. Idles rock solid for the first 15-25 seconds I turn it on, then it goes back and forth from 12.5 - 17.7. This map previously had no problems, thats why I'm thinking it is a mechanical failure of sort vs the ECU / Sensor aspect. I was hoping for a vacuum line being off.. Didn't get that lucky.
What I've tried to do to diagnose:
1) tighten all fuel fittings, none were loose as a goose, so that wasn't it.
2) vacuum tested to 15psi. Everything checked out. No gaping holes Like I hoped there was.
3) disconnected the lines going from the Turbo nipple to the boost control solenoid and capped it to see if the leak was from that side of the
4) verified that the bov isn't leaking.
5) checked how much vacuum it is pulling. Appears to be similar to before before the sensors turn on
12/8/2012
This is about to be somebody else's problem 
I found a fuel leak again. Same place on the same injector as before one drip about every 2-3 seconds. Thankfully I had extra orings and the other jazz to fix it this time. I was all giddy getting ready to start it up and then the same problem happened.
Idles fine until the sensors get warmed up then all over the place. ...
Do I dare say a bad sensor? These sensors are appx 6 weeks old, and haven't been banged around at all.
PLEASE if anyone has any ideas let me know.
12/11/2012
I dont have any more fuel leaks. Maybe I didn't update that concisely, but I fixed the leak I did have on Saturday.
Latencies / Scalars are believed to be correct. When the car first starts up, it is running on what is stored in the computer while the sensors warm up. Once my fuel trims start being adjusted based on the O2 readings is when it starts messing up.
I did not think to check PCV valve, Maybe I will yank that off and see if it shakes around. When I was doing a boost leak test I did hear air coming through that tube going to the Air Oil Separator. . maybe its opened up.
There is no exhaust leaks. I checked that Saturday when I was under the car.
I am on the OE computer. Once I find this issue, I'm going to drive 100-200 more miles and start swapping in the Link. Barometric has been confirmed. I haven't logged the MAF for temp, but I probably should / could.
Thank you for the very helpful post, I definitely have some more things to take a look at.
Manitou - I did do another boost leak test, but I think I overlooked the PCV, at least looking at it.
12/26/2012
Well, a few of you now know, but I replaced the sensor yesterday and it idles much better. Let it sit and idle for 20 min before making this post, and AFRs stayed between 14.0 and 15.5 for the most part. I have to put the fender liner back in and zip tie that into place. (04 Liner with 06 Fender / bumper aka being cheap).
If the snow gives me an opportunity to do so, I'm going to take it for another 100 miles or so and call it good.
Junior has been contacted to get this bitch done.
1/7/2013
Bits of exciting news today. Some relating to this thread, one doesn't
1 - I'm paying my car off Friday! Between xmas bonus / savings / yearly vehicle "stimulus" from work, I have enough to pay it off. Figure it would be the smart thing to do with my money. $14 in student loans and debt free. Could be debt free if I wouldn't have built a motor, but what is the friggen fun in that.
2 - I drove my car 50 miles yesterday, first time since i put the new O2 in. I talked with Manitou last night and was ecstatic to tell him, 14.7 AFR for 10-15 seconds driving down the road, was tickled pink. ... Ohhh.... Juniorrrrr please put down the GT-R for a few days please 
3 - My girlfriend just got a job offer that will allow her to live with me so we can save money and live together.
4 - My grandma had a petscan today and 4 / 5 cancer spots are gone, this is a huge deal! her 3rd bout with breast cancer.
At last, I feel like 2013 has started out to be a great year so far. Knock on wood
5 - Did I mention I drove my car yesterday??
1/13/2013
I'm looking through some Data logs right now and checking out what his was. Can "scale" off his injectors because I know he is running at 52 psi base. Seems to be working out okay so far. Numbers make sense because I have almost 1000cc more base flow than him, so it wasn't that hard to accomplish.
Here is what I have so far. This does assume that the VE of Antons motor and my motor are the same. Which obviously isn't the case, but it will get me started.

I'm being honest, I have not much of a clue what I'm doing, so i'm more or less just messing around with it and familiarizing myself with the GUI. When I plug everything into the car it says "Warning E-throttle blah blah car wont start" I haven't investigated much into it
...
Kelly calls...
We discussed all of the above and he showed me a few directions to take and the E throttle cable issue could have been because I didn't save the map after I stored it to the computer. that was the very first thing I did with the link so I can try it again.
He said that his master fuel is at 11ms w/ 1100cc injectors, so my calculation of 5ms (4.5 actual) is likely to be relatively close to accurate. I will be watching as soon as I turn the car over for AFR changes because especially with the cold weather all the enrichment will be taking place.
I have a new mission for tomorrow to try to bang all that out. Maybe i'll even start it up to see what she does. I wont be using the fuel map that I have posted above - I'll copy over the scaled stock one that I have
1/14/2013
Welp, it didn't go catastrophically wrong, but It would only idle for a few seconds then shut off. AFRs seemed to be in check, but tough to say if it was accurate under first initial start up. I thought it would have been as simple as adjusting the injector pulse and the master from stock. I think I'll see if junior can get me (another) break in map, or if I just have to winch it onto a trailer.
1/20/2013
Saw the new motor for the Fozzy in action today at the auto show.
2.0, 250hp, Low mount Turbo, direct injection, and dual AVCS (from the look of it), Pretty cool looking. It was a Honeywell Turbo with a .60 AR. I couldn't see if it was a twin scroll or a T3 flange.
I couldn't tell if it was the actual drive or just for the model motor but the timing chain was interesting, and also that they used rocker arms vs buckets.


1/25/2013
Somehow summit racing is going to get me my fuel line stuff to go from my ethanol sensor to surge tank. I needed a couple 90s and about 10" of -6 line. I ordered Thursday at 6pm. I will have it by saturday with the normal shipping. Gotta love it.
I'm also going to hook up the knock block this weekend. That shouldn't be too bad. I'm currently making myself a pin out diagram so I dont have to keep coming to check computer when I am working on it. Like I said, not that bad, just have to heat the garage up and do it.
The thing I'm not that thrilled about is my ethanol sensor. I plan on pulling voltage and ground from the fuel pump, because that is relay controlled and works well. The thing I dont know what in the hell to do is wiring in the damn output. I haven't looked into it that much, but it is slightly embarrassing.
I dont know which digital input is worth sacrificing for it. Was thinking the Air Conditioning request, but that is a useful button for a switch or something in the future... but I do have the cruise switch too I guess. Looking for some input for Anton / Kelly / Dominic on this one 


1/26/2013
Well it spits out the signal.to go to ecu. I just put the neg on the battery terminal since it is wired directly through it. Fused of course.
In other news. I think I bought a big enough filter. Barely fit
Sorry for quality ... phone picture and upload.
aiming to get my knock block and IAT sensor wired in tonight yet, but tough to say if it will get done, I have to go over to parents to sing happy bday to my dad so depending how out of hand we get ... might not work on it tonight. MAF wires are the ones dangling there, I haven't snipped them off yet. Starting to come together!
1/27/2013
"If you can't find one... make one "
Made a simple voltage regulator today to get 5.0v for my ethanol sensor.

1/28/2013
Well my ethanol dilemma has been solved. Many thanks to Simon at Link ECU. 18 hour time difference helps also.
Here is where the mysterious DI#3 was: Simon said D16 or D17. Looking through the manual I found:


D16 is the winning ticket. I'll be looking for a blue wire with yellow stripe. Should stick out like a sore thumb.
He also mentioned that I could ditch DI#5, which is the brake switch. If I had to speculate that is what cancels the cruise, which I'm not using.
I did some soldering last night and got all organized and prepped for installing the knock block. I didn't want to rush since I had to get up at 4 this morning for work, so I can just do it tonight or tomorrow. I sound like a broken record but at this point 1 or two days isn't worth jeopardizing a year of work.
I tore out my motor one year ago the sunday of sno*drift
Welp. All wired. My cutoff time for being in the garage is 9:30. This is fine with me tonight. I will check all wires tomorrow. All I have to do is plug in the 4 connectors into the Link, and hook up my +14V, Wide Band, and Ground to the Expansion plug and I'll be done. Those already have soldered ends on them so it is literally a plug and play operation.
While I hope I NEVER have to do this, I made it so that It is reversible to stock by leaving enough tails there.
I also wired in oil pressure while I was in there.

That is what I ended up with. Anything with a -- is a change. I am in the process of making 100% sure all the tables for the sensor and calibrations is right.
Finally - I had a 35 minute conversation with Miles at Fine Line tonight, VERY Helpful! We shot the **** about his Flex Rex as I just named it, that they finished a few years ago, some other misc stuff. The important stuff that pertains to this thread is the fueling!! He gave me some good pointers to try to get the car going.
So I dont lose them I'm going to write them here.
6ms master
Trim 5%
10-11% at idle in the main fuel table
Store and save ( I always forget!! )
Make Idle in Open loop. That way it goes to the table and not off the sensor.
Watch Enrichment.
Timing should be good since I'm running 8.2 compression pistons.
Store and Save.
I hope to have my car running by tomorrow. It is realistic. It will be 50 Degrees. I should take a vacation day tomorrow.
1/29/2013
It is alive!!
It is still oscillating between Rich and Lean though, causing it to raise and drop in RPM. Maybe visa Versa though, maybe it is trying to drop in RPM but I have too much fuel or something.
I need to go through and smooth it out to see if that will help.
Holding the car at a steady 2,000 rpm it will do about 13.5 - 13.8 AFR all day though.
I dropped fuel pressure to 40psi at the rail and 8ms master and 15% trim got it going. I need to bump it up to 9ms master and 2% trim to get it finer tuned.
I was talking with Dylan there via email and he said the 2pm slot was open, and knows I'm getting a tune on the link. Yes, trailering down there.
It is a little rich I agree, the limited tuning ability I have is part of the problem. I was trying to get it to idle at 1500 rpm so it could just sit there and be happy.
I ended up dropping trim to 10% so I'm at 8.8ms of injection for a master. Having said that, this is what I just adjusted fuel to. I haven't tried running this yet, because the only cells that would run well are the ones that I have in a 2x2 square.

I just tailored out from 100 kPa and 0 RPM to 2500 rpm and 0 kPa. I have no clue what that will do, but if anything it is a bit rich, which I'm fine with at this point.
1/31/2013
After running pig rich from above, I came up with this. Seems to be a little smoothed out too. It was tough to tell looking at the old 3D map though because it was spread out. I'm out of ambition today to go to test it out to see how she idles.
obviously I dont plan on driving anywhere with this, but Just want to get it idling and able to pull onto a trailer.

2/3/2013
Fun install for the day:
Knock light.
Cell phone quality and had to time it.. please don't chastise
2/4/2013
Bored.
Tested to see if the knock block works or if I just had a Ricer LED in my dash. Thankfully it worked. I forgot my laptop at work otherwise I would have played with the gain on it to figure out what is best setting. Anton - if you're reading this, did the setting you used for gain work okay? Cause I haven't played with that at all, Just changed the frequency for the stock knock sensor
Fuel Fittings needed for Ethanol Sensor + Camera Fun

2/5/2013
Got a headphone extension cable threaded through the dash today, conveniently spits out of the ashtray and allows for easy reach with a set pf headphones while in drivers seat.
Doing something similar for the link USB cable but I want to make sure that it isn't going to cause too much stress on the cable / head of the cord where I put it because I don't want to have to replace it down the road.
Very very few things left to do before now and dyno day. Finish up boost lines, oil change and calibrate the Knock block and verify that all 4 cylinders read roughly the same. Test mode came back as a positive today so all wiring is done. ...
2/6/2013
99.99% done. I want to change out my Bosch sensor to see if that will fix the gauge being off since I have an extra anyways, It is really annoying having it be off like this, and at this point, I dont want to have to install an innovate, that would be really annoying too.
Other than that, got oil changed today, EBCS plumbed in, and my knockblock all situated, ended up dropping the gain on it a bit cause at 4 it was a little high doing the test that you're supposed to do ( 1-2 volts with frequency turned off and @ 3,500 RPMs )
If I am feeling ambitious, I might swap plugs, but after 1000 miles, I doubt there is anything wrong with the ones I have. Anyone have a comment about my carpet question?
What about how much gas to have in the tank when you go to get tuned. I was at 1/3 and dumped 5 gallons in, and apparently it was fuller than I thought, now it is almost full.
If needed, I can empty some out, that wouldn't be hard.
2/17/2013
Well, I am as ready as I can get to go to P&L :

Car will be there tomorrow around the time they open. Hopefully they can give er a once over and do the PDI before tuning day to make that day go smoother.
Just in case **** hits the fan, I have everything I need to do small fixes in the parking lot. I wasn't paying attention enough when I was changing out my transmission fluid, I poured 4 jugs in when it was still on jack stands thinking I would top off the rest once level. It is now it is a fuzz over full, so hopefully the PDI involves putting it on a lift so they can quick drain some fluid out so that it is where it needs to be.
Excited, nervous, and provided it makes it there, it is out of my hands.
Tune is the 25th at 2pm CST
2/18/2013
Car is in P & L 's hands. Should get the pre dyno inspection tomorrow.
2/25/2013
Good news today, I learned a lot about how Subaru motors work and why things work and what things don't. I think the biggest thing I learned is that there's no such thing as being too anal.
Something is going on with the injector so I'm going to send them into fuel injector clinic to get tested in the meantime buy some ID 2000.
We're having issues getting it to idle and so we opted just to bag it for the night, never even unlock the rollers. Sorry for the lack of a fun update but sometimes that's the way the ball bounces
Yeah it is a bummer, but it isn't the end of the world. You made out a little better than I did because at least you left with a functional car but when I go down in March it'll be fine.
I am still being optimistic about the whole thing.
We fiddled with it for probably about 2 hours or so . . If not more, I don't know I fell asleep sitting in the chair for 5 minutes or so. Junior isolated the problem by shutting off individual injectors and then seeing if he can get it to idle, when he shot of cylinder two injector it would Idol at about 14afr.
3/1/2013
Just got off phone with fuel injector clinic. 3 Injectors were at 2050cc and the other one was 2175ish. The nominal flow was supposed to be 2150.
I'm waiting for a full diagnostic sheet on monday.
3/11/2013
just got everything all buttoned up tonight. Allan and I chatted on the phone, he had a pretty good day. We shall see how it goes tomorrow.
My prediction:
496 - 93
592 - E85
Junior will be deciding factor in how he feels its going. I want a solid "safety" margin. At these power levels nothing is a guarantee so i have my fingers crossed.
3/12/2013
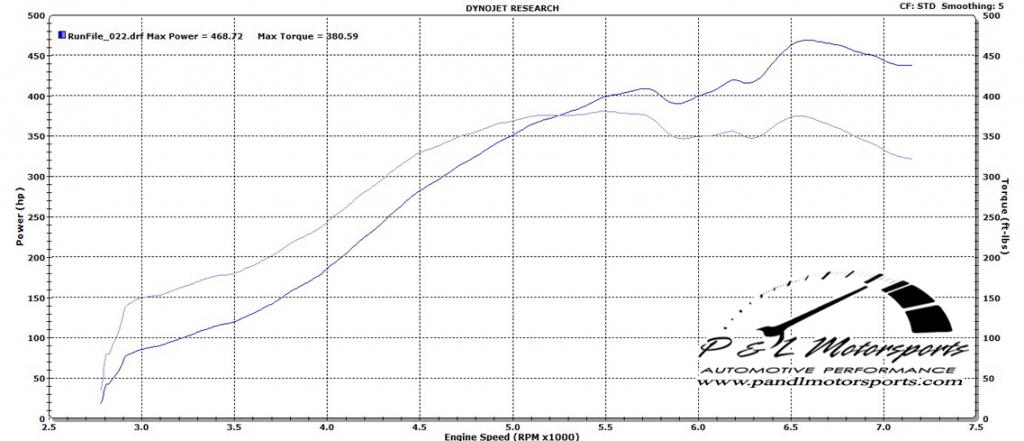
Made 468/370 on 93 on 20-22 psi, I dont exactly know what. Dyno will be posted tomorrow hopefully.
Had a fuel fitting fail because I was lazy to make it right and didn't even cross my mind till fuel crossed the floor. I will find out where / what the issue was and go down to get tuned on E85 this summer after our house is purchased and settled.
Had fun with the P&L Crew again, and Kathy made some good cupcakes regardless of what Dylan says!! 
Should give Junior some ammunition for in the morning.
I am going to have to ask Junior before I start handing out information. I don't think it will be an issue, but I want to make sure that he's cool with it.
Here are some videos
Just for ****s and giggles, I called PT to see what they had to say. Grant @ PT was pretty stoked to hear 470 at 21psi on pump gas. He said on a 2.0 liter that they test on ( I dont know what motor platform, I'm guessing Evo) that it is efficient at 30 PSI.
For my motor he said that it would be a little bit less, 25-27 psi. . . So like you said Allan, it the turbo will shine on E85. I couldn't be happier with how things are panning out.
Fittings are ordered so gotta get that **** welded and ready to rock.
3/16/2013
Well... car is a riot.
My buddy welded up the fuel pump assembly and it looks sexy as hell. Linear power is fun
Yeah she is fun. The cold air (19°) has it getting a little boost happy and hitting boost cut, so Junior suggested dropping wgdc in affected areas. I will get some logs tomorrow to show spool and stuff. Im curious myself.
90-110 miles today. It was a good time by all involved
3/17/2013
Not a complete log, but here is a screen shot from today.
I'm not sure I'd trust my wideband AFR, I put a new one in, but I'm still having the same fricking issues getting the gauge / comptuer to match up. I'm thinking a Innovate is going to be purchased after this house, and I can mount a AEM Fuel Pressure gauge in the Apillar, because I'm anal about matching
You can see that I hit boost cut right there, . I'm adjusting WGDC right now to try to fix it.
I'm liking that 28% IDC. Overbuilding is nice.

Also - Here is the fuel system updates


3/21/2013
Did some pulls tonight. Input real data as much as possible into VD. I'm assuming that I weigh 210 right now, which is probably a bit too nice. Also assuming that VD has the weight of an 07 STi right because I was too lazy to verify.

Notice that the dips are gone also. At 0 smoothing they were still a little apparent, but not as bad as the dyno graph.
I had to stop. Snow is falling I felt er getting a little slippery.
3/24/2013
On that tank of fuel made it like 265 miles which was about 22mpg. Thats 100 miles of 60mph roads and the rest freeway/flint.
Wont have many updates this week, leaving for Louisville tomorrow at 8am.
I need to get a few things situated on the car:
- idle after driving dips way low, like pulling up to stop sign
- knock setup
- fender liners replaced
- headlights wired up, cause right now all i have is high beams
4/14/2013
Small update :
Not related to the motor or performance but some protection for my tinted windows.
I have a Beltronics STi driver and have had it for a while and love it. The speaker pooped out on it about the time i started my build. I couldn't find an internal speaker for it so i bought the external for it. Wow. Loud.
I had my radar detector powered off the map light switch on the left, and both lights powered by the right. Junior had fun with that. ... one of the funnier moments on the dyno. Today, i moved the power to the gauge power source i have so that it is on with key on.
Thankfully the speaker came with a super long plug into the side of the radar detector. (3.5mm plug) i put the speaker in the vent passenger side by the hazard button.
Once i got everything tested it was time for reassembling of the interior. Since i didn't run the speaker wire before hand i had to fight it, which sucked.
Now that it is done, im glad. ...
Tomorrow is the day to get some LC setup. Track sunday!!
4/7/2013
Well... No track update today, apparently they thought it was too wet, I found dry pavement all the way to the track when I found out.
Cooked another wideband today practicing a launch. Getting really pissed about that. I dont think my sensor mount is vertical enough, so it is going to get shifted next weekend to completely vertical. I'm tired of effing around, and am ready to get serious... I might even move it back a few feet just to make sure. After doing about 3 hours of research tonight, these sensors dont like to be run richer than 10, which I see on occasion, so that probably doesn't help anything.
I also think I am going to install this to make sure that I dont have any more oopsies. 60 dollars a sensor will make me run broke. Innovate makes this, and sense they utilize the same sensor I figured it would be worth while.

For those that dont know, little insert not only shields the sensor from water at cold start but also helps cool the sensor and sensor body itself. If it saves one sensor it paid for itself.
Bah. I really wanted to run today. I found out I need to work on 4 things while practicing:
2-3 Shifts.
Balls to take it to 7k.
Launches obviously
and making sure I lift 100% of the way.
4/24/2013
Oops!!! Took apart a buddies motor thus weekend. He said when it died, it died.
one rod had beaten so much stuff that it looked worse than those rods from the west coast Tuning fiasco.

4/26/2013
Finally ---
Brian at iWire got me headlight plugs and levelers from an 06 STi harness he had merged. $20 shipped. Doesnt get any better!

If it was easy, everyone would be doing it. Final conundrum of the swap. I think it should still work, just running the 4 position wires from the 04 to the single of the 06. As long as the resistances inside the position switch are the same, should be no problem. If it is, a 06 switch would be an easy swap.


5/9/2013
E85 tune scheduled for the 17th of June.
Gotta do some small things before then.
Oil change
Boost leak test
Check / change plugs
Grab some corn fuel and migrate south to visit the P & L crew and Junior.
Tinker with knock control some more. I still dont like how its working. Working 5 14hr days has taken its toll on my motivation level when i finally get home Friday
5/11/2013
Track day weight, plus me @ 225 fully dressed.
Full tank of fuel
Full interior
No spare tire
Jack going in dumpster at the track
Battery full size but rear mounted
Aluminum DS
Stock wheels with 245/40 DWS (should grip well in this effing rain  :rollseyes: )
Ironically enough the 04 STi from the factory has a 1893 and 1380 split.
3260+225 = 3485

5-12-2013
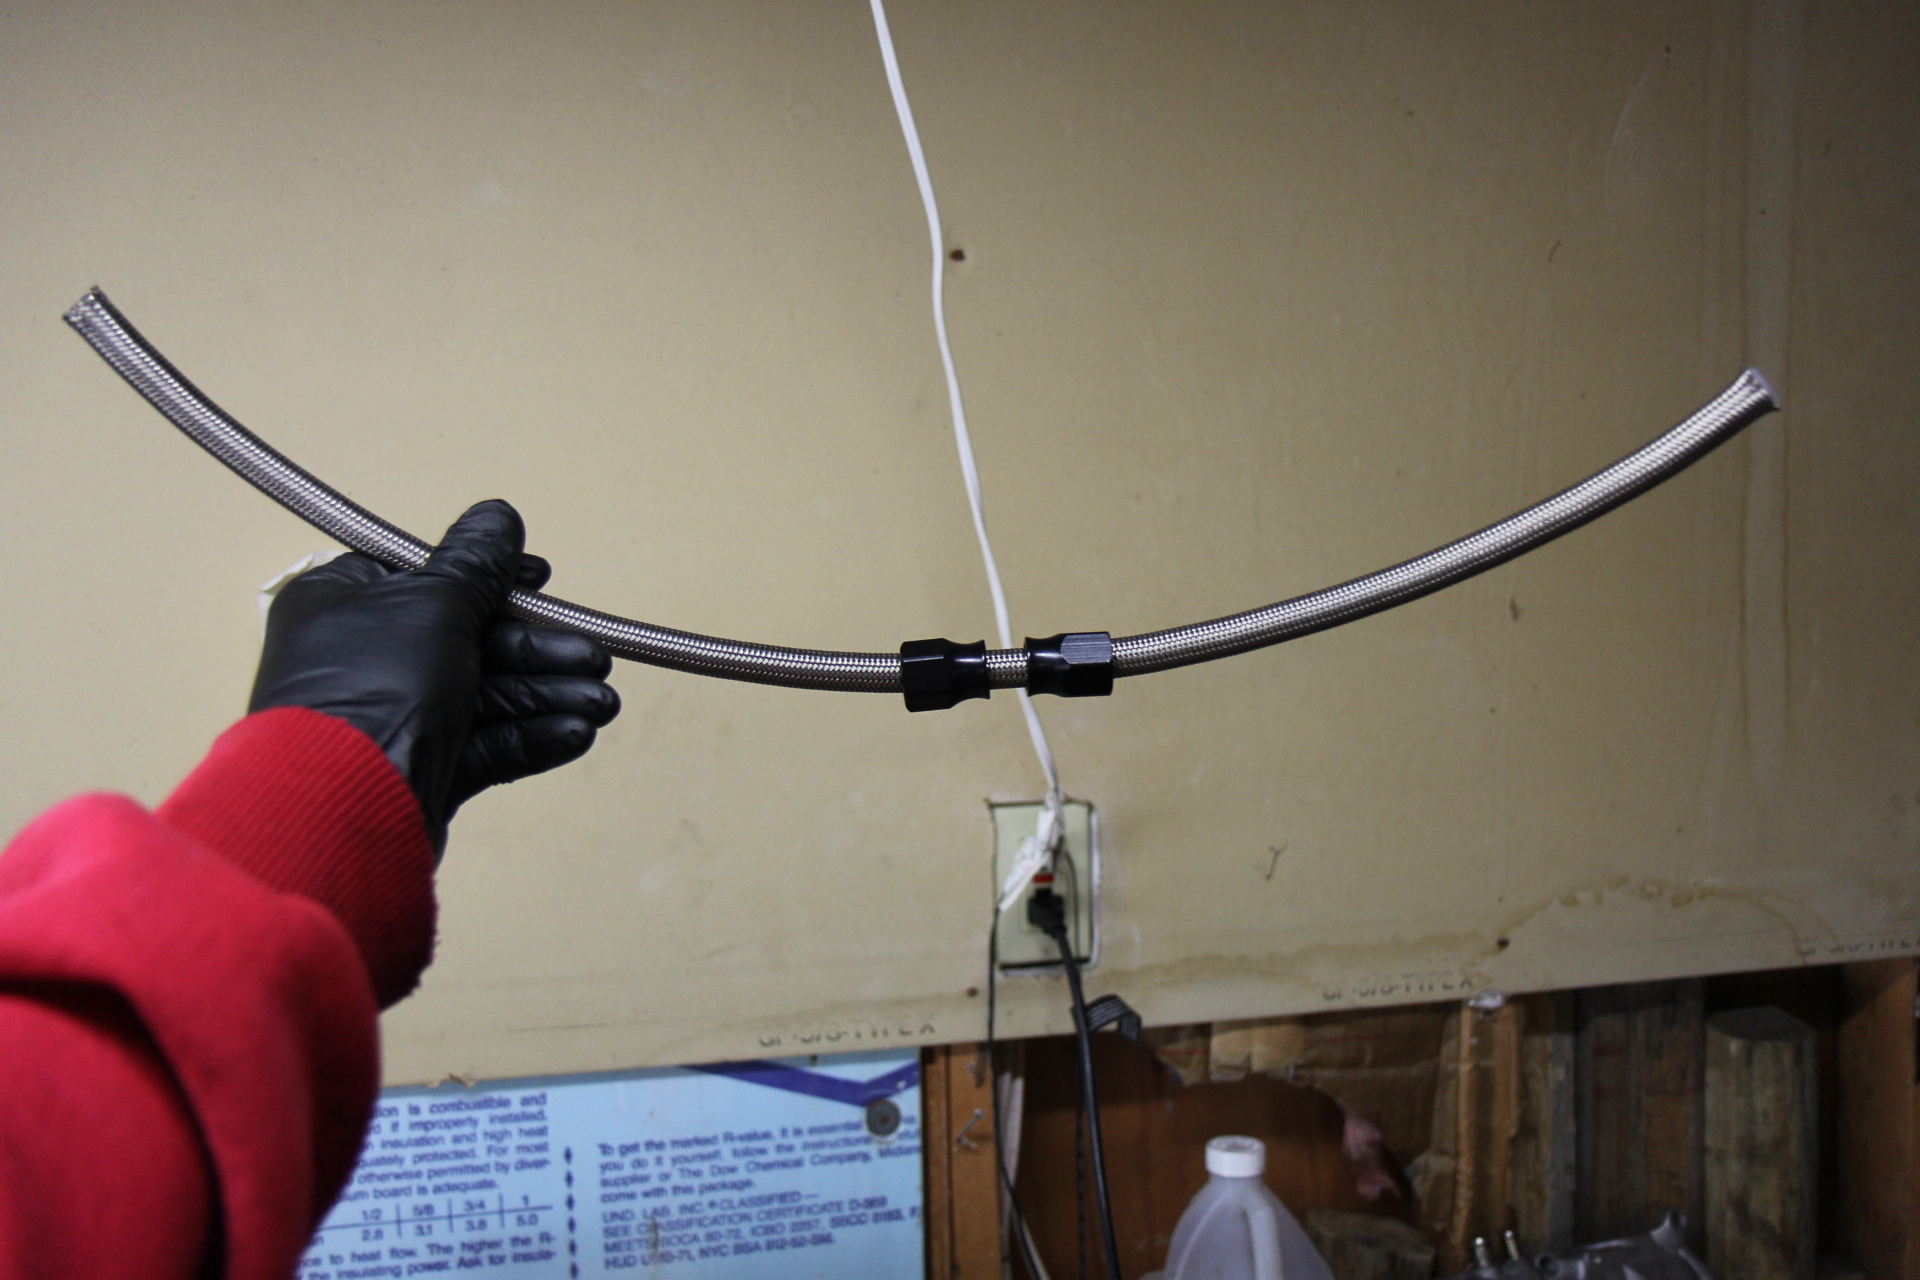
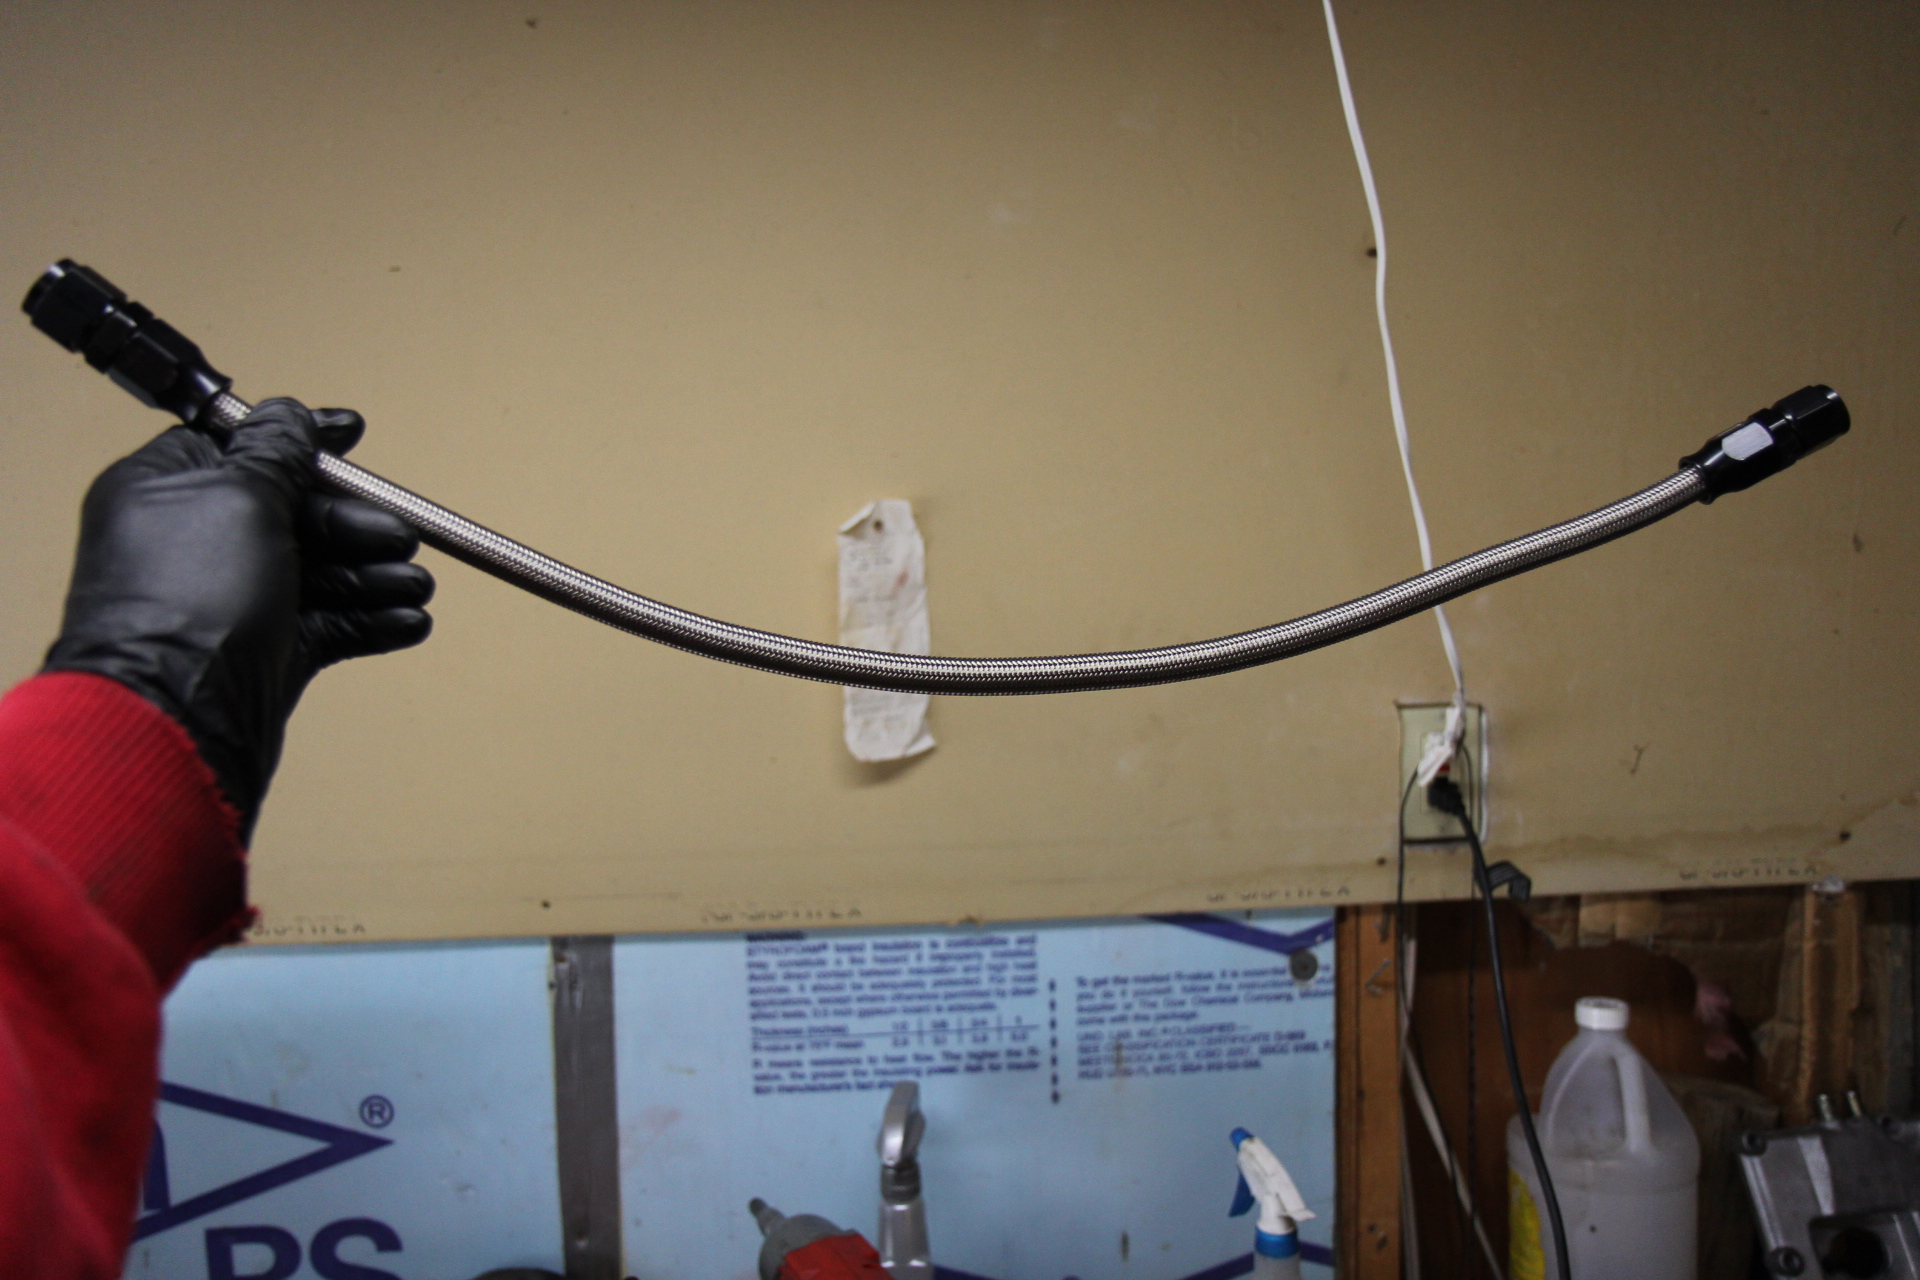
The cost of doing things right is astounding. Just to get Teflon fuel lines in the trunk to the exterior of the car was almost $400. That was with summit brand because i couldn't justify 600+ for Earl's. oh well.
I think I'm going to fabricate up a fuel cooler that mounts in hood scoop location because i Have the extra fittings and hose.
They are E85 compatible however they are also permeable, and I'm tired of smelling gas in the cabin.
It's also going to allow me to change the way everything is ran; right now it is spread out way too far. The reason I did not change it before is because I was just trying to get it done in the way I had it worked. Now that I can afford ( both time and money) to get nitpicky I am. I want to get my fuel trace sitting up near the seats and parallel to the back rest, and get my y block after the pumps back up into the cabin.
I have already found one thing that I wish I would have purchased different though. No matter how many times I build it sitting there looking at it I always seem to be one or two fittings off. In this particular case I think a 45 would have worked better than a 90. Having said that at $20 a piece I cant afford to just swap them out.
Ditto that that's exciting! Congrats!
That is for
13' -8 hose
10' -6 hose
9 -8 straight fittings,
3 -8 90° fittings
2 -6 90° fittings,
1 -6 straight
Finally another inline filter so i have 2 to protect my pumps, plus the big fuel lab one post pumps
I had an idea while driving that I am going to swap some -8 stainless onto my catch can, it will all be free and extra so might as well.
5-15-2013
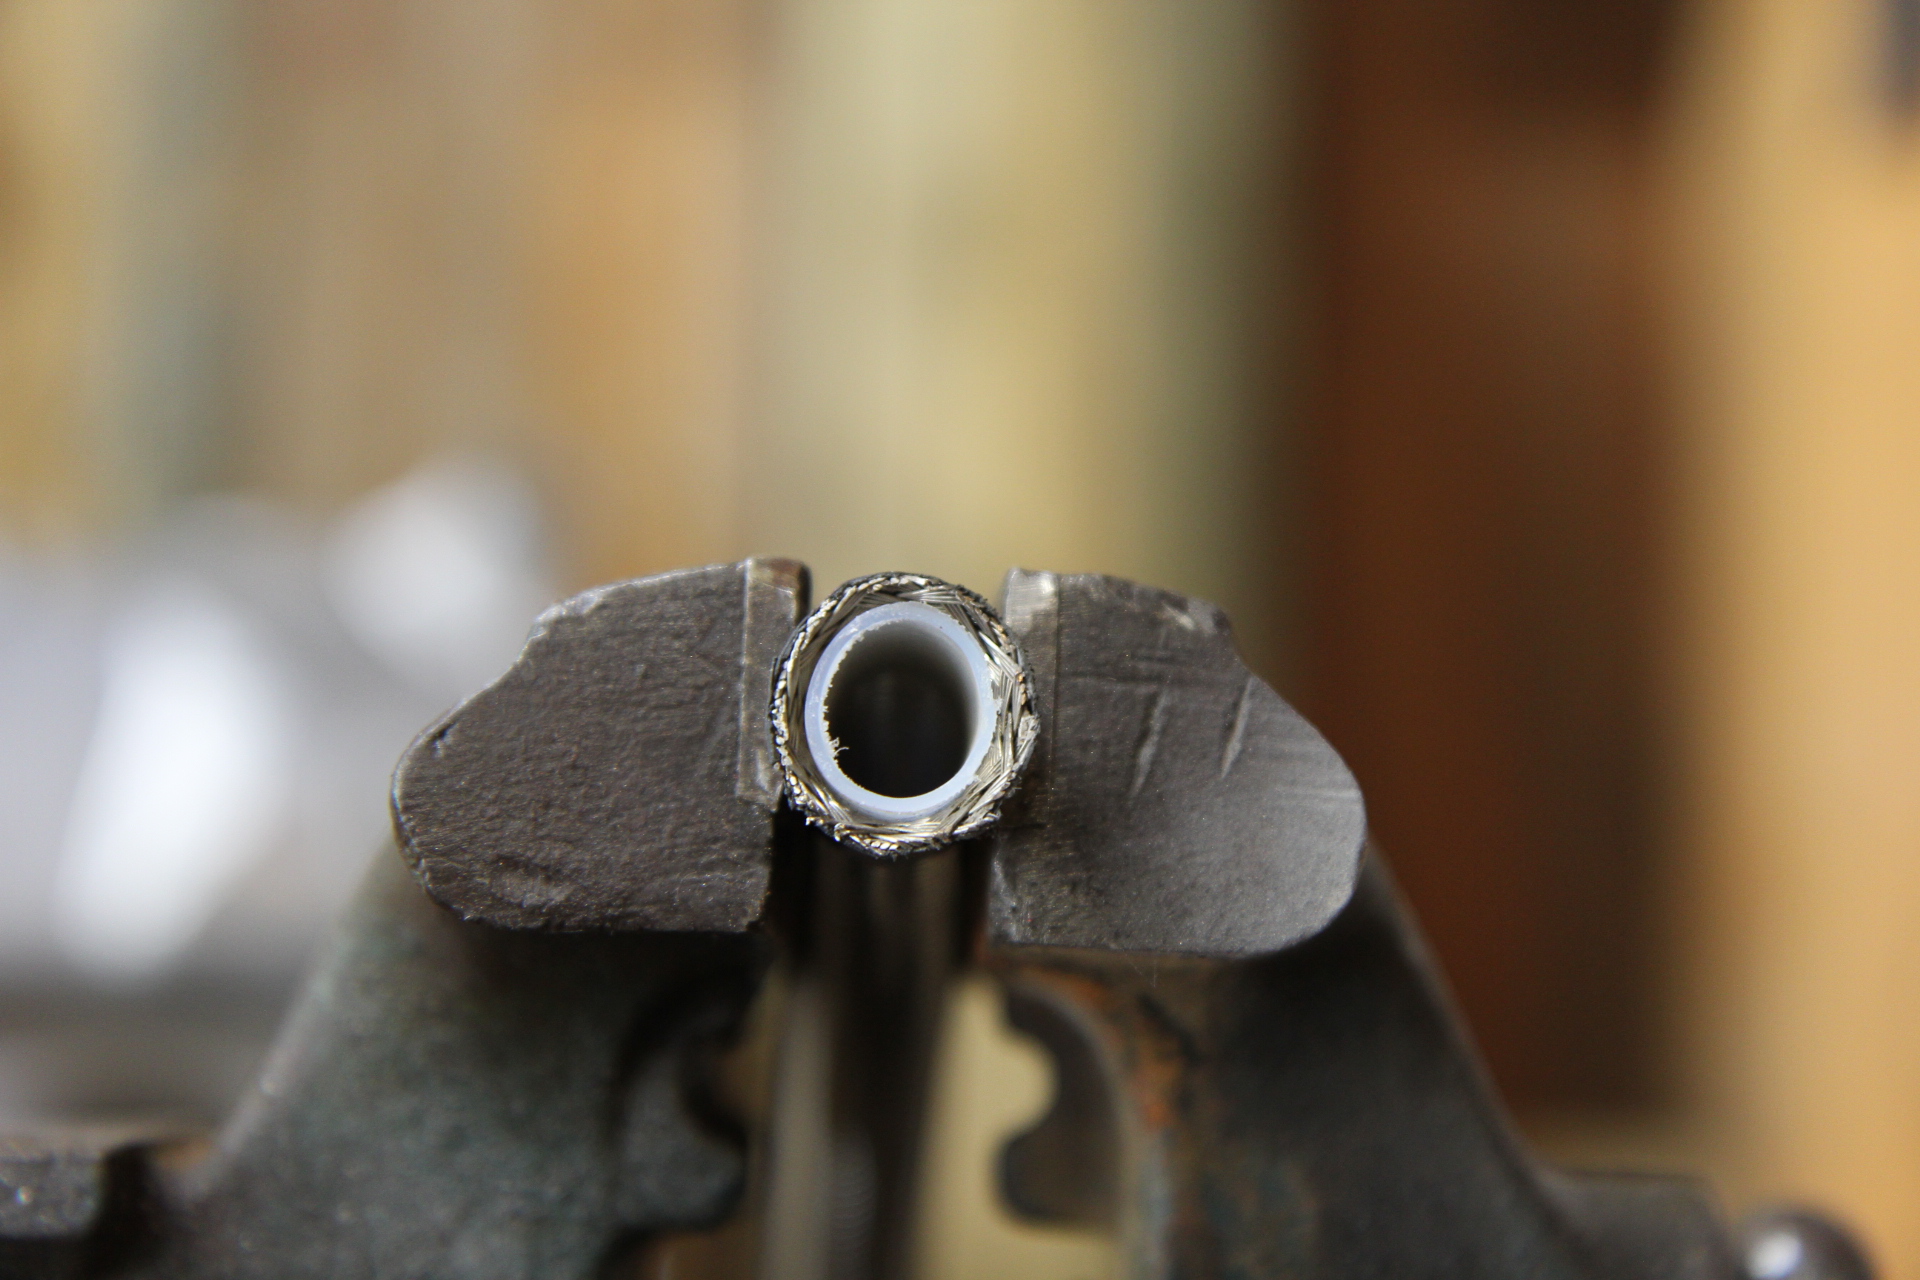
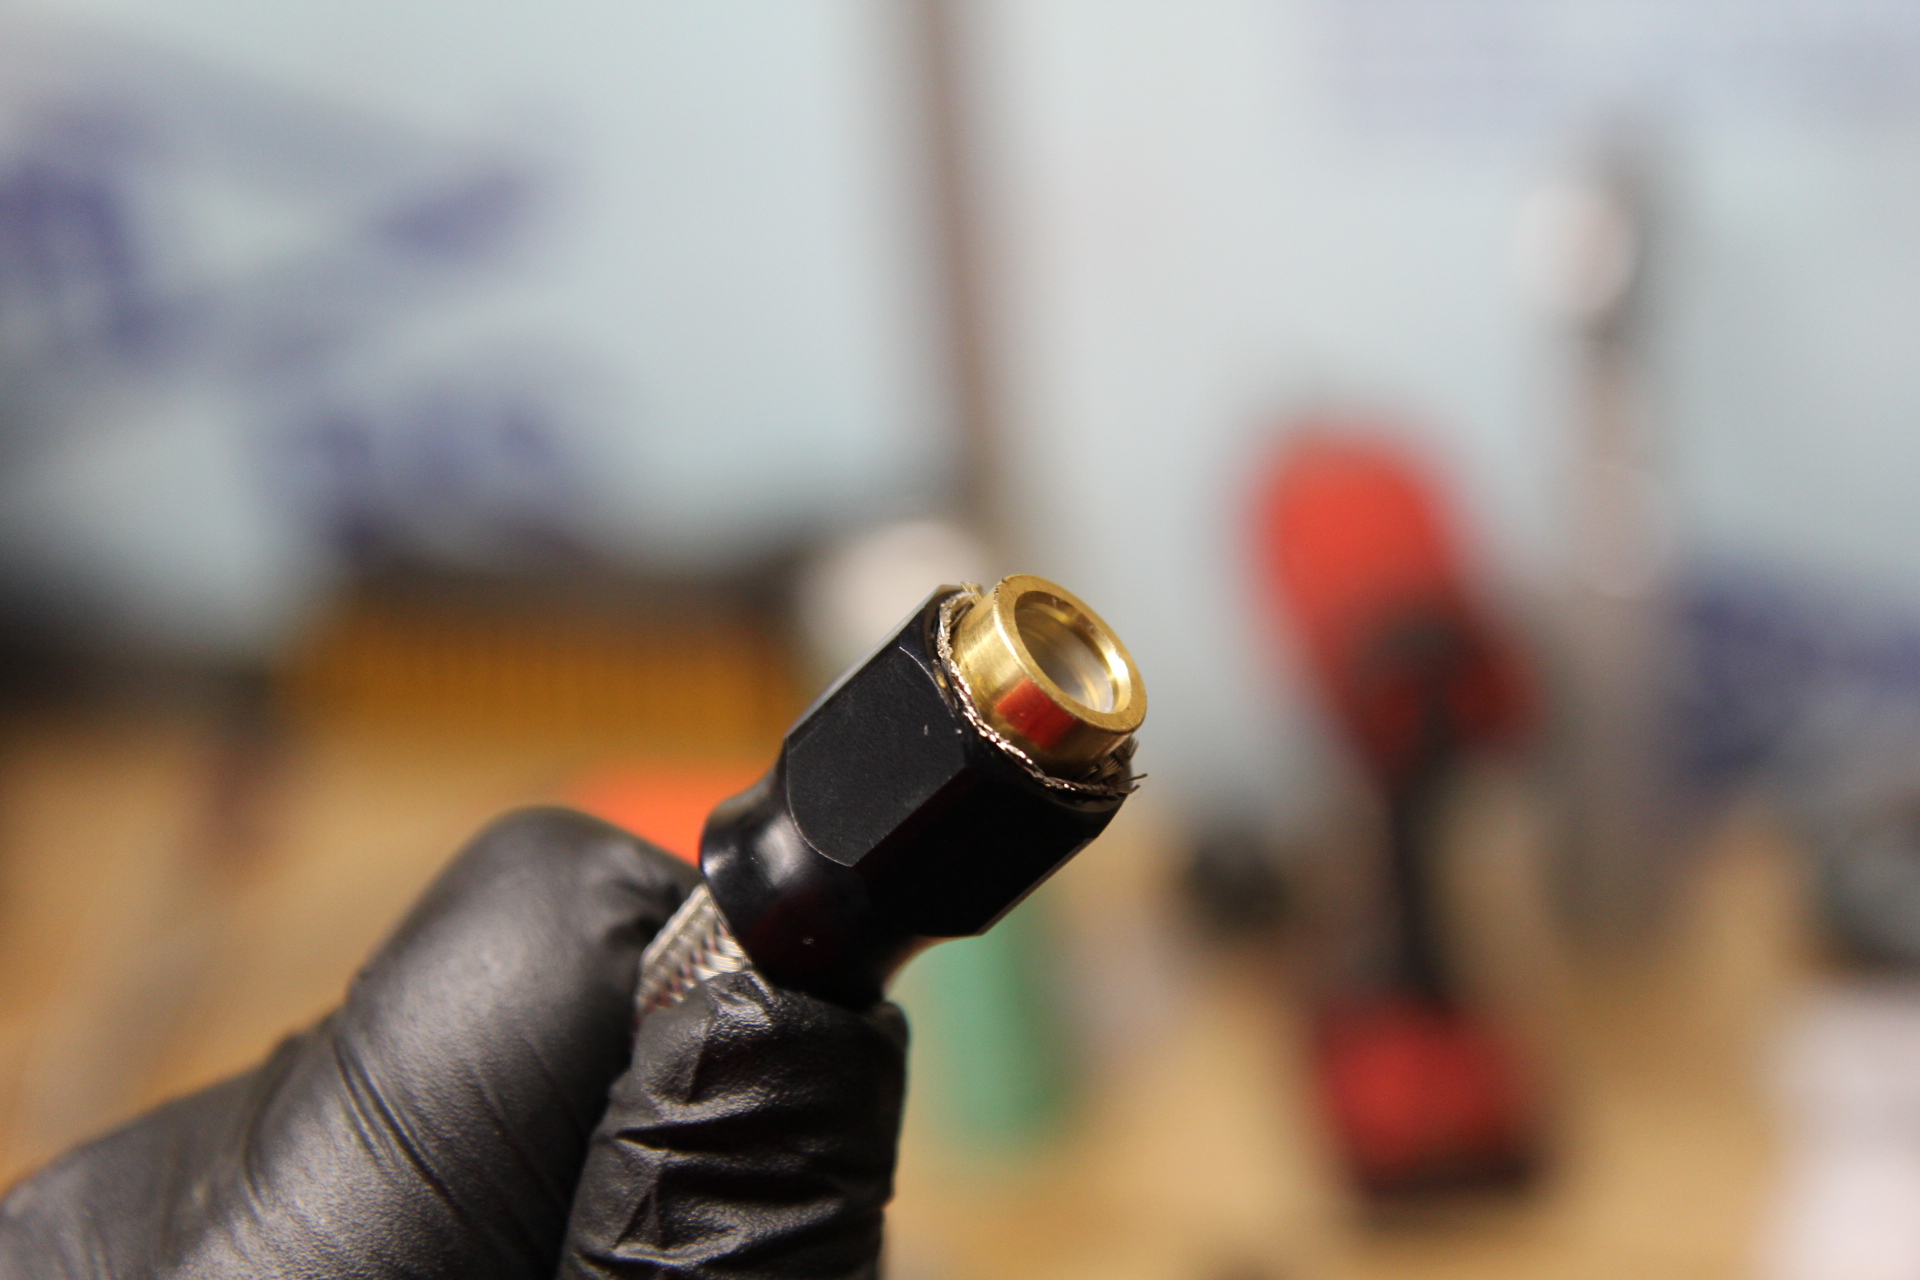
Teflon hardware showed up today, there is a big difference in size of hose, so i grabbed what i thought was -6 hose and a fitting to try it out before bed. 2 hours later i have 2 fittings done. One took hour and 50 minutes because i was trying to use a -6 fitting on -8 hose.
2 bloody thumbs and a lot of swearing later i realized there was smaller hose in the box. Even using the right stuff the -6 is much harder than -8 to put together. -8 was a breeze. -6 has issues getting the male piece through the olive and pressing the Teflon out enough to fit. the teflon likes to kink easier on -6 too.
Hopefully will finish up tomorrow now that ive got the hang of it.
5-18-2013
You got it! I will do a DIY, because there was a LOT of learning as I went.
The last fitting took me 90 min I dont know if the 2nd hose I had was a different batch or what, but I couldn't get the olive over the Teflon to save my life.
Step one, is cut and flare out the Steel casing to put the olive on

The "vise" side was automatically flared by the Grinder, worked out good. The other side was nice and tight.
Put both fittings on the side that stays tight, so that you dont have to force it over the steel.
Put the Olive over the teflon, and push against your work bench to bury it.
Pull up the fitting
Lube up with water the other end, and push through the olive
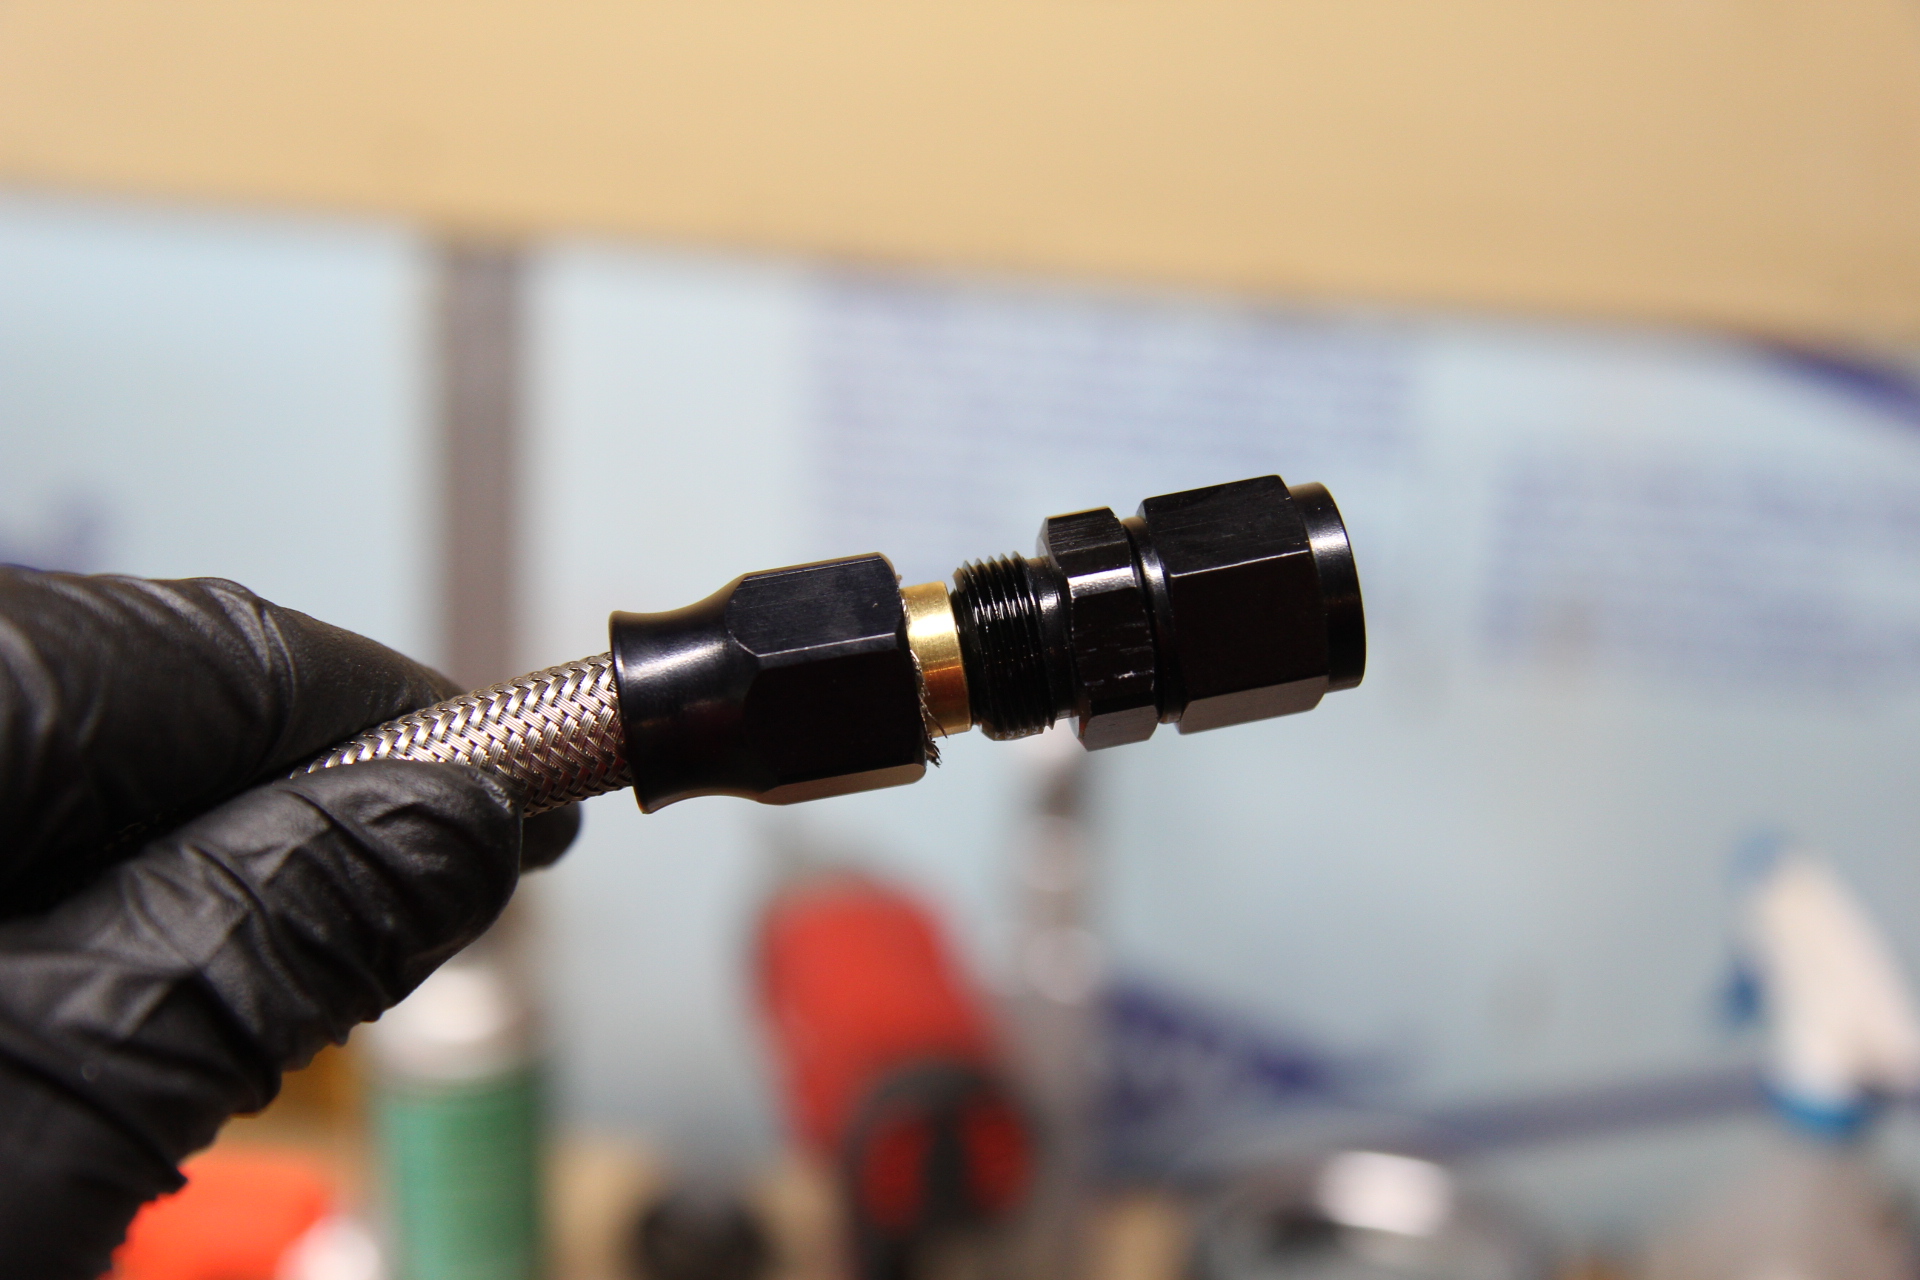
Flip over, repeat, and tighten down.
Spilled gas over the carpet and the backing so I gutted that, I am going to make a nice one this summer w/ a grounding block / +12V on the bottom so that I only 1 wire going to and from the battery
5-26-2013
Just got home - went out for a bite to eat afterwords.
Watching the videos is almost embarrassing at how slow I shift, and makes me appreciate some of the other guys on here who can really cut gears.
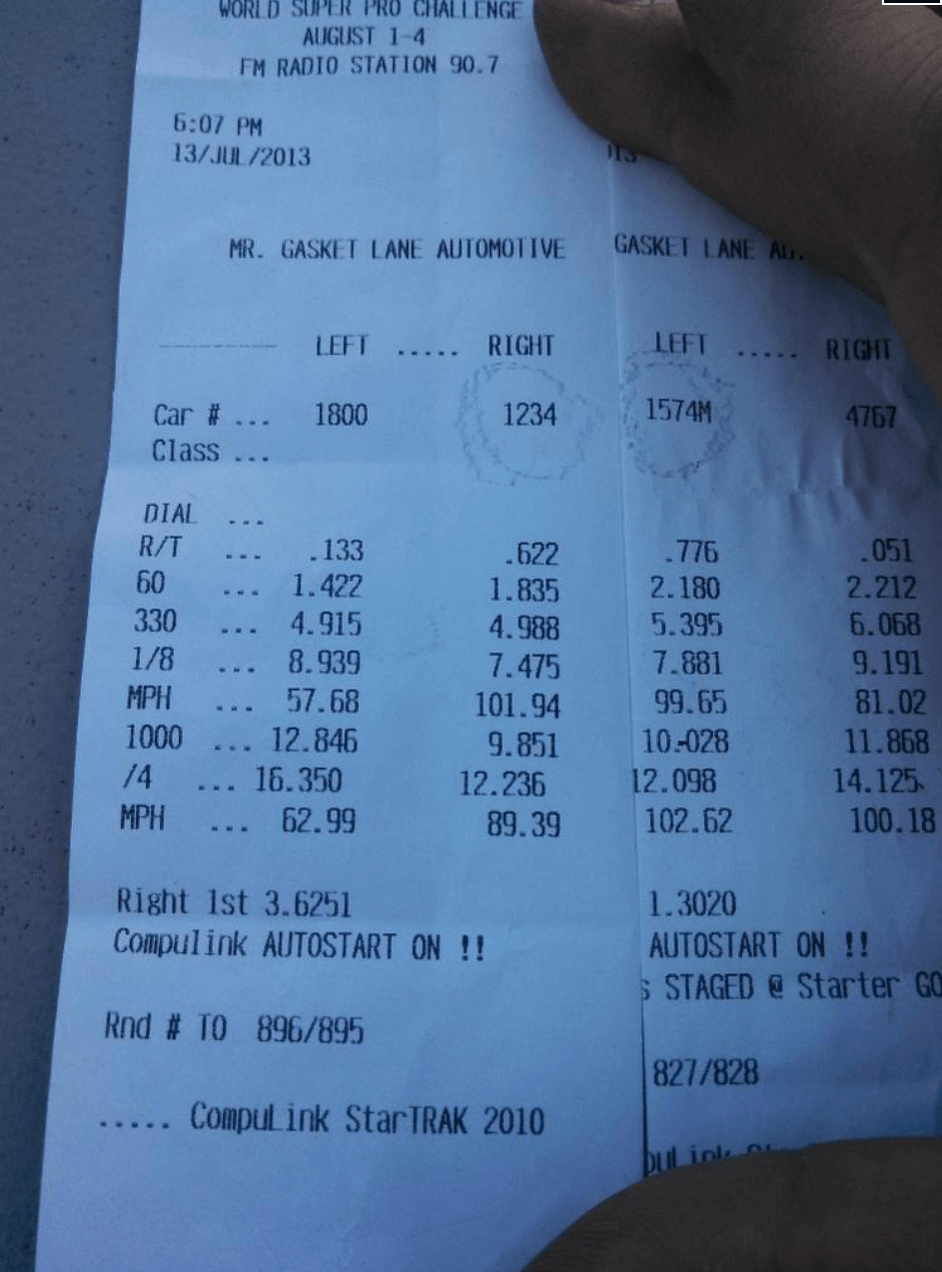
This was the best video for the night, I kinda give a description on the video, but I had mostly 1.95-2.05 60' times with avgs in the mid 8s for the 1/8th mile.
Best time was a 1.89 60' with a 8.293 @ 88 mph.
I learned right at the end that I need to let the turbo build a little longer, and ride the clutch a fuzz longer.
I also KNOW that my audi ruined my manual habits, I never push in the clutch all the way without thinking about it, so that doesn't help. Final complaint. 3rd never wants to play nice with 2nd.
All in all still fun, but not going back till I am back from P&L for E85 tune, dont want that clutch slipping on dyno.
"Just imagine that car in detroit, people would shoot back"
6-1-2013
Finally had time to give this car some love.
Hasn't had a full wash / clay / wax in over a year and a half, almost 2 years. Buddies (4x4rich89) 2012 STi in background

6-10-2013
Finally got the keys!!!
First project completed:


This took a lot more work than I anticipated. Probably 12 hours of preparation by myself and 4 hours for 2 guys painting.
I am going to paint everything white too eventually. Probably mid summer
6-16-2013
Dyno day tomorrow.
600whp or bust hopefully not literally.
Like the 1st girl friend, this one is a Diva too. This is the first time I didn't listen to Junior Lol. He said drive it but its a long way to worry about getting my car back home if something goes wrong.

Did some knock sensor stuff today and my car is really being quiet (knock noise levels under 325 at peak boost) today. Its loving the warm weather!
Get those damn axles done Allan, DSS is probably running out of material any the rate you're consuming
6-17-2013
Just hopped on the dyno. Guy in front of me didn't have a rewired fuel pump for a 30R tune so he took a little longer to get fueling done.
My prediction for the day
Pump 470/390 @22psi
E85 584/514 @ 25.5psi
Based on guess no knowledge.
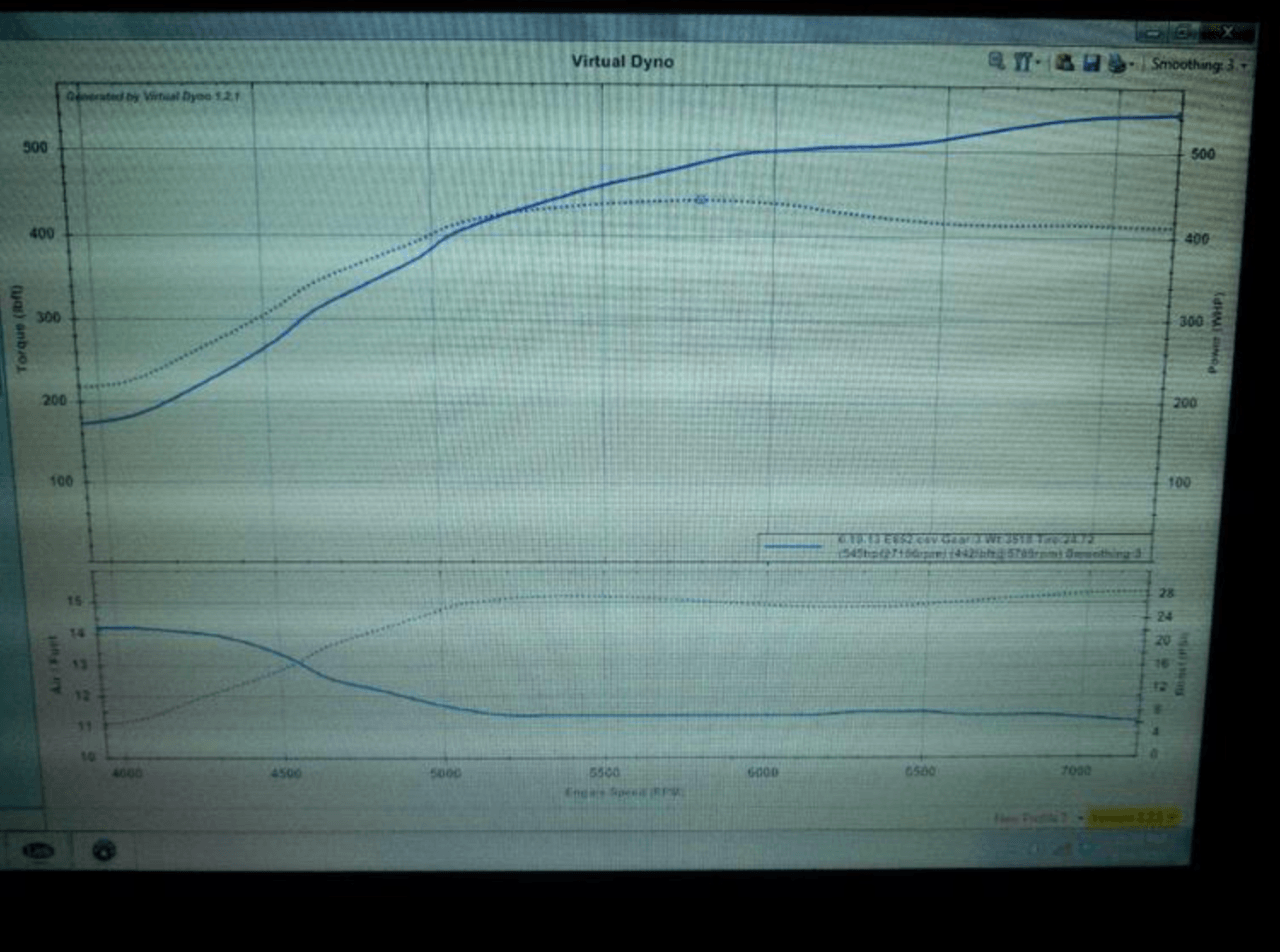
Final result was 605/505. Holds 500 for that flat line for .... ever!!! Can't wait to drive it

Thanks JR and the Rest of the P&L Crew!
Especially Tyler on the boost leak finding!!
Had an issue with vacuum lines popping off. That's a renovation for the near future
6-18-2013
Nothing different from before, just did a couple driveability checks and they all worked out so ~470/370 were the final numbers that day... that was on 20.5-21 psi
Once Dylan does the processing to the Dyno sheet I'll post that, but for now, here is a VD Graph from this morning. 3rd gear goes quick. I probably will not drive it much until thursday, I cooked a WB on the dyno and I dont like beating on it w/o it.

Did not take to redline because I'm not used to it not being 7000
Car --3260, full tank of E85.
Me --220
"stuff" - 30
Posting Dyno Graphs Here, and Making a PBB Thread that actually reflects the turbo in the name. I cannot edit it for some reason


6-19-2013
Thanks Allan.
I just got back from a little cruise where I really got a chance to get on it. Did 3 pulls and it cooks.
"Only" came up as 550/440 on virtual but with the road I was on I'm not to concerned with the numbers. The curves still looked the same which is what matters to me.
From looking at my logs looks like 50-100 was 4.2 with a .5 second shift. I'll take it.
6-28-2013
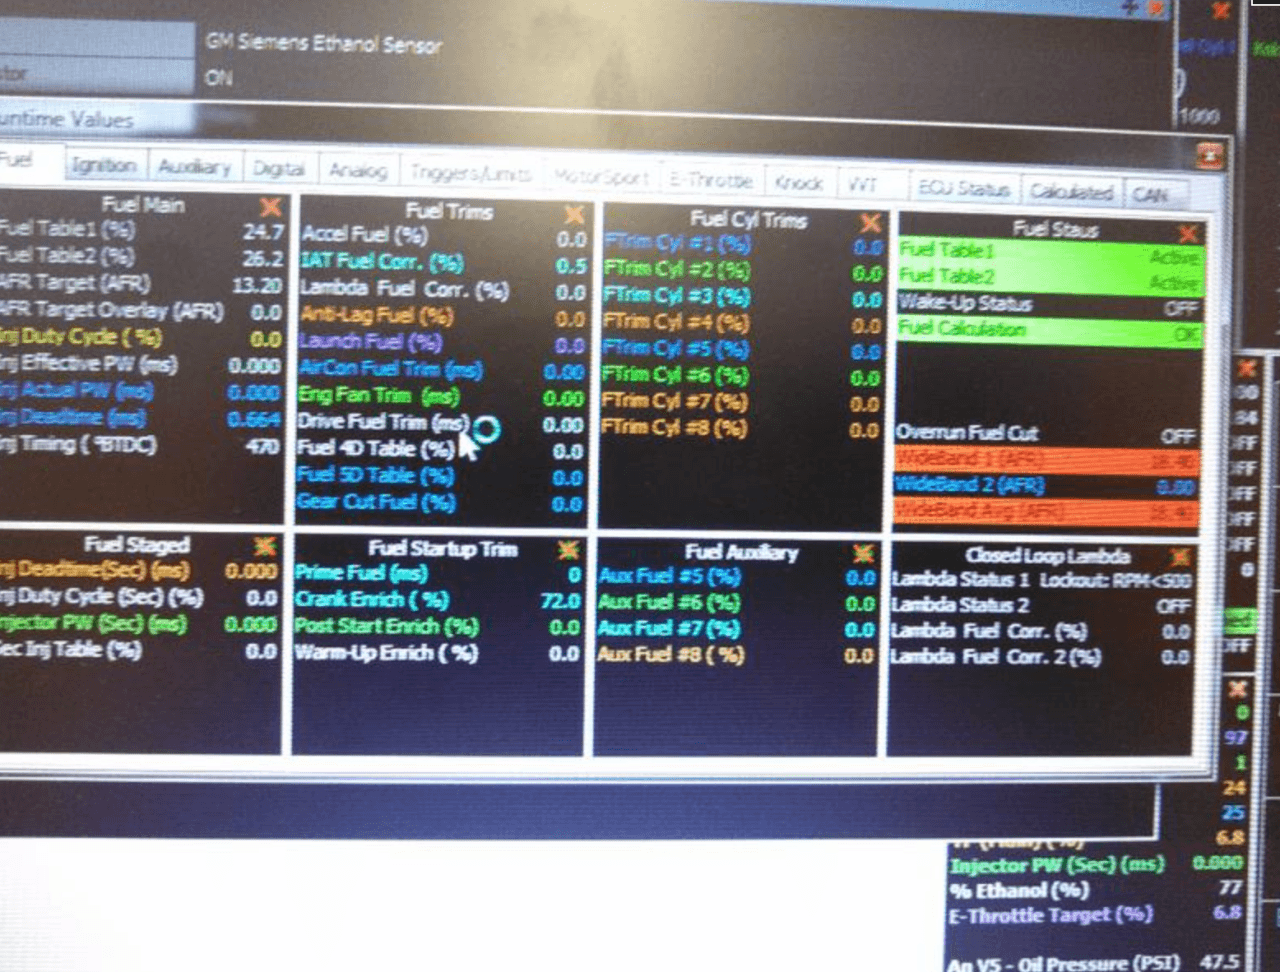
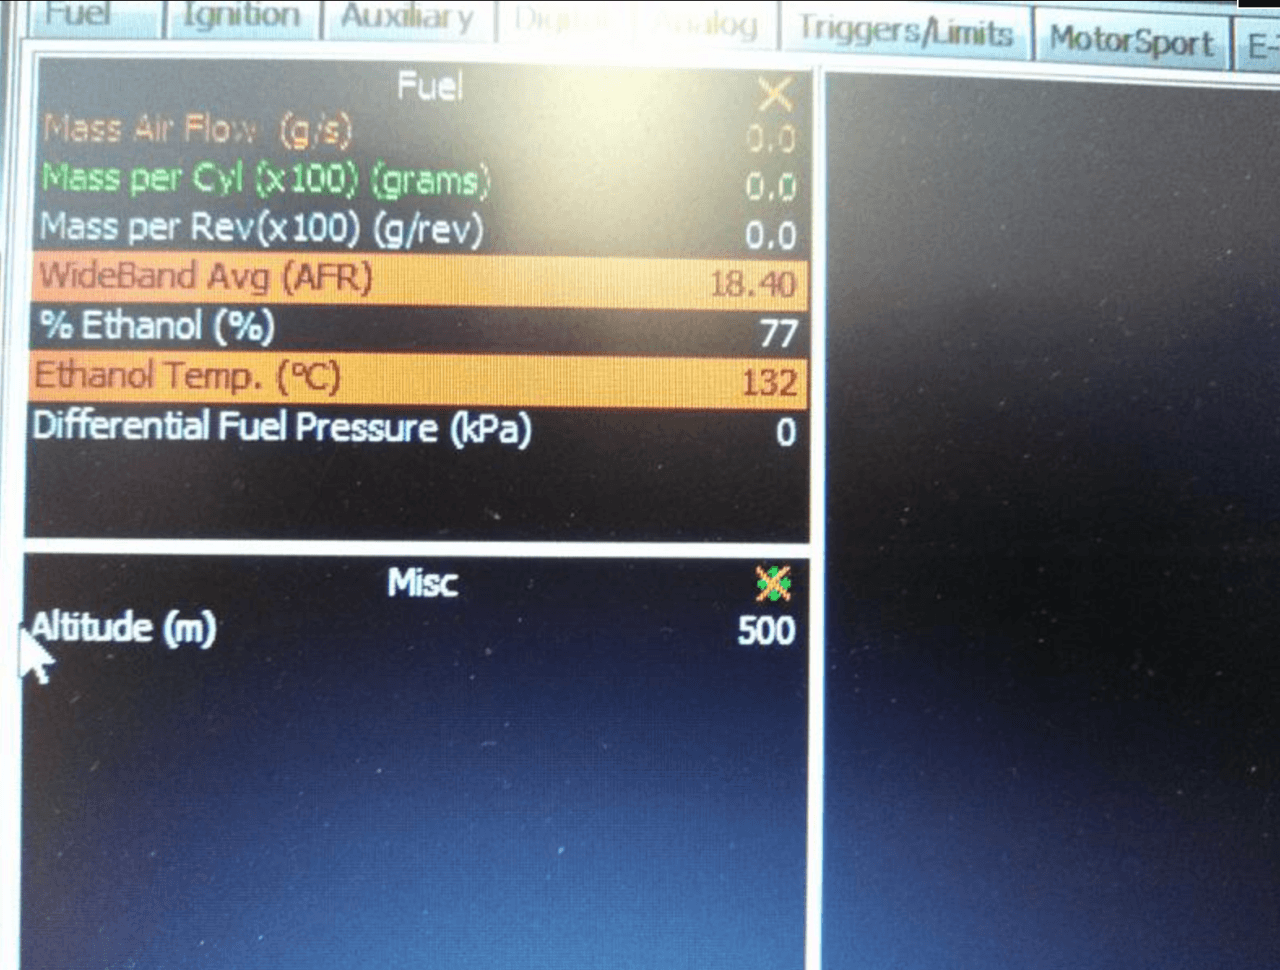
I pulled up the run time values, there was nothing ethanol related under fuel.
Under the calculated tab, I see ethanol % and ethanol temp. Cool... except for it says 132° C. This was just pulling up my map at work. Not real time.
As for the table, that could be and probably is the proper way to do it, but currently it isn't that way.
I wonder if the Siemens sensor is a little different than the continental? Its supposed to be the same functionality wise, but maybe its not. I changed the wiring over to the continental wiring last night, but it didn't change any content.
21 pound diet today + whatever dirt fell out!
6-29-2013
Scary **** last night - I was worried I blew something up. Accelerating from a light last night on a bumpy road, and all the sudden my car just lost power, went lean and could barely run under its own power.
I tried lookimg at the fuel lines, actually hardwired the 255 and checked all vacuum lines ... still no dice. My buddy rich asked if I could check for spark from the Link and I said Yepp..
As I was connecting, he noticed that the passenger front (cylinder 1?) Had the spark plug wire disconnected ... the damn coil pack broke. Thankfully Erocs04sti had a couple for me, and gonna ship them out first thing Monday. ... which led to spending some more money also - DSS front axle bars .
Car lost 6-8 pounds today between intercooler sprayer and the middle seat belt in the rear... don't need that juuunk!
6-30-2013
It was not a good feeling. Thankfully a buddy was up and we were installing downpipe and cat back otherwise I would have been worried sick... or maybe found the issue then.
Weight savings is just something I realized I needed to do after my car still weighed 3260 (with full interior and full tank of fuel) plus me. I want to get to 3350 or less with me in it. I have an amazing lead on some Seibon carbon fiber doors and that would save 80 pounds at the cost of some safety so I don't know if I will be doing that mod until I have a cage.
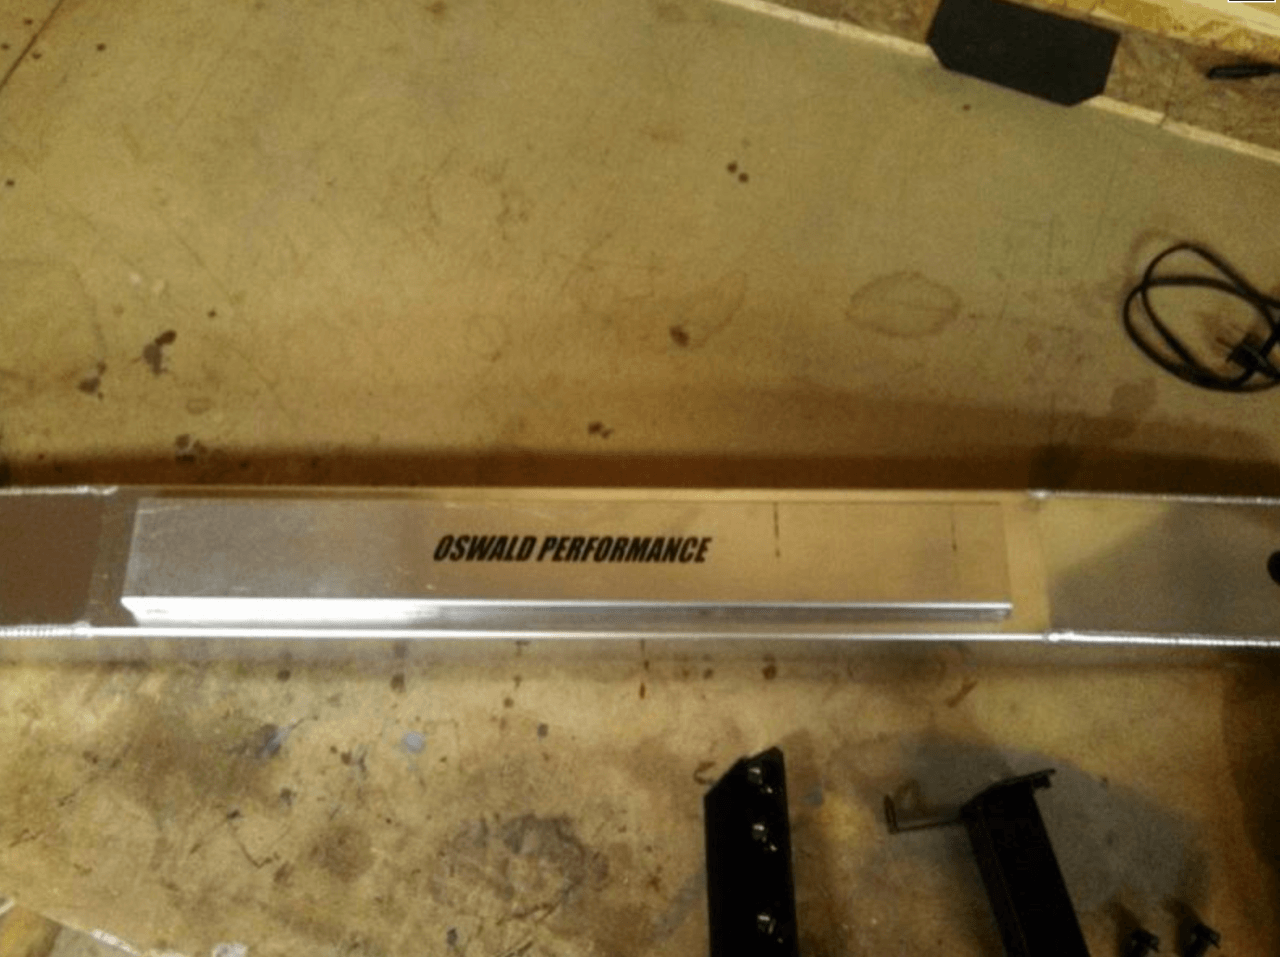
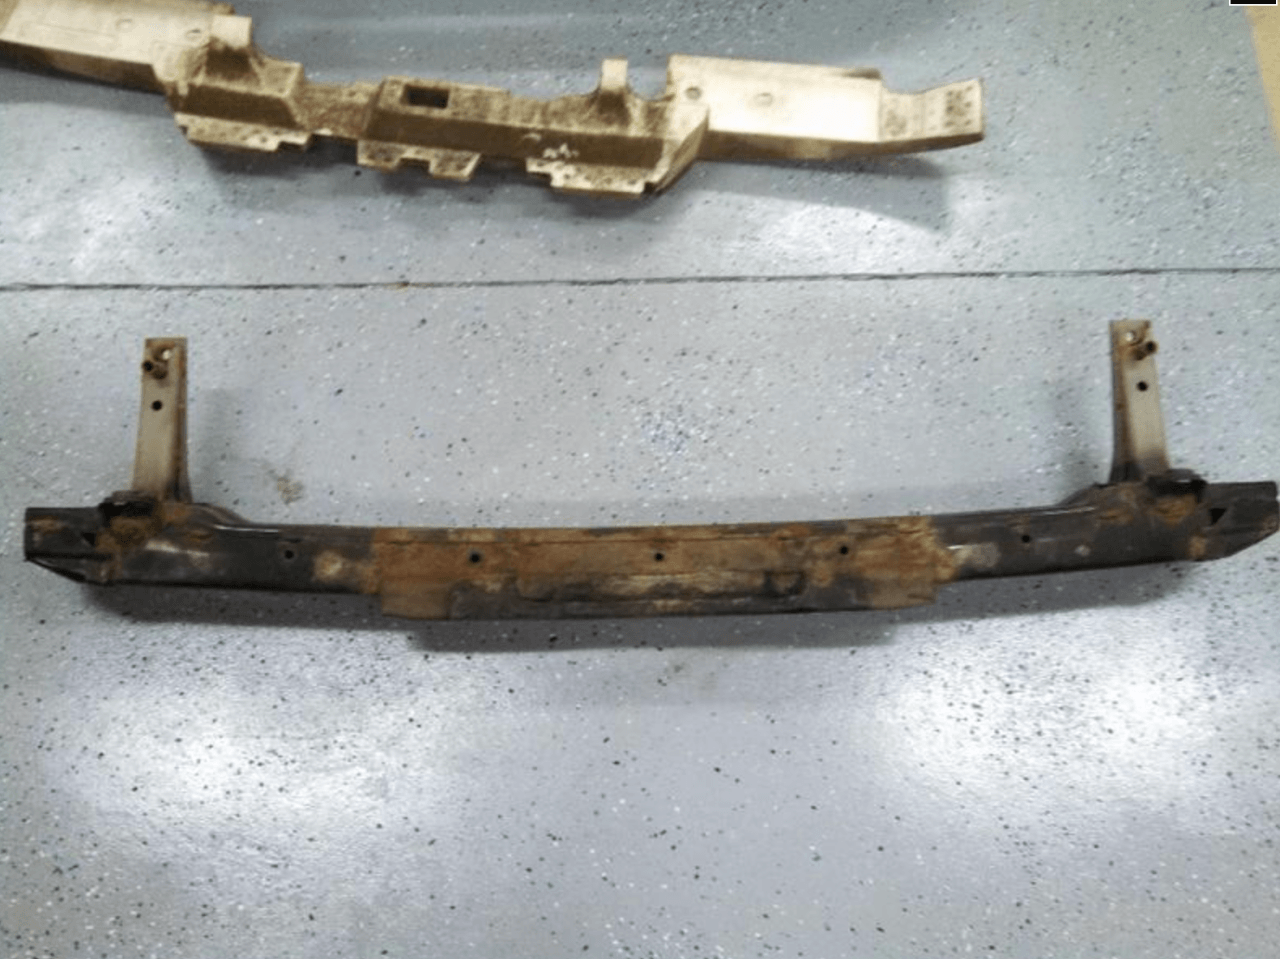
As for the Oswald - easiest 21 pounds to shave and you get rid of the rusty ass rear bumper beam. That install is literally a 2 hour job start to finish, no jacking required or any fancy tools. All aluminium and the stock Styrofoam still fits. Not to mention the parts fit together nicely and instructions were very well written and thorough
7-3-2013
Got my coil pack today. That fixed the issue I had last Friday.
Spent some time merging my two maps. I've got boost, WGDC and knock sensor merged all together.
From the suggestion of a guy on the Link forums I had the edge detection wrong ( rising vs falling) on my ethanol sensor so my fuel readings were all out of whack, but its good now. Fuel temps rose from 24-35 on a trip into town, nothing too crazy. I want to do some cold start trims on E85 cause it is cranking a little longer than I want it to.
7-9-2013
Still no videos! Haven't driven the car, but I did find a design flaw that others have also noticed.
The weapon-r coolant overflow / windshield washer fluid tank has a nipple at the top with no tube going down to the bottom. This makes it extremely difficult for the coolant to drain back into the radiator once it is cool down. I will be either Welding a new nipple on the bottom or putting a tube inside the nipple if it is a tight enough fit.
I just stopped and picked up some goodies from coolblue05, thanks again man! Here's one teaser photo while driving down the road
Favorite goodie
Bye bye radio

7-10-2013

It wasn't boost Logged, sorry.
There was a dip at 6200 but only 1-2 psi. I had to mess with some stuff (WGDC mostly) and it went fine. I haven't driven the car hard while logging in a while ... here is a picture of my latest 4th gear pull I have.

7-11-2013
I shared this with some already but I just am in love with it for some reason....
This is just a little inlay I put behind the radio bezel after taking the radio out tonight. 7" touch screen no more .
Real carbon fiber with some sort of sticker / vinyl on top . Thanks cool blue!

7-13-2013
Well no tech inspection but j have full interior and extra battery in the front with me. Cannot wait till I can buy a trailer to tow my car here.
Anyways I had one good pass so far, keep missing third. Only running the 1/8th till the end of night so I don't get booted
7-15-2013
I just did what JR Suggested for street tires. He knew I was on street tires and suggested 8PSI, I dont have enough experience to dispute what worked and what didn't
I had Tire pressures of 22F/19R running 255/40/18 KDW2s
Here is a log screen shot. Peak boost of about 27.5 and dipping to 23ish. I think this was the 11.57s pass posted above.
I was shifting at 7300 ish

7-16-2013
As good as that sounds Darius... I might as well kinda key people in to what's been going on the last 72 hrs.
Driving home from the track Saturday, I pulled into a gas station half way home to fill up on E85. When I was getting off the freeway a rattle really started making a ruckus. Gas station was 1/4 mile off freeway so I coasted into the station and shut car off.Checked oil, looked fine.
So I had my buddy with me start the car up to see if I could see where the noise was and it was not pleasant, car was on for 3-4 seconds.
Car was too fricken hot to do much of anything on it, so I decided to push it to the main parking lot adjacent to the gas station and my boss who lives 3 miles away let me take his truck home. Left the car there Sunday
Yesterday I went and loaded the car... for power line construction we use chain hoists to bring up the wire tension so that's how the car got put on the trailer ( no winch)
Got car home, started reefing on exhaust and drained the oil. Didn't see anything jumping out at me, oil looked fine and no rattles when shaking things.
Pulled a single plug and it looked too clean. My gut feeling was this, as the wideband was acting goofy on the trip home. Idling fine and going under 15mph it was fine. Anything over that it said full lean. If I put it on neutral while cruising, it would stay lean. Buddy who was riding with me said his did the same thing on his Supercharged Tacoma right before the sensor died. A quick Google suggested the same thing... though mine when dying have said 14.8 all the time.
So... that leads me to where I'm going to be at tonight. Compression and leak down test.
7-18-2013
Well... results are in. Sort of.
Motor is cold and I was doing some video watching and it has to be warm. So while my battery is on the charger this is what I have.
1 - 120psi
2 - 90psi
3 - haven't checked
4 - 88psi
I have my heat gun on low blowing on the oil pan so it can warm up the motor... I can't think of anything else I can do to make the test more accurate.
Anyone have ideas????
Is what it is. Gotta pay to play.
Having said that
Hopefully just a broken cam that didn't do much damage.
If you bend / kill a valve what does that usually mean? All new heads?
7-19-2013
With block reinforcements hopefully low-mid 30s will be attainable.
No monkeyboy jerry atrics on the rebuild it is going to be well thought out rather than a rush.
8-10-2013
Wow, not going to believe this fellas...
Just pulled the motor, and got it on the stand, and was showing my buddy the noise it was making... Then we pulled the valve cover off, no initial damage seen.
I turned it over, and the cam would snap a few degrees when it would be about to the breaking over point on the exhaust lobe.
I didn't know what that was all about so I started to take the cam gears off. . . as most know this is a bitch, so the cheater bar was instantly grabbed for the 1/2 inch breaker bar. I put the bar on it, and the weight of the bar moved the bolt a fuzz...
Loose cam gear the whole time was the noise. I tightened the gear back down, and bam noise gone. This was previously torqued too. ... I guess impacting them on is the way to go lol.
Let the deliberation begin. I'm pulling the heads anyways to make sure, but I am 96% confident that I could put it back in right now and it would run fine.
Closed deck from P&L? Outfront? New studs? Oring?!
Pretty excited but at the same time disappointed that it was that simple.
8-13-2013
Motor is out. Parts are scattered and lab led and thankfully everything looks good.
Going to get winter build opinions at P&L Monday.
On the docket for discussion
Closing the Deck
Orings
Big-boy studs ( as a salesman and business owner I'm guessing the 13mm P&L's will be suggested, which I'm cool with)
My case or new
My crank or new
My rods or new ( Turbo tuff )
Hoping to use the case to save some pennies, but might will leave it up to him. My pistons are fine, however I was surprised by how easy it was to keep E85 in the car So I'm bumping compression to something at Paul's recommendation.
Financially it is a long way off.. but what do you guys think for 6266 decision.
Keep in mind this is twin scroll...
.84 A/R ( Which should be bigger than the 6262 .84 AR which I currently have.. I think )
1.0 A/R
8-28-2013
I appreciate the insight! I'm gonna reread that a couple times to fully digest it.
I do want to mention I had the turbo tuffs and they seemingly worked out great at 605hp. Paul at P&L said he'd prefer i start out with the rods he's comfortable using (Pauter) and go from there. I had a sit down face to face meeting with him and Jr a week ago.
I don't have the means to make measurements or engineered decisions due to the fact I work out of my truck all over Mich Indiana and Ohio, so I wanted to put my trust in a shop to do that for me. I have no doubt in the world it will hold up to the power its just how long. Maybe sleeves are the right way to go... I'm not saying they are or arent, I just don't know what's best for my application.
I have heard good things about the 625s too but again going with what a paul is comfortable with
I don't know if I've posted it or not yet but the specs if I asked Paul to build the motor today it'd be:
P&L closed deck (includes orings)
P&L built
13mm studs
10:1 CP
Pauter Rods
Stock crank
P&L special Blend Kelford AVCS delete
6266 turbo.
If down the road I chose to sleeve it'd be a Benson sleeve and probably MPS built.
9-14-2013
Well - its been a while since I've done some real updates, not just theory or " i think I'm gonna do"
In the last 2-3 weeks, the following has been done
ABS deleted - Retained lines for future use if I decided to start circuit track racing.
Brake Booster Deleted - Yes I know pedal is going to be harder. Will be drilling a new hole in the brake arm about 3/4" higher to increase pedal ratio into the high sixes / low sevens. I will be going to a Wilwood MC to keep things simple. going to the auto parts store to begin running the lines. Should be pretty dang easy really.
Also going to get a new line to replace this: I guessed wrong on a length lol.

I have also removed the PS tank, battery bracket, wiper motor and the fuse box. I am doing a little tuck action, its not as bad as I thought, but I am waiting on a spare motor so I can mount everything up and then make my harness fit that. Rather than guessing.


Finally - I bought a set of lightweight brakes to help free up some rotating / static mass. I haven't seen them yet. Just sent payment today, but I'm guessing it will free up appx 30 pounds.
http://www.streettunedmotorsports.co...ubaru_rear.htm
http://www.streettunedmotorsports.co...baru_front.htm
I'm hoping to be under 3000 with full interior and enough fuel to make a pass at the track, no driver. ( 3250 race weight with me, helmet, computer, fire extinguisher etc )
9-15-2013
Thanks Carmi, appreciate it.
The only reason I'm looking forward to a cage is I've had 6 point harnesses for a year and a half, and its a big no no to use those without a cage. Rollover incident = broken neck. That and those CF Doors I picked up
That and I have an OMP CF seat I've been waiting to put in also
Bench bleeding and Clutch Line Redo... Much better.


9-22-2013
I forgot how much of a bitch it was dealing with a reversed intake manifold.
Throttle body & alternator are not jiving.. I might have to shoot full race a message and see if they can sell me just a throttle body spacer out of their kit. ... I about had a temper tantrum in the garage because something so simple is such a biatch!
If there was a little more meat around the tb flange itd be easy but the damn MAP sensor channel screws you over.
GAh....
10-13-2013
Progress is small but moving forward.
Did some more gutting today. Taking advantage of the fact Michigan doesn't require rear seatbelts I gingerly took mine out today. Saved all the pieces so if I ever need to put them back in I can.
Took out the stock fuel lines also. Not so gingerly I am thinking of running my three gauge wires through the three fuel line spots on the rubber grommet to clean up the wire entrances into the engine bay.
Anyone have any crafty ways of getting the two big black & brown wire connectors on left side of car to meet up with the main loom? I'm toying with going thru the water drain area by windshield ... wiper motors have been eliminated also. Fuse box probably going in fender well but not confirmed.
Question for everyone. How come no one has made a new lighter bracket that spans the rear seats that would incorporate a harness bar? I think I'm going to try to make this one better or make one out of aluminum because this thing is heavy as balls for what it does.
It is secured by 6 8mm bolts ( 12mm head ) so I imagine its as tough as the two 10mm bolts that secure the OEM seatbelt. Could add some support to this one if needed too. Just nice if I don't have to weld anything so I can still put a rear seat in.

Just tossing ideas right now because I finally got a chance to work on the car. I was kind of doubting if I still knew how to wrench because it had been so long since I has worked on anything.
Next weekend i will be looking into the clearance on my reverse intake manifold. I think the 8mm Grimmspeed are going bye bye for some 3mm or maybe nothing?!
10-15-2013
I loved my Saiku Michi Can from before. He makes good stuff. I had some minor design changes I wanted, so I am going to go with this route again, but a little more stout. I will be pairing the -10 Oil drains from the AOS and the turbo together with a yblock if space permits. I will be joining the two "clean air" lines with a -10 yblock again. The two oil drain lines will be stainless I think, the others will be rubber. Yay, more AN fittings to buy!! But it will be really nice, positive connections when I am done, no more sloppy BS dicking with **** on the dyno this time.
Version 1:
Version 2:

Drawn in Saiku Michi Form

The reason for the third is to eliminate any residual air to try to keep the intake / throttle body clean. I know it still has flaws, but after assessing the situation, it is this or a vacuum pump. I haven't hit the buy it now button, I know stretchedk7 and I were discussing this tonight, and a decent Hella Pump runs 150 bucks from Summit, so it might actually be cheaper, but if it dies, its another 150. This system is passive and runs mechanically so it is "impossible" for the 3rd tank to break.
the dual tank will be above pitch stop. the 3rd tank will be on where ABS / PS Fluid used to be, OR on the Strut tower bar ( Move the bung to position 7.5 )
10-19-2013
Some new goodies for the build. Nothing too crazy, but essential.
Trailer, 2003, w/ new tires, 4,000 pound winch with box, and ramps. Will need to modify ramps to be a bit longer to get my car on. Paid $1500. I feel like it's a good deal. Minimal rust bubbles.

Outfront rails came in also for the 2.5i intake. $170 shipped w/ 4 -6 AN fittings, really fair price for these. Get em before they realize it and jump to the $200 pricepoint fuel rails historically have been. Since nothing is perfect, I wish they would have used metric bolts to hold the chrome piece to the body, just to keep tools easy ,but I'm sure it is cost / availability related.
Fitment was 100%


10-23-2013
band in/out 6266
650-675 is my guess. Not pushing it much harder than before.
I should have Jr and Paul tune it while I'm not there so I don't have an influence. Though I think I would have walked away with 597 instead of 605 if Paul wasn't there that day.
Dialog after my 597hp run:
"1/2 pound more boost! All it needs is half pound"
Vroom
"See 605!! Now you're in the 600 club. 597 isn't 600"
11-11-2013
Twin scroll has been ditched
Coming back with a single scroll vband 6266 .84 AR.
In the words of our world traveling friend JR - " It will make power without boosting to a million psi "
I'm okay with that.
1-13-2014
Soon. Very Soon. I have goodies at home. Was waiting to get something accomplished first haha.
For those that dont know, I bought an outback for something to do while I save money for this car, it had a blown motor, hoping to make a few bucks for my hard work to put into this car. Currently it is for sale.
I talked with Paul last week and it sounds like he was sick the week before the holidays, then P&L was closed for 2 weeks, then last week Paul was sick again, and I barely caught him in the shop. Anyways, he said once he's caught back up I'm on the list to start getting work done to my schtuff. In the mean time, I've been trying to do as many free mods as I can around the car.
Back to your post D, the Hood does clear with the 8mm spacers! Barely, and it still hits the silicone coupler, but it does close. Yesterday in the garage, I was playing with 3MM of spacers, to see if I would still clear various things, and I think by the time I add in the two gaskets (5.5mm total distance between the head and the manifold ) I will get an extra 5mm of clearance on the hood and then give me room to clear AVCS related stuff.
I was supposed to do a test fit on the outback , but I forgot. Oops.
Pictures of Brake MC / Booster Delete / New Lines to follow.
Question for you folks. ... Do you think it would be a bad Idea to run a teflon line from the back of the car up to the front through the cabin? I currently have it running on the bottom side of the car and I'm not sure I like how much of a pain it is down there. Any safety factors to be concerned with in cabin (is this legal for track use?)
2-9-2014
Texted you back on that ^^^
Finally an update worth doing. Still a long way off from getting this rig back on the road though.
In the last 2 months to the day, I've been working on three different projects.
1 is obviously this car, get to that in a second. Second, I bought an outback XT with a blown motor and fixed it up to make some money. Unfortunately i didn't get cash, I got another project. I traded the outback for a 2007 impreza with an 04 STi swap and a GT30R Perrin kit, FMIC etc.
The impreza is going to be "hopefully" functional by March 1st. I bought my gasket kit today, and I pick up the motor wednesday night / thursday. This motor is a built motor also, and with the GT30 on E85 it should be a fun little car till i get this going. It will be for sale as soon as I get it running and cleaned up.
Back to this car. ... Finally did some fun stuff to it. I've had all this stuff since early December and it was just sitting in the car because I've had no time to work on it.
Got my brake booster delete plate / wilwood master cylinder installed a while back, finished up the lines and the proportioning valve for it yesterday. I'm pretty proud of the brake line tuck. I wish i would have went with 3AN the whole time, I did after the proportioning valve, the 1/8NPT was getting annoying.

Secondly, I installed the Perrin Catch Can I bought.
Third and finally - Installed the Vacuum block I purchased. No getting harassment from Tyler @ PnL about hoses blowing off since I will be using all positive connections ( AN fittings or the Vibrant one touch connectors) for all connections. I highly recommend those fittings. I've tugged on one with all my might ( which isn't much ) and it didnt do anything but sit there and be happy. The bolt head that is sticking out is a longer one because it goes through the wall and also secures the proportioning valve, I need to find an allen head so that it matches the other.
Overall picture of the engine bay. Everything is dirty, and the block is a junk block with the intake manifold i'm going to use.
Excited to get this impreza going so that I can start putting money into this car again. It is so much more fun to accessorize and build than return to OEM specs ( outback )


2-10-2014
As of right now there is still enough space, I do not think I will be driving the car in the rain with the electrical stuff running thru there. But if I go on a journey I might throw them in, it is just a few bolts.
Or I could just drive faster with rain X windows and not worry about it
Wow nice
Posted by Diggymart on 4/3/20 @ 2:24:09 PM