You must be logged in to rate content!
21 minute(s) of a 44 minute read
3-16-2021
Project DEMONIZER!
Compliments of Demonizer67 @ www.pro-touring.com
9/3/12
I thought I would post the final build of my 67 Mustang - I call it the "DEMONIZER"
Newbie Note - I am new to posting, so if anyone has any suggestions on how to better post the pics & text, that would be great - Im gonna dive in & see if I can figure this out - starting with some random pics of what I've been doing the last few years.
I have been working on it for about 3 years now years & wanted to get some feedback & share ideas with other people building modified classic Mustangs.
I started this project after my last 67 got T-Boned in 2006.
First I built the whole car on paper - figuring out what I wanted to do, what parts & style I liked, etc... I established a whole library of stuff.
Then I starting purchasing all the parts while starting all the fab & pre-assembly work.
Over the past 3 years I have had every aspect of the car mocked up & apart a dozen times or more to the point where if I added a battery, oil & gas it would run - all in the name of getting everything just right.
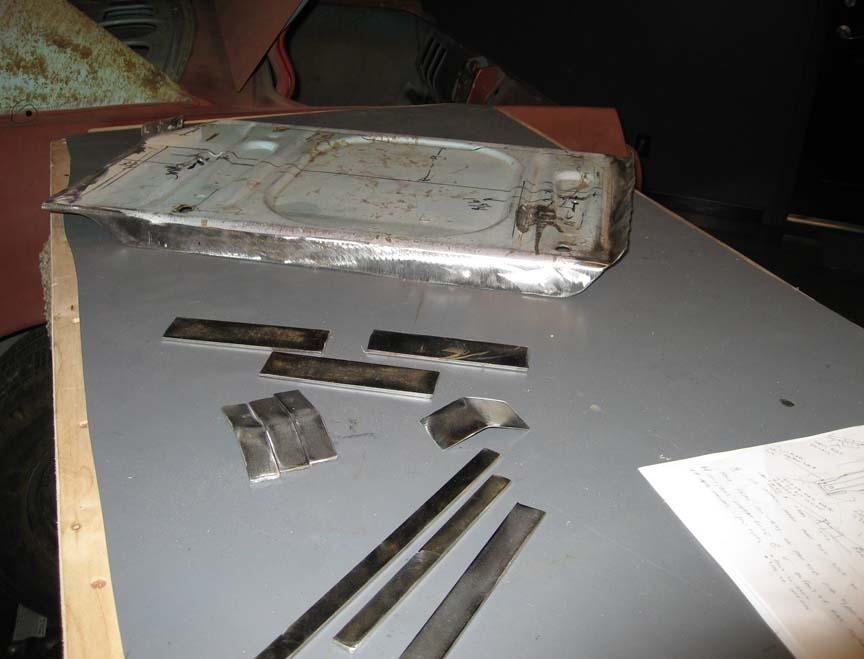
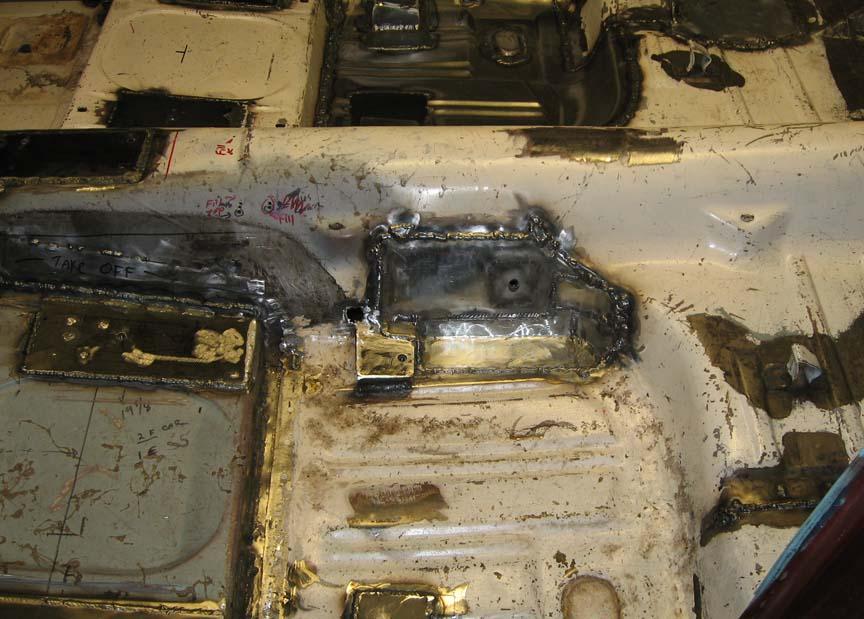
Then I put on the rotisserie & had at it for about 10 months stripping, scrapping, cleaning & fabricating that last of it.
Now it is at the paint shop being cut & buffed out. I should have the body back in a few weeks. I have painted all my other parts, brackets & stuff & pre- assembled all the sub components - the car should go together quick & easy like a model kit!
Some details about the Demonizer
BODY MODS:
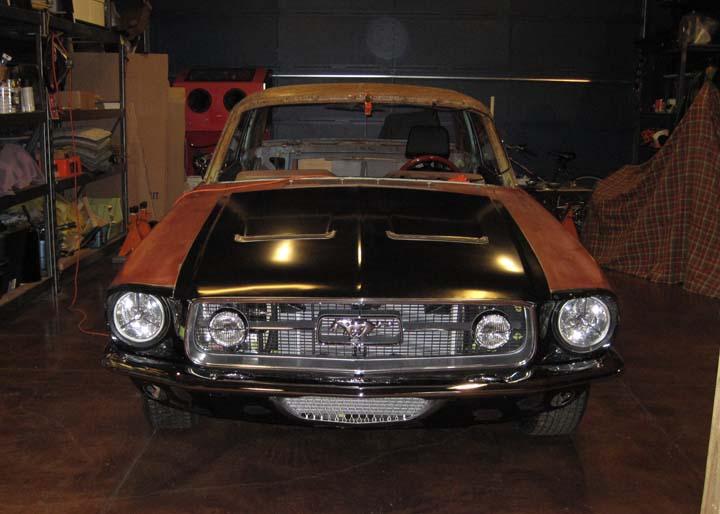
- 67 Coupe
- Removed Cowl Vents & Side Scoops
- Lots of fabrication to get repo & original parts to fit right!
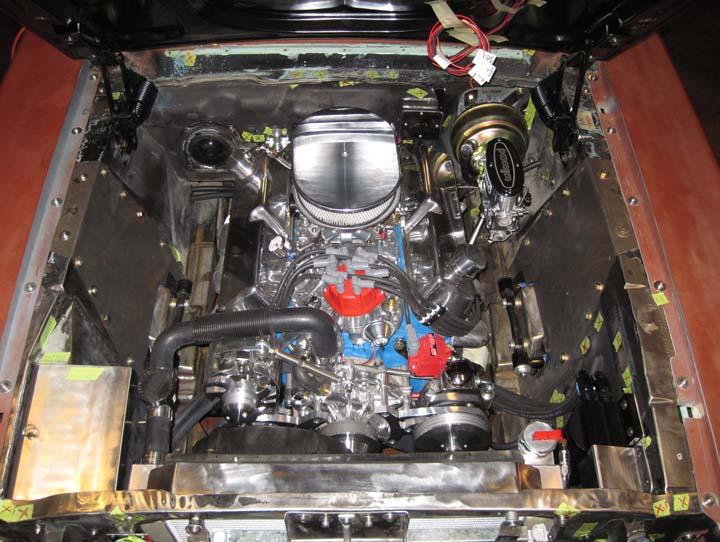
ENGINE:
- Ford Performance 5.0 Crate Engine, Estimated 350 HP & Torque
- Aluminum Ford Racing GT-40 style "X" cylinder heads, 1.94 x 154" valves
- Holley Street Avenger 4150, 570 cfm
- MSD Pro Billet Dist, Coil & 6AL
- Edelbrock Performer RPM intake
- Powermaster 140 amp alt
- GM Power Steering Pump
- Sanden AC Compressor
- March Performance Serpentine system with AC
- Custom built PRC 26" Radiator
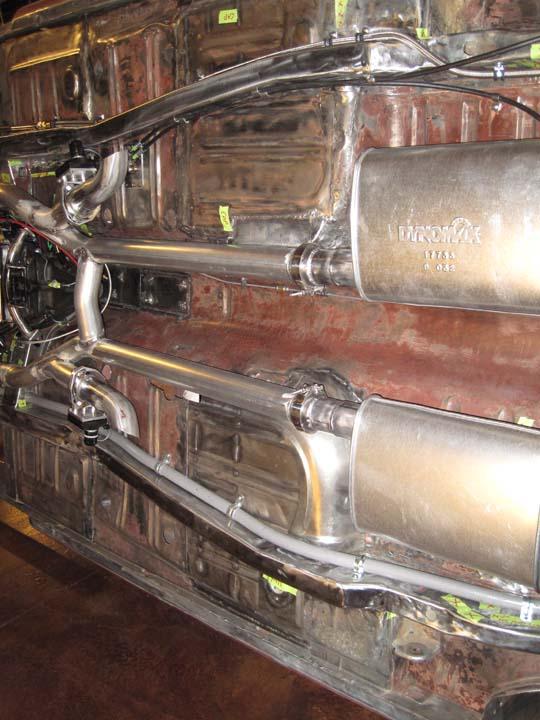
- Dynomax Super Turbo Mufflers
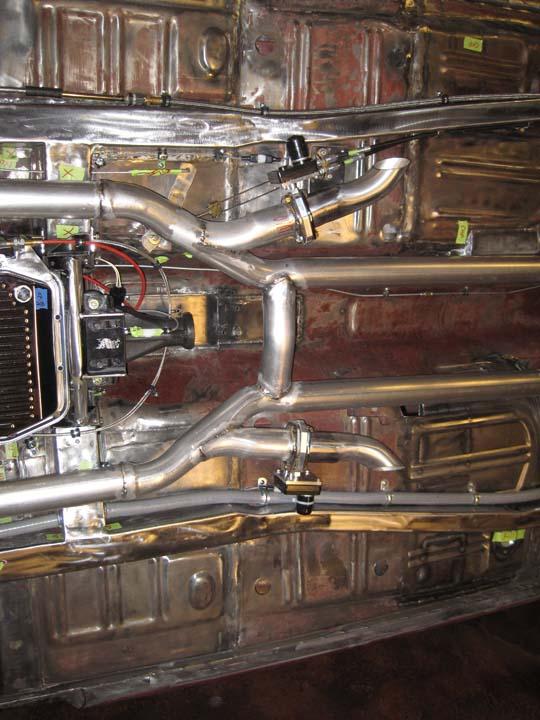
- Dual Exhaust with Electric Cut Outs
- Everything is polished.
TRANSMISSION:
- Ford AOD built by Silverfox Performance Transmissions
- Lentech style full auto & manual shifting
- OD lock out switch
- B&M Mega Shifter
REAR END:
- Ford 9" rebuilt & powdercoated
- Moser 28 spline axles
- 3.89 Trac-Lock
STEERING, SUSPENSION
- TCI Custom Independent Front Suspension
- Leafs on the back with Firestone 900 airbags attached to the frame to adjust ride height
BRAKES:
- Wilwood disk all the way around
- 12.19" Dynalite Big Brake kit with 4 piston calipers
- Drilled, Slotted, Zinc plated rotors
- Wilwood Tandem MC
- Hurst Line Lock & Prop valve
- Hydraulic Self Sealing Quick Disconnects to MC
WHEELS & TIRES:
- Rocket Fuel 15" Chrome Wheels
- BFG Radial TA - 205/60/15 up front, 255/60/15 in the back
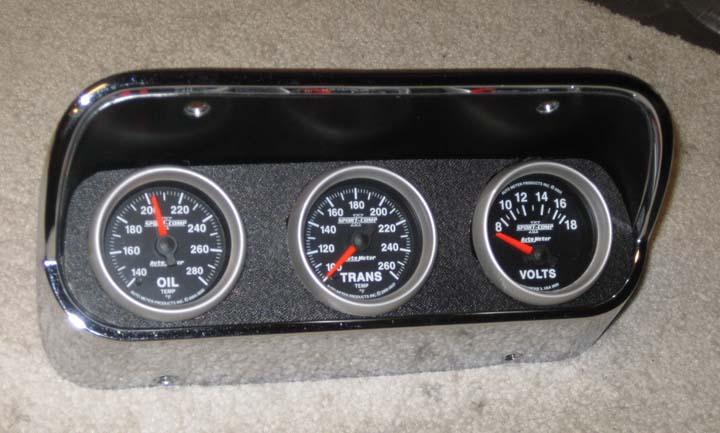
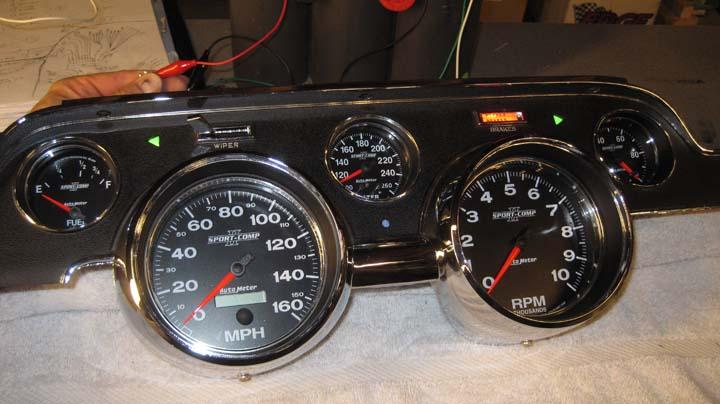
GAUGES:
- Full set of Autometer Street Comp II LED black face gauges
- Installed into a reproduction 67 Mustang standard Bezel
OTHER ACCESSORIES:
- Power Steering, Power Windows, Power Locks, Power Trunk,
- Vintage Air Gen II Super
- Kenwood DNX DVD with GPS, Corbeau Sport Seats.
- Corbeau 3 point harness

Some more test pics of the Demonizer.
I am basically figuring out how to post the progress of the build, including captions for the pics & the best way to upload the text & pics - any help would be great. Im just stumbling along here as I test uploading some pics & stuff.
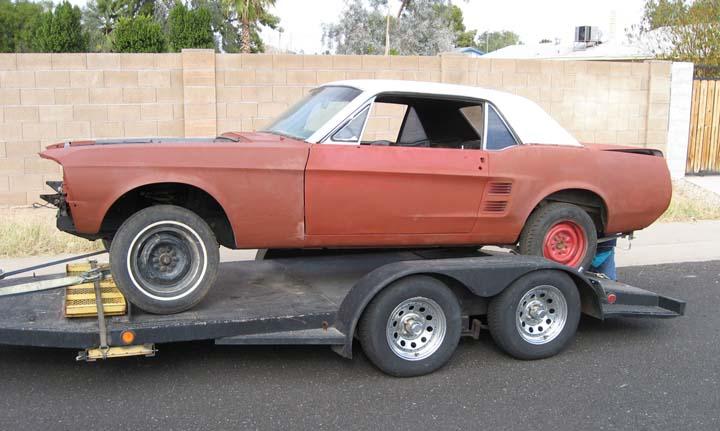
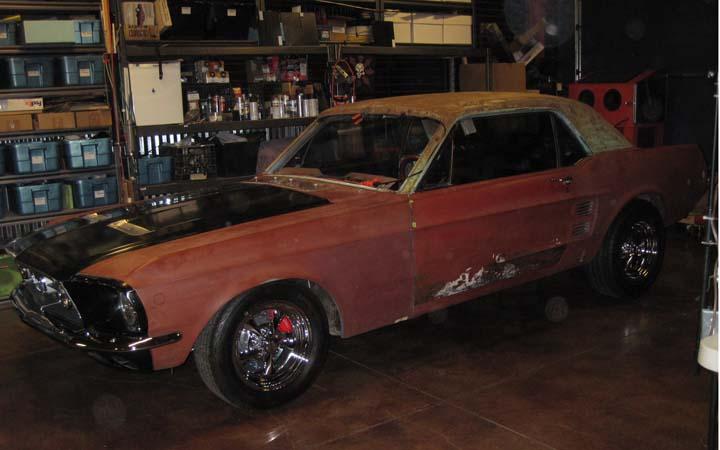
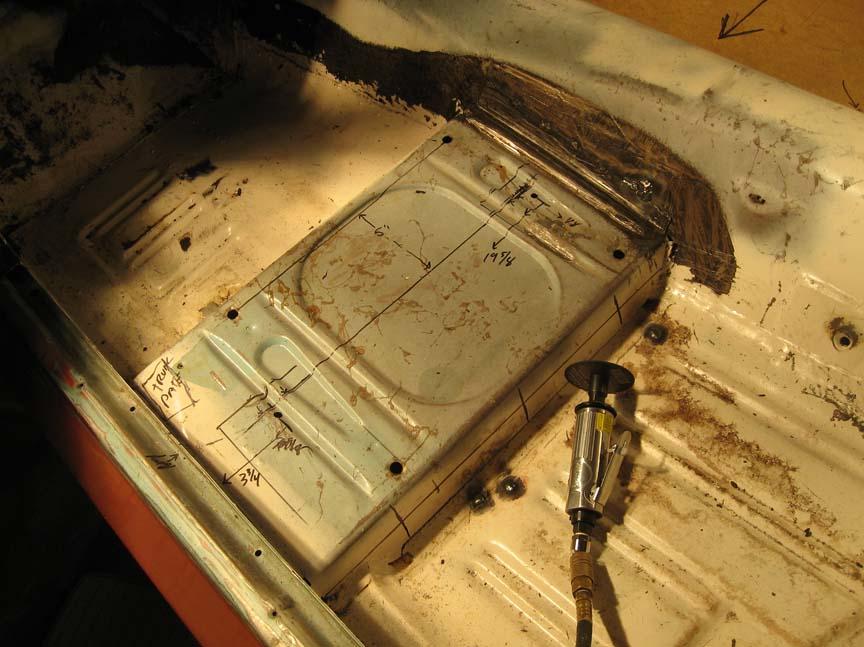
I purchased a 67 coupe body from a friend in the Mustang Club. It was just the body, no engine, no trans no interior, no seats, no hood - just a rolling body. My plan was to strip it down and use all new parts or grab parts from the smashed mustang if they fit the build.
The idea for the Demonizer was to completely re-engineer & re-design the car to my liking - maintaining the classic muscle car style & lines of the 60's era, but updating everything else like a high end street rod - a Mustang Street Rod!
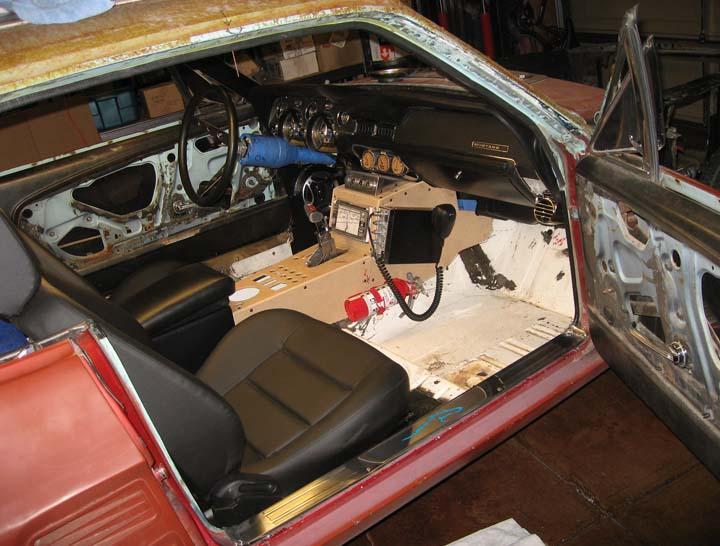
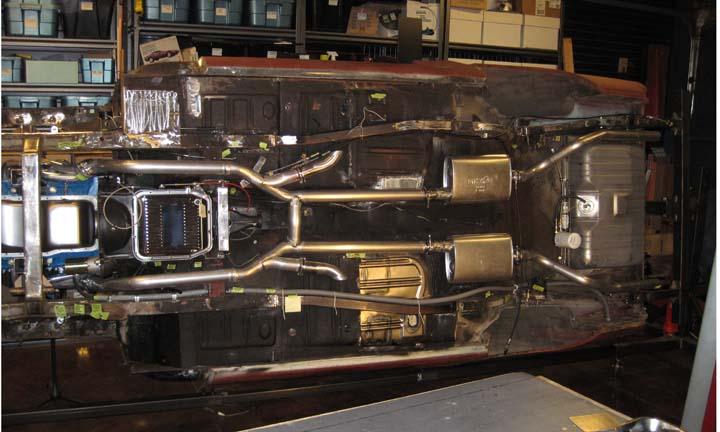
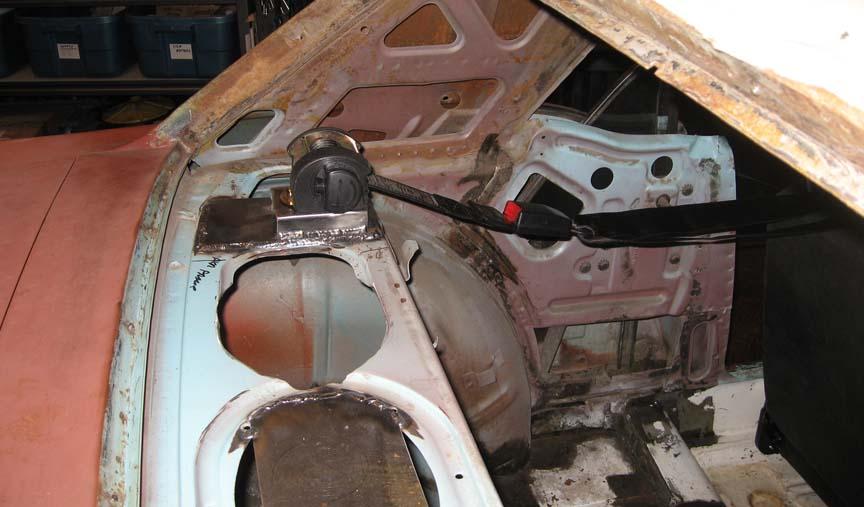
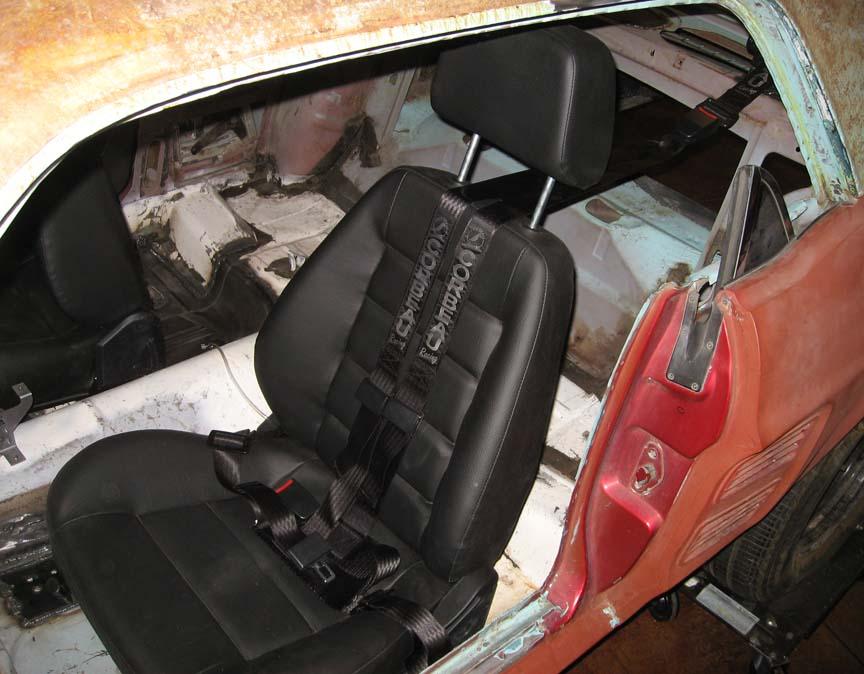
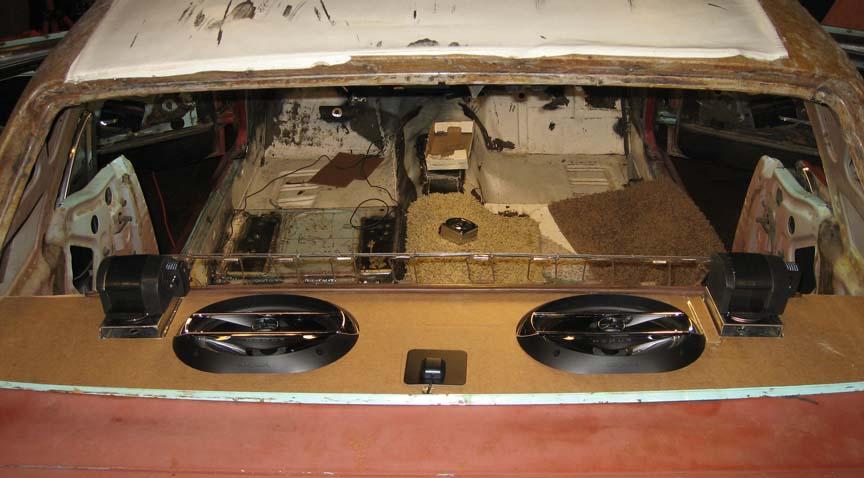
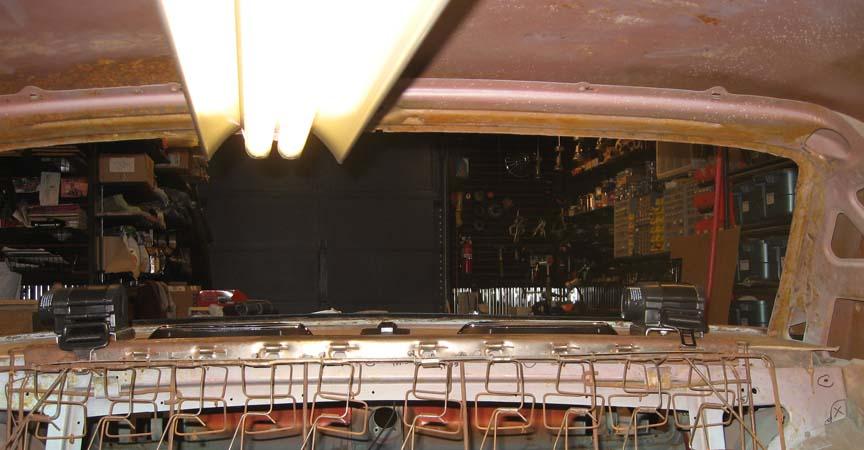
The pics show the car as it first arrived at my house, then a few pics at various stages of the fabrication & pre-assembly of everything up top the full rolling mock up - in no particular order.
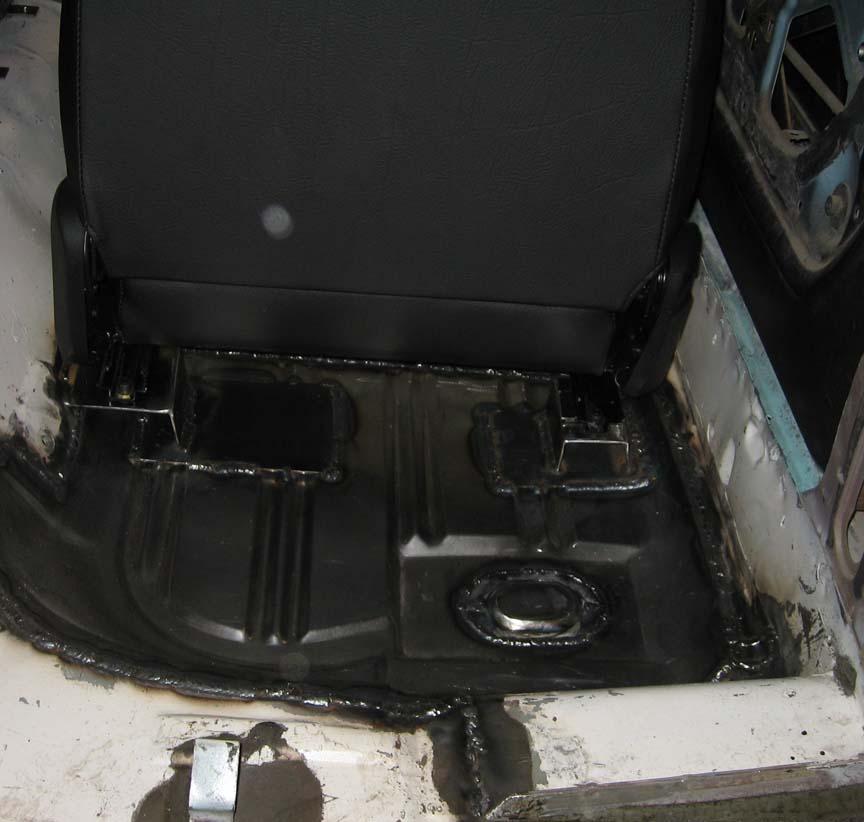
- Underside all mocked up
- Engine compartment
- Interior mock up - sort of
- Gauge panels with the Sport Comp II LED series

9/4/12
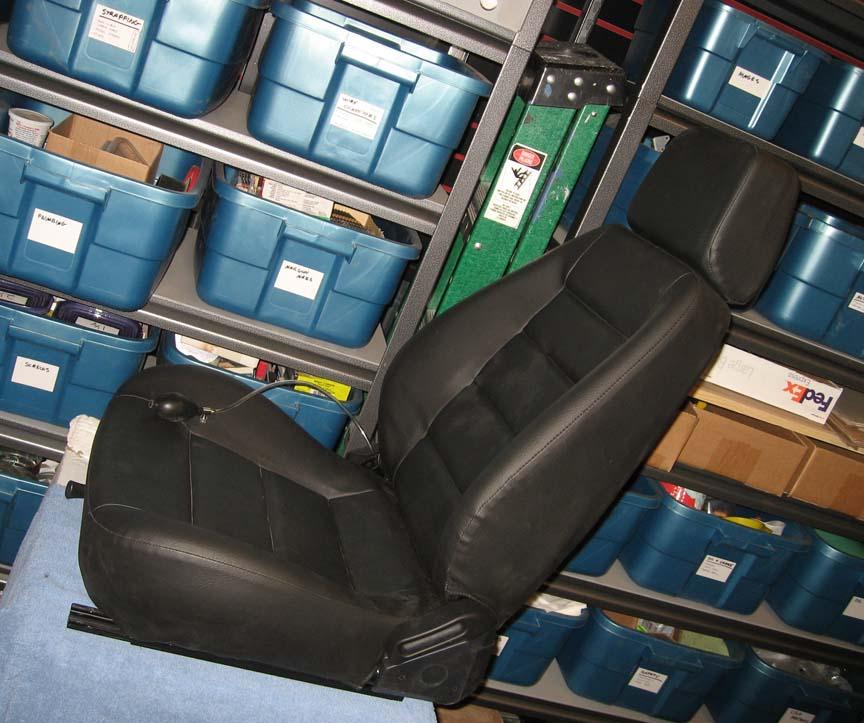
I checked out all the seats with styles I liked (Recaro, Cerullo, ProCar, etc...) and they were very expensive. I was planning on forking out the cash for a good pair of seats with good support, but I couldn't justify spending $1,500 or more for a pair of seats that I couldn't sit in & test first!
The Corbeau seats were a cost effective "test" seat. I got the standard vinyl seats for around $245 ea direct from Corbeau. They are firm, but comfortable. They dont have the oversized side bolsters & stuff that wear out & make it harder to get into the car. just enough to keep you from sliding around.
I ordered them direct from Corbeau because they usually have a huge CORBEAU logo across the front side on the seat back & I didn't want that on there, so I specifically ordered them with no logo.
I also asked them to send me samples of the different vinyls & leathers they use. I opted for the standard Vinyl as it seemed the most durable & had a nice texture. I also asked if they could sell me a couple yards of the same vinyl so I could do my console upholstery with it & have it match - they sent me some for free - just stuffed it in the box with the seats - pretty cool!
They also have a standard & extra wide size. I ordered the extra wide because I'm a big guy (6'10") and didnt want to be crunched in the seat. They fit very well in the car with about 1" space from the Hump & the door.
They also have an inflatable lumbar support option. I ordere that (you can see it in the pic). To be honest, I cant really see much of a difference when its inflated or not - but I have not driven the car yet, so maybe after a few hours in the seat it might make a difference. They seem well designed.
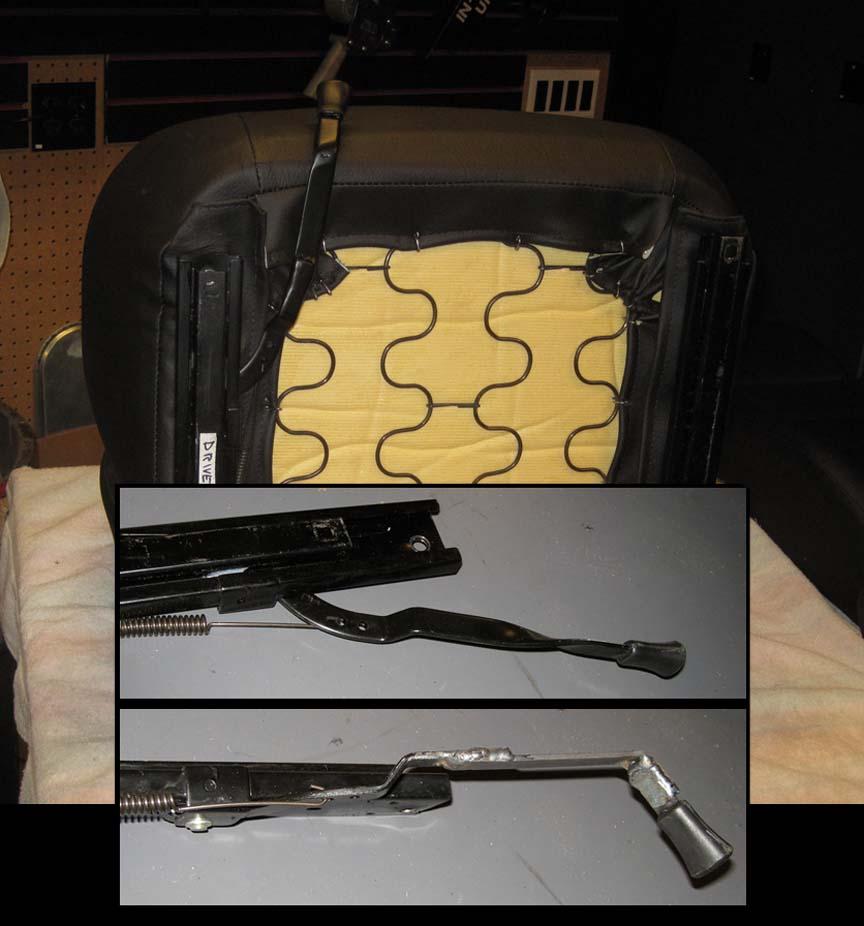
For seat sliders, I ordered the Corbeau Sliders PN A22001F
They were inexpensive and mounted flat on the floor, about 3/4 or so thick - very low profile.
I had to modify them because the slider lever stuck straight out in front of the seat. So when mounted on the floor, on carpet & padding, the slide levers would be pressed down into the carpet & make it hard to move. So I cut the ends off & welded on an angled piece so the slide lever knob came up in front of the seat - operates way better now - see the pics.
Also, Corbeau makes a really cool 2" Retractable Harness.
After I got T-Boned at 45 mph in my last 67 Mustang & did a face plant in the passenger side windshield - I wasn't gonna chance it with a regular 3 point shoulder/lap style belt you can slide out of - I wanted to be secure in the seat for impact in all directions.
It comes with with an inertia reel so you can be buckled in snug like a good harness but still lean forward while driving. The inertia reel also has a lock switch so you can really snug it up & be held in tight with little movement if you want to.
The 3rd point belt also detached with a buckle so you can ride with just the lap belt if you like.
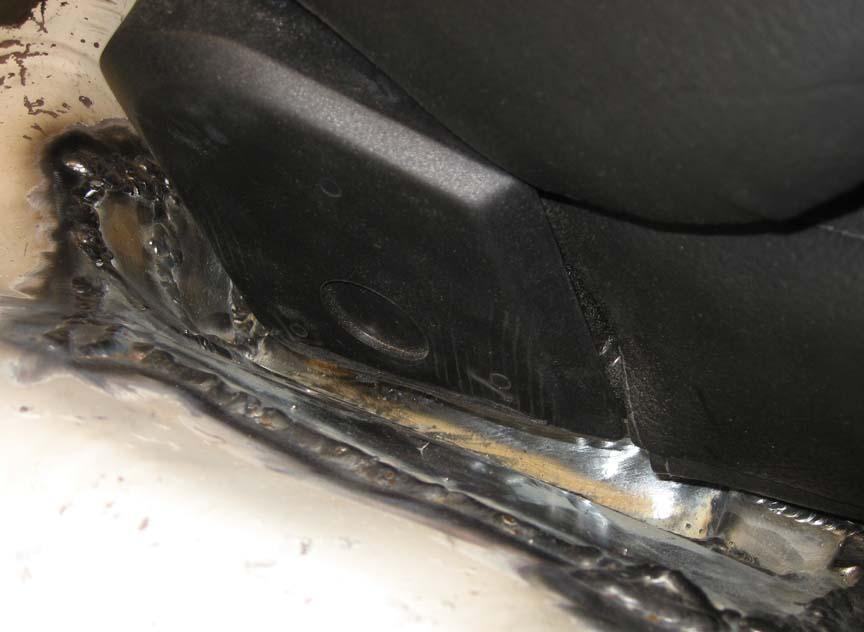
I mounted the 3rd point to the package tray directly behind the seat so the stress/force of impact would be straight-on for minimal shoulder damage - just in case. Who ever sits in the back seat is just gonna have to deal with it!
Anyway, check out the pics on how I put it all together.
I moved both seats back 4" and lowered the drivers seat 1.5". Also had to cut a notch on the driver side seat pan for the inner slider.
You can also see the package tray & how it all works with the harness brackets welded on there.
9/7/12
These Corbeau seats are vinyl (or leather if you choose) so that (to me anyway) would detract somewhat from the "cushiony" feeling.
They are mostly foam and are low profile - less springy.
If you were to just plop down in them from standing, you would probably NOT bounce - but just land like a thump.
When I first got them and sat in them, they felt to firm - I didnt "sink in" & the cushion didnt conform much at all so to speak. I was a little concerend that they would not be comfortable on long cruises & stuff - to much like a racing seat or something - more of a firm foam feeling than a springy feeling - they are very low profile seats - great for headroom & they had the right look.
As I moved forward with building the car, I had it all mocked up with complete interior for about 4 months as I worked on other parts of the car.
I would just sit in the car in the garage, almost every day after work & on the weekends - sometimes for hours at a time looking & studying all the interior details & making all my re-design notes & plans, etc... Getting the feel for the car before I took it all apart again.
Anyway, the firmness of the seats never came into question again, they ended up being quite comfortable - just firmer then a regular car seat. Maybe they started to conform to me after sitting in them so much, or maybe I just got used to them, but I like them. They sit different than a regular "new" car but in a way they add to the feeling that your not in grandma's new cushy cadillac but that you in a 60's muscle car ready to rip it up!
They keep you in place & althoe I have not driven in them yet, I believe they will provide a level of performance above a standard car seat & still provide comfort for long cruises.
9/8/12
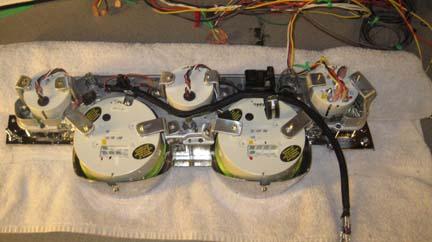
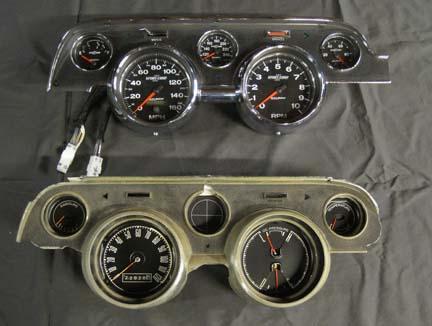
Installing Autometer Pro Comp II LED Gauges in a 67 Mustang gauge panel
The idea here was to make the gauge panel a self contained unit with just a couple plugs. No cables or oil lines, all electric, for easy removal. Some friends said electric gauges suck compared to the accuracy of mechanical, but all new cars use electric gauges, and they are accurate enough for me.
If my oil psi or water temp is of by a couple psi or degrees, it isn't gonna hurt anything - this car is for cruising.
The gauges I used are Autometer Sport Comp II, electric, full sweep, Black face, LED gauges.
Sizes I used are:
- Speed & Tach: 5"
- Oil Psi, Water Tmp, Fuel: 2 5/8"
- Oil Temp, Trans Temp, Volt: 2 1/16" (for the radio bezel)
They fit perfectly into a 67/68 gauge panel!
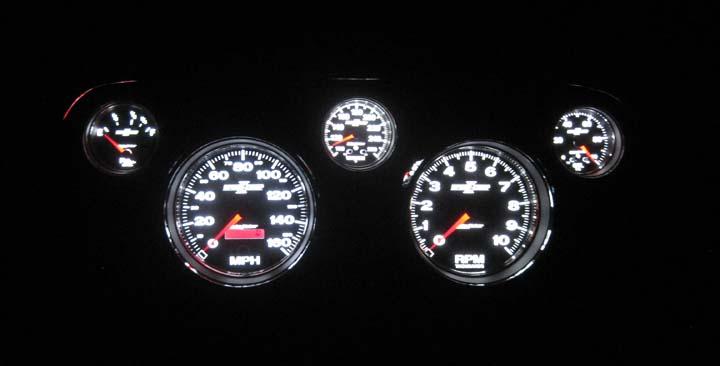
These gauges are very cool. They light up like the gauges in new cars - LED light through the gauge, not a rimlight, so the numbers & stuff are all very clear & bright.
I would have preferred a Speedo that went to only 120mph & a tach that went to 8,000 rpm instead of 180mph & 10k for racing applications - but its a minor complaint & in the end didn't bother me at all.
I also used the dimmer by Autometer because the Ford Headlight switch dimmer wont dim the LED's.
They are expensive because they are Electronic and LED - set me back about $1,200 for all 8 gauges & dimmer - from Summit.
Tech notes:
- Fuel gauge:
Autometer reads 10 ohm FULL, 73 ohm EMPTY (OEM ford sender for 1969 20 gal gas tank reads 7.9ohm FULL & 92ohm Empty as I measures it stop to stop - I connected the sender to the gauge and it reads well, the gauge will stay on FULL for the first inch or so of movement on the sender, then start registering. The gauge will show EMPTY a little before the stop. Should be OK.
- Power for Dimmer:
Autometer advertises that you can dim up to 6 gauges with the dimmer.
I called Autometer because I want to dim 8 gauges plus the Lokar LED shift indicator. The tech guy said the Max load the LED Dimmer can handle is just over 1 amp (1,120 ma). Nothing bad will happen if you draw to much, it just wont dim well. The 5" gauges draw @ 140ma, The 2 5/8 Gauges draw @ 100 ma, and the 2 1/6 Draw @ 85ma plus the Lokar shift indicator at @ 150ma. All total should be around 980 - 1,000 ma (about 1 amp.)
INSTALLATION:
There are many ways to do this Im sure, but I wanted it to look like OEM with the gauges mounted behind the bezel, not stuffed in through the front. To mount the gauges behind I had to remove the bezel on the AM gauges. There are companies on the net that will build one for you to the tune of about $1,400 or so - and they only use a couple style of the regular mechanical gauges, not the electric LED.
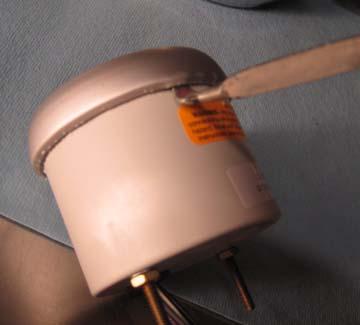
First you have to remove the Aluminum bezel from the gauge. NOTE - start with the cheapest gauge (Volt) to get the hang of it - its a little unsettling to start tearing apart a $250 gauge right off the bat.
I used a small screwdriver to start bending up the lip, then used a paint can opener & just worked my way around the gauge. Just bend a little at a time & go around several times - Be careful of the plastic lens as you can scratch the outer edges of it as the bezel gets loose. I scratch the edges of the Speedo gauge before I realized it. I called AM to buy a replacement lens, they would not sell me one. Fortunately once installed behind the Ford Bezel, the scratches are hidden because the gauge opening on the bezel is smaller than the AM bezel that scratched it.
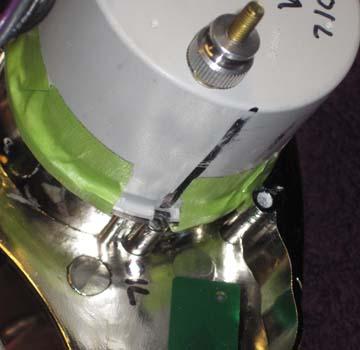
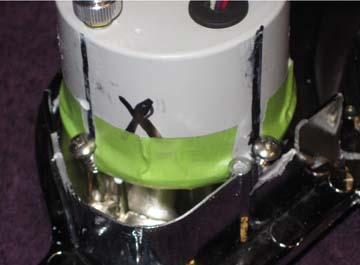
On these Sport Comp II gauges, the lens is not attached to the housing. see the expanded view.
To keep everything aligned, I used green tape to attach the lens to the housing so it doesn't slide around & keeps dirt & stuff from getting inside on the face.

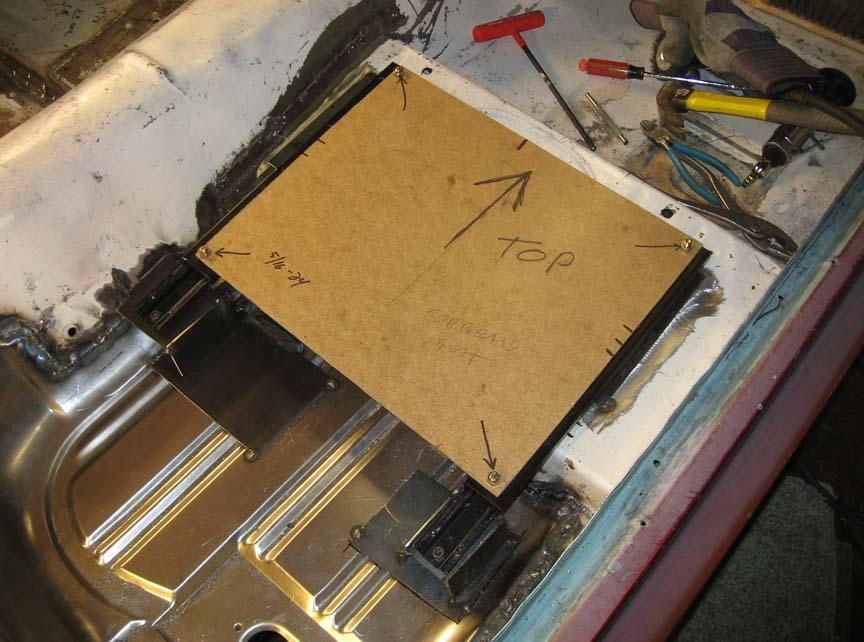
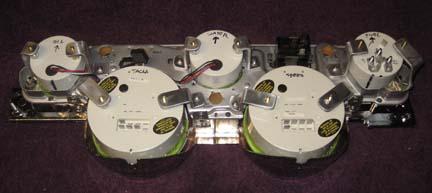
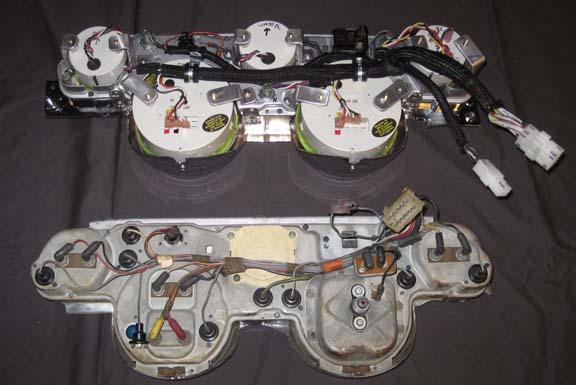
TAKE APART THE FORD CLUSTER:
I had two old ones to choose from.
NOTE: Label the cardboard light sleeves & index them with a line so you get the right ones back in the right place - makes it easier. Also, when final assembling, I used a bit of tape to hold them in place.
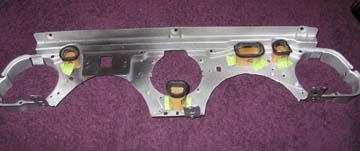
I used the OEM metal back plate to hold the gauges & to mount the bezel to the dash using all 7 screws and a new reproduction plastic bezel - standard black camera case finish.
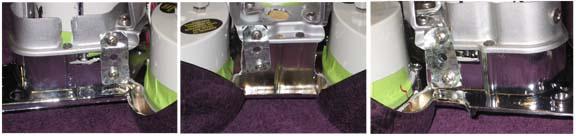
Some aftermarket conversion kits will only use 5 out of the 7 attachment points - eliminating the two lower mounting points under the 5" gauges. Its my opinion that you need these two mounting points to really secure the cluster in place, if not, the two points on each side of the cluster are all that keeps the panel from "swinging" out & bouncing around - the top 3 mounting points can act like a "hinge" if not secured at the bottom. Also, most kits dont have a good solution for the wiper switch & mounting the turn signal lights & stuff that I want to keep connected.
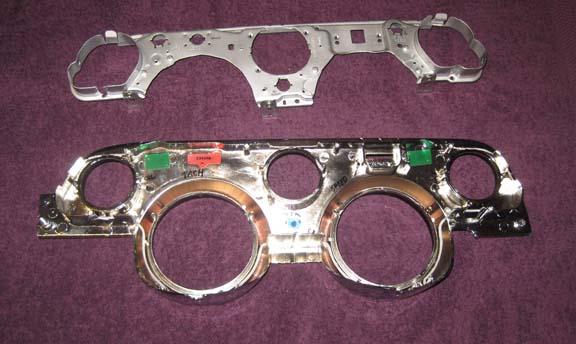
TRIM THE BEZEL:
With the bezel upside-down, place the gauges on top of the correct opening (I labeled mine on the back because the positioning of the gauges is reversed when its upside down) You will see where to cut the plastic to get the gauge to sit nice & flat on the opening. You will also have to snap of the little alignment "nubs" on the plastic bezel. If you have an old bezel, practice on that first - I did, and that gave me a good template for the final trimming on the new bezel.
Once the gauges lay flat on the openings, I indexed them so they were straight. I labeled the gauges on the back with "TOP" on the top.
Then I cut notches where the OEM screws mounted the OEM gauges. I screwed in sheet metal screws at an angle because the AM gauges are bigger. This holds the gauge in place & indexed while you drop on the back plate. I dont think its secure enough to hold them for actual use.
TRIM THE METAL BACK PLATE:
Position the gauges on the metal back & you will see where you need to cut it - be sure to leave as much meat as you can on the back plate - specially on the top & bottom of the outside two gauges.
Mine looked like this when I was finished.

Once the back plate is on & secured with gauges in place, I made brackets to hold the gauges more securely - specially since the Speedo, Oil Psi & Water Tmp gauges have buttons you push & I didnt want to end up pushing the gauges through once installed.
I used some aluminum bar, cut & bent to lake brackets & the screwed them right to the back plate & used the AM thumbscrews to push out on the brackets (opposite how you normally install gauges). This made the very tight.
I added 3 reinforcement mounting points on the bottom of back plate to the bezel with some plumbers strap. Because I cut off the two lower mounting points attached to the OEM Speedo & Tach.
Then I took it all apart, painted the back plate & assembled it all one last time.
Note - paint the inside of the back plate - the area around where the wiper switch goes - flat black. It blacks out silver & stuff behind the switch when its all finished - looks cleaner.
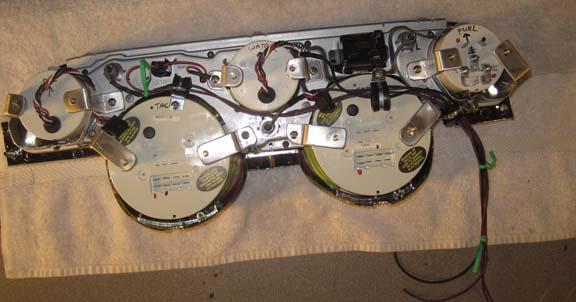
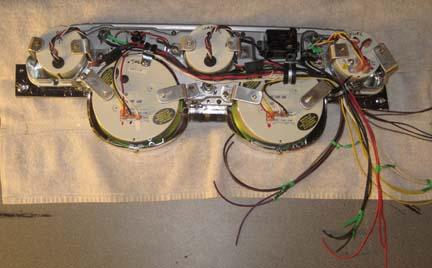
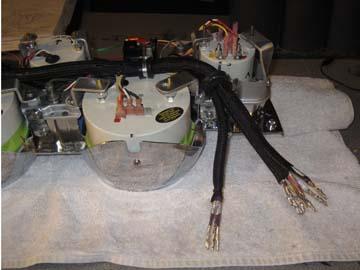
WIRE IT UP:
Some gauges used push on tabs, some had pigtails & plugs. I wanted to keep the gauges as is, so if I had to change one out, it would be a simple swap.
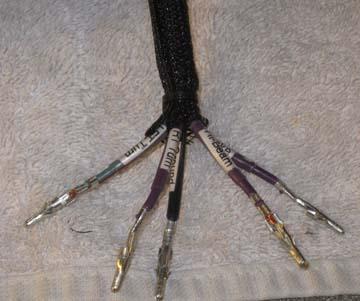
I made two harnesses - one for the car stuff (5 pins - turn sig, brake, Hibeam) and one for the gauge LED & signals (11 pin). I kept the Wiper harness as is.
I combines common wires (ground, LED, 12v Power, etc... ) into one wire for making the plugs easier.
At the wire ends, I labeled them so I could identify easier later on - I printed up little labels, slid on a piece of clear shrink tube on the wire, then slid the label into the clear shrink tube & hit it with some heat - easy to read & wont rub off.
Turn Signal, Hi Beam & Brake wiring
Wire Labels
Gauge wiring
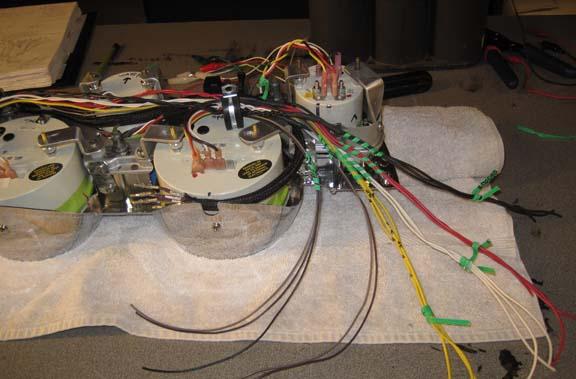
All wrapped up with plugs attached
LED lighting - hard to get a good pic

Took a weekend to make up & it looks really cool!
Nice Mustang! I like what you did with the gauges!
Posted by miatamatt on 3/16/21 @ 8:54:42 PM