You must be logged in to rate content!
11 minute(s) of a 668 minute read
11-11-2013
Sorry about that everybody..... the traction bar setup pics had to be removed, hopefully I can reload them later.
Since the truck is going to be expected to do burn outs when done I figure I'll be sliding sideways on occasion. There isn't anything uglier than doing a burn out, then having the rear end hooking to the pavement causing the vehicle to shift it's weight and having to counter steer because the excess body roll.
So, I ordered a sway bar kit for the rear. The front has the Camaro front frame already and had large sway bar in place. Once I got the rear kit I suspected it wasn't going to be a simple install and it wasn't. The design had the sway bar connected to and following the axle up and over the differential. I've lowered the truck about 3 to 4 inches, this doesn't allow the space between the axle and the bed floor when the suspension is compressed to have a sway bar also.
Instead of having the hump in the sway bar go over the differential I'm gonna use this hump to go over the driveshaft and move it forward about 18 inches. Now the two end arms of the sway bar will be attached to the axle where before the were attached to the frame. Here we go again... making changes based on the theory of operation.


I had to make the rear axle brackets, you can see the tab and notch idea here to help strengthen the pieces once everything is together. The tab and notch also made it a lot easier during assembly of all the pieces too.
Printing the design on paper always gives me a chance to look at the design is real size. I made a few slight changes from the left paper cut out to the right one.

Top view, you can see the interlocking fit and I've used the idea of cutting part way through the side plates to bend the ends to match the center plate.


I had plenty of space for a full inside weld.

We've seen this before.

After a little flap disc work and I tack welded the pieces in place.

11-12-2013
Thanks Gojeep, means alot, I've seen your work and I know you're a very detailed craftsman.
Getting to the frame mounts of the stabilizer bar. I had an issue of the supports/pivot points being too narrow to be able to bolt the right to the frame. Also was the issue of I needed them to be approx 1 inch lower to have the arms reaching back to the axle level when the truck is sitting at ride height.
I cut a plate that will bolt to the frame then reach in far enough to provide a bolt plate for the stabilizer bar mounts. To get the drop I needed I measured and figured the the angle that will get me the needed drop. Here we go again, slicing part way through the plate.

Got my angles and did the weld.

Change of plan here.... I was going to have flaps that reached out beyond where you can see the tack welds. These flaps would then bolt to the frame. After thinking about it I saw a weak link, the further away I move the mounting bolts, the more flex I am allowing. I decided to weld this smaller plate directly across the whole thing.

I took a piece of angle iron and squeezed in the sides, this fit good between the top plate and the bottom plate. It will provide the strength between the top frame mount bolts and the stabilizer bar mounting bolts.

The moral of the story, even though you've come up with a plan. This plan can create a box, this is the box that when people say, "think outside of the box", it can be a box that you put yourself into. This is fabrication, I find myself stopping and thinking about a better way all through the process.
11-17-2013
Moving back to the interior.... there were two items missing, the kick panel vent covers. I looked in the catalogs for replacements with no luck, so here goes.
I took pictures of the procedure that the torchmate use when making multiple cuts.


I had to make two more cuts. There is one cut to make the step up, this is the riser from the base and the base itself. After the pieces were cut I then began the process of welding and weld/filling.

The top weld done and finished. Where the side riser meets the base I've ground down the welds from the backside. I need to take a little body filler to smooth the inner edge of the side and base plate.

One more item to check off the to-do list.
Flap disc, me use a flap disc. lol

Sure you can ask Jeff88. Time wise...hmmm, I'm guessing that top weld clean up was around 15 to 20 minutes, just guessing though.
I want to keep this short, but it would leave false impressions, so I'll keep this as short as I can.
When I have a large bead such as all around the edge like this vent I will search for a used 40 grit flap disc, one that is about 1/2 worn down. They are not cheap so by using a used one will be cost efficient.
Way back when I did the seamless repairs on the frame I mentioned one problem with flap discs is they are terrible on flat surfaces, the grit wears away but since there is no edge to remove the paper backing that the grit is stuck to, you end up polishing the flat surface with the gritless exposed paper.
I have the edge of the weld bead sticking up here, I will use a used disc because the weld bead will remove the exposed paper and I will have grit to use. I will only grind til the weld is nearly flush with the surface then stop. IMPORTANT... always grind so the disc is spinning so the disc is hitting the flat surface then flinging off the edge. In other words, don't grind into the edge, it will be too aggressive and dig into the edge.
Now that the weld is nearly flush by using an old disc go to a brand new disc. Going from the old disc to the new disc will be a huge difference. Now, with very little pressure let the new disc do the work. Hold it fairly flat, watch the surface grinding marks, don't stay in one place, and you'll see the surface become true with a nice crisp/square edge.
You'll only get a minute or two before the new disc wears to the paper and is useless as a finishing disc, I sometimes have to get another new disc to finish the job. And no, you don't want to push harder on the worn disc, the surface will not have the clean edge as going to a new disc will give you.
Is the used new disc junk? no. There will be many other projects that will have an edge that it will be perfect for later.
For a visual of using the flap disc.
I welded a cap on the bed side, then finished with new disc. I never allowed the disc to cut into the edge.
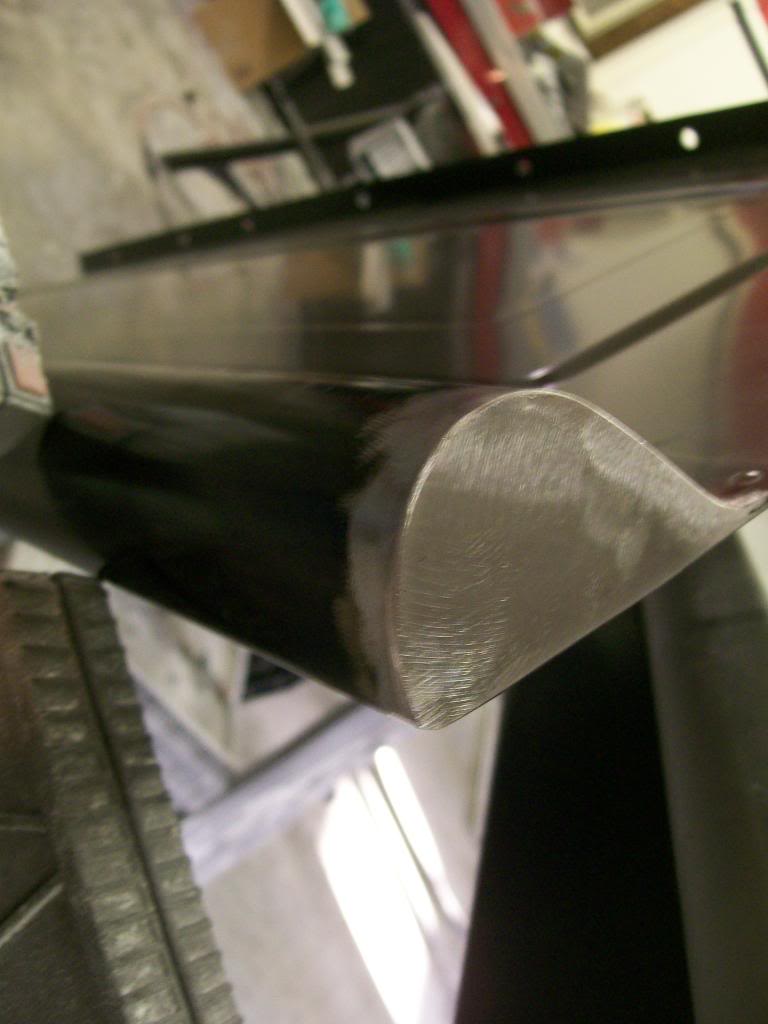
Sheet metal again. You can see the grind marks fling off the edge instead of cutting into the edge.

This one I really liked.


This crossmember has 4 sections needing 4 full length welds. I think I used 4 or 5 new discs to get the whole thing finished. Expensive, yes, extremely proud of the finished project, definitely.


I know I like to see pictures, I hope you all do to.