You must be logged in to rate content!
10 minute(s) of a 391 minute read
8-4-2013
I was afraid if I fish plated, Id have a really stiff spot, a 1/2" thick section. I think with the internal sleeves it'll be good. The fish plates Would make me feel better, but I know the frame is strong the way I've done it and making it too rigid would actually be bad. Thanks for the compliments though, you two are some of the best builders on here so it means alot.
8-5-2013
Got a nice start on the rear bumper / crossmember with the couple hours before work I had today. I made two of the four plunge cuts for the Clevis mounts. Not to hard with just the grinder. I didn't feel like running out looking for jig saw blades, haha. I over cut a little more than I wanted in a couple spots but not bad and nothing I can't fill in with weld. Going pretty good. Should be a nice little bumper. It won't end up flush with the tub, but will be tucked in pretty nice compared to my old one. 


8-6-2013
Bumper coming along pretty nice. I've got the clevis mounts welded up, and I got it capped off and ground. I took the time to flap the welds on the clevis's also for a smooth appearance. Looking pretty cool IMO.

Now I've got to take some measurements and get the angle iron welded to the inside that'll be my tank mounting point. Also need to cut the frame a little shorter, and get to my final measurements before welding. I hope to at least get it tacked up by tonight.... possibly burned in solid. Oh, and also gotta whip up some body mount platesbut that shouldn't be real hard.
I wanted to originally, but I can't. There's is NO way to raise the bumper up high enough to eliminate them, AND have the bumper LOW enough for tank mounting. I could eliminate them by simply raising the body mount higher, but what's the point? I'd rather just tie the body mount simply into the bumper and frame with some flat stock. It's not a big deal really, just like every other TJ with a 1" body lift.... It looks a little strange to me right now because there's no tank but as soon as the tank is there it'll look right.
Tub isn't secured down at all in these pics, so after doing that it'll probably eat another quarter to 3/8's of that gap. 


 I had some momentum going today so I pushed on.... And reached a huge milestone. I now have the tub attached to the frame at all body mounts. A lot of things need to go right in order to accomplish this without just welding the mounts on where-ever they "want" to be. I'm happy to say that the rear most mounts wanted to be welded on in just about the exact same spot on either side. I'm about 1/8 low on the drivers side it looks like, I welded the rear crossmember on a touch off it appears (even after several re-tacks) but hey... there's a lot of crap that you have to account for! Overall a very productive day.

8-7-2013
Believe me Art, a part of me wants to do that badly, it's just that I'm very attached to what little space I have in the Jeep. Just as soon as I can officially say I no longer need more than two seats, the tank will be gone. That'll be at least 3 years though. Improving the departure angle as much as I am I think the hard tank slams will be much improved.
Well I had a couple hours to tinker tonight with my son in the garage. He mostly played on the computer, but did really help me get the garage cleaned up!
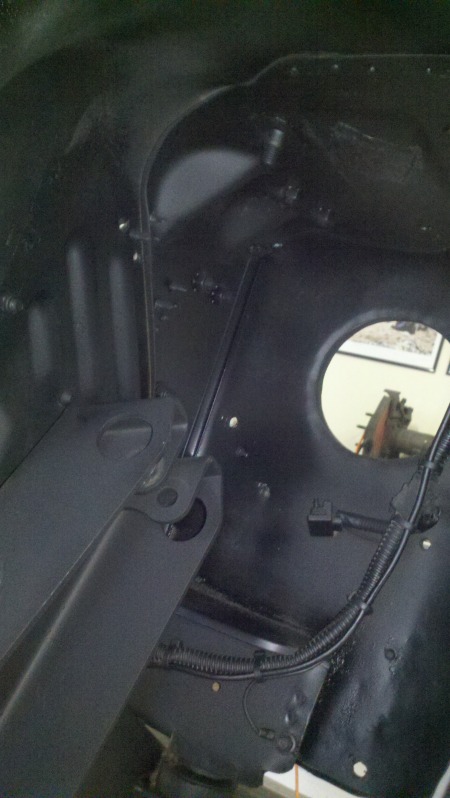
Tonight I focused on the inner fender wells. Now that I've got rid of that vertical support towards the rear all the ugliness in there is exposed, it needed some attention. Nothing some black paint can't clean up. I also took the time to clean up the taillight wiring. I completely cut off the factory connector finally and soldered on my plugs for the round lights. A little loom and some zip ties and it looks much better. Nice to knock out that little project on a work day along with some much needed garage cleaning. 
Some major focus on the corner armor again is next. Looking forward to putting those behind me.
8-8-2013
Ok I'm looking for suggestions or opinions on the what to do with the rub rail.
I made the cut for the new gas filler bezel. And I knew the rub rail would overlap the bezel quite a bit, but I'm not willing to move the bezel (actually I can't, unless I move it to the back of the tub) It's up as high, and as far over as possible. My thoughts right now are to cut off the two mounting brackets for the rail and have it only attached at the ends, much like the front rub rail. I think this will be a cleaner look.
I know it's not the cleanest with it overlapping like this, but I need to make the best of it.
I've got to cut it right at the beginning of the radius.
I'm thinking about just cutting these brackets off....

I'm not opposed to that, but that's 1.5" less tire coverage than I already have, and while I know it can just "barely" be considered tire coverage, especially after I cut it more, it's still something.
Here it is with the gas bezel moved over an inch. Now it's as far as I can take it before the bezel is on the curved area. This is much better. It looks like I'll have to cut the rail's rear leg in half to be on the flat area. I'm over analyzing it right now but I'm confident now that with the armor painted nicely like before, and rail simplified and cut, it's gonna look good. By Saturday end, I hope to be posting a completed photo, with a tire in the wheel well for visual accuracy!
8-9-2013
Working on the rub rails tonight.... I have to say I like them A LOT more than I thought I would. I think this will work just fine for me. These are some rough mock up photos. I think I'm going to paint the area below the rail black like some had suggested I do in the past, I think this will make them blend better. All in all.... pretty happy with the modified version. 
Neither the gas bezel or the flair is in it's final position here.... but you get the idea.
It's going be lower than that, but you get the idea... haha.

This is the reason I think I have to run them... as you can see I basically have a rail running the length of the vehicle.
Wow this is something!
Posted by Diggymart on 12/1/21 @ 7:43:28 PM