You must be logged in to rate content!
8 minute(s) of a 362 minute read
7-18-2013
Woo hoo I can answer this one as it was one of the few things that was still attached to the inside of the car !
The rear seat is attached to the top of a steel curved piece that sits below the rear window. It is attached by two hinges so the back of the rear seat is put in first.
Therefore the seat ( rear part ) lifts up from the bottom. When in the car looking at the rear of the car, you'll notice two screw holes on the left steel vertical support strut. This is where a "stay" mounts and the other end mounts to the seat.
I'll take a few photos of what I'm talking about over the weekend and post as soon as I can. The pic below is from the actual sales brochure for the car.
Hope this helps
Ian

7/20/13
There is one thing that I'm finding hard to get. Its the rear 1/4 vent wind out window frame and rubber. My right side ( Driver in Aus or Passenger in USA ) is ok as per the pic but the other side is rusted quite bad and the rubber perished and there is nothing left. The rubber was vulcanised to the frame which makes it even more difficult. I've even tried every rubber manufacturer I can think of in the USA and Aus but no joy.
There was one guy selling parts off a 34 put he seems to have dropped off the face of the earth.
Ian


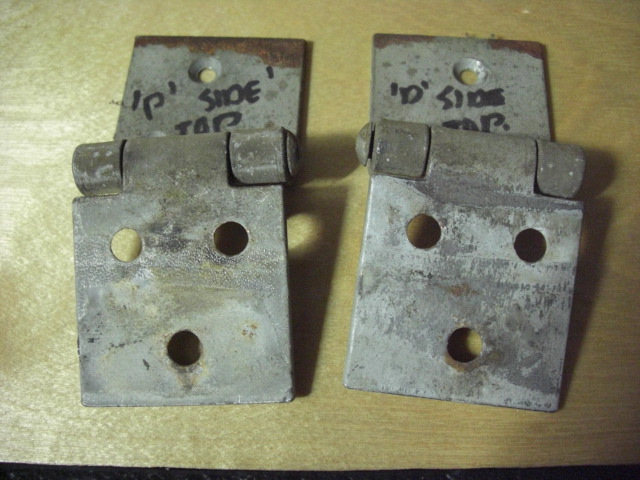
Got the photos for you of the rear seat stay and bolt holes. Mine bolts to the right side ( I thought it was the left until I found the stay ). And there are holes on both sides of the Verticle support bars. You'll see the three holes in the top curves metal just below the rear window. Thats where the hinges bolt to, and in the same photo the two holes futher down the support bar are for the Stay. The other holes in the support bar are for Upholstory clips to hold the surround cover in place. I mounted the stay and sat it on a piece of wood to try and give you a good look at it. I haven't cleaned it up and painted it yet.
Ian


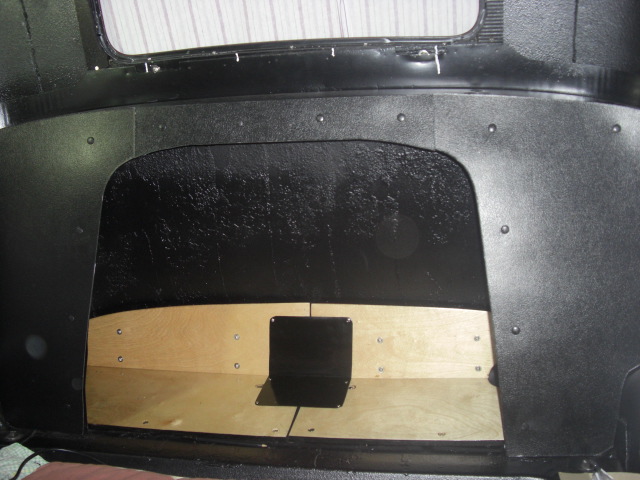
Finished installing the soundproofing behind the luggage area. Got my finished timbers and bolted / screwed everything in place. All that remains is to get the cover plate finished to cover the big hole in the middle. Only problem is I'm not sure if there was any lining, if any, of the metal body above the timber to underneath the rear seat support. I'll have to email a few people to see what they have.
Cheers
Ian


8/10/13
I've been busy with Tax time and still getting things done for my work. ( I don't really like this time of the year for that reason ! )
Anywho I have made some progress.
I made some templates for the side covers that when you lift the rear seat these neaten the area around the luggage area. I traced around the templates and cut out from some board I got from my upholsterer. Did a few final checks and seemed to fit well. I marked where the holes were and drilled these out and using little xmas tree upholstery fastners. There worked a treat and they even have the same finish as the board on them. Once in place I then made a template for the middle bit, cut it out then attached that too. I think it came up looking pretty good. I have to drill two more holes for the support stay for the rear seat but I'll do that at a later date.
I cleaned up the original cover plate for the hole in the luggage area and printed and screwed it in place. I think the guy who made this in the factory must have had a few drinks, or it was last thing on a Friday as it was a bit wonky but came up ok after some tapping out with a hammer.
I'm also still sanding back the door handles. I'm doing 6 in total so I have a few spares. Three down and three to go. Trouble is I sanded one back that far I lost the lines on the top so I'll have to reshape that by hand.
Cheers
Ian


8/19/13
Started the engine for the first time since the painting of the body. Only had a small leak from the fuel bowl. Pulled it apart and the gasket looked a bit tired so I replaced that and seems fine now. I've uploaded a short video to Youtube. Sorry I couldn't get the watermark off the video.
Cheers
Ian
9/7/13
Hey all,
Fitted the painted grill to the front vent and picked up the painted spare wheel covers. The open part at the bottom of the pieces has two screw holes in each side. Does anyone know what the holes are for or what is missing ?
Cheers
Ian


Great build what a beauty! Fun family picture BTW
Posted by Diggymart on 1/31/19 @ 4:17:12 PM