You must be logged in to rate content!
11 minute(s) of a 668 minute read
12-12-2012
Eddielee72 and Jeff88, you're both on the same track as I am.
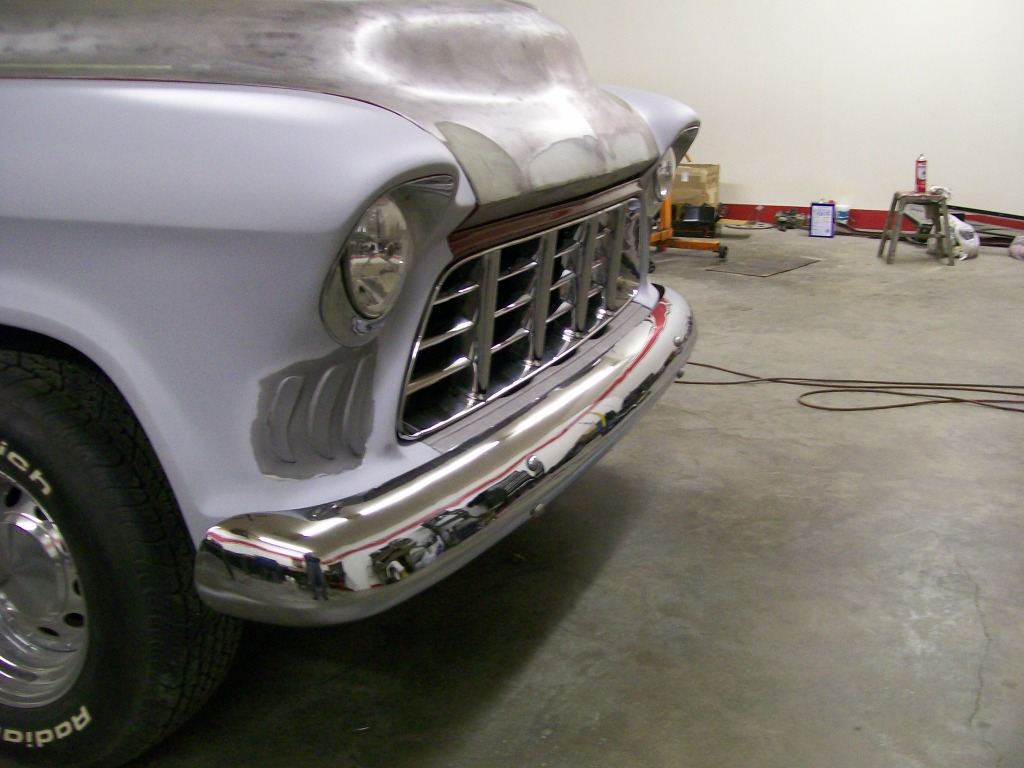
The gills are fairly subtle, I wasn't looking for them to be large stand out features. I have a couple ideas, and even some ideas that I thought of today, to make the grill. I know the grill will be based on the idea of teeth, so the grill is to be the center point of focus, the gills are basically just to support the grill.
Color wise, I still have to fulfill my dad's preference of a particular metalic maroon color. The truck was this color before but it was just toooooo much maroon. My plan to get rid of some of the maroon will be to go two tone, maroon on top and silver on the bottom.
With the silver bottom the gills will be silver, what a great time to do some black shadowing around the gils. I've done a ton of paint but I've never done air brushing, might be time to learn.

Going back to Corvettes back in the '60s they made a Macko Shark. It had a dark blue top with a silver bottom. I have to check but they also had gills in the front fenders, I think they may have dark shaded them on that car but I could be mistaken, I need to check.
LA-Sahara, settle down..... The jeep looks great, just a little above what I'm shooting for. But the picture does bring up a topic I wanted to mention.
I had a choice of either building them as I have or, I could have simply painted them on. For me, the building of them is alot of work, but in every project we have choices. Just as I redid the back of the truck and I hope when done the changes will look so true to the truck that people will have to think about what has been done.
Same with the front, as I look at the truck now in the shop, the gills and the way they were done looks just as factory as can be, it'll be fun watching the double takes when done. If I had painted them on....... well, it's just paint.
Plus, I've never done this type of body mods before, I guess you're never too old to start.
 You all just get to sit back and enjoy the ride (building) with me as I keep on working.
12-16-2012
A quick update. I'm having major design issues on the teeth in the grill area.
Here's what keeps happening..... The width vs the height of the grill opening is making it difficult to get the proprtion of the teeth right. I've spend hours with construction paper making teeth and putting them in place. I laughed out loud on Thursday, I felt like dentist, I got a new Nitrous oxide bottle in the cab and I'm busy working on teeth now.  teeth-
The best way I can explain is..... once I cut the teeth (many different designs now) the look is ok but the final result is like at Halloween when peple get those fake vampire teeth, yeah, you know the ones, they're white and have the fangs.
Anyway, that's what keeps happening, with the fake vampire teeth you can tell there is too much teeth for the mouth. Same here, it's just out of proportion. I will say however, the front does look scary agressive with a mouthfull of teeth but it's now the look I was really looking for. The word subte has come up a few times and it fits, I wanted something different, but it has to fit the rest of the truck build.
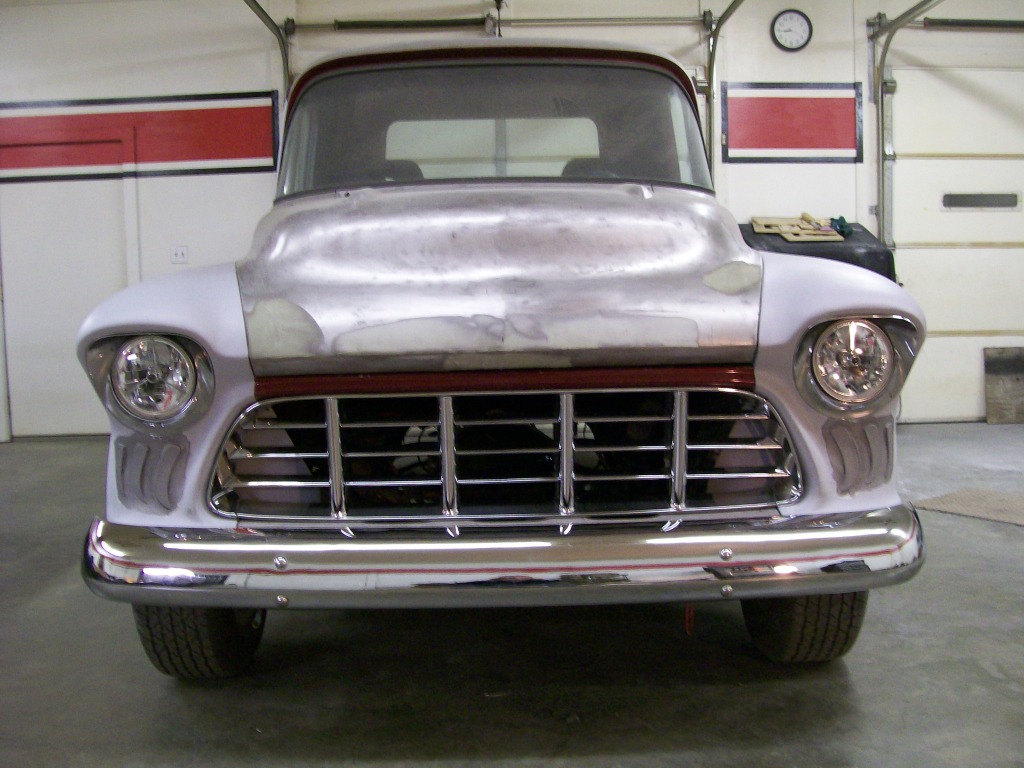
Where does that leave us???? Still in good shape, I have a near perfect 55-56 grill, it was dads favorite and with 4 bolts, it's mouted. I did get the headlights that are called 3 bar lights, they have an amber turn signal bulb within for the turn signals. The center of the headlight has what is similar to a pupil so they will help put a creature appearance to the front of the truck.
I've got about 15 to 20 hours into trying to get the teeth design to work but the bottom line is still..... if it doesn't fit the build, scrap it and move on, just as I've mentioned before in this build thread, it's not a failure to travel down a different path, you don't know it's not the right path til you travel down it first.
thomask, thanks for the kind words of my posts and the steps of the progress.
tj98, I did plan on making the teeth, lol,......
I have to modify the original headlight buckets to fit the new headlights, once done I'll mount them along with the grill and get some pictures.
12-23-2012
Finally got the new headlights fitted into the headlight buckets. I did a pre-assembly for an idea of the look. It's not too far from original, but it is a good feeling to get moving forward on the project again.
Getting past the grill issue I've stripped the dash and all the wiring.
I remember Dad fighting a wiring issue with the turn signals. I forgot about the problem til I disassembled the steering column. Once I got to the turn signal wiring in the column I found a broken wire. I ordered and installed a new switch from National Parts Depot, problem solved.....
I don't think I have removed any thing on this truck that didn't have some issue that would cause a headache further down the road.
When I'm done I should have a very reliable truck.
12-28-2012
Oh no..... I'm gone for a couple days and look what happens.

Jeff88, that looks fantastic, I love it. The girl swimming, isn't that the image from the original Jaws movie. They had the shark swimming upwards and the girl was swimming on the surface.
Ok, show of hands, who saw the movie when it first came out in the movie theaters? Way back in the 70's I think.
I did take a couple pics of one set of teeth that I cut. At this point I was cutting and trying anything.
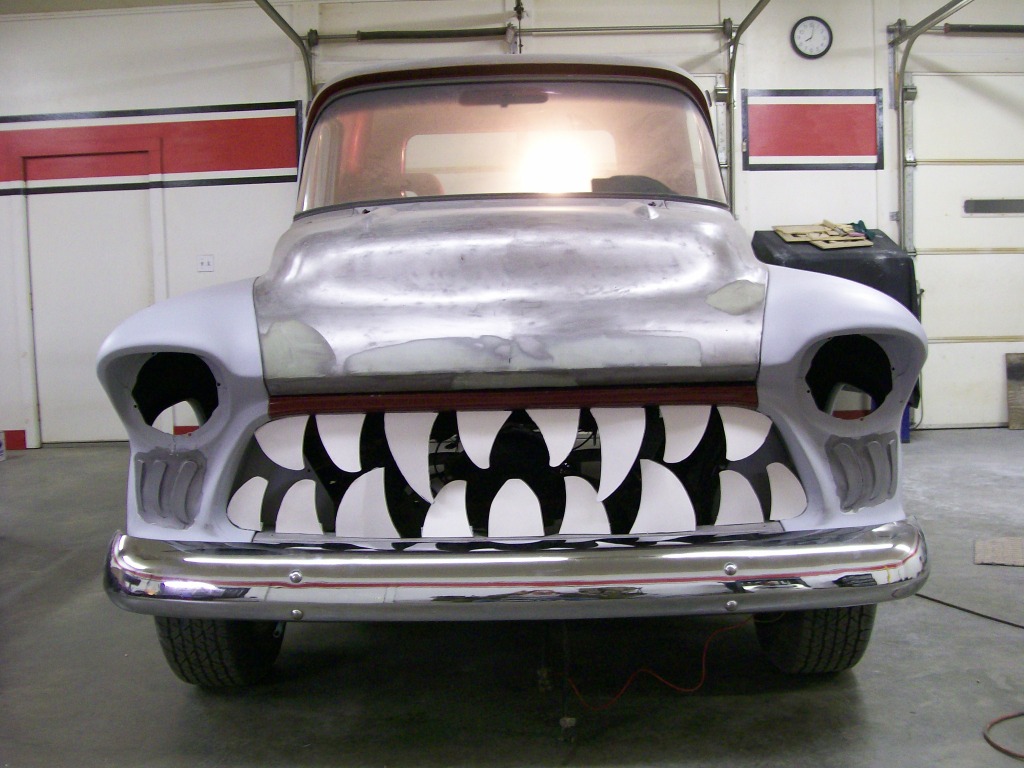
I'm not fully finished with the idea. Here's my thought.... by using the original style grill now, I can move forward on the rest of the truck. Since the grill has a outer ring that is the main piece that attaches to the truck, I figure I can find another old grill, use the outer ring, build teeth in it and be able to change grills when I want.
tj98, I'm glad to spark a few memories for you. It's the memories that are the foundation of who we are now. As I'm working with the fellow on this 360 engine we're talking and I'm remembering some of my first automotive experiences. Kinda fun going back about 20 to 30 years once in a while.
It was great checking in and seeing the updated grill pics, you guys keep this fun, thanks...
1-21-2013
 Hey everbody, let's get get this updated shall we.
Progress report.... Still working on the Chevy, redoing the dash in some areas. Been ordering lots of new pieces I know I'll need come assembly time. I've learned over the years to remove every piece as in shows up from the package and check the fit. I'd rather modify now than have to deal with something later after all the painting is done.
The Dodge 360 has the crankshaft, rods and pistons installed. Next is the cam, gears and chain. There is a very slight chance of getting a set of aluminum heads, this would be great.
The Willys, I still need to get some interior pictures. Otherwise it's hauled a bit of firewood, we had a chance for some snowfall, didn't get much snow but I drove it to work feeling confident I'd make it home if the weather got real bad. It has a GM turbo 350 in the bed that I picked up to rebuild. I'll take some pics of the rebuild, it's interesting to see what's inside. It's another build where I'll be teaching and the owner will be getting his hands dirty.
I've got some picks of the Chevy progress loaded so I'll post a few.
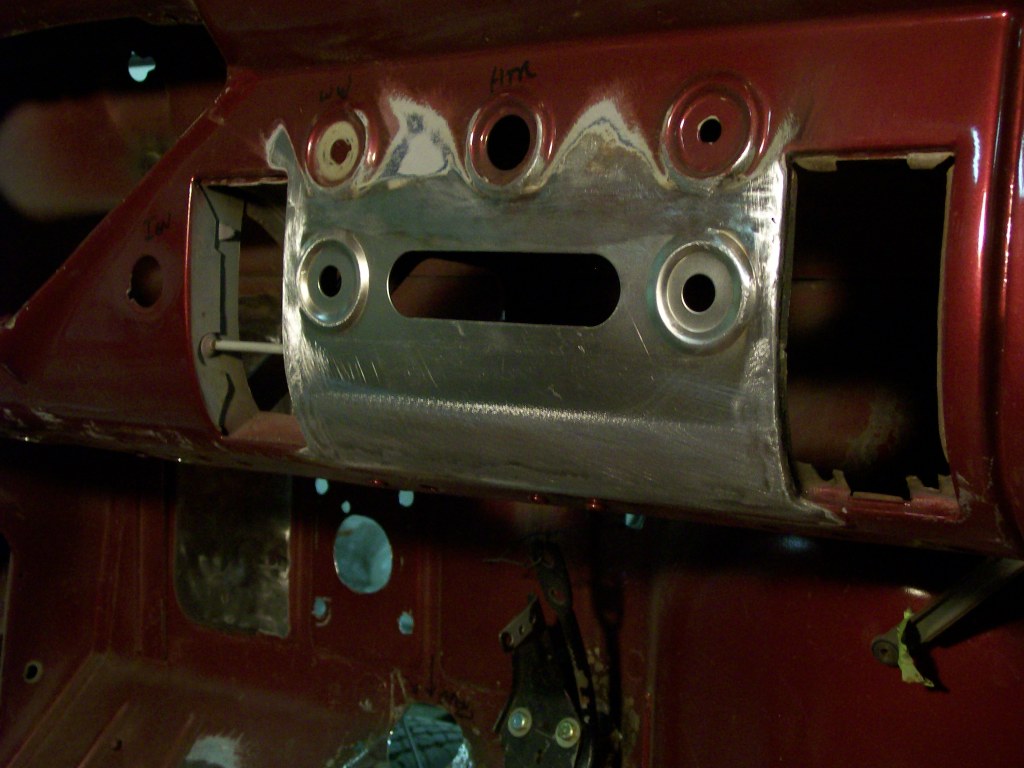
Somewhere during the past rebuilds someone cut the dash to accept a larger than original radio. Fortunatly there are patch panels to get the dash back to the original size. It requires some cutting and welding, so here we go.
I had no idea it ws this bad under the maroon paint. The opening was cut, then a backing plate was tack welded in. Then bondo was used to fill the and level the backing plate back to the original dash sheet metal.
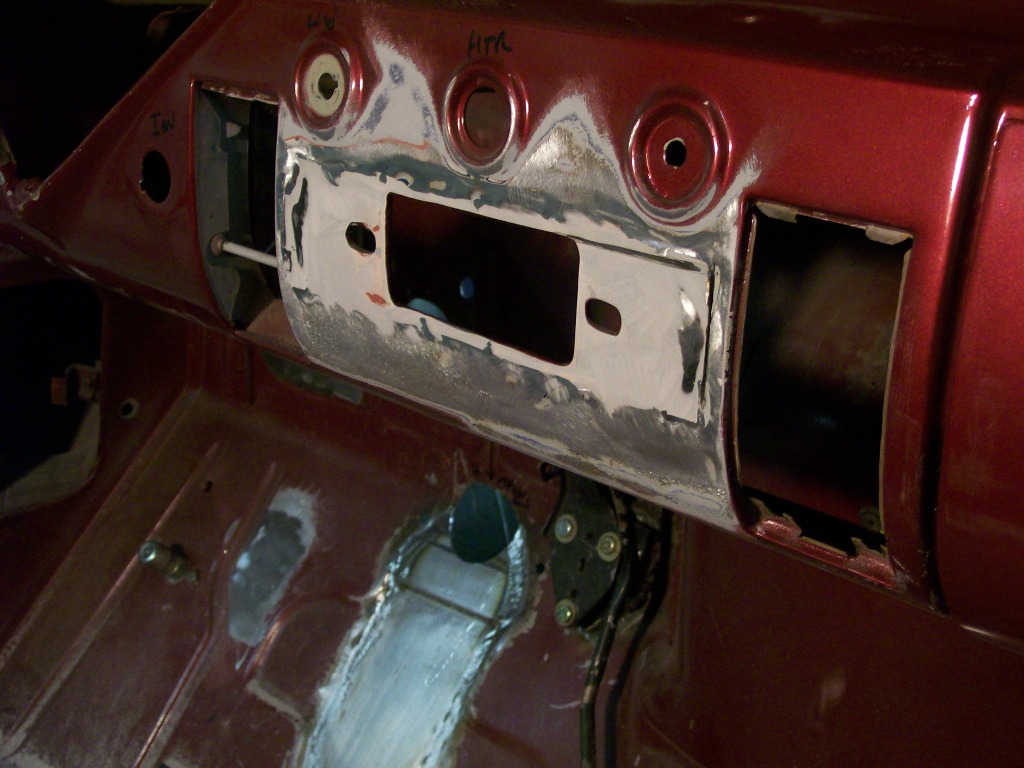
The replacement panel. I ended up cutting this panel just above the radio opening.
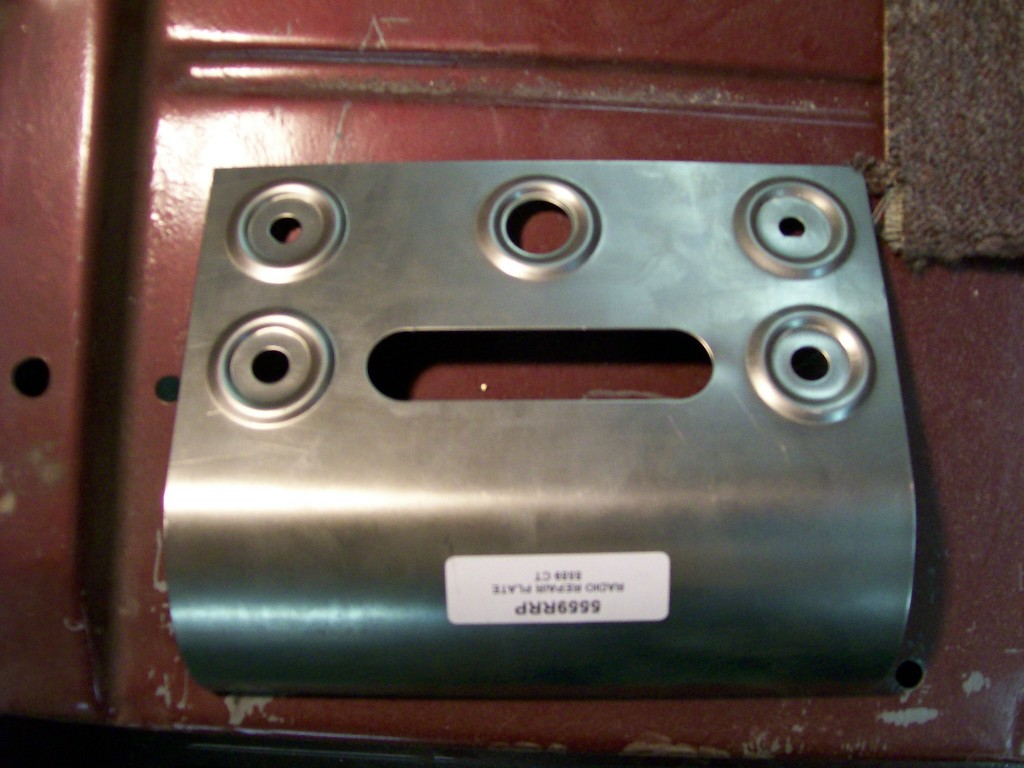
Problem solved. Little cutting, welding and grinding.
I never paid much attention to the radio opening til I started looking at radios. I noticed the face plates looked different than mine. Just amazing what a layer of bondo and a coat of paint will cover.