You must be logged in to rate content!
15 minute(s) of a 668 minute read
5-14-2012
A couple months ago I decided I wanted fender emblem for the 57 Chevy truck.
I came up with an idea but I didn't like the steps I was gonna have to do to assemble all the pieces.
As I was tinkering with the computer I finally settled on a design I liked. I cut the design out of mild steel and sent it for chroming. As time has passed it was brought to my attention that there is a process called electro-polishing for stainless steel. Since I seem to be doing more and more stainless work I figured I'd see how this polising process works.
I sent the stainless steel emblem off today, I hope to see it back in a week or so. Here is the final design.

As for the mounting on to the fender, I drilled a welded 3 screws to the emblem for the attaching to the fender.
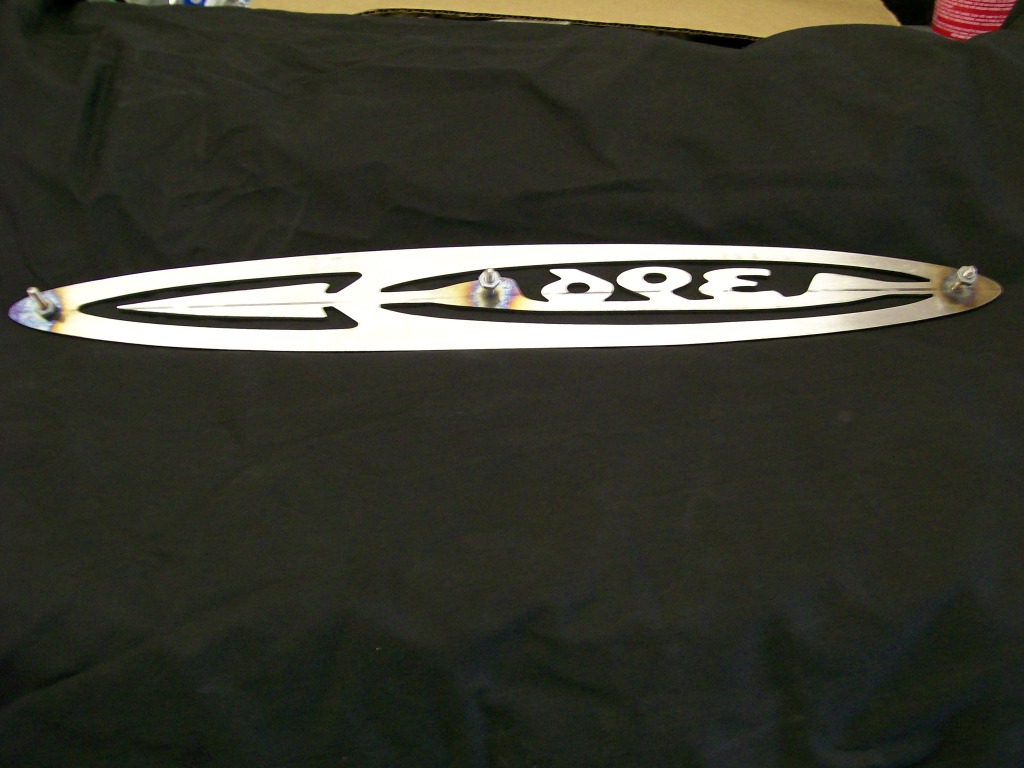
The picture doesn't tell the size of the emblem, the length is about 18 inches and height about 2 1/2". At that size, they should make a statement.
5-15-2012
Johann2006, I hear ya with the memories, we remember our youth. I've been driving this Willys for a long time now, I can't tell you the amount of times I've had people come up and tell me about an old Willys truck that was in the family. It's all good....
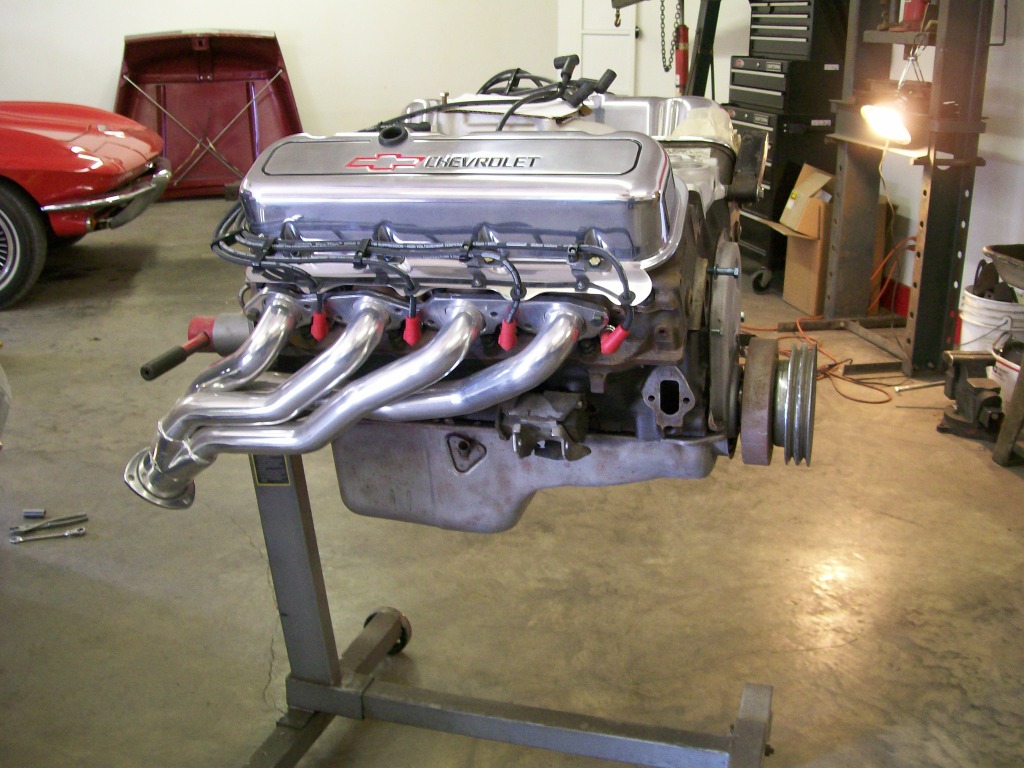
On the 57 Chevy I assembled about 90 percent of the engine before I put it asside a year and a half ago. Now that I'm back working on it, and it seems I'll be the main driver now, I decided to go with a more radical, aggressive idling camshaft.
I decided on comp cams mutha thumpr cam for this truck. With the "x' pipe exhaust and optional cut out valves to bypass the mufflers, this should be aggressive and fun.
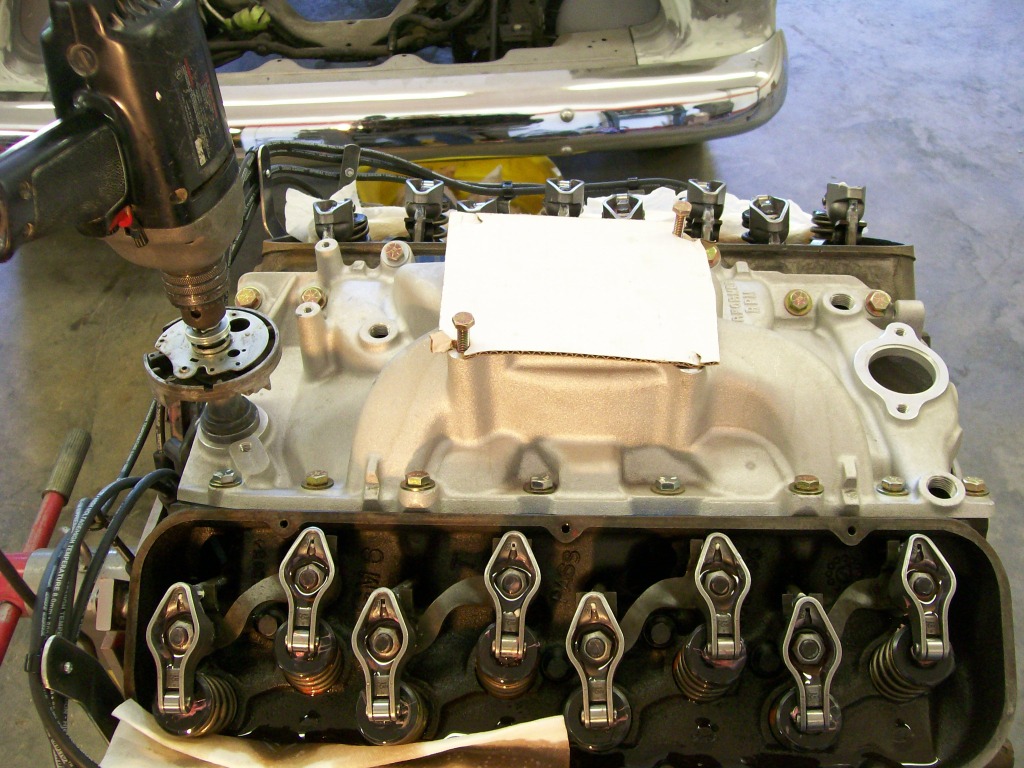
So, out came the engine to install the new camshaft. I like this picture also because it gives another look at how the plug wire holders worked out.

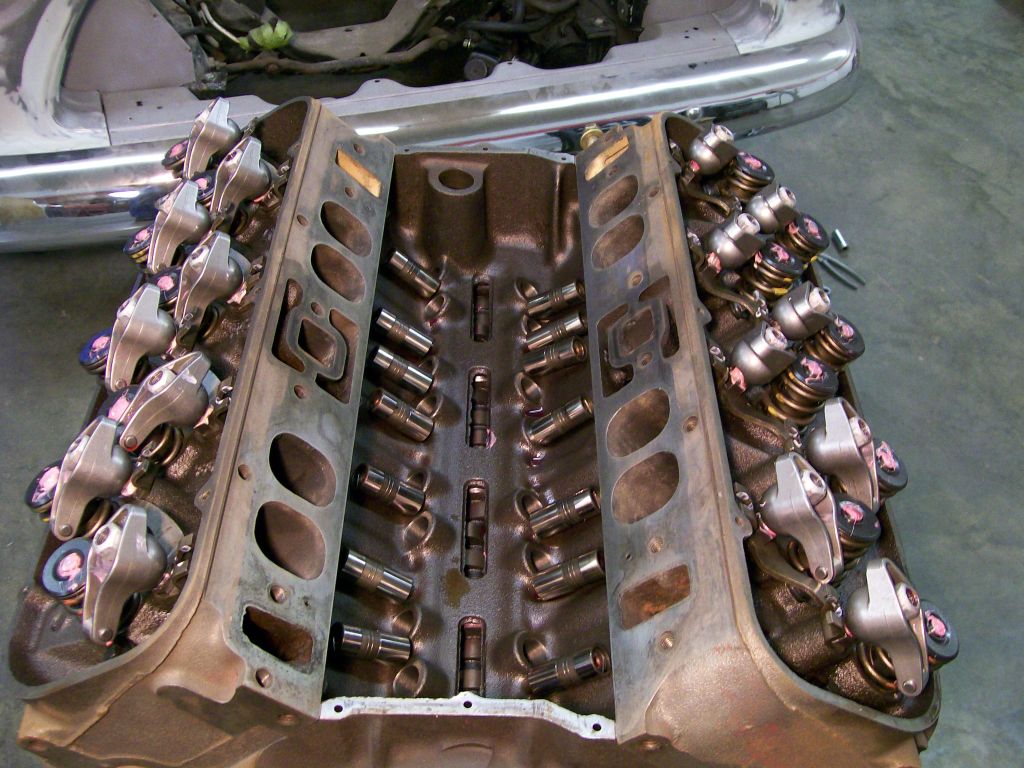
I must add a disclaimer.... The lifters that I have pulled and set aside in this picture are brand new. This engine was never run yet. If I had run this engine, I would not reuse the lifters. For the price of new lifters I wouldn't chance running old lifters with a new cam.
I figured I'd snap a couple pictures with the engine opened up. We're mainly looking at what is called the lifter valley. I've already loosened and turned the rocker arms sideways so I could remove the push rods that go from the lifters up to the rocker arms. I've pulled the 16 lifters up out of their holes (bores) in the valley and set them aside. Looking deeper, just passed the casting in the valley, you can see sections of the camshaft lobes.
5-16-2012
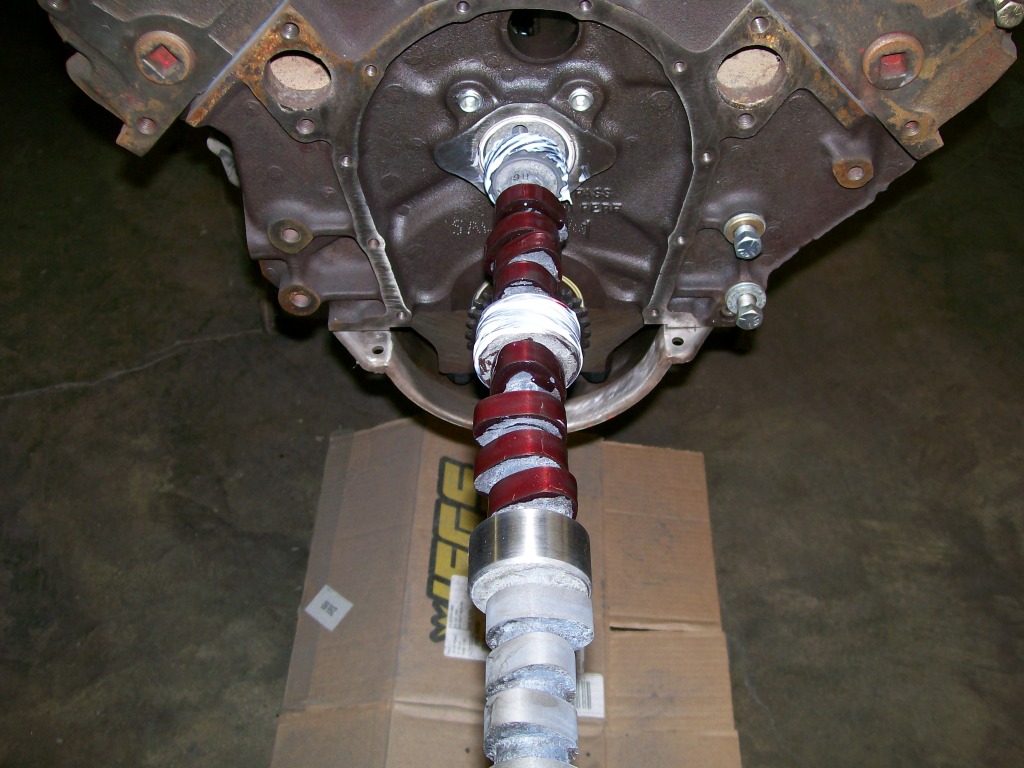
Old cam out, new cam in.... Now is the time for cleanliness and lubrication.
Beyond cleanliness and lubrication, this is a time for patience. If I count the 16 lobes, the one lobe for the fuel pump, and the teeth associated with the distributor gearing, there are alot of sharp edges that would love to scrape into the soft material of the cam bearings this cam is gonna be sliding through while getting it into place.
Cam companies are very strict about the type of lubricant used on the lobes for start up also. There is gonna be alot of friction points at start up with the new parts, obey the lubericant warnings.
While feeding the cam into the block, feed slowly, feel for obstructions, slowly turn the cam to help the lobes pass by the cam bearings in the block. They do have a cam instalation tool. The tool is usually a threaded rod that screws into the front of the cam. The idea being, once the cam is about 3/4 of the way in, the wieght of the cam vs the amount cam you have left to hold onto, you don't have the leverage to support the cam as you feed the last bit of the cam into place. With the length of the tool you now have something to hold onto so you can handle the weight of the cam during the last bit of installation.
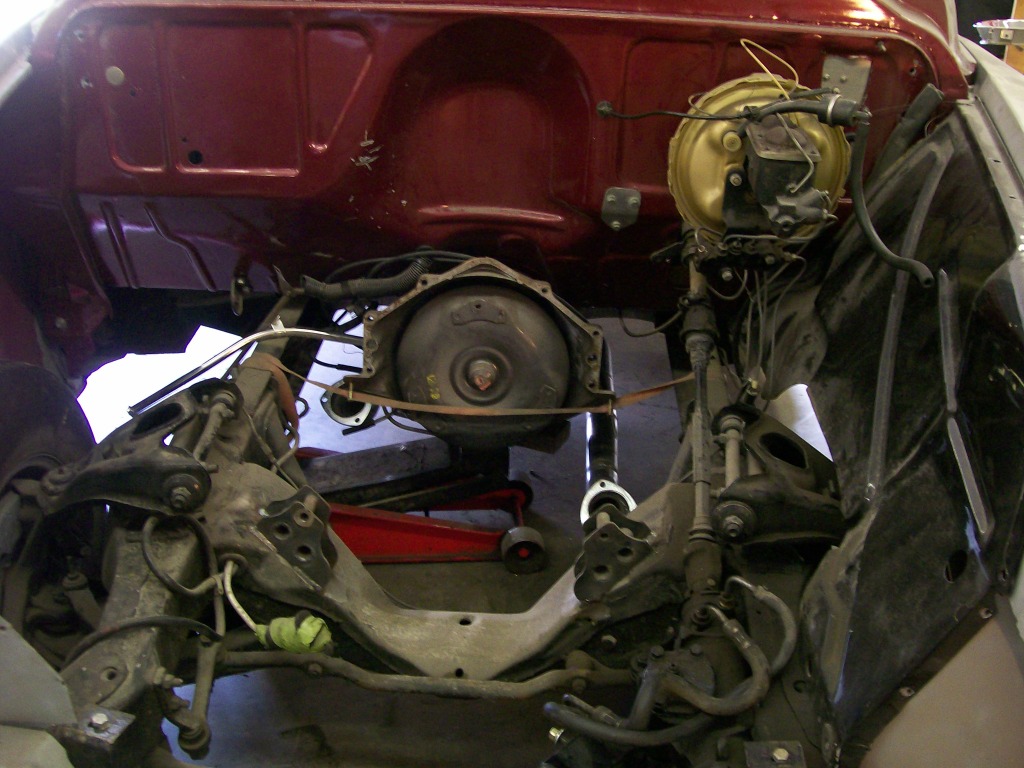
I want to get the engine back together so I can fill this hole in the engine bay as soon as possible.

5-17-2012
Oh yeah, I'm familiar with Sgt. Rock. I didn't get to watch the build, but I see the end result. What I like about both trucks is the statement of american history that comes along with each truck.
Just a picture of the Willys tonight. Poor thing has been driven and driven alot over the last couple months. For those who recall when I was restoring the frame I mentioned I wanted to do a good job not so much so it will be kept clean, but because I knew I would neglect it. With all the sandblasting, priming and painting, I now know when I take it to the car wash it'll wash up nice and I don't have to worry about any rusting issues lurking under the dust and dirt.
5-19-2012
Just an update....
For the last couple days I haven't been able to get photobucket to transfer any pictures from there, to here.
Since I usually try to have pictures, I haven't posted.
Project wise, I have the 396 engine back together for the 57 Chevy truck. I bolted it back in place in the 57 Chevy truck. I hooked up all necessary items, fuel, ignition, belts and pullys, radiator and the new exhaust.
I'm only using the truck as an engine stand since I will not drive it yet. I just wanted to make sure the engine starts and runs, and make sure the new exhaust is gonna be ok.
It's a long story, but the 396 is up and running. I'm sitting here shaking my head, it wasn't an easy task, had a few struggles, but one by one I got most of the bugs worked out.
I will say, I haven't opened up the cut outs in the exhaust yet, tomorrow I will.
Running the "x" pipe and the mufflers do create a different sound than I'm used to. I've got another car with a very rough idle cam, although if you listen you can hear the same beat but the "x" pipe, blending all the cylinders together has a very distinct sound. My other car, with two tailpipes, your ears still detect which pipe the sound comes from as you listen to it. With the "x" pipe, it's an 8 cylinder sound coming from either side. It gives the truck a higher reving sound than it actually is since the time space between each cylinder pulse is much shorter now.
So far do I perfer this new sound? yes. It has a new agressiveness that is different than most.
Tomorrow......


 ...I hook up the wires to the cut outs, now this ought to sound great.
Hopefully I can get the pics to work again soon.
5-20-2012
Not one to give up... I found a way to get the pictures working again.
A look from below. In the other pictures the oil pan and timing cover were just being held in place with a couple of bolts. Now that the new cam is in place I can first permanatly install the timing cover then the oil pan. Before the oil pan goes on, the oil pump needs to be installed. Along with the oil pump is the oil pump pick up. This pick up reaches down to the bottom of the oil pan.
There is the issue of adjusting the pick up when installing it. Each vehiclehas it's procedure. If the pick up is too high, it may suck air vs oil if the oil level gets a quart or two low. If the pick up too low, it could be against the oil pan, which will restrict the oil from getting to the pick up in the first place.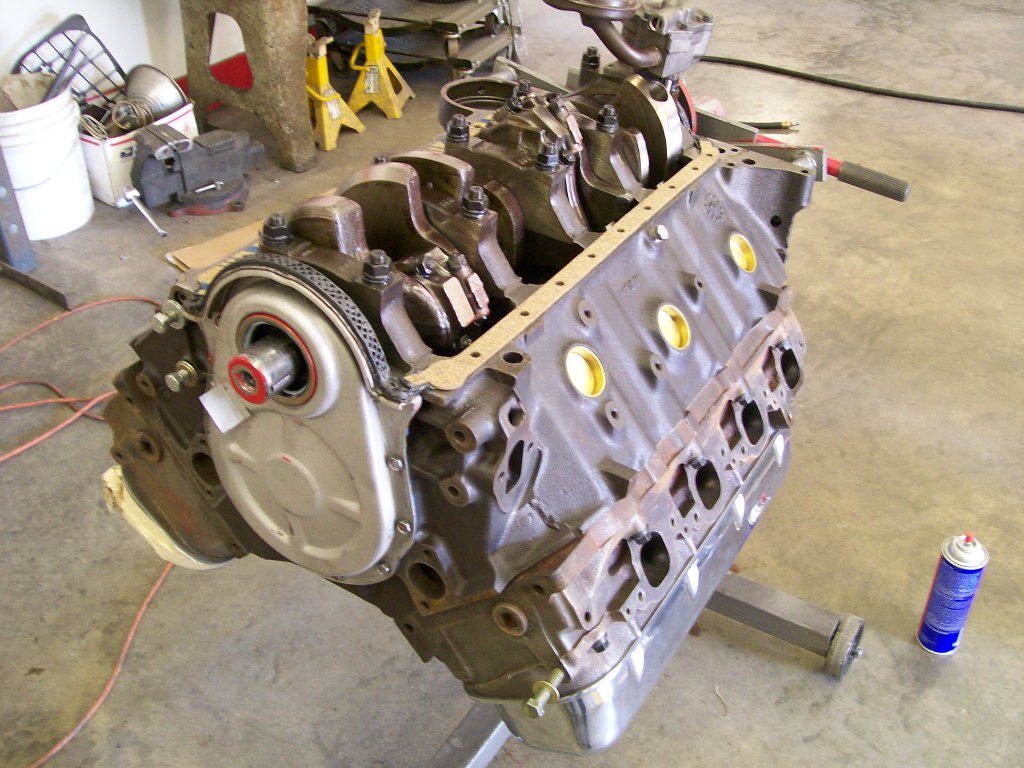
Now the oil pan is installed, the valves are adjusted, I've got oil in the pan..... What's the deal with the drill sticking out the top of the engine???
As for today's progress, I got past a few more issues I ran into on the initial start up yesterday. The electric exhaust cut outs worked perfect. I went with a set of Hooker brand turbo muffers. This are a relatively quiet muffler. As the truck was running at idle, I tapped the switch to open the valves for the cut outs. The valves go from fully open to fully closed in about 3 to 4 seconds. As I tapped the switch, you can listen to the exhaust go from mild to mean, slight rumble to having an attitude.
Yeah, I'm excited, it's not often that a vehicle can change it's attitude and sound by the press of a button.
As for a sound clip, I'd love to..... I need a recorder first, then move up from this dial up connection.
5-21-2012
Before I get into the conversation, I want to back up to the basics for those who either are not familiar with priming the oil system, or have heard it mentioned, but stayed away from the conversation due to lack of knowledge.

Although when assembling an engine all the moving parts will be lubricated, there is gonna be a somewhat dry time during the initial start up of the fresh engine. Between the oil in the pan and the crankshaft, camshaft, lifters, rocker arms, ect, the oil has to travel through the oil pump, oil filter and all the drilled holes through out the block that the oil travels through.
The idea is very similar to bleeding the brakes on your car, we need to get the air out and the oil in. Other wise, there will be hundreds of revolutions and friction happening before the oil gets to the vital parts once the enginestarts.
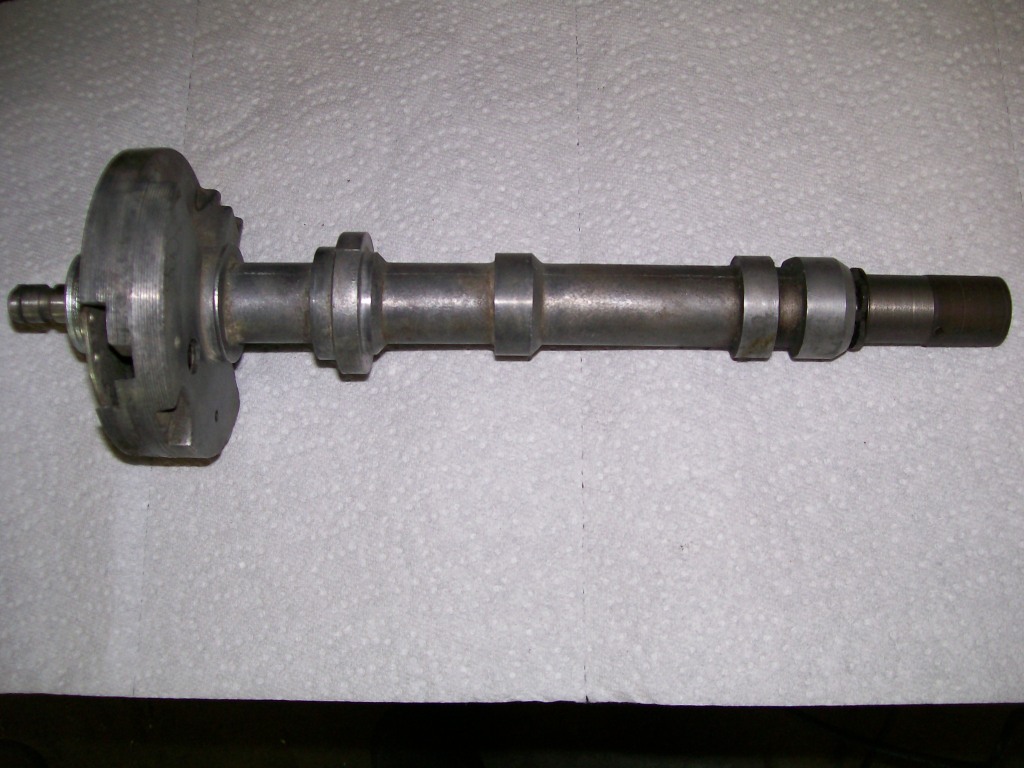
Focusing on the small block and big block chevy, the distributor is the driving force of the oil pump. The cam has a set of teeth that turns a set of teeth on the disributor, when the distributor turns it not only provides the spark, but on the other end it spins the oil pump.
In the next picture I have taken a distributor and by using a lathe, I removed the teeth from the distributor. Now I can put the distributor in place, and since it doesn't make contact with the cam anymore, I can spin it with a drill from the top. Now at the bottom of the distributor, it is connected to the oil pump. Now by spinning the distributor, I also spin the oil pump which in turn fills all the cavities in the engine with oil.
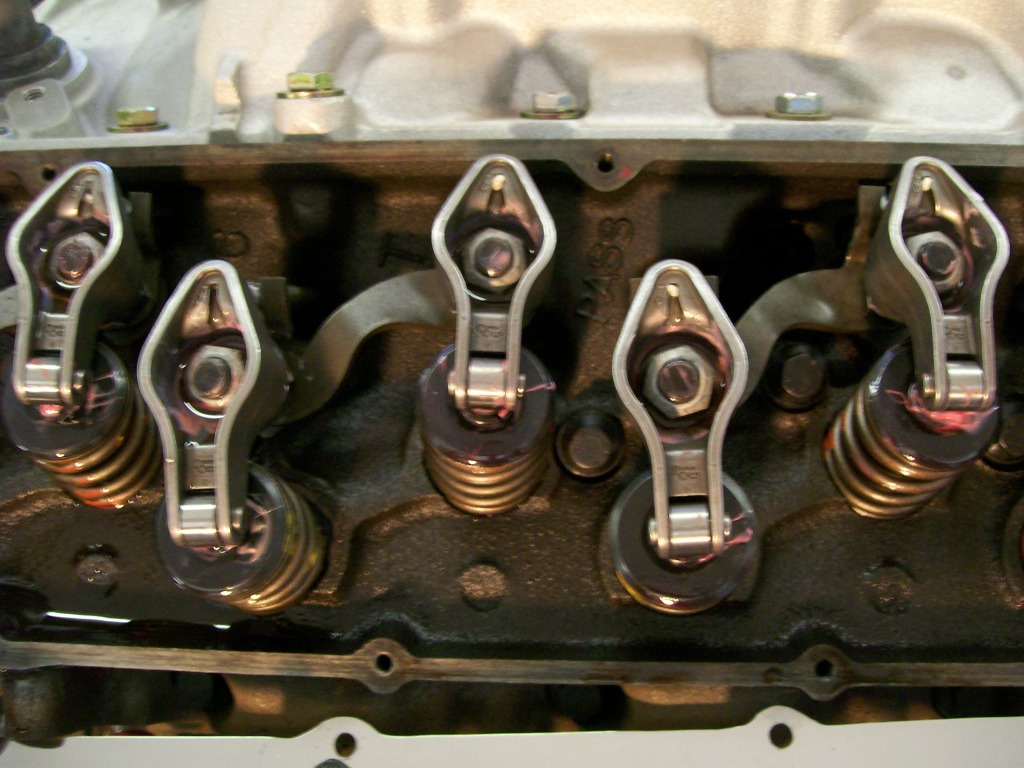
We can not see inside the engine, but we can see the top where the rocker arms are located. I like this pic, look closely and you can see how the oil is working it's way to the top and filling the rocker arms. You can see how the rocker arms to the left are filling before the rocker arms on the right. Just a good demonstration of how it takes time for the oil cavities to fill and why priming is a good thing to do. After another minute or two, all rocker arms will be filled, meaning the engine is pretty well primed with oil.
As for priming on the stand, I fully understand both view points.
If the engine was gonna sit for a period of time before starting, absolutely, reprime before starting.
In my case here, I am getting older, and yes, the more I can do on the engine stand, the happier I am. As many items I can bolt on before installing the engine, the better.
Theory wise, my biggest concerns on the priming are the cylinder walls and the lifters. Most everything else has a preassembly lube on it.
The cylinder walls since the only get oil by what gets slung off the crankshaft, by having the oil right there and ready is a good assurance of the cylinder walls getting oil.
The lifters since the require oil pressure to work properly. Since the lifters are placed in a row, and the front ones are the last to get oil, and every lifter has a cavity that needs to be filled, priming gets us past the lifters taking a beating til the oil gets to them on start up.
You are a thinker...
Let me get this more fine tuned, and we'll see what we can do.
This "X' pipe situation has reminded me a a lesson I learned and couple years ago about exhaust pulses, and how we hear them.
I mention this because the mufflers are quiter than I expected. As the opposing pulses from the two sides enter the "x" pipe, there is a cancellation happening, which in turn quiets the sound we hear.
It's not the movement of air we hear, it's the individual pulses of the cylinders we hear. Compared to letting air out of a compressed air hose, there is a whosh of air, but no pleasant pulse for our ears to listen to. When one pulse is cancelled by an opposing pulse, the air still moves, but our ear drum doesn't detect the individual pulses that we like to hear.
Don't worry though... It barks great with the cut outs opened up.