You must be logged in to rate content!
5 minute(s) of a 484 minute read
2-17-2019
Slowly but surely I am going through my check list of things to do and things needed to be packed in the car for European travel.
One of the first on the list is checking every light globe in/on the car.
European/French law decrees that a replacement globe is carried for every lamp on the car. This of course includes turn indicators extral tail lamps etc. I have amber globes for the driving lights but still have to obtain three for the headlamps. Three = one each for the two headlamps plus the required "spare". No one has ever been able to show me this requirement in writing it is just something "expected' so there is no point upsetting the locale if we do have to drive somewhere after dark.
After an hours fiddling I seem to have the switch on the windshield wiper working reliably. That is of course, as in the overall scheme of things, until it is required. I also pack a fresh bottle of "Rain-ex" whildshield glass treatment. This comes in handy when "all else fails"....... I have also spent a little time dismantling the two "D" shaped Lucas stop/tail lights, cleaning them inside and out, cleaning the globes and the contacts. So I should not have to worry about them again for a little while. Fortunately I have all these necessary tasks to complete. This helps preventing me from going mad with "nothing to do" until the gearbox returns. It should reach its destination with Peter Meyer in Germany, early in this comming week.
I still have to spend some time chasing down any oil leaks. I know where the two worse are. Both involve getting under the car so now is an ideal time. Just as well I am old and retired! I simply would not have the time to do them all otherwise........
2-19-2019
Back to something more topical. In the process of attempting to cure one possible oil leak I was compelled to remove both carburettors, to simplify this task even further I also removed the distributor cap and spark plug leads. The job of checking the cam-box oil drain tubes done, I could then replace the spark plug leads, the distributor cap and having made new gaskets I could replace the carburettors. The one problem is that I will not be able to check if I have cured the oil leak until I can take the car out for a short drive. This, I cannot do until I have the gearbox back and on the car.
I could start the motor and let it run for a few minutes BUT.
To make removing the gearbox a little easier I have removed the muffler and exhaust pipe and IF I start the motor the ensuing noise may disturb some of my more sensitive neighbours. Oh dear, Oh dear!
Why is my life not more simple?
The oil drain tube is the copper tube just visible in the bottom left hand corner of the photograph. The fitting I needed to tighten is the one hidden behind the distributor cap/plug leads. Next to this you can just see the steering box. The distributor is driven from the rear of the generator. The generator is gear driven from one side of the timing gears. The other oil pipe you can see is to bring oil at full pressure to the cam bearings. It has a metering screw to regulate the pressure, the cam bearings do not require the same amount of pressure or volume of oil. Those are the four inlet ports you can see, the four exhaust ports are on the other side of the cylinder head.
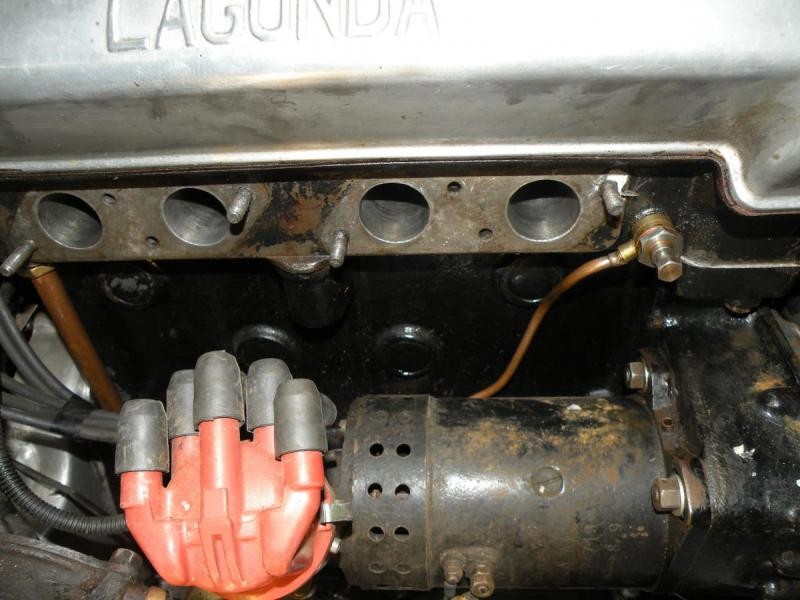
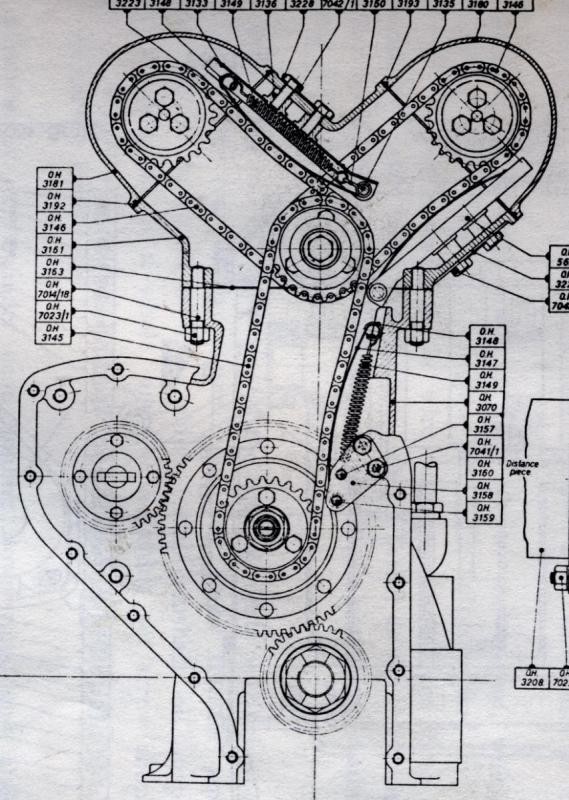
f you are paying attention, this should need no explanation!
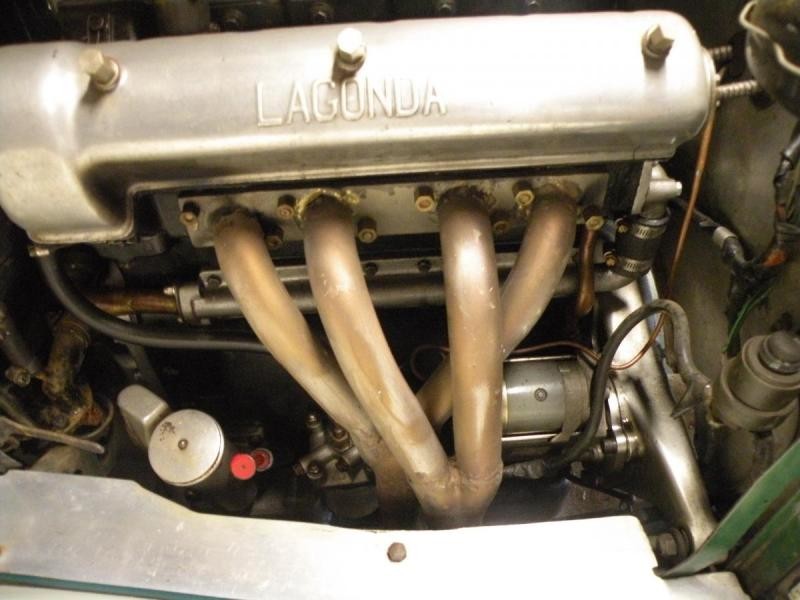
This shows the other (exhaust) side of the engine. with the tuned length, four into two, two into one exhaust arrangement. You can also see, if you look carefully, the (copper) oil drain tube from below the cylinder head, where it drains oil from the exhaust side cam-housing back into the crankcase behind the starter motor. Right at the rear of the photograph is the hose to transfer radiator water into the rear of the cylinder head. Water flows forward cooling the combustion chambers and exhaust ports. The red "Knob" is the top of the oil-level "dip-stick" to the front (left) is the oil filler cap and breather, on the other (right) side of the dip-stick you can just see the top of the full flow oil filter housing. further back is the (geared) starter motor. Right at the rear of the photo is the solenoid starter switch. The aluminium extension of the flywheel housing supports the rear of the engine and gearbox on either side. Really sharp eyed people may just make out the flexible Rev-counter (Tachometer) drive cable driven from the rear of the exhaust camshaft, from there it passes through the bulkhead to the rear of the dashboard.
Next question?
Great detail!
Posted by Diggymart on 6/20/19 @ 2:41:04 PM